当前位置:网站首页>Docker learning - redis cluster -3 master and 3 slave - capacity expansion - capacity reduction building
Docker learning - redis cluster -3 master and 3 slave - capacity expansion - capacity reduction building
2022-07-25 13:06:00 【Uh huh**】
Illustration 
//  First step : Start six Redis machine
docker run -d --name=redis-node-1 --net host --privileged=true -v /www/server/redis_master_slave/master_slave1/master:/data redis:latest --cluster-enabled yes --appendonly yes --port 6381

docker run -d --name=redis-node-2 --net host --privileged=true -v /www/server/redis_master_slave/master_slave2/master:/data redis:latest --cluster-enabled yes --appendonly yes --port 6382

docker run -d --name=redis-node-3 --net host --privileged=true -v /www/server/redis_master_slave/master_slave3/master:/data redis:latest --cluster-enabled yes --appendonly yes --port 6383

docker run -d --name=redis-node-4 --net host --privileged=true -v /www/server/redis_master_slave/master_slave1/slave:/data redis:latest --cluster-enabled yes --appendonly yes --port 6384

docker run -d --name=redis-node-5 --net host --privileged=true -v /www/server/redis_master_slave/master_slave2/slave:/data redis:latest --cluster-enabled yes --appendonly yes --port 6385

docker run -d --name=redis-node-6 --net host --privileged=true -v /www/server/redis_master_slave/master_slave3/slave:/data redis:latest --cluster-enabled yes --appendonly yes --port 6386


// The second step : Enter any one redis Inside the host container : For each master Create a slave From the node
docker exec -it redis-node-1 /bin/bash

// Input yes
redis-cli --cluster create 192.168.19.107:6381 192.168.19.107:6382 192.168.19.107:6383 192.168.19.107:6384 192.168.19.107:6385 192.168.19.107:6386 --cluster-replicas 1


// The third step : Through one Redis host ( Non slave ), View the entire Redis State of the cluster  ==  The container I am currently entering is the host
redis-cli -p 6381
cluster info
cluster nodes


// According to the above figure cluster nodes Information about , here Redis The master-slave relationship allocated by the system is : Lord 6381->  from 6385、 Lord 6382->  from 6386、 Lord 6383->  from 6384


// Step four : test reids Storage : Find out key1、key4 There are errors in setting , because key1、key4 The hash value of belongs to other slots , That is, other hosts, such as hosts 6382、6383 Before you can save
// If you need to report no error in the current host , Automatically put key1、key4 Save to other machines , Get into redis The client uses the cluster mode :redis-cli -p 6381 -c
set key1 value1
set key2 value2
set key3 value3
set key4 value4
exit

// Step five :redis client   Optimize route jump  ==  Every time I run set、 Pay attention to the change of port number
redis-cli -c -p 6381
set key1 value1
set key2 value2
set key3 value3
set key4 value4
exit

// Step six : View cluster information ( Another order )cluster node  You can also see the cluster information
// Look at all of... In the cluster key Distribution of hosts , And master-slave relationship
redis-cli --cluster check 192.168.19.107:6381


// Step seven : Simulate the downtime of one of the hosts ( I take 6381 Host downtime is a test ), Check the corresponding slave 6385 Whether it can automatically become a host , Carry out leveling
exit
exit
docker stop redis-node-1
docker ps
docker exec -it redis-node-2 /bin/bash
redis-cli -c -p 6382

//  Step eight : The original host can be observed 6381 Slave of 6385 Automatic level replacement into host
cluster nodes


// Step nine : Re 6381 Get up , Observe 6381 Whether it will change back to the host ,6385 Become a slave
exit
exit
docker start redis-node-1
docker exec -it redis-node-2 /bin/bash
redis-cli -c -p 6382
// Step 10 : It can be observed that  6385 Will not come back because of the old leader 6381 It will be reduced to slave
cluster nodes


// Step 11 : Adjust architecture , take 6381 Become a host  6385 Become a slave
exit
exit
docker stop redis-node-5
// etc. 1 Minutes in the morning
docker start redis-node-5
docker exec -it redis-node-2 /bin/bash
redis-cli -c -p 6382
// The twelfth step : It can be observed that  6381 Become a host ,6385 Become a slave
cluster nodes

//==================== Capacity expansion starts ==============================================
// Thirteenth Step : Ready to expand , Add two machines , host 6387、 Slave 6388 Enter the cluster
exit
exit

docker run -d --name=redis-node-7 --net host --privileged=true -v /www/server/redis_master_slave/master_slave4/master:/data redis:latest --cluster-enabled yes --appendonly yes --port 6387

docker run -d --name=redis-node-8 --net host --privileged=true -v /www/server/redis_master_slave/master_slave4/slave:/data redis:latest --cluster-enabled yes --appendonly yes --port 6388

docker ps

// The fourteenth step : Get into redis-node7 Containers
docker exec -it redis-node-7 /bin/bash

// The fifteenth step : Add current redis Machine entry master colony
redis-cli --cluster add-node 192.168.19.107:6387 192.168.19.107:6381

// Check the cluster  ==  Discover new 6387 The host has no slot
redis-cli --cluster check 192.168.19.107:6381

// The sixteenth step : Order the entire cluster to reallocate slots , Make the new host 6387 There are also slots
// How to divide :16384/4=4096  fill 4096 go in
// To whom :6387 Mechanical Redis Defined ID identifier : fill ad03db99f539b78b0b57c37c529f9eb2f612bb18
// The whole plane : New configuration : fill all
// Assigned starting :yes
redis-cli --cluster reshard 192.168.19.107:6381

// The seventeenth step : Check the cluster  ==  Discover new 6387 The host has slots ( The original three slots , Everyone agreed to come over a little ) ==  And will cluster all key All reassigned
redis-cli --cluster check 192.168.19.107:6381

// The eighteenth step : take 6388 The assignment becomes 6387 Slave of
// Delete node command :redis-cli --cluster del-node  node IP: Node port number   Node identifier
redis-cli --cluster add-node 192.168.19.107:6388 192.168.19.107:6387 --cluster-slave --cluster-master-id ad03db99f539b78b0b57c37c529f9eb2f612bb18

// The nineteenth step : Check the cluster  ==  see 6387、6388 Whether it is a master-slave relationship
redis-cli --cluster check 192.168.19.107:6381

//==================== The expansion is over ==============================================


//==================== Shrinkage start - Delete the slave node first 6388, Slot reallocation , Delete the master node 6387, Return to 3 Lord 3 from ====
// The twentieth step : Delete from node 6388
redis-cli --cluster del-node  192.168.19.107:6388 dc89a64b98290f4164e4ba1b6e8841a8b9d8d763

// Step 21 : Check the cluster  ==  View slave nodes 6388 Removed from cluster
redis-cli --cluster check 192.168.19.107:6381

// Step 22 : Start reallocating slots
// Number of slots allocated :4096
// Who receives the assigned slot :6381 Node ID identifier   fill :2d8bb525e25ecb239dbe059f8545eda64182e514
// Who assigns slots :6387 Node ID identifier   fill :ad03db99f539b78b0b57c37c529f9eb2f612bb18
//done
redis-cli --cluster reshard 192.168.19.107:6381

// Step 23 : Check the cluster  =  so 6387 Of key All allocated to 6381
redis-cli --cluster check 192.168.19.107:6381

// Step 24 : Delete from node 6388
redis-cli --cluster del-node  192.168.19.107:6387 ad03db99f539b78b0b57c37c529f9eb2f612bb18

// Step 25 : Check the cluster  ==  Look at the master node 6387 Removed from cluster
redis-cli --cluster check 192.168.19.107:6381

//==================== End of volume reduction ==============================================
The whole construction process 
边栏推荐
- Word style and multi-level list setting skills (II)
- What does the software testing process include? What are the test methods?
- Kyligence was selected into Gartner 2022 data management technology maturity curve report
- yum和vim须掌握的常用操作
- go : gin 自定义日志输出格式
- 卷积神经网络模型之——AlexNet网络结构与代码实现
- Selenium uses -- XPath and analog input and analog click collaboration
- Substance designer 2021 software installation package download and installation tutorial
- Docker学习 - Redis集群-3主3从-扩容-缩容搭建
- 公安部:国际社会普遍认为中国是世界上最安全的国家之一
猜你喜欢
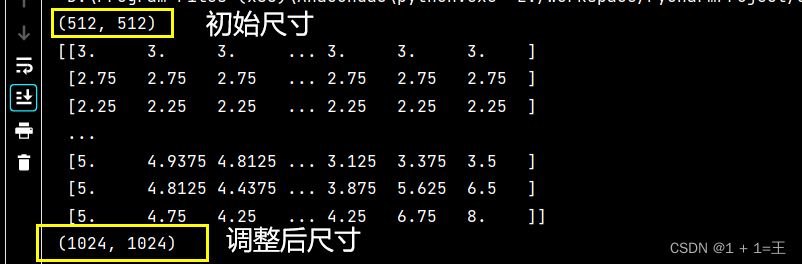
cv2.resize函数报错:error: (-215:Assertion failed) func != 0 in function ‘cv::hal::resize‘

A turbulent life

零基础学习CANoe Panel(15)—— 文本输出(CAPL Output View )

【AI4Code】《Contrastive Code Representation Learning》 (EMNLP 2021)

如何用因果推断和实验驱动用户增长? | 7月28日TF67

Detailed explanation of flex box

卷积神经网络模型之——AlexNet网络结构与代码实现
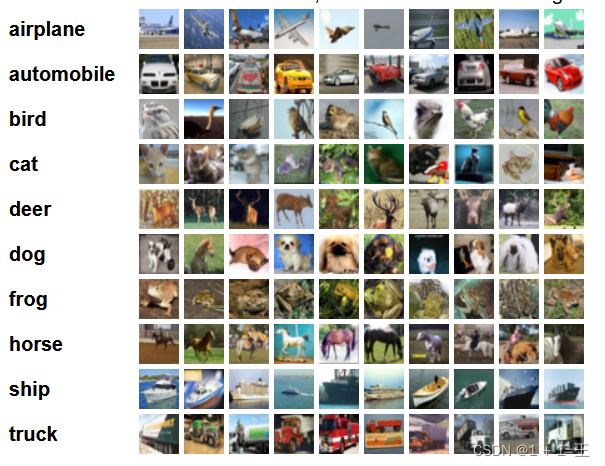
深度学习的训练、预测过程详解【以LeNet模型和CIFAR10数据集为例】

【运维、实施精品】月薪10k+的技术岗位面试技巧

Introduction to web security UDP testing and defense
随机推荐
yum和vim须掌握的常用操作
2022 年中回顾 | 大模型技术最新进展 澜舟科技
Selenium use -- installation and testing
弹性盒子(Flex Box)详解
卷积核越大性能越强?一文解读RepLKNet模型
485通讯( 详解 )
基于JEECG制作一个通用的级联字典选择控件-DictCascadeUniversal
[300 opencv routines] 239. accurate positioning of Harris corner detection (cornersubpix)
【问题解决】org.apache.ibatis.exceptions.PersistenceException: Error building SqlSession.1 字节的 UTF-8 序列的字
Business visualization - make your flowchart'run'(3. Branch selection & cross language distributed operation node)
手写一个博客平台~第一天
What does the software testing process include? What are the test methods?
Is the securities account opened by qiniu safe? How to open an account
Common operations for Yum and VIM
Chapter5 : Deep Learning and Computational Chemistry
想要白嫖正则大全是吧?这一次给你个够!
Docekr学习 - MySQL8主从复制搭建部署
State mode
Detailed explanation of switch link aggregation [Huawei ENSP]
Leetcode 0133. clone diagram