当前位置:网站首页>Wechat applet project practice
Wechat applet project practice
2022-07-23 08:01:00 【Front end childe Jia】
Catalog
Front and back end interaction of applet
Event transmission parameters of wechat applet
Mode 1 of parameter transmission : data-key='value'
Mode 2 of parameter transmission : id='value'
scroll-view Use in flex Layout
The drop-down refresh Pull on loading
There are two ways to realize the sharing function of wechat applet :
Background audio api Instructions
Detailed description of payment process
The applet obtains the user's unique id (openId)
Front and back end of applet Interaction
Syntax description
- Each wechat applet needs to set the communication domain name in advance , Applet You can only communicate with the specified domain name
- Please enter the server domain name in 「 Applet background - Development - Development and setup - Server domain name 」 To configure
- The default timeout and maximum timeout are 60s
- The timeout can be in app.json Pass through networktimeout To configure
- For security reasons, applets only support Https request wx.request Maximum concurrency limit 10 individual
- During development, legal domain names can not be verified in wechat development tools
export default (url,data={},method='GET')=>{
    return new Promise((resolve,reject)=>{
        wx.request({
            url:'http://localhost:3000'+url,
            data,
            success:(res)=>{
                resolve(res.data)
            },
            fail:(err)=>{
                reject(err)
            }
        })
    })

}
Use of custom components
Syntax description
newly build component Components No path
In the parent page used json in usingComponents Certified components
The parent passes the value through the attribute title=" Ranking List " Child components properties receive
properties Definition
api frame ----》 Custom components
| Definition segment | type | If required | describe | Minimum version |
|---|---|---|---|---|
| type | yes | Type of attribute | ||
| optionalTypes | Array | no | Type of attribute ( You can specify multiple ) | 2.6.5 |
| value | no | The initial value of the property | ||
| observer | Function | no | Callback function when the property value changes |
Case study
Child components
<view class="header">
    <text class="title">{
   {title}}</text>
    <view>
        <text>{
   {nav}}</text>
        <text class="more">  To view more </text>
    </view>
</view>

// pages/index/commponents/NavHeader/NavHeader.js
Component({
    /**
     *  A list of properties of a component
     */
    properties: {
        title:{
            type:String,
            value:' The default value is '
        },
        nav:{
            type:String,
            value:' The default value is '
        }
    },
})
Parent component
{
  "usingComponents": {
    "NavHeader":"../index/commponents/NavHeader/NavHeader"
  }
}
  <NavHeader title=" Recommended songs " nav=' I recommend you '></NavHeader>
Event object of wechat applet
e.target and e.currentTarget
When the event callback of the applet is triggered , Will receive an event object , The parameters of the event object contain a target and currentTarget attribute , Next, let's talk about the difference between the two .
<view id='tar-father' bindtap='click'>
   Parent component
  <view id='tar-children'> Child components </view>
 </view>

event.target For its subcomponents , That is, the source component that triggers the event , event.target Parent component , Because the source of triggering is the parent component itself
event.currentTarget Components bound to events event.currentTarget Components that are always bound by events
summary :target It corresponds to the source component that triggers the event , This component may be a sub component , It may be the parent component , It mainly looks at the area where the action is performed . and currentTarget Always correspond to the component to which the event is bound .
Event transmission parameters of wechat applet
1. What is event delegation
Delegate the event of the child element to ( binding ) Give the parent element
2. The benefits of event delegation (ul Below 100li Events need to be added , You can bind directly to the parent element )
1. Reduce the number of bindings
2. New elements added later can also enjoy the previously delegated Events
3. The principle of event delegation
1. Bubbling
4. Who triggered the event
1. Subelement
5. How to find the object that triggers the event
1. event.target
6. currentTarget VS target
1. currentTarget It is required that the element bound to the event must be the element that triggers the event
2. target The element that binds the event is not necessarily the element that triggers the event
Mode 1 of parameter transmission : data-key='value'
ps:key You can customize Deliver multiple
<input class="" data-key="phone"   placeholder=" Please enter a user name "   bindinput="change"> </input>
    <input class="" data-key="password"   placeholder=" Please enter a user name "   bindinput="change" > </input>


#js
change(evet) {
    console.log(evet);
    let value = evet.detail.value
    let type = evet.currentTarget.dataset.key
    this.setData({
      [type]: value
    })
  },
Mode 2 of parameter transmission : id='value'
The only value
<input class="" id="phone"   placeholder=" Please enter a user name "   bindinput="change"> </input>
    <input class="" id="password"   placeholder=" Please enter a user name "   bindinput="change" > </input>

#js
change(evet) {
    console.log(evet);
    let value = evet.detail.value
    let type = evet.currentTarget.id
    this.setData({
      [type]: value
    })

  },
scroll-view Use
tips y When the axis rolls, the rolling height should be calculated
scroll-view Use in flex Layout
enable-flex
Enable flexbox Layout . After opening , The current node declares display: flex Will become flex container, And act on its child nodes .
scroll-view Turn on display:flex Set up enable-flex The size must be set, otherwise scroll-view Error in vertical layout height
<scroll-view class="scroll" enable-flex scroll-x>
            <view class="scrollItem" wx:for='{
   {recommendList}}' wx:key='id'>
                <image src="{
   {item.picUrl}}"></image>
                <text>{
   {item.name}}</text>
            </view>
</scroll-view>

.scroll{
    display: flex;
    height: 300rpx;
}
scroll-into-view
Value should be a child element id(id Cannot start with a number ). Set which direction to scroll in , In which direction to scroll to the element
scroll-into-view yes scroll-view A property of , The main function is to scroll to the position of the specified element , Its corresponding value is the id, How to use it is as follows :
 <scroll-view
    class="navScroll"
    scroll-x
    enable-flex
    scroll-into-view="{
   {'scroll' + navid}}"
    >
        <view class="navItem"  id="{
   {'scroll' + item.id}}"wx:for='{
   {GroupList}}' wx:key='id'>
            <view class="navContent {
   {navid==item.id?'active':''}}" bindtap='navChange' id="{
   {item.id}}">
                {
   {item.name}}
            </view>
        </view>
</scroll-view>

 data: {
        GroupList: [],
        navid: '',
        VideoList: [],
        isTriggered: false // The drop-down refresh
    },

    //tags Switch
    navChange(event) {
        //  Save Click id , The video list is assigned empty
        this.setData({
            navid: event.currentTarget.id,
            VideoList: []
        })
        // Turn on the load prompt , Send a request
        wx.showLoading({
            title: ' Being loaded ',
        })
        this.getVideoList(event.currentTarget.id)
    },
The drop-down refresh Pull on loading
The drop-down refresh
refresher-enabled: Enable automatic pull-down refresh
Define the callback triggered when the pull-down refresh bindrefresherrefresh
refresher-triggered Set the current pull-down refresh status ,true Indicates that the pull-down refresh has been triggered ,false Indicates that the pull-down refresh is not triggered Control refresh status
Pull up and touch the bottom
bindscrolltolower Definition Pull up and touch the bottom Trigger callback when
- // In order to realize the drop-down loading data 1. Back end paging 2. Front end paging
- // 1. Back end paging Generally trigger the request Tell the back page And number of entries
- // 2. Front end paging Go straight back to 100 strip for the first time 1-9 After hitting the bottom 10-19
    // The drop-down refresh
    handleRefresher() {
        console.log(' The drop-down refresh ');
        this.getVideoList(this.data.navid)
    },
    //  Pull up and touch the bottom
    handleToLower() {
        console.log(' Pull up and touch the bottom ');

        let list=this.data.VideoList
        list.push(...list)
        this.setData({
            VideoList:list
        })
    }

    data: {
        GroupList: [],
        navid: '',
        VideoList: [],
        isTriggered: false // The drop-down refresh
    },
  <scroll-view
    class="view-scroll"
    scroll-y
    refresher-enabled
    bindrefresherrefresh="handleRefresher"
    bindscrolltolower="handleToLower"
    refresher-triggered="{
   {isTriggered}}"
     >
        <view class="vieoItem"  wx:for='{
   {VideoList}}' wx:key='index'>
            <video src="{
   {item.data.previewUrl}}"> </video>
    </scroll-view>
There are two ways to realize the sharing function of wechat applet :
The first one is
stay page.js To realize onShareAppMessage, You can choose to share the page in the upper right corner of the applet
Listen to the user click the forward button on the page (button Components open-type="share") Or the menu in the upper right corner “ forward ” The behavior of the button , And customize the forwarding content .
| Parameters | type | explain | Minimum version |
|---|---|---|---|
| from | String | Forward event source .button: On page forward button ;menu: Forward menu in the upper right corner | 1.2.4 |
| target | Object | If from The value is button, be target This forwarding event was triggered by button, Otherwise undefined | 1.2.4 |
| webViewUrl | String | The page contains web-view When the component , Returns the current web-view Of url | 1.6.4 |
onShareAppMessage: function () {
 return {
  title: ' The sharing title displayed when sharing pops up ',
  desc: ' Share the content of the page ',
  path: '/page/user?id=123' //  route , Pass parameters to the specified page .
 }
}
Judge which one the user clicked
  onShareAppMessage: function ({from}) {
    console.log(from);
    if(from === 'button'){
      return {
        title: ' come from button Forwarding ',
        page: '/pages/video/video',
        imageUrl: '/static/images/nvsheng.jpg'
      }
    }else {
      return {
        title: ' come from menu Forwarding ',
        page: '/pages/video/video',
        imageUrl: '/static/images/nvsheng.jpg'
      }
    }

  }
The second kind
Customize the button to share , stay page Add a with open-type='share' Of button label
After clicking this button , It will automatically trigger that it is already in page.js Defined in onShareAppMessage Method , Realize the sharing function .
(<button open-type='share'></button>).
As in the above example ,path Property points to user page , With id=123 Parameters of . We just need to user.js Of onLoad Function , adopt options Check the passed parameters :
// user.js
Page({
 onLoad: function(options) {
  console.log(options);
 }
})
Wechat music player
page Layout
  <!--  Progress bar control area  -->
    <view class=".progerss">
        <text>{
   {currentTime}}</text>
        <!--  Overall progress  -->
        <cview class="bar">
            <!--  Real time progress  -->
           <view class="audio-bar" style="width: {
   {width + 'rpx'}}">
               <!--  Little ball  -->
               <view class="audio-circle" ></view>
           </view>
        </cview>
        <text>{
   {endTime}}</text>
    </view>
    <!--  The bottom controls the playback area  -->
    <view class="musicControl">
        <text class="iconfont icon-iconsMusicyemianbofangmoshiShuffle"></text>

        <text class="iconfont icon-shangyishou" id="pre" bindtap='handleSwitch'></text>

        <text class="iconfont {
   {isPlay?'icon-zanting': 'icon-bofang'}} big" bindtap="handleMusicPlay"></text>

        <text class="iconfont icon-next" id="next" bindtap='handleSwitch'></text>

        <text class="iconfont icon-iconsMusicyemianbofangmoshiPlayList"></text>
    </view>
</view>

.musicControl {
    position: absolute;
    width: 100%;
    bottom: 40rpx;
    left: 0;
    display: flex;
    border-top: 1px solid #ffffff;
}

.musicControl text {
    width: 20%;
    height: 120rpx;
    line-height: 120rpx;
    text-align: center;
    color: #ffffff;
    font-size: 50rpx;
}

.musicControl text .big {
    font-size: 80rpx;
}

/*  Progress bar  */
.progerss {
    width: 640rpx;
    height: 80rpx;
    line-height: 80rpx;
    display: flex;
    position: absolute;
    bottom: 200rpx;
}

.progerss .bar {
    position: relative;
    width: 450rpx;
    height: 8rpx;
    background: rgba(0, 0, 0, .4);
    margin: auto;
}

.bar .audio-bar {
    position: absolute;
    top: 0;
    left: 0;

    height: 8rpx;
    background-color: red;
    z-index: 99;
}

.audio-circle {
    position: absolute;
    right: -18rpx;
    top: -6rpx;
    width: 18rpx;
    height: 18rpx;
    border-radius: 50%;
    background-color: #fff;
}
Component sharing PubSubJS
1. Using third party libraries : pubsub-js
2. install : npm install pubsub-js
3. Use :
- a) Import PubSub from ‘pubsub-js’
- b) Subscribe to news : PubSub.subscribe(‘eventName’, callback)
- c) Release the news : PubSub.publish(‘eventName’, data)
- d) Unsubscribe : PubSub.unsubscribe(‘eventName’)
Applet usage npm package
- initialization package.json npm init
- Check allow npm
- download npm package
- structure npm 1. development tool ---> Tools ---> structure npm 2. Will node_modules Package the package in to miniprogram_npm in
Background audio api Instructions
- BackgroundAudioManager Get instance
- BackgroundAudioManager.onPlay(function callback) Listen for background audio playback events
- BackgroundAudioManager.onPause(function callback) Listen for background audio pause events
- BackgroundAudioManager.onStop(function callback) Listen for background audio stop event
- BackgroundAudioManager.onTimeUpdate(function callback) Listen for background audio playback progress update events , Only the applet will call back when it is in the foreground
- BackgroundAudioManager.onEnded(function callback) Monitor the end event of natural playback of background audio
- BackgroundAudioManager.stop() Stop the music
- BackgroundAudioManager.pause() Music suspended
string src
Audio data source (2.2.3 Start supporting cloud files ID). The default is an empty string , When a new src when , Will automatically start playing , Currently supported formats are m4a, aac, mp3, wav.
number startTime
Where the audio starts playing ( Company :s).
string title
Audio title , For native audio player audio titles ( Required ). Sharing function in native audio player , Shared card title , This value will also be used .
number currentTime
The current audio playback position ( Company :s), Only when there is legal src When to return to .( read-only )
Code example
// Get the big picture app Application example
const app = getApp()
import PubSub from 'pubsub-js'
import request from '../../utils/request'
import moment from 'moment'
Page({


    data: {
        isPlay: false,
        song: {},
        id: '',
        linkUrl: '',
        currentTime: '00:00',
        endTime: '00:00',
        width: 0
    },


    onLoad: function (options) {
        this.setData({
            id: options.id
        })
        this.getMusicInfo(options.id)
        // Judge whether the current music is playing
        console.log(app.globalData.musicId, app.globalData.isMUsicPlay + ' overall situation de', options.id + ' Click on ');
        if (app.globalData.isMUsicPlay && app.globalData.musicId == options.id) {
            this.setData({
                isPlay: true
            })
        }
        // Create an instance object for music playback
        this.getBackgroundAudioManager = wx.getBackgroundAudioManager()
        //  Listen for the user to click the playback pause of the operating system
        this.getBackgroundAudioManager.onPlay(() => {
            this.changePlayStatus(true)
            app.globalData.musicId = options.id
        })
        this.getBackgroundAudioManager.onPause(() => {
            this.changePlayStatus(false)
        })
        this.getBackgroundAudioManager.onStop(() => {
            this.changePlayStatus(false)
        })
        //  Monitor the progress of music playing in real time
        this.getBackgroundAudioManager.onTimeUpdate(() => {
            //  Real time duration
            let time = this.getBackgroundAudioManager.currentTime
            //  Total duration
            let totalTime = this.getBackgroundAudioManager.duration
            let currentTime = moment(time * 1000).format('mm:ss')
            let width = time / totalTime * 450
            this.setData({
                currentTime,
                width
            })
        })
        // The listening music will end naturally
        this.getBackgroundAudioManager.onEnded(() => {
            // Automatically switch to the next music , And play it automatically
            PubSub.publish('SwitchType', 'next');

            // Restore the length of the progress bar to 0
            this.setData({
                width: 0,
                endTime: '00:00'
            })
        })
    },
    // Get music details
    async getMusicInfo(ids) {
        let {
            songs
        } = await request('/song/detail', {
            ids
        })
        // Total real length of conversion
        let endTime = moment(songs[0].dt).format('mm:ss')
        this.setData({
            song: songs[0],
            endTime
        })
        wx.setNavigationBarTitle({
            title: this.data.song.name,
        })
    },
    // Modify the status function
    changePlayStatus(isPlay) {
        this.setData({
            isPlay
        })
        // Modify the global status of the application
        app.globalData.isMUsicPlay = isPlay
    },
    //  Click the start pause button
    handleMusicPlay() {
        let isPlay = !this.data.isPlay
        this.setData({
            isPlay
        })
        let {
            id,
            linkUrl
        } = this.data
        this.musicControl(isPlay, id, linkUrl)
    },
    //  Play   Pause   Function callback
    async musicControl(isPlay, id, linkUrl) {
        // performance optimization :  No, url Ask again when   Sometimes take global variables
        if (!linkUrl) {
            let {
                data
            } = await request('/song/url', {
                id
            })
            linkUrl = data[0].url
            this.setData({
                linkUrl
            })
        }
        if (isPlay) { // Play
            //  You must add url  and title
            this.getBackgroundAudioManager.src = linkUrl
            this.getBackgroundAudioManager.title = this.data.song.name
        } else { // Pause
            this.getBackgroundAudioManager.pause()
        }

    },
    //  Click the callback of cutting song
    handleSwitch(e) {
        let type = e.currentTarget.id
        // Close current music
        this.getBackgroundAudioManager.stop()
        // Release the news
        PubSub.publish('SwitchType', type);
        // Get the subscription message back id
        PubSub.subscribe('musiceId', (msg, id) => {
            console.log(msg, id);
            // Get music information
            this.getMusicInfo(id)
            // Auto play
            this.musicControl(true, id)
            // Unsubscribe after receiving
            PubSub.unsubscribe('musiceId');

        })
    }

})
Applet subcontracting process
Why subcontract
- 1. The small program requires that the volume of the compressed package cannot be greater than 2M, Otherwise it can't be published
- 2. If the volume of small and medium-sized programs actually developed is greater than 2M You need to use the subcontracting mechanism to publish and upload
- 3. It can be solved after subcontracting 2M Limit , And can subcontract and load content , Improve performance
- 4. After subcontracting, the volume of a single package cannot be greater than 2M
- 5. After subcontracting, the volume of all packages shall not be greater than 16M
Form of subcontracting
- 1. Conventional subcontracting
- 2. Independent subcontracting
- 3. Subcontracting pre download
Conventional subcontracting

1. The developer passes the app.json subpackages Field declares the project subcontracting structure
2. characteristic :
a) When loading the applet, first load the main package , The subcontracting content is loaded only when the subcontracting page needs to be accessed
b) The subcontracting page can access the files of the main package , data , Pictures and other resources
c) Main package :
Main package source : All content except subcontracting will be packaged into the main package Usually put the startup page /tabBar page
  "subPackages":[
        {
            "root": "songPackge",
            "pages": [
                "pages/recommendSong/recommendSong",
                "pages/songDetail/songDetail"
            ]
        }
    ],
Independent subcontracting
Subcontracting pre download
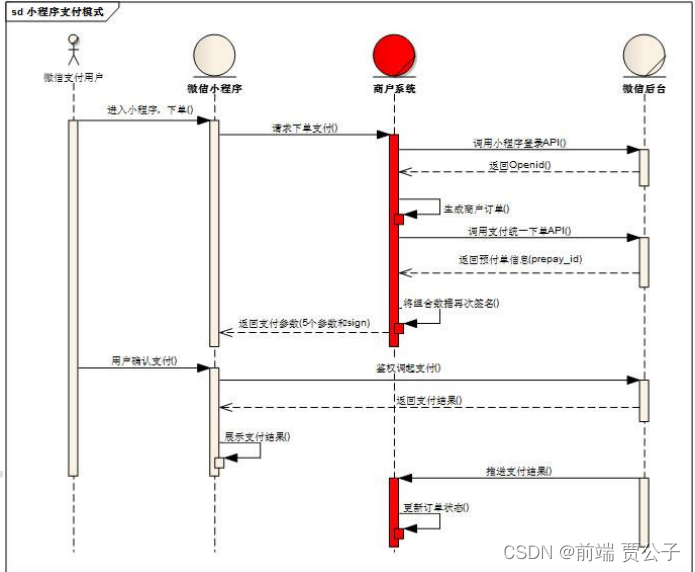
Detailed description of payment process
- 1. The user places an order at the customer service end of the applet ( Including user and product information )
- 2. The applet client sends the order payment request to the merchant server
- 3. The merchant server interfaces with the wechat server to obtain the unique ID openID
- 4. Merchant server according to openId Generate merchant orders ( Contains merchant information )
- 5. The merchant server sends a request to call a unified order API Get advance payment order information
- a) Address of the interface : https://api.mch.weixin.qq.com/pay/unifiedorder
- 6. The merchant signs and encrypts the pre payment information and returns it to the applet client
- a) Signature method : MD5b) Signature field : Applet ID, Time stamp , Random string , Data packets , Signature methodc) Reference address:https://pay.weixin.qq.com/wiki/doc/api/wxa/wxa_api.php?chapter=7_7&index=37. The user confirms the payment ( Authentication and transfer payment )a) API: wx.requestPayment()8. The wechat server returns the payment result to the applet client9. Wechat server pushes payment results to merchant server
The applet obtains the user's unique id (openId)
1. wx.login()
- 2. send out code To the server
- 3. The server sends a request with parameters (code, appSecret, appId) Get... From wechat server openId
- a) Address of the interface :
- 4. appSecret,appId Get... On the front page of the applet
- 5. Server acquisition openId After encryption, it is returned to the front end

边栏推荐
- Mysql A left(right) join B on A.id=B.id and A.age=1与A left(right) join B on A.id=B.id where A.age=1
- LAN SDN technology hard core insider 4 from computing virtualization to network virtualization
- Topic domain model
- 21 -- 除自身以外数组的乘积
- matlab ode45求解微分方程
- Scala 获取指定目录下的所有文件
- LeetCode 第26天
- 主控芯片CSU18M92开发智能体重秤方案
- About redis, do you update the database first or the cache first?
- 实验三 LZW
猜你喜欢
Three effective strategies for driving page performance optimization

大厂底层必修:“应用程序与 AMS 的通讯实现”

Three things programmers want to do most | comics
Bottom compulsory of large factory: "communication realization between application program and AMS"

实验六 MPEG

Kubernetes deployment strategy

延伸联接边界,扩展业务范围,全面迈向智能云网2.0时代

Could NOT find Doxygen (missing: DOXYGEN_EXECUTABLE)

Qt文档阅读笔记-QAudioInput&QAudioFormat解析与实例

@Transactional事务方法中包含多个同类事务方法,这些事务方法本身设置失效两种解决方案
随机推荐
scala 主构造器_Scala主构造器深度
如何在 PHP 应用程序中预防SQL 注入
PNY file to picture
Rust -- detailed explanation of option
Spark疑难杂症排查-Premature EOF: no length prefix available
主控芯片CSU18M92开发智能体重秤方案
Scala main constructor_ Scala main constructor depth
实验七 H.264文件分析
亚马逊旗下Zoox通过安全测试 并在加州申请试驾
Scala idea prompt function parameters
弥散张量分析开源软件 DSI Studio 简体中文汉化版可以下载了
记一次线上SQL死锁事故:如何避免死锁?
JVM监控工具介绍jstack, jconsole, jinfo, jmap, jdb, jstat
MPLS VPN 跨域-optionB
flink批量读取es
LAN SDN hard core technology insider 18 beautiful new world
ASP.Net Core创建MVC项目上传多个文件(流方式)
LAN SDN technology hard core insider 7 from layer 2 to layer 2
C语音实现tcp客户端和tcp服务端,Qt调用测试
LAN SDN technology hard core insider 6 distributed anycast gateway