当前位置:网站首页>Flume配置1——基础案例
Flume配置1——基础案例
2022-06-29 19:46:00 【一个正在努力的菜鸡】
- 截图颜色有出入
Flume安装与配置
1.到官网下载flume


2.将压缩文件上传到需要日志采集的Linux
- 这里是node1

3.解压
- tar -xvf apache-flume-1.9.0-bin.tar.gz
4.修改解压文件的名称
- mv apache-flume-1.9.0-bin/ flume-1.9.0
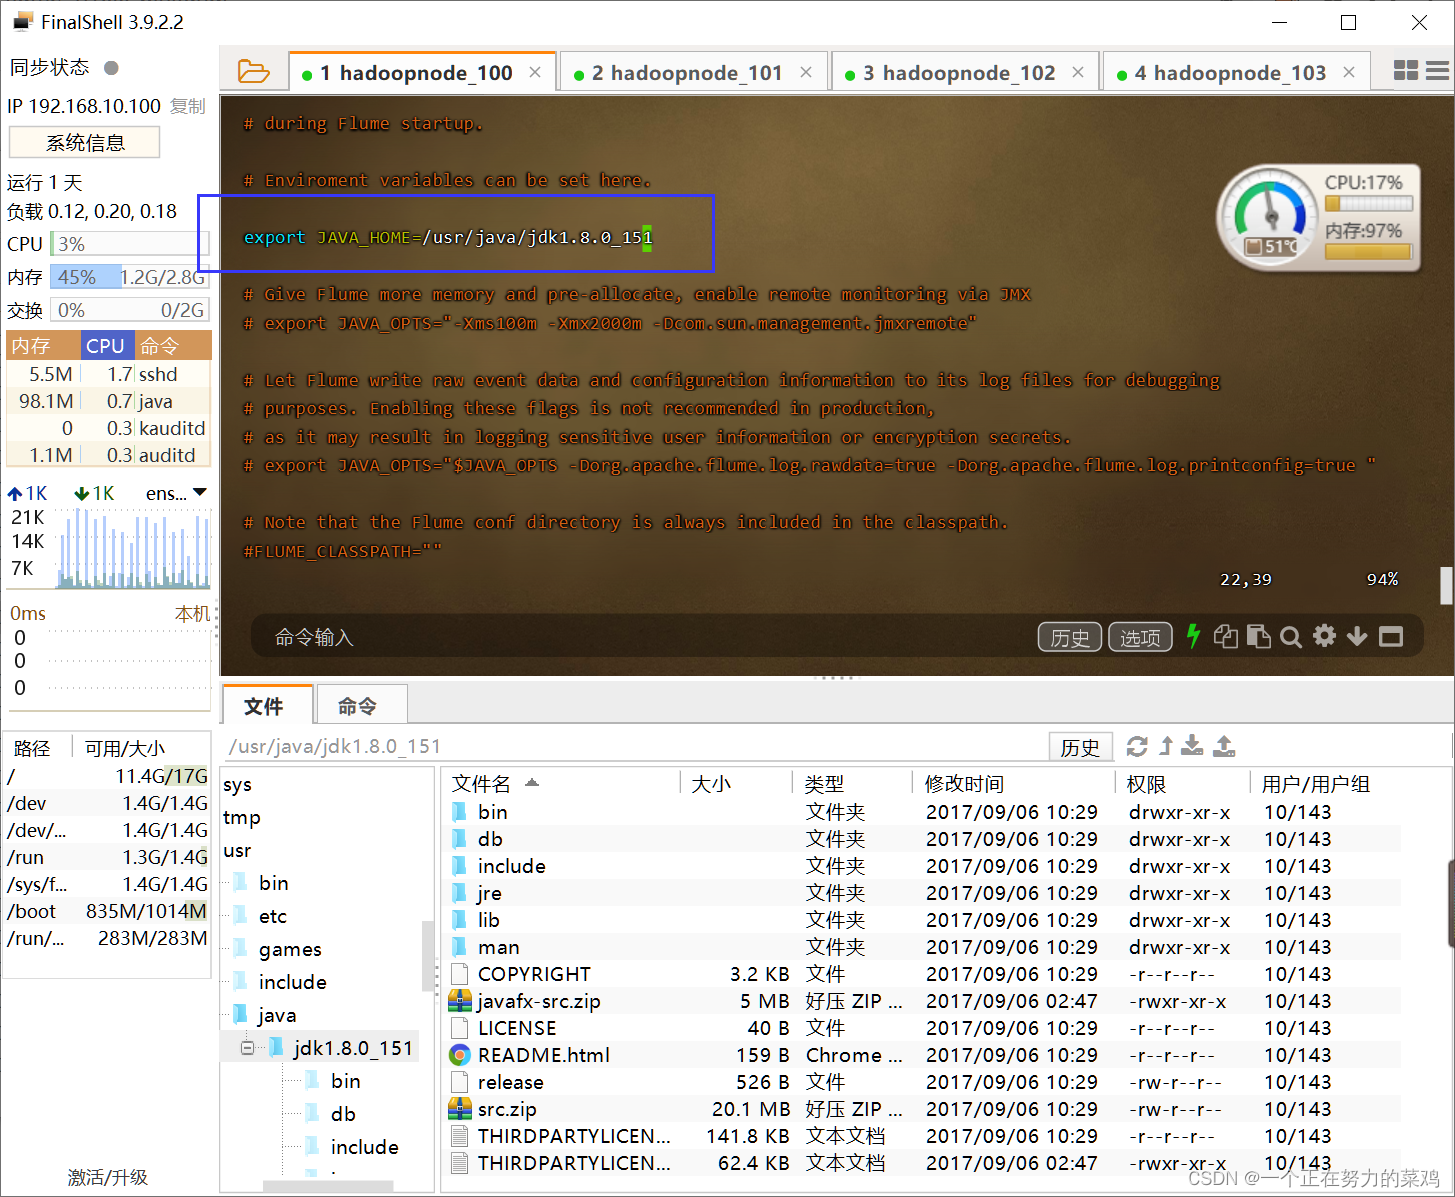
5.将flume/conf下的flume-env.sh.template文件修改为flume-env.sh,并配置文件JAVA_HOME
- cd /usr/local/flume-1.9.0/conf
- mv flume-env.sh.template flume-env.sh
- vim flume-env.sh
- export JAVA_HOME=/usr/java/jdk1.8.0_151
Flume监控端口并打印到控制台
1.官网读配置方法
2.需求
- 首先启动Flume任务,监控本机44444端口(服务端)
- 然后通过telnet工具向本机44444端口发送消息(客户端)
- 最后Flume将监听的数据实时显示在控制台
3.原理图

开始配置
4.安装telnet
- 检查是否安装,有输出表示安装了
rpm -qa telnet-server
rpm -qa xinetd
- 安装
yum -y install telnet
yum -y install xinetd
- 启动服务
systemctl start xinetd.service
- 设置为开机自启
systemctl enable xinetd.service
- 重启的命令,此处不要操作
systemctl restart xinetd.service
5.配置环境变量
- vim /etc/profile

JAVA_HOME=/usr/java/jdk1.8.0_152
JRE_HOME=/usr/java/jdk1.8.0_151/jre
HADOOP_HOME=/usr/local/hadoop-2.7.1
ZOOKEEPER_HOME=/usr/local/zookeeper-3.3.6
FLUME_HOME=/usr/local/flume-1.9.0

CLASSPATH=.:$JAVA_HOME/lib/dt.jar:$JAVA_HOME/lib/tools.jar:$JRE_HOME/lib
PATH=$PATH:$JAVA_HOME/bin:$JRE_HOME/bin:$HADOOP_HOME/bin:$HADOOP_HOME/sbin:$ZOOKEEPER_HOME/bin:$FLUME_HOME/bin
export PATH CLASSPATH JAVA_HOME JRE_HOME HADOOP_HOME ZOOKEEPER_HOME FLUME_HOME
- source /etc/profile
3.检查44444端口是否被占用
- ** sudo netstat -tunlp | grep 44444**

- 若有输出则需要进行一下步骤杀死进程
- 首先哪个进程占用该端口
lsof -i:44444
- 杀死该进程
kill -9 PID
4.创建一个目录用于放每个任务的配置文件

5./jobs/t1下编写配置
- vim flume-telnet-logger.conf
注意:最好将中文删去--(这句话也不要)

# Name the components on this agent   --  a1表示agent的名字
a1.sources = r1	#表示a1的输入源
a1.sinks = k1	#表示a1的输出目的地
a1.channels = c1	#表示a1的缓冲区

# Describe/configure the source
a1.sources.r1.type = netcat	#表示a1的输入源类型为netcat端口类型
a1.sources.r1.bind = localhost	#表示a1的监听主机
a1.sources.r1.port = 44444	#表示a1的监听端口号

# Describe the sink
a1.sinks.k1.type = logger		#表示a1的输出目的地时控制台logger类型

# Use a channel which buffers events in memory
a1.channels.c1.type = memory	#表示a1的缓冲区类型是内存型
a1.channels.c1.capacity = 1000	#表示a1的缓冲区总容量是1000个event
a1.channels.c1.transactionCapacity = 100	#表示a1的缓冲区之前收集到100条event后再提交事务

# Bind the source and sink to the channel
a1.sources.r1.channels = c1	#连接source与channel
a1.sinks.k1.channel = c1	#连接sink与channel
6.启动flume
- bin/flume-ng agent --conf conf --conf-file
jobs/t1/flume-telnet-logger.conf --name a1
-Dflume.root.logger==INFO,console
命令解析
	--conf conf:配置文件目录
	--conf-file jobs/t1/flume-telnet-logger.conf:flume本次启动读取的配置文件位置
	--name a1:agent的名字
	-Dflume.root.logger==INFO,console
		-D表示flume运行时动态修改flume.root.logger参数属性值
		将控制台日志打印级别设置为INFO级别
- jps

7.另外打开一个node1节点,通过telnet发送消息
- telnet localhost 44444


实时读取本地文件到HDFS
1.原理图

开始配置
2.拷贝相关Hadoop的jar到flume-1.9.0/lib下


3./jobs/t2下创建flume-file-hdfs.conf文件
- 注意相关配置官网都可查!!!一定要学会查!!
- vim flume-file-hdfs.conf
a2.sources=r2
a2.sinks=k2
a2.channels=c2

a2.sources.r2.type=exec
a2.sources.r2.command=tail -F /usr/local/hadoop-2.7.1/logs/hadoop-root-namenode-hadoop100.log	#Source读取数据前执行的命令
a2.sources.r2.shell=/bin/bash -c
a2.sources.r2.batchSize=10
a2.sources.r2.batchTimeout=2000

a2.sinks.k2.type=hdfs
a2.sinks.k2.hdfs.path=hdfs://node1:8020/flume/%Y%m%d/%H	#hdfs路径 /年月日/小时
a2.sinks.k2.hdfs.filePrefix=logs-	#文件前缀
a2.sinks.k2.hdfs.round=true	#轮询
a2.sinks.k2.hdfs.roundValue=1	#时间间隔
a2.sinks.k2.hdfs.roundUnit = hour	#重新定义时间单位
a2.sinks.k2.hdfs.useLocalTimeStamp = true	#是否使用本地时间戳
a2.sinks.k2.hdfs.batchSize = 100	#积攒多少个Event才flush到HDFS一次
a2.sinks.k2.hdfs.fileType = DataStream	#设置文件类型,可支持压缩
a2.sinks.k2.hdfs.rollInterval = 600	#多久生成一个新的文件
a2.sinks.k2.hdfs.rollSize = 134217700	#设置每个文件的滚动大小
a2.sinks.k2.hdfs.rollCount = 0	#文件的滚动与Event数量无关
a2.sinks.k2.hdfs.minBlockReplicas = 1	#最小冗余数

# Use a channel which buffers events in memory
a2.channels.c2.type = memory
a2.channels.c2.capacity = 1000
a2.channels.c2.transactionCapacity = 1000

# Bind the source and sink to the channel
a2.sources.r2.channels = c2
a2.sinks.k2.channel = c2
4.启动flume
- bin/flume-ng agent --conf conf --conf-file jobs/t2/flume-file-hdfs.conf --name a2 -Dflume.root.logger==INFO,console
5.HDFS查看日志文件

单数据源Source多出口Channel-Sink案例(选择器)
1.拓扑图

2.需求
- Flume-1(node1)监控文件变动,Flume-1将变动内容传递给Flume-2,Flume-2(node3)负责存储到HDFS
- 同时Flume-1将变动内容传递给Flume-3,Flume-3(node3)负责输出到Local FileSystem
3.原理图

开始配置
4.在node1的/jobs/t3下创建exec-flume-avro.conf文件,该文件是分发分Agent
- vim exec-flume-avro.conf
# Name the components on this agent
a1.sources = r1
a1.sinks = k1 k2
a1.channels = c1 c2

a1.sources.r1.selector.type = replicating	# 将数据流复制给所有channel
a1.sources.r1.selector.optional = c2	#若c2写入流错误则系统忽略,但c1错误则回滚

# Describe/configure the source
a1.sources.r1.type = exec
a1.sources.r1.command = tail -F /tmp/a.log
a1.sources.r1.shell = /bin/bash -c

# Describe the sink
a1.sinks.k1.type = avro
a1.sinks.k1.hostname = node1
a1.sinks.k1.port = 4141

a1.sinks.k2.type = avro
a1.sinks.k2.hostname = node1
a1.sinks.k2.port = 4142

# Describe the channel
a1.channels.c1.type = memory
a1.channels.c1.capacity = 1000
a1.channels.c1.transactionCapacity = 100

a1.channels.c2.type = memory
a1.channels.c2.capacity = 1000
a1.channels.c2.transactionCapacity = 100

# Bind the source and sink to the channel
a1.sources.r1.channels = c1 c2
a1.sinks.k1.channel = c1
a1.sinks.k2.channel = c2
5.同步配置到其他节点
- scp -r flume-1.9.0/ node2:/usr/local/
- scp -r flume-1.9.0/ node3:/usr/local/
- scp -r flume-1.9.0/ node4:/usr/local/
6.为noed234节点配置环境变量
- vim /etc/profile
JAVA_HOME=/usr/java/jdk1.8.0_152
JRE_HOME=/usr/java/jdk1.8.0_151/jre
HADOOP_HOME=/usr/local/hadoop-2.7.1
ZOOKEEPER_HOME=/usr/local/zookeeper-3.3.6
FLUME_HOME=/usr/local/flume-1.9.0

CLASSPATH=.:$JAVA_HOME/lib/dt.jar:$JAVA_HOME/lib/tools.jar:$JRE_HOME/lib
PATH=$PATH:$JAVA_HOME/bin:$JRE_HOME/bin:$HADOOP_HOME/bin:$HADOOP_HOME/sbin:$ZOOKEEPER_HOME/bin:$FLUME_HOME/bin
export PATH CLASSPATH JAVA_HOME JRE_HOME HADOOP_HOME ZOOKEEPER_HOME FLUME_HOME
- source /etc/profile
7.在node3的/jobs/t3下创建avro-flume-hdfs.conf文件,该文件是配置写到hdfs的flume
- vim avro-flume-hdfs.conf
# Name the components on this agent
a2.sources = r1
a2.sinks = k1
a2.channels = c1

# Describe/configure the source
a2.sources.r1.type = avro
a2.sources.r1.bind = node3
a2.sources.r1.port = 4141

# Describe the sink
a2.sinks.k1.type = hdfs
a2.sinks.k1.hdfs.path = hdfs://node3:8020/flume2/%Y%m%d/%H

a2.sinks.k1.hdfs.filePrefix = flume2-	#上传文件的前缀
a2.sinks.k1.hdfs.round = true	#是否按照时间滚动文件夹
a2.sinks.k1.hdfs.roundValue = 1	#多少时间单位创建一个新的文件夹
a2.sinks.k1.hdfs.roundUnit = hour	#重新定义时间单位
a2.sinks.k1.hdfs.useLocalTimeStamp = true	#是否使用本地时间戳
a2.sinks.k1.hdfs.batchSize = 100	#积攒多少个Event才flush到HDFS一次
a2.sinks.k1.hdfs.fileType = DataStream	#设置文件类型,可支持压缩
a2.sinks.k1.hdfs.rollInterval = 600	#多久生成一个新的文件
a2.sinks.k1.hdfs.rollSize = 134217700	#设置每个文件的滚动大小大概是128M
a2.sinks.k1.hdfs.rollCount = 0	#文件的滚动与Event数量无关
a2.sinks.k1.hdfs.minBlockReplicas = 1	#最小冗余数

# Describe the channel
a2.channels.c1.type = memory
a2.channels.c1.capacity = 1000
a2.channels.c1.transactionCapacity = 100

# Bind the source and sink to the channel
a2.sources.r1.channels = c1
a2.sinks.k1.channel = c1
8.在node3的/jobs/t3下创建avro-flume-dir.conf文件,该文件是配置写到本地的flume
- vim avro-flume-dir.conf
# Name the components on this agent
a3.sources = r1
a3.sinks = k1
a3.channels = c2

# Describe/configure the source
a3.sources.r1.type = avro
a3.sources.r1.bind = node3
a3.sources.r1.port = 4142

# Describe the sink
a3.sinks.k1.type = file_roll
a3.sinks.k1.sink.directory = /tmp/flumedatatest

# Describe the channel
a3.channels.c2.type = memory
a3.channels.c2.capacity = 1000
a3.channels.c2.transactionCapacity = 100

# Bind the source and sink to the channel
a3.sources.r1.channels = c2
a3.sinks.k1.channel = c2
9.node3下分别启动两个flume,若先启动flume1的话会导致远程连接失败,被拒绝连接
- bin/flume-ng agent --conf conf --conf-file
jobs/t3/avro-flume-hdfs.conf --name a2
-Dflume.root.logger==INFO,console - bin/flume-ng agent --conf conf --conf-file
jobs/t3/avro-flume-dir.conf --name a3
-Dflume.root.logger==INFO,console
10.node1启动,在t3下
- bin/flume-ng agent --conf conf --conf-file
jobs/t3/exec-flume-avro.conf --name a1
-Dflume.root.logger==INFO,console
11.结果
- 本地文件

- hdfs文件
单数据源Source-Channel多出口Sink案例(负载均衡)
1.拓扑图

2.需求
- Flume-1(node1)监控文件变动,Flume-1将变动内容传递给Flume-2,Flume-2(node1)负责打印到控制台
- 同时Flume-1将变动内容传递给Flume-3,Flume-3(node1)也负责打印到控制台
3.原理图

开始配置
4.在node1的/jobs/t4下创建netcat-flume-avro.conf文件
- vim netcat-flume-avro.conf
# Name the components on this agent
a1.sources = r1
a1.channels = c1
a1.sinkgroups = g1
a1.sinks = k1 k2

# Describe/configure the source
a1.sources.r1.type = netcat
a1.sources.r1.bind = localhost
a1.sources.r1.port = 44444

a1.sinkgroups.g1.processor.type = load_balance
a1.sinkgroups.g1.processor.backoff = true
a1.sinkgroups.g1.processor.selector = round_robin
a1.sinkgroups.g1.processor.selector.maxTimeOut=10000

# Describe the sink
a1.sinks.k1.type = avro
a1.sinks.k1.hostname = node1
a1.sinks.k1.port = 4141

a1.sinks.k2.type = avro
a1.sinks.k2.hostname = node1
a1.sinks.k2.port = 4142

# Describe the channel
a1.channels.c1.type = memory
a1.channels.c1.capacity = 1000
a1.channels.c1.transactionCapacity = 100

# Bind the source and sink to the channel
a1.sources.r1.channels = c1
a1.sinkgroups.g1.sinks = k1 k2
a1.sinks.k1.channel = c1
a1.sinks.k2.channel = c1
-------------------------------------
a1.sinkgroups = g1
	为了消除数据处理管道中的单点故障,Flume可以使用负载平衡或故障转移策略,将event发送到不同的sink
	sink组是用来创建逻辑上的一组sink,这个组的行为是由sink处理器来决定的,它决定了event的路由策略
a1.sinkgroups.g1.processor.type = load_balance	#负载均衡,除了这个还有default, failover(故障转移)
a1.sinkgroups.g1.processor.backoff = true	#Should failed sinks be backed off exponentially
a1.sinkgroups.g1.processor.selector = round_robin	#负载均衡策略
a1.sinkgroups.g1.processor.selector.maxTimeOut=10000
5.在node1的/jobs/t4下创建avro-flume-console1.conf文件
- vim avro-flume-console1.conf
# Name the components on this agent
a2.sources = r1
a2.sinks = k1
a2.channels = c1

# Describe/configure the source
a2.sources.r1.type = avro
a2.sources.r1.bind = node1
a2.sources.r1.port = 4141

# Describe the sink
a2.sinks.k1.type = logger

# Describe the channel
a2.channels.c1.type = memory
a2.channels.c1.capacity = 1000
a2.channels.c1.transactionCapacity = 100

# Bind the source and sink to the channel
a2.sources.r1.channels = c1
a2.sinks.k1.channel = c1
6.在node1的/jobs/t4下创建avro-flume-console2.conf文件
- vim avro-flume-console2.conf
# Name the components on this agent
a3.sources = r1
a3.sinks = k1
a3.channels = c2

# Describe/configure the source
a3.sources.r1.type = avro
a3.sources.r1.bind = node1
a3.sources.r1.port = 4142

# Describe the sink
a3.sinks.k1.type = logger

# Describe the channel
a3.channels.c2.type = memory
a3.channels.c2.capacity = 1000
a3.channels.c2.transactionCapacity = 100

# Bind the source and sink to the channel
a3.sources.r1.channels = c2
a3.sinks.k1.channel = c2
7.先启动flume23,再启动flume1
- bin/flume-ng agent --conf conf --conf-file
jobs/t4/avro-flume-console2.conf --name a3
-Dflume.root.logger==INFO,console - bin/flume-ng agent --conf conf --conf-file
jobs/t4/avro-flume-console1.conf --name a2
-Dflume.root.logger==INFO,console - bin/flume-ng agent --conf conf --conf-file
jobs/t4/netcat-flume-avro.conf --name a1
-Dflume.root.logger==INFO,console
8.telnet向node1发送消失
- telnet localhost 44444
9.结果


多数据源汇总
1.拓扑图

2.需求
- node3上的Flume-1监控文件 /usr/local/hive236/logs/hive.log
- node1上的Flume-2监控44444端口的数据流
- Flume-1与Flume-2将数据发送给node4上的Flume-3,Flume-3将最终数据打印到控制台
3.原理图

开始配置
4.在node3的/jobs/t5下创建exec-flume-avro.conf文件
- vim exec-flume-avro.conf
# Name the components on this agent
a1.sources = r1
a1.sinks = k1
a1.channels = c1

# Describe/configure the source
a1.sources.r1.type = exec
a1.sources.r1.command = tail -F /tmp/a.log
a1.sources.r1.shell = /bin/bash -c

# Describe the sink
a1.sinks.k1.type = avro
a1.sinks.k1.hostname = node4
a1.sinks.k1.port = 4141

# Describe the channel
a1.channels.c1.type = memory
a1.channels.c1.capacity = 1000
a1.channels.c1.transactionCapacity = 100

# Bind the source and sink to the channel
a1.sources.r1.channels = c1
a1.sinks.k1.channel = c1
5.在node1的/jobs/t5下创建netcat-flume-avro.conf文件
- vim netcat-flume-avro.conf
# Name the components on this agent
a2.sources = r1
a2.sinks = k1
a2.channels = c1

# Describe/configure the source
a2.sources.r1.type = netcat
a2.sources.r1.bind = localhost
a2.sources.r1.port = 44444

# Describe the sink
a2.sinks.k1.type = avro
a2.sinks.k1.hostname = node4
a2.sinks.k1.port = 4141

# Use a channel which buffers events in memory
a2.channels.c1.type = memory
a2.channels.c1.capacity = 1000
a2.channels.c1.transactionCapacity = 100

# Bind the source and sink to the channel
a2.sources.r1.channels = c1
a2.sinks.k1.channel = c1
6.在node4的/jobs/t5下创建avro-flume-logger.conf文件
- vim avro-flume-logger.conf
# Name the components on this agent
a3.sources = r1
a3.sinks = k1
a3.channels = c1

# Describe/configure the source
a3.sources.r1.type = avro
a3.sources.r1.bind = node4
a3.sources.r1.port = 4141

# Describe the sink
a3.sinks.k1.type = logger

# Describe the channel
a3.channels.c1.type = memory
a3.channels.c1.capacity = 1000
a3.channels.c1.transactionCapacity = 100

# Bind the source and sink to the channel
a3.sources.r1.channels = c1
a3.sinks.k1.channel = c1
7.启动顺序flume321
- bin/flume-ng agent --conf conf --conf-file jobs/t5/avro-flume-logger.conf --name a3 -Dflume.root.logger==INFO,console
- bin/flume-ng agent --conf conf --conf-file jobs/t5/netcat-flume-avro.conf --name a2 -Dflume.root.logger==INFO,console
- bin/flume-ng agent --conf conf --conf-file jobs/t5/exec-flume-avro.conf --name a1 -Dflume.root.logger==INFO,console
8.telnet向node1发送消失
- telnet localhost 44444

9.a.log输入内容


边栏推荐
- 2022年深圳市福田区支持先进制造业发展若干措施
- Arm comprehensive computing solution redefines visual experience and powerfully enables mobile games
- 关于印发宝安区重点产业项目和总部项目遴选及用地保障实施细则(2022修订版)的通知
- AI scene Storage Optimization: yunzhisheng supercomputing platform storage practice based on juicefs
- With these four security testing tools, software security testing can be said so easy!
- Automatically obtain local connection and network address modification
- 7.取消与关闭
- 14,04 millions! Appel d'offres pour la mise à niveau de la base de données relationnelle et du système logiciel Middleware du Département des ressources humaines et sociales de la province du Sichuan!
- shell bash脚本注意:单行末尾转义符 \ 后千万不能有其他无关字符(多行命令)
- 数据基础设施升级窗口下,AI 新引擎的技术方法论
猜你喜欢

做白银k线图有多重要?

As the "only" privacy computing provider, insight technology is the "first" to settle in the Yangtze River Delta data element circulation service platform

How to install and use computer SSD hard disk
云服务器的安全设置常识

Where is the win11 installation permission set? Win11 installation permission setting method

Win11系统小组件打不开?Win11系统小组件无法打开解决方法

Flutter calls Baidu map app to realize location search and route planning
There is no small green triangle on the method in idea
雲服務器的安全設置常識

There are more than 20 databases in a MySQL with 3306 ports. How can I backup more than 20 databases with one click and do system backup to prevent data from being deleted by mistake?
随机推荐
Kdd 2022 | prise en compte de l'alignement et de l'uniformité des représentations dans le Filtrage collaboratif
童年经典蓝精灵之百变蓝爸爸数字藏品中奖名单公布
QC协议+华为FCP+三星AFC快充取电5V9V芯片FS2601应用
【摸鱼神器】UI库秒变低代码工具——表单篇(一)设计
测试方法学习
关于印发宝安区重点产业项目和总部项目遴选及用地保障实施细则(2022修订版)的通知
npm ERR! fatal: early EOF npm ERR! fatal: index-pack failed
Shell bash script note: there must be no other irrelevant characters after the escape character \ at the end of a single line (multi line command)
shell bash脚本注意:单行末尾转义符 \ 后千万不能有其他无关字符(多行命令)
数据基础设施升级窗口下,AI 新引擎的技术方法论
In 2022, the financial interest rate has dropped, so how to choose financial products?
How is the combination of convolution and transformer optimal?
NLP - giza++ implements word alignment
Sword finger offer 59 - I. maximum value of sliding window
The list of winners in the classic Smurfs of childhood: bluedad's digital collection was announced
The era of data security solutions
有了这4个安全测试工具,对软件安全测试say so easy!
Mba-day19 if P then q contradictory relation P and not Q
[proteus simulation] matrix keyboard interrupt scanning
What if the win11 policy service is disabled? Solution to disabling win11 policy service