当前位置:网站首页>Harbor high availability cluster design and deployment (practice + video), based on offline installation
Harbor high availability cluster design and deployment (practice + video), based on offline installation
2022-06-21 20:33:00 【51CTO】

【 Abstract 】 Based on offline installation Harbor High availability cluster deployment scheme , From theory to practice , file + The way of video combination is comprehensive 、 Explain the deployment process in detail .
1. Environmental statement
1.1 Architecture diagram

1.2 Host list
IP Address | Host name | describe |
192.168.2.107 | harbor1 | Harbor example 1,8021 port |
192.168.2.108 | harbor2 | Harbor example 2,8021 port |
192.168.2.110 | harbor-data | Deploy Harbor Shared storage of instances 、 External database 、 External cache service |
192.168.2.111 | / | Load balancing VIP,8121 port |
1.3 Cluster topology

1.4 Service version
The version requirements of relevant services are shown in table :
service | Version for | Installed version |
Harbor | / | 2.3.5 |
Docker | 17.06.0+ | 19.03.8 |
Docker-compose | 1.18.0+ | v2.2.3 |
Redis | 6.0.16 | 6.2.7 |
PostgreSQL | v13.2+ | 13.5 |
2. Host initialization
Harbor The instance host is initialized
- install docker
- install docker-compose
- Configure kernel parameters
2.1 install docker
$ wget
-O /etc/yum.repos.d/docker-ce.repo https://mirrors.aliyun.com/docker-ce/linux/centos/docker-ce.repo
$ yum install
-y docker-ce
$ systemctl enable
--now docker
$ systemctl status docker
$ cat
<<EOF > /etc/docker/daemon.json
{
"registry-mirrors": ["https://xcg41ct3.mirror.aliyuncs.com"],
"exec-opts": ["native.cgroupdriver=systemd"],
"registry-mirrors":
["https://3hjcmqfe.mirror.aliyuncs.com"],
"log-driver": "json-file",
"log-opts": {
"max-size": "500m",
"max-file": "2"
}
}
EOF
$ systemctl daemon-reload
$ systemctl restart docker
- 1.
- 2.
- 3.
- 4.
- 5.
- 6.
- 7.
- 8.
- 9.
- 10.
- 11.
- 12.
- 13.
- 14.
- 15.
- 16.
- 17.
- 18.
- 19.
exec-opts": ["native.cgroupdriver=systemd"], # Driver
registry-mirrors: Image acceleration address , Can be more
max-file: log Maximum quantity to be retained
live-restore: restart docker Do not restart the container , be chiefly used in k8s On
2.2 install docker-compose
install docker-compose 1.18.0 Version above , Installed here v2.2.3 edition .
2.3 Configure kernel parameters
3. Use NFS Provide external storage
stay 192.168.2.110 Deploy NFS The service provides shared storage to Harbor1 example 、Harbor2 Case use .
192.168.2.110 As NFS Server side ,harbor The instance is the client .
3.1 Deploy NFS Server side
1) Install and start nfs
Be careful : Forwarding request to “systemctl enable nfs.service”.
2) Create shared directory
The data of the client will be stored in the shared directory remotely .
3) Modify the configuration

4) restart nfs service
5) Check shared directory information
3.2 Deploy client
stay harbor1 and harbor2 On the operation
3.3 Client mount NFS Shared memory
stay harbor1 and harbor2 Node operation , Create the instance storage directory , Then mount the track NFS.
Mount format :NFSIP: share directory Local directory nfs defaults 0 0
Test whether it can be used normally :
       [[email protected] ~]

       # touch


/data/harbor_data/test.txt


[[email protected] ~]

       # ls /data/harbor_data/


test.txt
- 1.
- 2.
- 3.
- 4.
4. Deploy Redis Caching services ( Source code )

stay 192.168.2.110 Deploy Redis Caching services , by harbor1 and harbor2 Instance provides external redis Caching services .
Redis It's a high-performance key/value Distributed memory database .
4.1 Download installation package
4.2 Install dependency packages
4.3 Source code compilation
       [[email protected] ~]

       mkdir

       -p /app/


[[email protected] ~] tar zxvf  redis-6.2.7.tar.gz

       -C /app


[[email protected] ~]

       cd /app/redis-6.2.7/


[[email protected] redis-6.2.7]

       # make # compile


[[email protected] redis-6.2.7]

       # make install # install
- 1.
- 2.
- 3.
- 4.
- 5.
4.4 Modify the configuration file
redis By default, only local use is supported , This part needs to be modified to be externally connectable ;
redis Starting mode ;
redis Remote connection password ;
       [[email protected] ~]

       # vim /app/redis-6.2.7/redis.conf


       #bind 127.0.0.1 -::1 #75 That's ok , Comment out bind The line of , Allow any host connection ;


daemonize

       yes

       #259 That's ok , take no It is amended as follows yes, send redis You can use daemon mode to start ;


requirepass lidabai666

       #903 That's ok , Set up redis Connected auth password (lidabai666)
- 1.
- 2.
- 3.
- 4.
4.5 start-up Redis service
The above configuration uses the daemon mode to start , So use it directly systemctl You can start redis service .
       [[email protected] redis-6.2.7]

       # pwd


/app/redis-6.2.7


[[email protected] redis-6.2.7]

       # redis-server redis.conf
- 1.
- 2.
- 3.
4.6 see Redis Service version
4.7 Check the port
redis Default listening 6379 port
       [[email protected] redis-6.2.7]

       # ps aux | grep 6379


root

       6200

       0.1

       0.2

       162416

       10020 ?       Ssl

       17:59

       0:00 redis-server *:6379


root

       6231

       0.0

       0.0

       112720

       984 pts/0    R

       +

       18:01

       0:00

       grep

       --color

       =auto

       6379
- 1.
- 2.
- 3.
4.8 Client connection Redis
harbor1 and harbor2 As redis client
Client side usage redis-cli Tool connection Redis The server
       [[email protected] redis-6.2.7]

       # which redis-cli # see redis-cli Tool location


/usr/local/bin/redis-cli


[[email protected] redis-6.2.7]

       # scp /usr/local/bin/redis-cli 192.168.2.107:/usr/local/bin/


[[email protected] redis-6.2.7]

       # scp /usr/local/bin/redis-cli 192.168.2.108:/usr/local/bin/


[[email protected] ~]

       # redis-cli -h 192.168.2.110 -p 6379 -a lidabai666
- 1.
- 2.
- 3.
- 4.
- 5.
-a Parameter assignment redis Connect the password
5. Deploy PostgreSQL External database services ( Source code )
stay 192.168.2.110 The host is installed in the form of source code PostgreSQL Database services , by harbor1 and harbor2 Instance provides shared storage .
5.1 newly build postgres user
Default superuser (root) Cannot start postgresql, Users need to be created manually postgres.
       [[email protected] ~]

       # useradd postgres


[[email protected] ~]

       # id postgres


       uid

       =

       1000(postgres)

       gid

       =

       1000(postgres)  Group

       =

       1000(postgres)
- 1.
- 2.
- 3.
5.2 Install dependency packages
5.3 Download the source code
5.4 Compilation and installation
       [[email protected] ~]

       # cd /app/postgresql-13.5/


[[email protected] postgresql-13.5]

       # ./configure --prefix=/usr/local/postgresql


[[email protected] postgresql-13.5]

       # make && make install
- 1.
- 2.
- 3.
5.5 Create a data directory
5.6 Set up postgres environment variable
       [[email protected] postgresql-13.5]

       # su - postgres


[[email protected] ~]

       $ vim

       + .bash_profile


       PGHOME

       =/usr/local/postgresql

       #psql The installation directory


       export PGHOME


       PGDATA

       =/data/postgresql/data

       # Database directory


       export PGDATA


       PATH

       =

       $PATH:

       $HOME/bin:

       $HOME/.local/bin:

       $PGHOME/bin


       export PATH


[[email protected] ~]

       $ source ./.bash_profile


[[email protected] ~]

       $ which psql


/usr/local/postgresql/bin/psql
- 1.
- 2.
- 3.
- 4.
- 5.
- 6.
- 7.
- 8.
- 9.
- 10.
- 11.
- View version
5.7 Initialize database
because Red Hat Policy for series releases ,PostgreSQL The installation does not enable automatic startup or automatic initialization of the database . To complete the database installation , You need to perform the following steps according to your distribution :
       [[email protected] ~]

       $ initdb


......


You can change this by editing pg_hba.conf or


using the option

       -A, or


       --auth

       -local and

       --auth

       -host, the next time


you run initdb.


Success. You can now

       start the database


server using:

       # Indicates successful initialization


pg_ctl

       -D /data/postgresql/data

       -l logfile

       start
- 1.
- 2.
- 3.
- 4.
- 5.
- 6.
- 7.
- 8.
- 9.
- 10.
5.8 start-up PostgreSQL
Execute the startup command according to the prompt after successful initialization !
       [[email protected] ~]

       $ pg_ctl

       -D /data/postgresql/data


       -l logfile

       start


waiting

       for server to

       start....

       done


server started
- 1.
- 2.
- 3.
- 4.
5.9 Set up ( modify )Postgresql password
Default psql Local login does not require a password , Even if we set the password , You don't need a password to log in . Expected profile pg_hba.conf Medium local Set to trust , For the sake of safety, we modify it to password, Is to use a password to log in ,( When we forget the password , You can also use this way , Set to trust after , Change Password , Then set to password.
       [[email protected] ~]

       $ psql


psql (13.5)


Type

       "help"

       for help.


       postgres

       =

       # \password


Enter new password:

       # Enter the set password  Lidabai666


Enter it again:

       # Confirm the password ( Input again )


       postgres

       =

       # \q # sign out
- 1.
- 2.
- 3.
- 4.
- 5.
- 6.
- 7.
- 8.

5.10 Set remote login PostgreSQL
       [[email protected] ~]

       $ vim /data/postgresql/data/postgresql.conf


listen_addresses

       =

       '*'

       #60 That's ok , Listen to all addresses


[[email protected] ~]

       $ vim

       +


/data/postgresql/data/pg_hba.conf


local


all             all                                 password


host


all             all

       0.0.0.0/0            password


host


all             all             ::1/128             password
- 1.
- 2.
- 3.
- 4.
- 5.
- 6.
- 7.
- 8.
- 9.
- 10.

5.10 restart PostgreSQL

5.11 Create database
Harbor 2.3.5 The database you need to create :notaryserver、notarysigner、registry at present Harbor Support only PostgraSQL database , It needs to be manually on the outside PostgreSQL To create a harbor、notary_signer、notary_servers Three databases ,Harbor When starting, the table will be automatically generated under the corresponding database .
Because this place is mainly a demonstration environment ,PostgreSQL Database users are super Administrators - postgres For example , If it's a production environment , It is recommended to create a new user , And conferred harbor、notary_signer、notary_servers The corresponding permissions of the three databases .
       [[email protected] ~]

       $ psql


Password

       for user postgres:

       # Input password


       postgres

       =

       # create database registry;


CREATE DATABASE


       postgres

       =

       # create database notary_signer;


CREATE DATABASE


       postgres

       =

       # create database notary_servers;


CREATE DATABASE


       postgres

       =

       # \l
- 1.
- 2.
- 3.
- 4.
- 5.
- 6.
- 7.
- 8.
- 9.
- 10.

5.12 Create user
establish server Users and signer user

5.13 Client test link
6. Load balancing settings (Nginx +Keepalived)
Use keepalived and Nginx Realization harbor High availability .
stay harbor1 and harbor2 Install on node keepalived Services to provide VIP Load balancing .Nginx Service realization will come VIP Forward your request to the back-end server group harbor
6.1 install nginx and keepalived
stay harbor1 and harbor2 operation
nginx from 1.9.0 Start adding steam modular , It is used to realize the forwarding of layer 4 protocol 、 agent 、 Load balancing, etc. .
Binary installed nginx It's in ./configure add --with-stream Parameters to install stream modular .
6.2 modify nginx The configuration file
stay harbor1 and harbor2 Of Nginx The same as the service configuration file .
       $ vim /etc/nginx/nginx.conf


user nginx;


worker_processes auto;

       # Automatic setting nginx Number of work processes for


error_log /var/log/nginx/error.log;


pid /run/nginx.pid;


include /usr/share/nginx/modules/*.conf;


events {


   worker_connections

       1024;

       # Number of connections for worker process


}


       #  Four layer load balancing , For two harbor Provide load balancing


stream {


   log_format  main

       '$remote_addr $upstream_addr - [$time_local]


       $status $upstream_bytes_sent';


   access_log  /var/log/nginx/harbor-access.log  main;


   upstream harbor{


     server

       192.168.2.107:8021;

       # harbor1


     server

       192.168.2.108:8021;

       # harbor2


    }


   server {


     listen

       8121;

       # because nginx And harbor Node reuse , This listening port cannot be 8021, Otherwise it will conflict


     proxy_pass harbor;


     }


}


http {


   log_format  main

       '$remote_addr - $remote_user [$time_local] "$request" '


       '$status $body_bytes_sent "$http_referer" '


       '"$http_user_agent" "$http_x_forwarded_for"';


   access_log /var/log/nginx/access.log  main;


   sendfile            on;


   tcp_nopush          on;


   tcp_nodelay         on;


   keepalive_timeout

       65;


   types_hash_max_size

       2048;


   include            /etc/nginx/mime.types;


   default_type       application/octet-stream;


   server {


      listen

       80 default_server;


      server_name  _;


      location / {


       }


    }


}
- 1.
- 2.
- 3.
- 4.
- 5.
- 6.
- 7.
- 8.
- 9.
- 10.
- 11.
- 12.
- 13.
- 14.
- 15.
- 16.
- 17.
- 18.
- 19.
- 20.
- 21.
- 22.
- 23.
- 24.
- 25.
- 26.
- 27.
- 28.
- 29.
- 30.
- 31.
- 32.
- 33.
- 34.
- 35.
- 36.
- 37.
- 38.
- 39.
- 40.
- 41.
- 42.
- 43.
- 44.
- 45.
- testing nginx Profile syntax
6.3 modify keepalived To configure
This department harbor1 by keepalived The master node of the service ,harbor2 by keepalived Standby node of . The number of active and standby nodes keepalived The configuration files are different .
Master node (harbor1)
       [[email protected] ~]

       # cat /etc/keepalived/keepalived.conf


! Configuration File

       for keepalived


global_defs {


   notification_email {


       859281177@qq.com


   }


   router_id master1


}


vrrp_instance lidabai {


    state MASTER


    interface ens33


    mcast_src_ip:192.168.2.107


    virtual_router_id

       107


    priority

       100


    advert_int

       1


    nopreempt


    authentication {


      auth_type PASS


      auth_pass

       1111


    }


    virtual_ipaddress {


       192.168.2.111/24

       # fictitious VIP Address


    }


    track_script {


       chk_nginx


    }


}


       #####  health examination


vrrp_script chk_nginx {


   script

       "/etc/keepalived/check_nginx.sh"


   interval

       2


   weight

       -20


}
- 1.
- 2.
- 3.
- 4.
- 5.
- 6.
- 7.
- 8.
- 9.
- 10.
- 11.
- 12.
- 13.
- 14.
- 15.
- 16.
- 17.
- 18.
- 19.
- 20.
- 21.
- 22.
- 23.
- 24.
- 25.
- 26.
- 27.
- 28.
- 29.
- 30.
- 31.
- 32.
- 33.
- 34.
- 35.
For the node (harbor2)
       [[email protected] ~]

       # cat /etc/keepalived/keepalived.conf


! Configuration File

       for keepalived


global_defs {


    notification_email {


       859281177@qq.com


    }


    router_id master2


}


vrrp_instance lidabai {


    state BACKUP


    interface ens33


    mcast_src_ip:192.168.2.108


    virtual_router_id

       107


    priority

       80

       # The weight


    advert_int

       1


    nopreempt


    authentication {


      auth_type PASS


      auth_pass

       1111


    }


    virtual_ipaddress {


       192.168.2.111/24


    }


    track_script {


       chk_nginx


    }


}


vrrp_script chk_nginx {


    script

       "/etc/keepalived/check_nginx.sh"


    interval

       2


    weight

       -20


}
- 1.
- 2.
- 3.
- 4.
- 5.
- 6.
- 7.
- 8.
- 9.
- 10.
- 11.
- 12.
- 13.
- 14.
- 15.
- 16.
- 17.
- 18.
- 19.
- 20.
- 21.
- 22.
- 23.
- 24.
- 25.
- 26.
- 27.
- 28.
- 29.
- 30.
- 31.
- 32.
- 33.
- 34.
6.4 Write a health check script
At the primary and standby nodes (harbor1 and harbor2) Same operation .
$ vim /etc/keepalived/check_nginx.sh
#1、 Judge Nginx Survival
counter
=
`ps -C nginx --no-header | wc -l`
if [
$counter
-eq
0 ];
then
#2、 If it doesn't survive, try to start Nginx
service nginx
start
sleep
2
#3、 wait for 2 Get it again in seconds Nginx state
counter
=
`ps -C nginx --no-header | wc -l`
#4、 Judge again , Such as Nginx If you don't survive, stop Keepalived, Let the address drift
if [
$counter
-eq
0 ];
then
service keepalived
stop
fi
fi
$ chmod
+x /etc/keepalived/check_nginx.sh
- 1.
- 2.
- 3.
- 4.
- 5.
- 6.
- 7.
- 8.
- 9.
- 10.
- 11.
- 12.
- 13.
- 14.
- 15.
- 16.
6.5 Start the service
Start... First master1 and master2 nodes nginx service , Restart keepalived service
1) start-up nginx service
       [[email protected] ~]

       # systemctl enable --now nginx # start-up nginx Service and set to start automatically


[[email protected] ~]

       # systemctl enable --now nginx


[[email protected] ~]

       # systemctl status nginx.service


[[email protected] ~]

       # systemctl status nginx.service
- 1.
- 2.
- 3.
- 4.
2) start-up keepalived service
       [[email protected] ~]

       # systemctl enable --now keepalived


[[email protected] ~]

       # systemctl enable --now keepalived


[[email protected] ~]

       # systemctl status keepalived.service


[[email protected] ~]

       # systemctl status keepalived.service
- 1.
- 2.
- 3.
- 4.
6.6 see VIP
stay harbor1 Node view VIP Is the binding successful .
       [[email protected] ~]

       # ip addr


......


       2: ens33:


<BROADCAST,MULTICAST,UP,LOWER_UP> mtu

       1500 qdisc pfifo_fast state UP


group default qlen

       1000


link/ether

       00:0c:29:f1:a3:65 brd ff:ff:ff:ff:ff:ff


inet

       192.168.2.107/24 brd

       192.168.2.255 scope global


noprefixroute ens33


valid_lft forever preferred_lft forever


inet

       192.168.2.111/24 scope global secondary ens33

       #VIP Address


valid_lft forever preferred_lft forever


inet6 fe80::80b0:1d7f:b5d4:19e8/64 scope link tentative dadfailed


......
- 1.
- 2.
- 3.
- 4.
- 5.
- 6.
- 7.
- 8.
- 9.
- 10.
- 11.
- 12.
- 13.
adopt ifconfig I can't see VIP Of , adopt `hostname -I` Command can also view VIP.
7. Deploy Harbor example 1
stay harbor1 192.168.2.107 Deployment on host harbor service
7.1 Download and extract the offline installation package
7.2 Modify the configuration file
Copy the profile template as a profile , Then modify the corresponding parameters .
[[email protected] ~]
# cd /app/harbor/
[[email protected] harbor]
# cp
harbor.yml.tmpl harbor.yml
[[email protected] harbor]
# vim harbor.yml
hostname:
192.168.2.107
http:
port:
8021
# Cancel https Secure encrypted access :
#https:
# port: 443
# certificate: /your/certificate/path
# private_key: /your/private/key/path
## Enable external proxy , When enabled hostname Will no longer use
external_url: http:192.168.2.111:8121
## Configure shared storage , Mounted NFS Catalog
data_volume: /data/harbor_data
_version:
2.3.0
## Configure external database
external_database:
harbor:
host:
192.168.2.110
# Database host address
port:
5432
# Database port
db_name: registry
# Database name
username: postgres
# User name to connect to the database
password: Lidabai666
# Password to connect to the database
ssl_mode: disable
max_idle_conns:
2
max_open_conns:
0
notary_signer:
host:
192.168.2.110
port:
5432
db_name: notary_signer
username: postgres
password: Lidabai666
ssl_mode: disable
notary_server:
host:
192.168.2.110
port:
5432
db_name: notary_server
username: postgres
password: Lidabai666
ssl_mode: disable
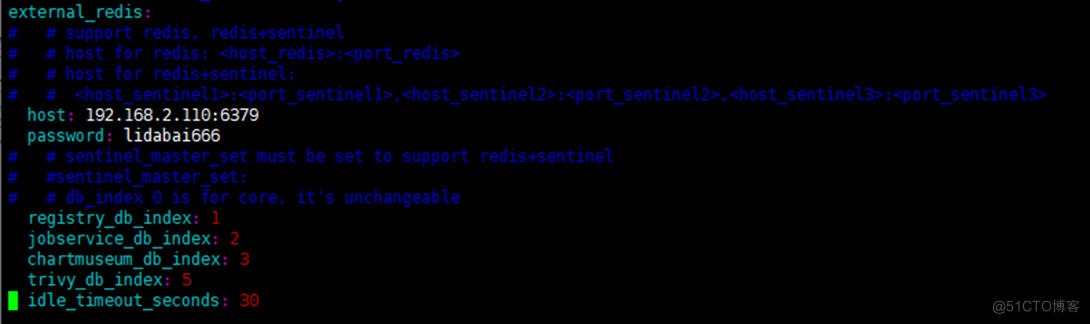
## Configure external Redis example :
external_redis:
host:
192.168.2.110:6379
#redis service IP Address and port number . If redis It's sentinel mode ,
# This is supposed to be host_sentinel1:port_sentinel1,host_sentinel2:port_sentinel2
password: lidabai666
# Connect external redis Password for the service
# sentinel_master_set: # Use only Sentinel Pattern ( Sentinel mode ) When using
registry_db_index:
1
jobservice_db_index:
2
#job Database index of the service
chartmuseum_db_index:3
#chartmuseum The plug-in Redis Indexes
trivy_db_index:
5
#Trivy Scanner data index
idle_timeout_seconds:
30
# Timeout time
# Enable metrics Data acquisition plug-in :
metric:
enabled:
true
port:
9090
path: /metrics
- 1.
- 2.
- 3.
- 4.
- 5.
- 6.
- 7.
- 8.
- 9.
- 10.
- 11.
- 12.
- 13.
- 14.
- 15.
- 16.
- 17.
- 18.
- 19.
- 20.
- 21.
- 22.
- 23.
- 24.
- 25.
- 26.
- 27.
- 28.
- 29.
- 30.
- 31.
- 32.
- 33.
- 34.
- 35.
- 36.
- 37.
- 38.
- 39.
- 40.
- 41.
- 42.
- 43.
- 44.
- 45.
- 46.
- 47.
- 48.
- 49.
- 50.
- 51.
- 52.
- 53.
- 54.
- 55.
- 56.
- 57.
- 58.
- 59.
- 60.
- 61.
- 62.
- 63.

7.3 Inject the configuration file into the component
take harbor.yml The contents of the configuration file are injected into the configuration file of each component .
7.4 install Harbor
The image will be automatically imported during installation , The execution will start automatically Harbor service .


----Harbor has been
installed and started successfully.---- Indicates successful installation !
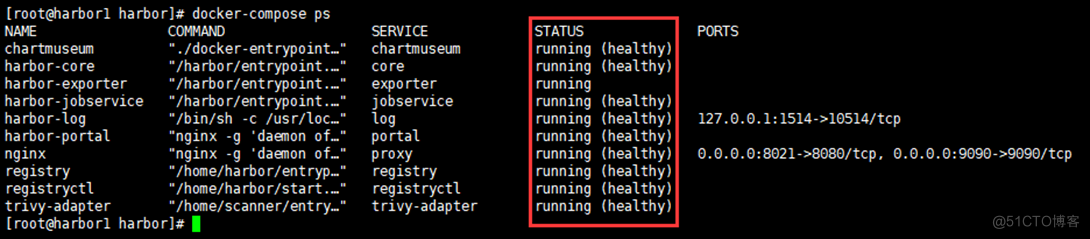
7.5 View service status
7.6 Browser login Harbor UI
Use instance host IP+ The port is accessed in the browser harbor UI
http://192.168.2.107:8021

user name :admin
password : Harbor12345
8. Deploy Harbor example 2
Operation steps and deployment Harbor example 1 Agreement
[[email protected] harbor]
# mkdir /app
[[email protected] harbor]
# wget https://github.com/goharbor/harbor/releases/download/v2.3.5/harbor-offline-installer-v2.3.5.tgz
[[email protected] harbor]
# tar zxvf harbor-offline-installer-v2.3.5.tgz -C /app/
[[email protected] harbor]
# scp 192.168.2.107:/app/harbor/harbor.yml /app/harbor/
[[email protected] harbor]
# vim /app/harbor/harbor.yml’
hostname:
192.168.2.108
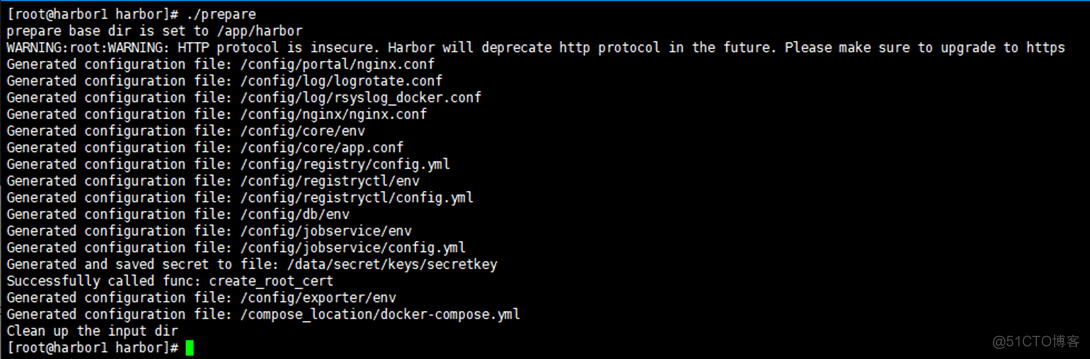
       [[email protected] harbor]

       # ./prepare
       [[email protected] harbor]

       # ./install.sh --with-trivy --with-chartmuseum
       [[email protected] harbor]

       # docker-compose ps
- 1.
- 2.
- 3.
- 4.
- 5.
- 6.
- 7.
- 8.
- 9.

9. Service validation
9.1 Browser access VIP And port
http://192.168.2.111:8121
stay Harbor UI Interface test image push 、 Pull 、 Create user 、 Whether it is normal to create a project

9.2 Command line login Harbor
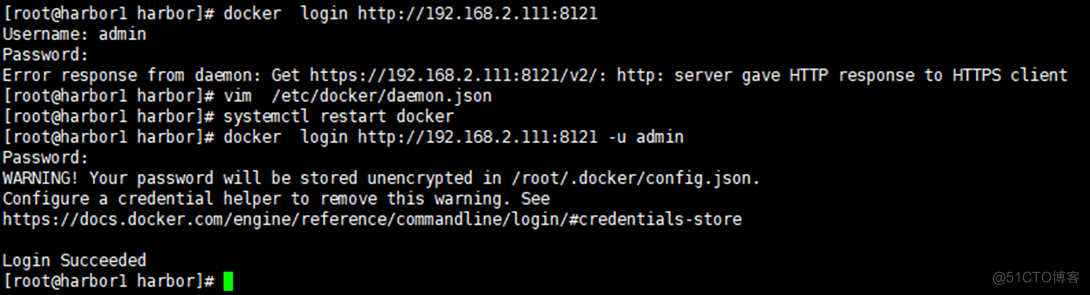
There is an error :
Error response from daemon: Get https://192.168.2.111:8121/v2/: http: server gave HTTP response to HTTPS client
stay docker Add parameters to the configuration file :
       [[email protected] harbor]

       # vim /etc/docker/daemon.json


{


       "registry-mirrors": [

       "https://xcg41ct3.mirror.aliyuncs.com"],


       "exec-opts": [

       "native.cgroupdriver=systemd"],


       "registry-mirrors": [

       "https://3hjcmqfe.mirror.aliyuncs.com"],


       "insecure-registries": [

       "192.168.2.111:8121"],


       "log-driver":

       "json-file",


       "log-opts": {


       "max-size":

       "500m",


       "max-file":

       "2"


        }


}


[[email protected] harbor]

       # systemctl restart docker # And then restart docker
- 1.
- 2.
- 3.
- 4.
- 5.
- 6.
- 7.
- 8.
- 9.
- 10.
- 11.
- 12.
- 13.
9.3 towards Harbor Push the mirror
       [[email protected] harbor]

       # docker pull alpine:3.16


[[email protected] harbor]

       # docker tag alpine:3.16 192.168.2.111:8121/lidabai/alpine:3.16


[[email protected] harbor]

       # docker push 192.168.2.111:8121/lidabai/alpine:3.16
- 1.
- 2.
- 3.
Then you can go to Harbor UI The interface shows that the image has been pushed successfully !

10、 Video part
because 51 No videos uploaded , video and file All on wechat official account 《Harbor The advanced combat 》 了

边栏推荐
- Is there any difference between MySQL and Oracle
- Assembly language greedy snake and Tetris dual task design implementation details (III) -- Tetris detailed design
- 机器学习和模式识别怎么区分?
- I remember that procedure cannot be written in maxcomputer. If you want to use Oracle procedure
- SQL教程之数据科学家需要掌握的五种 SQL 技能
- 深度学习图像数据增强
- EasyCVR智能边缘网关硬件如何设置通电自启动?
- National certification -- examination requirements for software evaluators
- What statements are added to MySQL
- Details, MySQL_ DATE_ FORMAT()_ Functions_ Detailed explanation (remember to collect)
猜你喜欢

Points cloud to Depth maps: conversion, Save, Visualization

Inno setup change installation path learning

Assembly language greedy snake and Tetris dual task design implementation details (III) -- Tetris detailed design

京东39岁“毕业生”被裁一周就找到新工作,涨薪20%!

Snake game project full version

Implementation of assembly language greedy snake and Tetris dual task design (II) -- detailed design of greedy snake

RPA financial process automation | Shanghai Pudong Development Group and cloud expansion technology accelerate financial digital operation

Zabbix6.0+timescaledb+ enterprise wechat alarm

Big Fish eating Little Fish Games version complète

自然语言处理如何实现聊天机器人?
随机推荐
Redis 做缓存场景引发的问题
Linear model and decision tree of machine learning
通过flinksql 的方式使其部分字段更新可以么?
国标设备注册EasyCVR平台,如何修改设备在离线状态判断的时间?
[wechat applet failed to change appid] wechat applet failed to modify appid all the time and reported an error. Tourist appid solution
Daily development of common tools to improve efficiency
1157 Anniversary
Jenkins regularly builds and passes build parameters
mysql如何对列求和
Goldfish rhca memoirs: do447 managing user and team access
Is it safe to open a margin account? What are the requirements?
SD training 6.21 summary
大鱼吃小鱼小游戏完整版
[complete course of time series prediction] take temperature prediction as an example to illustrate the composition of the paper and the construction of pytorch code pipeline
How to use memcached to implement Django project caching
集成公告|Anima协议上线Moonbeam
Is it possible to update some fields through flinksql?
Goldfish rhca memoirs: do447ansible tower navigation
金鱼哥RHCA回忆录:DO447管理用户和团队的访问
SQL教程之6种鲜为人知的 SQL 技术,可帮助您每月节省 100 小时