当前位置:网站首页>【pytorch 修改预训练模型:实测加载预训练模型与模型随机初始化差别不大】
【pytorch 修改预训练模型:实测加载预训练模型与模型随机初始化差别不大】
2022-06-10 03:25:00 【网络星空(luoc)】
1. pytorch 预训练模型
卷积神经网络的训练是耗时的,很多场合不可能每次都从随机初始化参数开始训练网络。pytorch中自带几种常用的深度学习网络预训练模型,如VGG、ResNet等。往往为了加快学习的进度,在训练的初期我们直接加载pre-train模型中预先训练好的参数,model的加载如下所示:
import torchvision.models as models

#resnet
model = models.ResNet(pretrained=True)
model = models.resnet18(pretrained=True)
model = models.resnet34(pretrained=True)
model = models.resnet50(pretrained=True)

#vgg
model = models.VGG(pretrained=True)
model = models.vgg11(pretrained=True)
model = models.vgg16(pretrained=True)
model = models.vgg16_bn(pretrained=True)
2. 修改全连接层类别数目
预训练模型以 resnet50 为例。
model = torchvision.models.resnet50(pretrained=True)
#提取fc层中固定的参数
fc_features = model.fc.in_features
#修改类别为10,重定义最后一层
model.fc = nn.Linear(fc_features ,10)
print(model.fc)
或者直接传入类别个数:
self.resnet = torchvision.models.resnet50(pretrained=False,num_classes=10)
3. 修改某一层卷积
预训练模型以 resnet50 为例。
model = torchvision.models.resnet50(pretrained=True)
# 重定义第一层卷积的输入通道数
model.conv1 = nn.Conv2d(4, 64, kernel_size=7, stride=2, padding=3, bias=False)
4. 修改某几层卷积
4.1 去掉后两层(fc层和pooling层)
预训练模型以 resnet50 为例。
nn.module的model它包含一个叫做children()的函数,这个函数可以用来提取出model每一层的网络结构,在此基础上进行修改即可,修改方法如下(去除后两层):
resnet_50_s = torchvision.models.resnet50(pretrained=False)
resnet_layer = nn.Sequential(*list(resnet_50_s.children())[:-2])
self.resnet = resnet_layer
在去掉预训练resnet模型的后两层(fc层和pooling层)后,新添加一个上采样层、池化层和分类层,构建网络代码如下:
class Net_resnet50_upsample(nn.Module):
     def __init__(self):
         super(Net_resnet50_upsample, self).__init__()
         self.conv = nn.Conv2d(1, 3, kernel_size=1)
         resnet_50_s = torchvision.models.resnet50(pretrained=False)
         resnet_layer = nn.Sequential(*list(resnet_50_s.children())[:-2])
         self.resnet = resnet_layer
         # print(self.resnet)

         self.up7to14=nn.UpsamplingNearest2d(scale_factor=2)
         self.avgpool=nn.AvgPool2d(7,stride=2)
         self.fc = nn.Sequential(
             nn.Linear(2048 * 4 * 4, 1024),
             nn.ReLU(inplace=True),
             nn.Linear(1024, 128),
             nn.ReLU(inplace=True),
             nn.Linear(128, 10))
     def forward(self, x):
         x = self.conv(x)
         x = self.resnet(x)
         x=self.up7to14(x)
         x=self.avgpool(x)
         x = x.view(x.size(0), -1)
         x = self.fc(x)
         return x
4.2 增减多个卷积层
有的时候要修改网络中的层次结构,这时只能用参数覆盖的方法,即自己先定义一个类似的网络,再将预训练中的参数提取到自己的网络中来。这里以resnet预训练模型举例。
# coding=UTF-8
import torchvision.models as models
import torch
import torch.nn as nn
import math
import torch.utils.model_zoo as model_zoo

#Bottleneck是一个class 里面定义了使用1*1的卷积核进行降维跟升维的一个残差块,可以在github resnet pytorch上查看
class Bottleneck(nn.Module):
    expansion = 4

    def __init__(self, inplanes, planes, stride=1, downsample=None):
        super(Bottleneck, self).__init__()
        self.conv1 = nn.Conv2d(inplanes, planes, kernel_size=1, bias=False)
        self.bn1 = nn.BatchNorm2d(planes)
        self.conv2 = nn.Conv2d(planes, planes, kernel_size=3, stride=stride,
                               padding=1, bias=False)
        self.bn2 = nn.BatchNorm2d(planes)
        self.conv3 = nn.Conv2d(planes, planes * 4, kernel_size=1, bias=False)
        self.bn3 = nn.BatchNorm2d(planes * 4)
        self.relu = nn.ReLU(inplace=True)
        self.downsample = downsample
        self.stride = stride

    def forward(self, x):
        residual = x

        out = self.conv1(x)
        out = self.bn1(out)
        out = self.relu(out)

        out = self.conv2(out)
        out = self.bn2(out)
        out = self.relu(out)

        out = self.conv3(out)
        out = self.bn3(out)

        if self.downsample is not None:
            residual = self.downsample(x)

        out += residual
        out = self.relu(out)

        return out

#不做修改的层不能乱取名字,否则预训练的权重参数无法传入
class CNN(nn.Module):
    def __init__(self, block, layers, num_classes=9):
        self.inplanes = 64
        super(CNN, self).__init__()
        self.conv1 = nn.Conv2d(3, 64, kernel_size=7, stride=2, padding=3,
                               bias=False)
        self.bn1 = nn.BatchNorm2d(64)
        self.relu = nn.ReLU(inplace=True)
        self.maxpool = nn.MaxPool2d(kernel_size=3, stride=2, padding=1)
        self.layer1 = self._make_layer(block, 64, layers[0])
        self.layer2 = self._make_layer(block, 128, layers[1], stride=2)
        self.layer3 = self._make_layer(block, 256, layers[2], stride=2)
        self.layer4 = self._make_layer(block, 512, layers[3], stride=2)
        self.avgpool = nn.AdaptiveAvgPool2d(output_size=(1,1))
        # 新增一个反卷积层
        self.convtranspose1 = nn.ConvTranspose2d(2048, 2048, kernel_size=3, stride=1, padding=1, output_padding=0,
                                                 groups=1, bias=False, dilation=1)
        # 新增一个最大池化层
        self.maxpool2 = nn.MaxPool2d(kernel_size=3, stride=1, padding=1)
        # 去掉原来的fc层,新增一个fclass层
        self.fclass = nn.Linear(2048, num_classes)

        for m in self.modules():
            if isinstance(m, nn.Conv2d):
                n = m.kernel_size[0] * m.kernel_size[1] * m.out_channels
                m.weight.data.normal_(0, math.sqrt(2. / n))
            elif isinstance(m, nn.BatchNorm2d):
                m.weight.data.fill_(1)
                m.bias.data.zero_()

    def _make_layer(self, block, planes, blocks, stride=1):
        downsample = None
        if stride != 1 or self.inplanes != planes * block.expansion:
            downsample = nn.Sequential(
                nn.Conv2d(self.inplanes, planes * block.expansion,
                          kernel_size=1, stride=stride, bias=False),
                nn.BatchNorm2d(planes * block.expansion),
            )

        layers = []
        layers.append(block(self.inplanes, planes, stride, downsample))
        self.inplanes = planes * block.expansion
        for i in range(1, blocks):
            layers.append(block(self.inplanes, planes))

        return nn.Sequential(*layers)

    def forward(self, x):
        x = self.conv1(x)
        x = self.bn1(x)
        x = self.relu(x)
        x = self.maxpool(x)

        x = self.layer1(x)
        x = self.layer2(x)
        x = self.layer3(x)
        x = self.layer4(x)

        x = self.avgpool(x)
        # 新加层的forward
        x = x.view(x.size(0), -1)
        x = self.convtranspose1(x)
        x = self.maxpool2(x)
        x = x.view(x.size(0), -1)
        x = self.fclass(x)

        return x

# 加载model
resnet50 = models.resnet50(pretrained=False)
print(resnet50)
cnn = CNN(Bottleneck, [3, 4, 6, 3]) #3 4 6 3 分别表示layer1 2 3 4 中Bottleneck模块的数量。res101则为3 4 23 3
# 读取参数
pretrained_dict = resnet50.state_dict()
model_dict = cnn.state_dict()
# 将pretrained_dict里不属于model_dict的键剔除掉
pretrained_dict = {

    k: v for k, v in pretrained_dict.items() if k in model_dict}
# 更新现有的model_dict
model_dict.update(pretrained_dict)
# 加载我们真正需要的state_dict
cnn.load_state_dict(model_dict)
# print(resnet50)
print(cnn)
结果对比: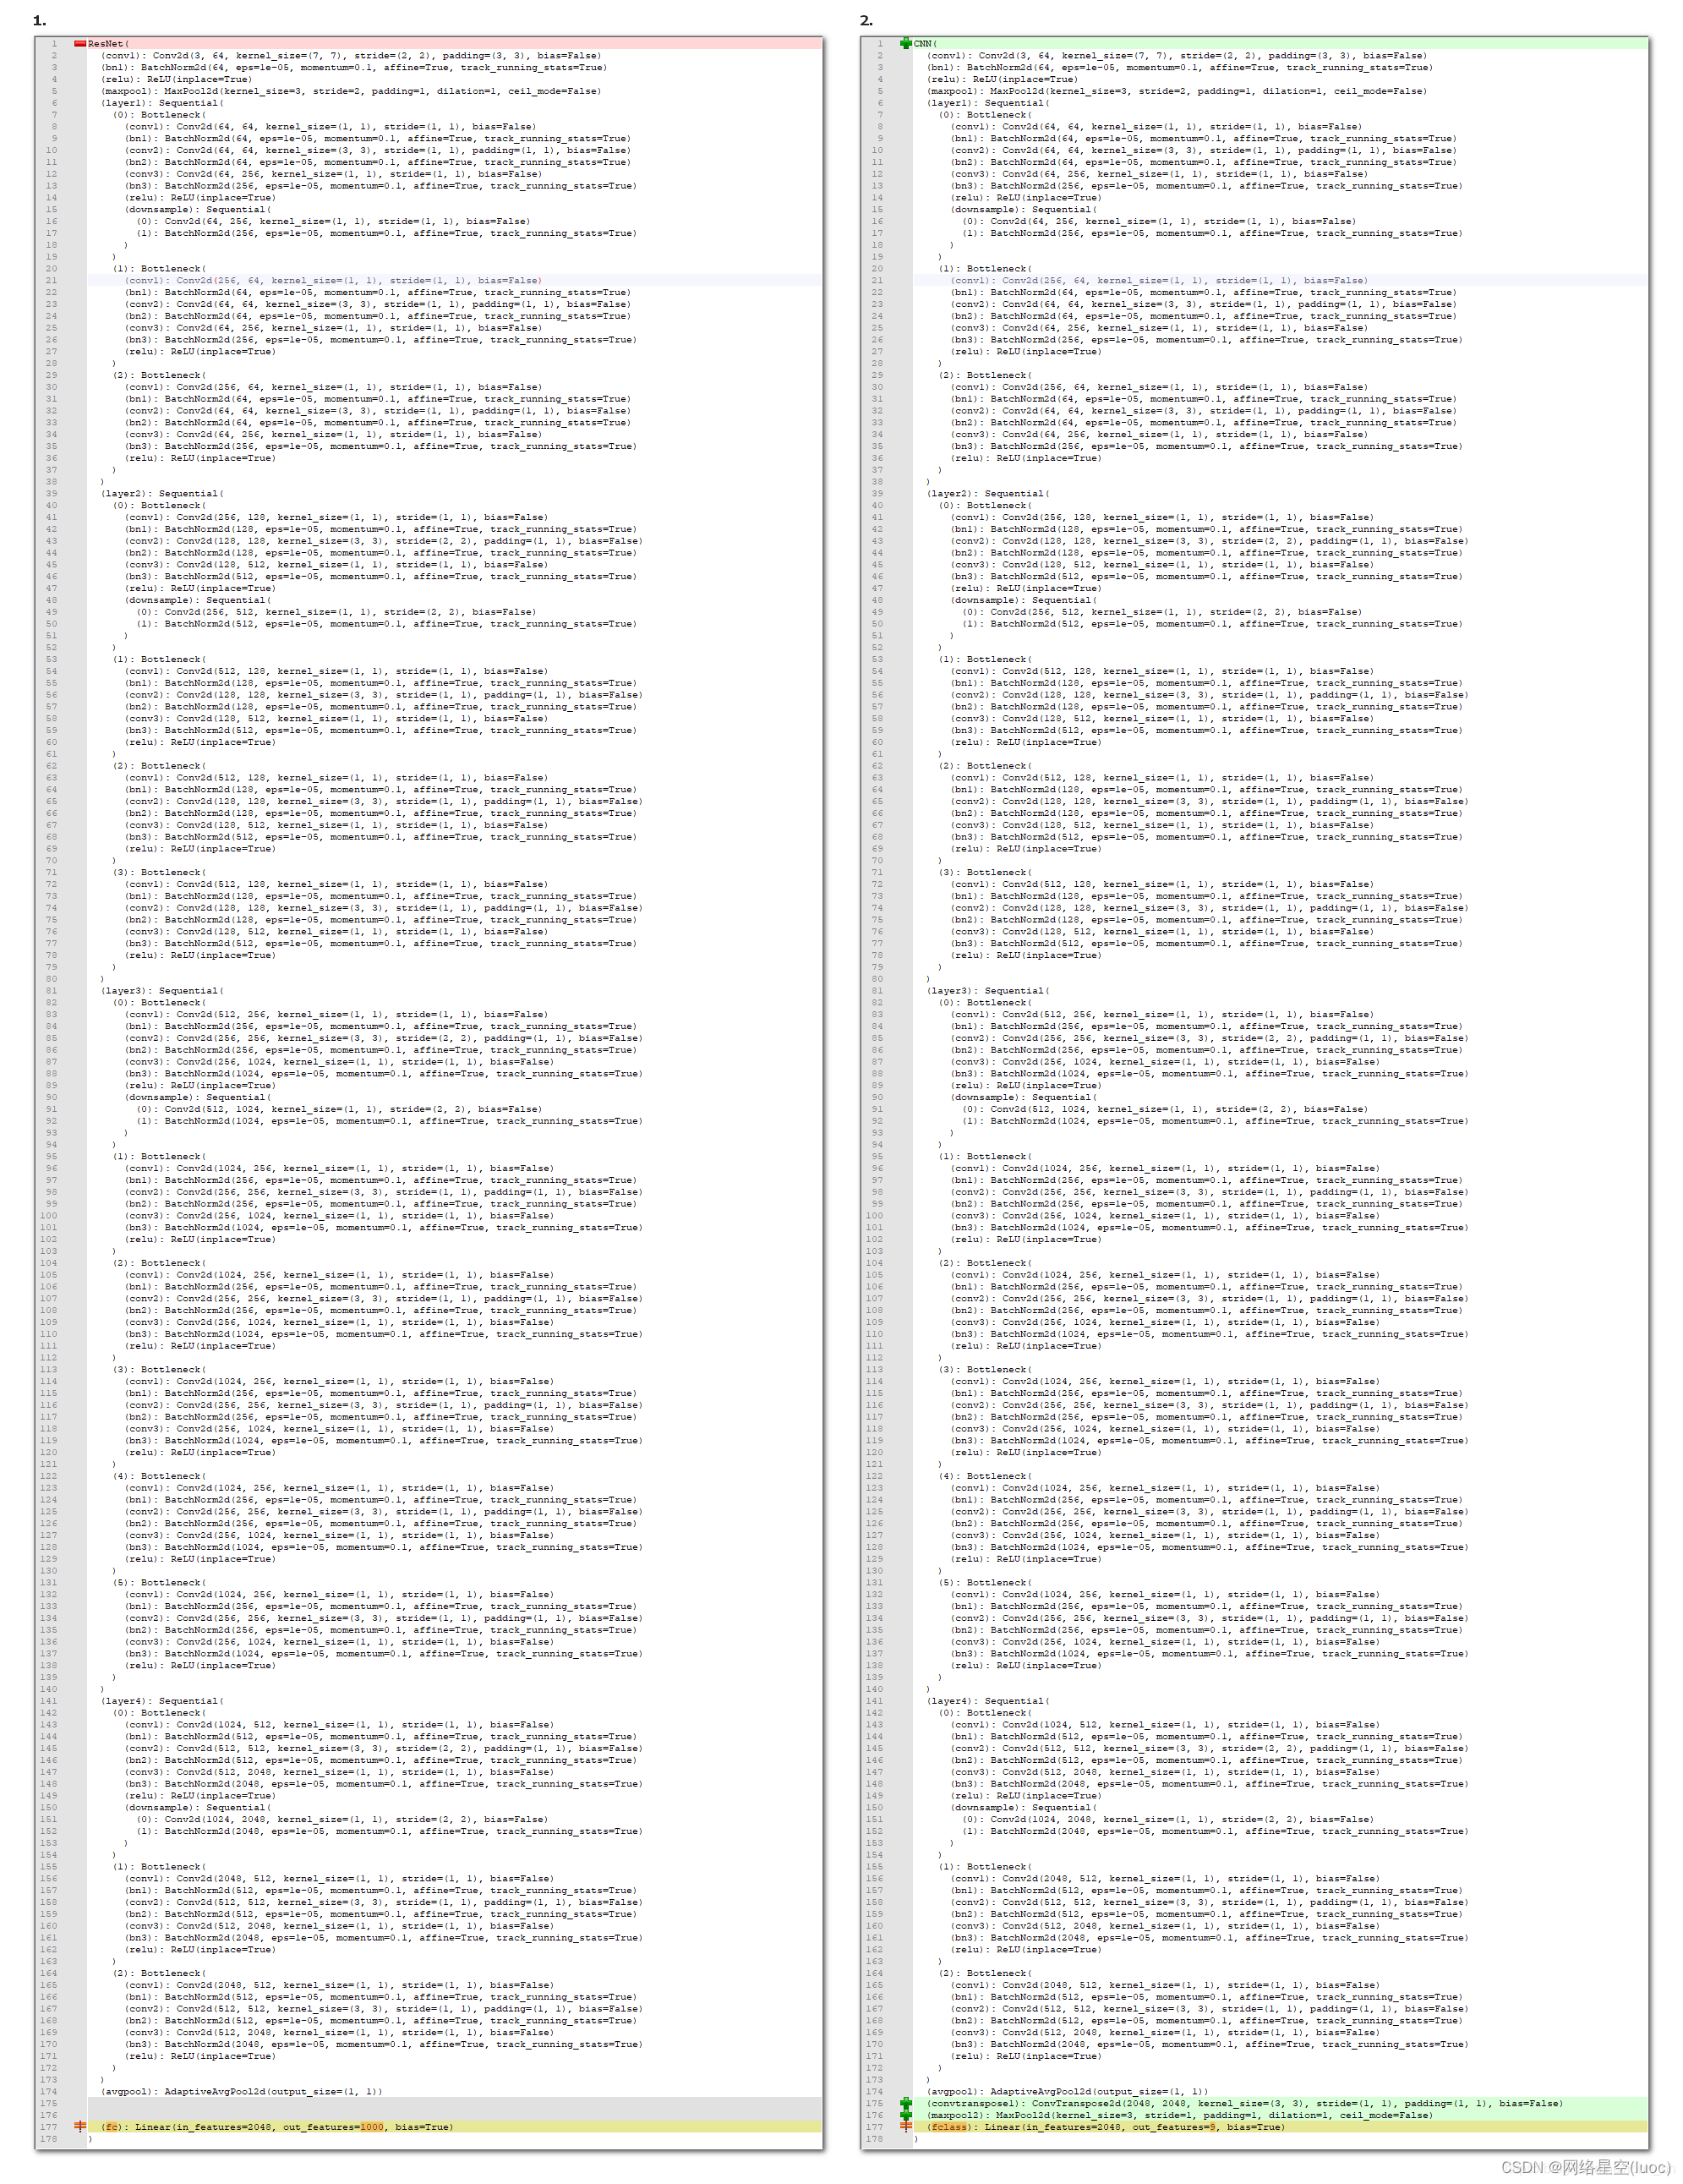
文章知识点与官方知识档案匹配,可进一步学习相关知识
边栏推荐
- Sword finger offer 30 Stack containing min function
- Opencv_100问_第一章 (1-5)
- RPC 实战与核心原理-进阶篇笔记
- IDE problem (I) wechat developer tool cannot be opened
- New function official publicity playfab makes cross platform game architecture so simple
- Halodoc's key experience in building Lakehouse using Apache Hudi
- 剑指 Offer 09. 用两个栈实现队列
- Ptrtostructure error prompt: this structure must not be a value class. Solution
- Storage of signed and unsigned shaping in memory
- 重构手法--Extract Class
猜你喜欢

新号起步狂揽近200万粉,“老年”账号也能成为推广黑马

Redis 核心技术与实战-实践篇读书笔记 20~终结

Easyexcel realizes dynamic import and export

Idea start multiple services with the same set of code

IDE problem (I) wechat developer tool cannot be opened

答辩前电脑坏了......

新功能官宣丨PlayFab让跨平台游戏架构如此简单

使用责任链模式重构原有的一段代码

Pure JS implements image compression and returns file image information
【TFLite, ONNX, CoreML, TensorRT Export】
随机推荐
Refactoring -- bad code smell
Will free price increases force young people back?
signed、unsigne整形在内存的存储
Keyword Auto
860. lemonade change
vulnhub之HARRYPOTTER: FAWKES
Dapr - 大厂都用的这个微服务框架好在哪里?
cmake记录
From ancient literature to cloud technology
Refactoring technique --extract class
[mui+flask+mongodb+hbuilderx] detailed explanation of the answer integration logic of app development
RPC 实战与核心原理-高级篇笔记
FPGA can perform binocular and monocular operations
机器学习 && 内容安全 && 海外风控公司
【TFLite, ONNX, CoreML, TensorRT Export】
do while for 等关键字
张量(tensor)编程
Huawei Hubble will add another IPO, and Maxon will rush to the scientific innovation board after more than ten years of dormancy
JVM内存结构分析(通俗易懂)
三个月GMV6000w+,盘点家纺行业打造爆款的关键