当前位置:网站首页>合工大苍穹战队视觉组培训Day6——传统视觉,图像处理
合工大苍穹战队视觉组培训Day6——传统视觉,图像处理
2022-07-26 08:40:00 【工大电科小趴菜】
目录
学习目标:
- 对图像进行预处理
- 转化为灰度图
- 二值化(阈值化)操作
- 开闭运算
- 了解 NVIDIA Jetson TX2
学习内容:
- 图像处理
- 了解tx2
学习时间:
- 2022年7月23日
学习产出:
一、图像预处理
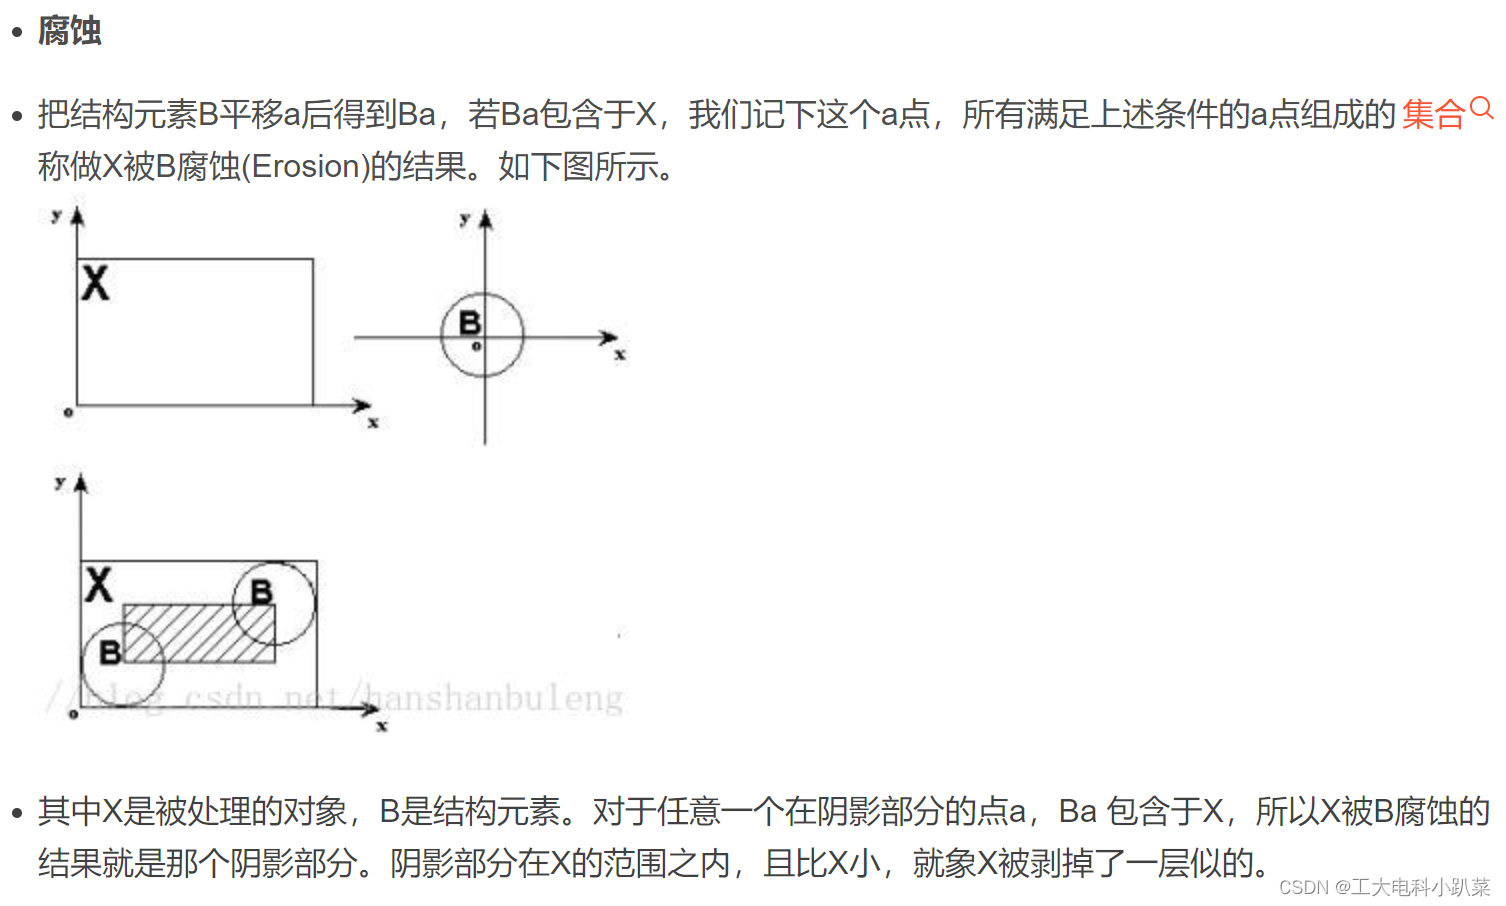
理论依据为:g(i,j)=α∗f(i,j)+β α用于调节图像的对比度,β 用于调节图像亮度。
1.zeros函数
函数功能:创建一个指定尺寸和类型的零矩阵。
构造函数:
cv::Mat::zeros(	int rows,int cols,int type)	%第一种构造函数
参数1:指定行数
参数2:指定列数
参数3:指定类型
cv::Mat::zeros( Size size,int type) %第二种构造函数
参数1:指定尺寸
参数2:指定类型
2.at函数
函数功能:对指定数组元素进行操作。
构造函数:
//at的重构函数比较多,几种常用的构造函数如下:
//对于单通道
cv::Mat::at<标识符>(int i0);//对于一维数组,直接获取对应的元素
cv::Mat::at<标识符>(int row, int col);//对于二维数组,获取对应行和对应列上的元素
//标识符的类型和图像类型相关:
CV_8U ——> Mat.at<uchar>(y,x).
CV_8S ——> Mat.at<schar>(y,x).
CV_16U ——> Mat.at<ushort>(y,x).
CV_16S ——> Mat.at<short>(y,x).
CV_32S ——> Mat.at<int>(y,x).
CV_32F ——> Mat.at<float>(y,x).
CV_64F ——> Mat.at<double>(y,x).

//对于多通道,一般指三通道
cv::Mat::at<标识符>(int row, int col)[i];//i为通道数
//标识符为:
Vec<uchar, 3> Vec3b;
Vec<short, 3> Vec3s;
Vec<ushort, 3> Vec3w;
Vec<int, 3> Vec3i;
Vec<float, 3> Vec3f;
Vec<double, 3> Vec3d;
3.saturate_cast函数
函数功能:这是一个强制转换函数,即把数据从原始类型转换成另一种新类型,利用这种特性,可以充当特定的饱和函数使用。
4.代码整体
#include<opencv2\opencv.hpp>
#include<iostream>

using namespace cv;
using namespace std;

int pos = 0;
float alpha = 1;
float beta = 0;
Mat src, dst, dst1;

void set_brightness(int,void*) {
	src = imread("test.jpg");
	//cvtColor(src, src, COLOR_BGR2GRAY);
	int height = src.rows;
	int width = src.cols;
	beta = pos;
	dst = Mat::zeros(src.size(), src.type());
	for (int i = 0; i < height; i++)
		for (int j = 0; j < width; j++) {
			if (src.channels() == 3) {//如果读入图象是rgb图像
				float b = src.at<Vec3b>(i, j)[0];
				float g = src.at<Vec3b>(i, j)[1];
				float r = src.at<Vec3b>(i, j)[2];
				dst.at<Vec3b>(i, j)[0] = saturate_cast<uchar> (b * alpha + beta);
				dst.at<Vec3b>(i, j)[1] = saturate_cast<uchar> (g * alpha + beta);
				dst.at<Vec3b>(i, j)[2] = saturate_cast<uchar> (r * alpha + beta);
			}
			else if (src.channels() == 1) {如果是灰度图像
				float m = src.at<uchar>(i, j);
				dst.at<uchar>(i, j) = saturate_cast<uchar> (m * alpha + beta);
			}
		}
	imshow("out", dst);
}
int main() {
	namedWindow("out", 1);//创建窗口
	createTrackbar("Brightness", "out", &pos, 100, set_brightness);//创建进度条
	set_brightness(0,0);//调用设置亮度函数
	imshow("input", src);
	waitKey(0);
}


可以对其进行调节。
二、转化为灰度图
1.读取时灰度化处理
def img2Gray(filePath):
    image = cv.imread(filePath)
    cv.imshow("sourcePic",image)
    gray1 = cv.imread(filePath,cv.IMREAD_GRAYSCALE)
    cv.imshow("read2gray",gray1)

    cv.waitKey(0)
    cv.destroyAllWindows()
 2.调用cvtColor灰度化处理
def img2Gray(filePath):
    image = cv.imread(filePath)
    cv.imshow("sourcePic",image)
    gray2 = cv.cvtColor(image, cv.COLOR_BGR2GRAY)
    cv.imshow("cvtColor2gray", gray2)
    cv.waitKey(0)
    cv.destroyAllWindows()
 3.平均值法:
def img2Gray(filePath):
    image = cv.imread(filePath)
    cv.imshow("sourcePic",image)
    #平均值法
    h, w = image.shape[:2]
    gray3 = np.zeros((h, w), dtype=np.uint8)
    for i in range(h):
        for j in range(w):
            gray3[i, j] = (int(image[i, j][0]) + int(image[i, j][1]) + int(image[i, j][2])) / 3
    cv.imshow("meanGray", gray3)

4.最大值法
def img2Gray(filePath):
    image = cv.imread(filePath)
    cv.imshow("sourcePic",image)
    #最大值法
    h, w = image.shape[:2]
    gray4 = np.zeros((h, w), dtype=np.uint8)  # 创建一个h行w列的二维list
    for i in range(h):
        for j in range(w):
           gray4[i, j] = max(image[i, j][0], image[i, j][1], image[i, j][2])
    cv.imshow("maxGray",gray4)
 5.分量法
5.分量法
def img2Gray(filePath):
    image = cv.imread(filePath)
    cv.imshow("sourcePic",image)

    #分量法:
    gray6 = cv.imread(filePath, cv.IMREAD_COLOR)
    for i in range(gray6.shape[0]):
        for j in range(gray6.shape[1]):
            gray6[i, j] = gray6[i, j, 0]
    cv.imshow("componentGray",gray6)
6.加权平均法
def img2Gray(filePath):
    image = cv.imread(filePath)
    cv.imshow("sourcePic",image)
    #加权平均分
    h, w = image.shape[:2]
    gray5= np.zeros((h, w), dtype=np.uint8)
    for i in range(h):
        for j in range(w):
            # Y = 0.3R + 0.59G + 0.11B
            # 通过cv格式打开的图片,像素格式为 BGR
            gray5[i, j] = 0.3 * image[i, j][2] + 0.11 * image[i, j][0] + 0.59 * image[i, j][1]
    cv.imshow("weightedGray",gray5)
三、二值化(阈值化)操作
#include <opencv2/opencv.hpp>
#include <iostream>

using namespace cv;
using namespace std;

int main(int argc, char* argv[]){
	Mat img;
	img = imread("C:\\Users\\86139\\Desktop\\target1.png");
	if (img.empty())
	{
		printf("could not load the picture...");
	}

	// 转为二值图
	threshold(img, img, 100, 255, THRESH_BINARY);

	imshow("Binarization", img);
	waitKey(0);

	return 0;
}
图像是由矩阵构成,矩阵中每个点的RGB值都不一样,呈现出来的色彩不一样,最终整体呈现给我们的就是一张彩色的图像。所谓”二值化处理“就是将矩阵中每个点的RGB值(0,0,0)[黑色]或者(255,255,255)[白色]简单阈值是选取一个全局阈值,然后把整幅图像分成非黑即白的二值图像,灰度值大于阈值就赋为255反之为0。
ret,mask = cv2.threshold(img2gray,175,255,cv2.THRESH_BINAR)

返回值一: 阈值,(Otsu‘s二值化会用到)
返回值二: 处理以后的图像
参数一:   初始图像
参数二:设定的阈值
参数三:当图像像素置超过我们的设定的阈值时赋为255
参数四 : 设定的二值化类型
二值化的效果会因为上一步是否进行通道相减或其他操作以及threshold函数中阈值设置而产生偏差。下面直接利用之前灰度化之后的图像进行二值化。
    GaussianBlur(gray, gray, Size(3, 3), 1);
    threshold(gray, dst, 100, 255, THRESH_BINARY_INV);
    imshow("dst", dst);

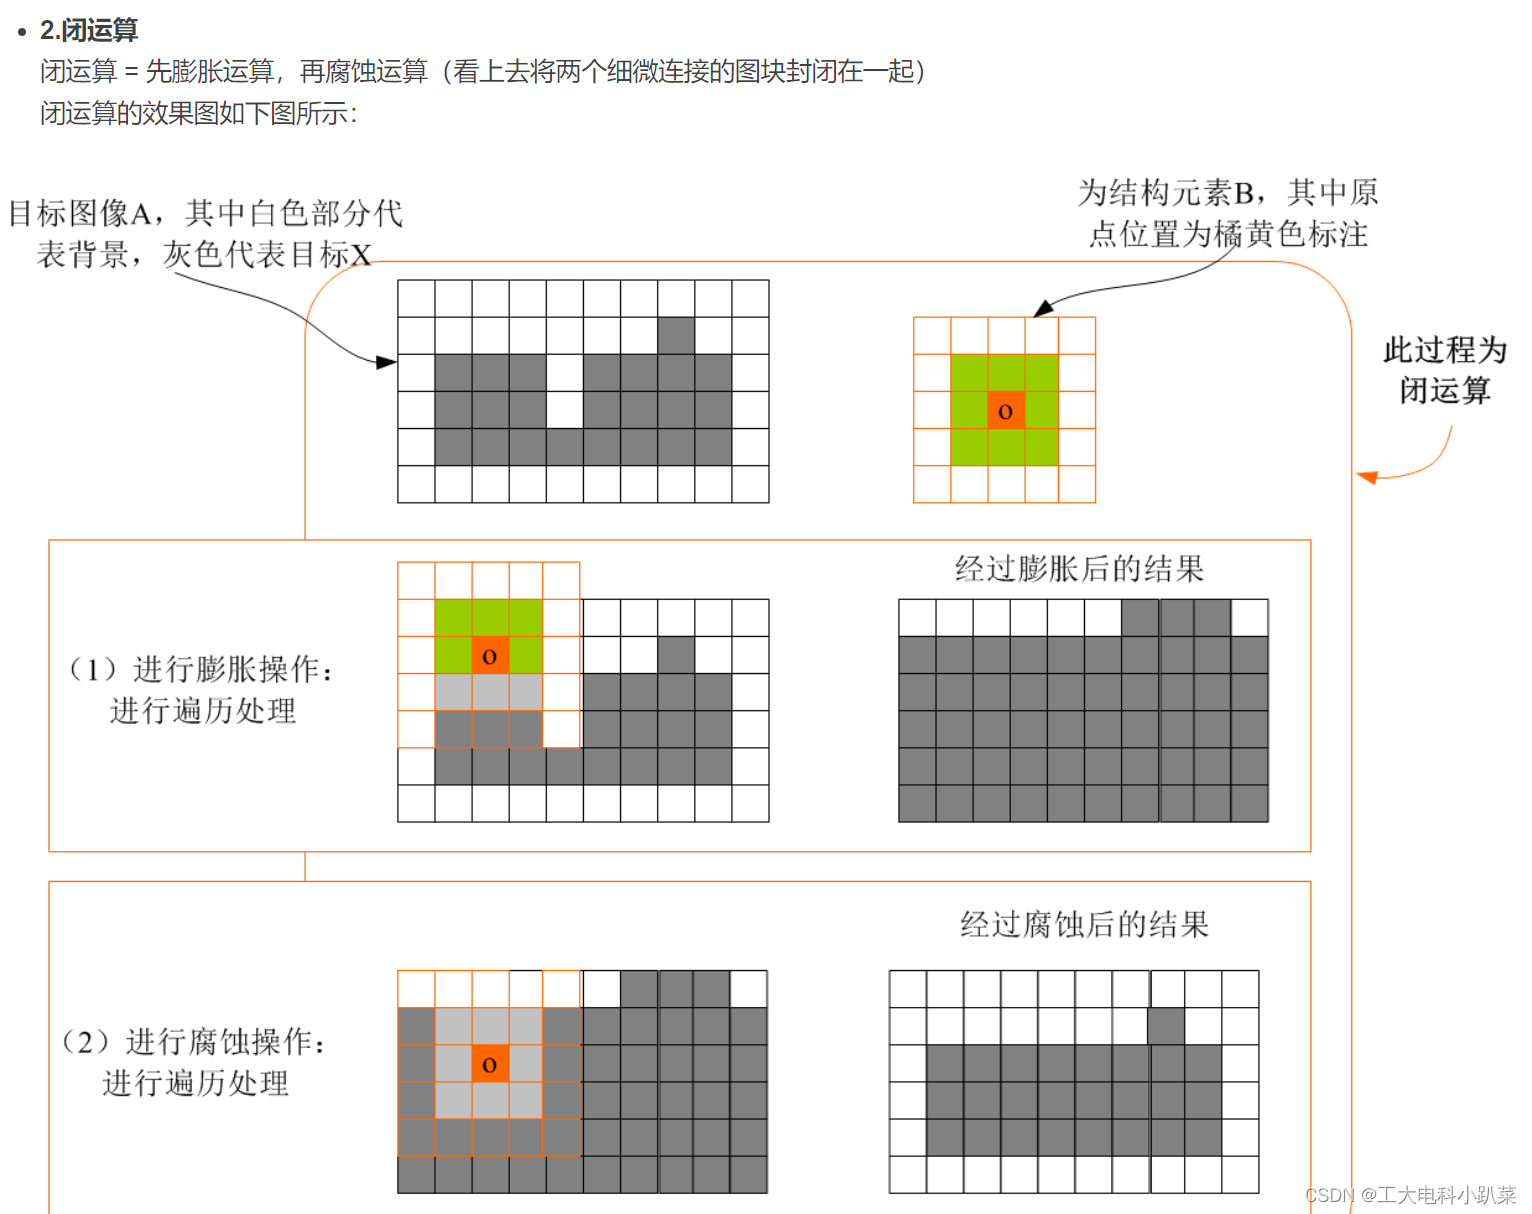
四、开闭运算
知识点补充:


#include <opencv2/opencv.hpp>
#include <iostream>

using namespace cv;
using namespace std;

int main(int argc, char* argv[]){
	Mat img;
	img = imread("C:\\Users\\86139\\Desktop\\target2.png");
	if (img.empty())
	{
		printf("could not load the picture...");
	}

	Mat element;
	Mat dstImage;

    element = getStructuringElement(MORPH_RECT, Size(4, 4)); //Size选择要处理的精度,越大处理的越多

    morphologyEx(img, dstImage, MORPH_OPEN, element);

	imshow("open", dstImage);
	waitKey(0);

	return 0;
}
处理结果:


#include <opencv2/opencv.hpp>
#include <iostream>

using namespace cv;
using namespace std;

int main(int argc, char* argv[]){
	Mat img;
	img = imread("C:\\Users\\86139\\Desktop\\target2.png");
	if (img.empty())
	{
		printf("could not load the picture...");
	}

	Mat element;
	Mat dstImage;

    element = getStructuringElement(MORPH_RECT, Size(4, 4)); //Size选择要处理的精度,越大处理的越多

	morphologyEx(img, dstImage, MORPH_CLOSE, element);

	imshow("close", dstImage);
	waitKey(0);

	return 0;
}
处理结果:


 开闭运算:
开闭运算:
//上面同上,不再赘述//
    element = getStructuringElement(MORPH_RECT, Size(3, 3));
    morphologyEx(dst, dst, MORPH_CLOSE, element);
    imshow("morphology", dst);
    waitKey(0);
    return 0;

}
处理结果:

其实所有处理结果还有另一种二值化操作的不做赘述。
五、英伟达 Jetson TX2
Jetson TX2是NIVDIA瞄准人工智能在Jetson TK1和TX1推出后的升级
TX2的GPU和CPU都进行了升级,内存增加到了8GB、存储增加到了32GB,支持Wifi和蓝牙,编解码支持H.265,体型同样小巧。
据NVIDIA官方介绍,Jetson TX2提供两种运行模态:一种是MAX Q,能效比能达到最高,是上一代的TX1的2倍,功耗在7.5W以下;另一种是MAX P,性能可以做到最高,能效比同样可以做到前一代的2倍,功耗则在15W以下。
边栏推荐
- Oracle 19C OCP 1z0-082 certification examination question bank (7-12)
- 2022年收益率最高的理财产品是哪个?
- Inaccurate problem of flutter fijkplayer seekto
- Super potential public chain dfinity -- the best time for DFI developers to enter
- Arbitrum Nova release! Create a low-cost and high-speed dedicated chain in the game social field
- 【C语言】程序员筑基功法——《函数栈帧的创建与销毁》
- Number of briquettes & Birthday Candles & building blocks
- When developing flutter, idea_ ID cannot solve the problem
- [untitled]
- Uninstallation of dual systems
猜你喜欢
Shell programming

Winter vacation homework & Stamp cutting
![[GUI] swing package (window, pop-up window, label, panel, button, list, text box)](/img/05/8e7483768a4ad2036497cac136b77d.png)
[GUI] swing package (window, pop-up window, label, panel, button, list, text box)

Nodejs2day (modularization of nodejs, NPM download package, module loading mechanism)

keepalived双机热备

Arbitrum Nova release! Create a low-cost and high-speed dedicated chain in the game social field

Why reserve a capacitor station on the clock output?

OA项目之我的会议(会议排座&送审)

Kotlin variables and constants

C#入门系列(三十一) -- 运算符重载
随机推荐
Analysis on the query method and efficiency of Oracle about date type
Oracle 19C OCP 1z0-082 certification examination question bank (42-50)
SSH,NFS,FTP
Implementation of Prometheus web authentication and alarm
Kotlin function
Arbitrum Nova release! Create a low-cost and high-speed dedicated chain in the game social field
Transfer guide printing system based on C language design
Cadence (x) wiring skills and precautions
6、 Pinda general permission system__ pd-tools-log
Web3 Games: current situation and future
内存管理-动态分区分配方式模拟
23.8 using the applicationrunner or commandlinerunner to implement applicationrunner and commandlinerunner
[abstract base class inheritance, DOM, event - learning summary]
Arbitrum launched the anytrust chain to meet the diverse needs of ecological projects
Flutter WebView three fingers rush or freeze the screen
【C语言】程序员筑基功法——《函数栈帧的创建与销毁》
03异常处理,状态保持,请求钩子---04大型项目结构与蓝图
pl/sql之动态sql与异常
Why reserve a capacitor station on the clock output?
Cadence(十)走线技巧与注意事项