当前位置:网站首页>Publish Yum private server using nexus3 (offline intranet)
Publish Yum private server using nexus3 (offline intranet)
2022-07-25 09:24:00 【zk_ Kang】
The company's servers are not networked , The company requires the intranet to be built yum Private clothes
I found that this part is rarely found in online tutorials , I hope this article can help you
First of all, you should build it correctly nexus3, I use docker Built , You can baidu by yourself or refer to the connection I wrote docker install nexus3 ( offline / Intranet )_zk_Kang The blog of -CSDN Blog ,
Relatively simple , Image download , Mapping directory , To start, etc.
Let me start with my thoughts ,
1. The Intranet environment is installed nexus3- Use docker, Remember to map directories , If you are linux, That's easy , Just look at the directory you installed .
2. After installation nexus3 Created on yum Environmental Science --yum Kuhe yum source address .
3. Download the image source package from a machine with an external network environment
4. Import the downloaded image source package to the intranet
5. Import the image source package in batches to nexus3 Upper yum Source address
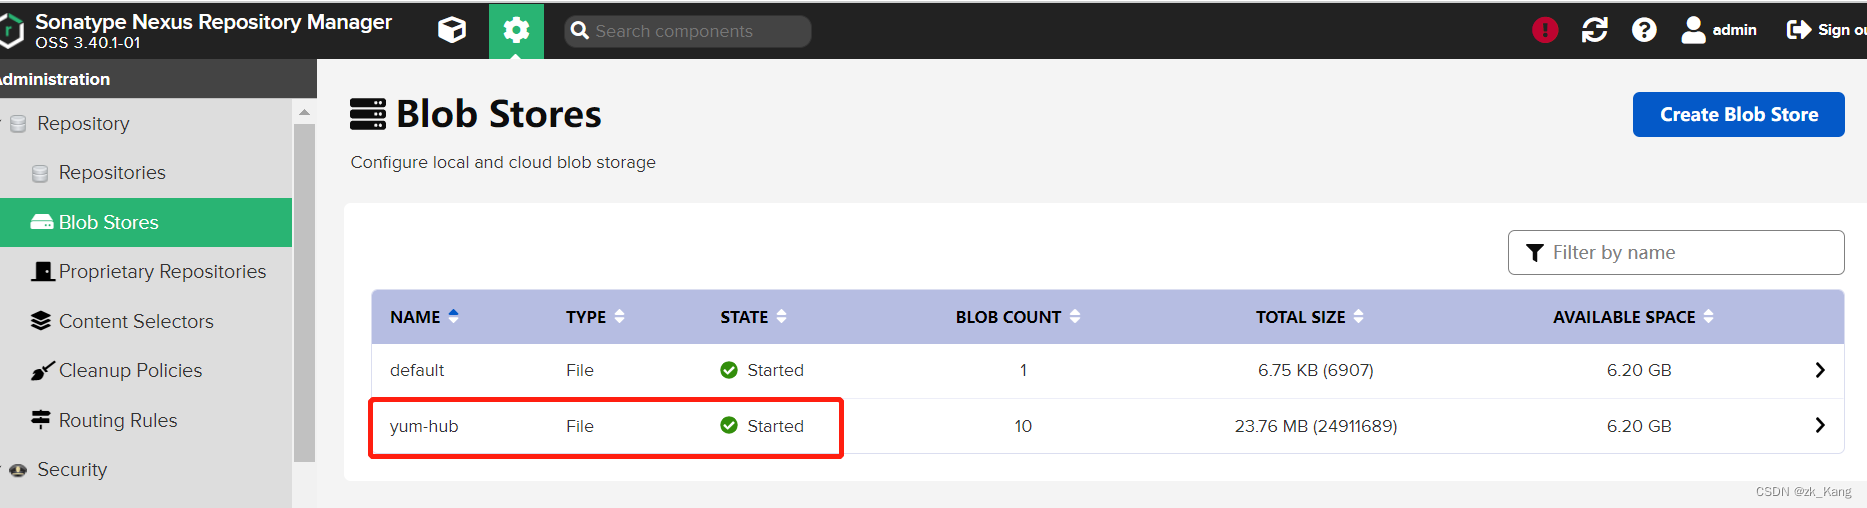
Install as follows -- Note that the one in the red box is built by myself

1. Create a library ( If you want to use default, This step can be omitted , Look directly at step two )
as follows - Click on create blob store

The latest version I use , It's changed here. You need to choose here type by file, If you don't have this , It doesn't matter , To look down .

Define the library name as yum-hub
After creation, you can see , Here you are size Should be 0, I put something in it, so size Not for 0
2. establish yum Mirror source
Here you are proxy( agent ) hosted( Local mirror source )group(proxy and hosted The combination of )
You can only create hosted and group , You can also create just one hosted( Anyway, you have no Internet , One is enough , Of course, in case of subsequent expansion of the local image source , It is suggested to establish a group, Will all hosted Put in group)
Here is a demonstration of proxy It also demonstrates ,-- If you have Internet conditions in this step, you can take a look
1. spot create repository

2. establish proxy agent

Below http://url, Just write an Alibaba image source

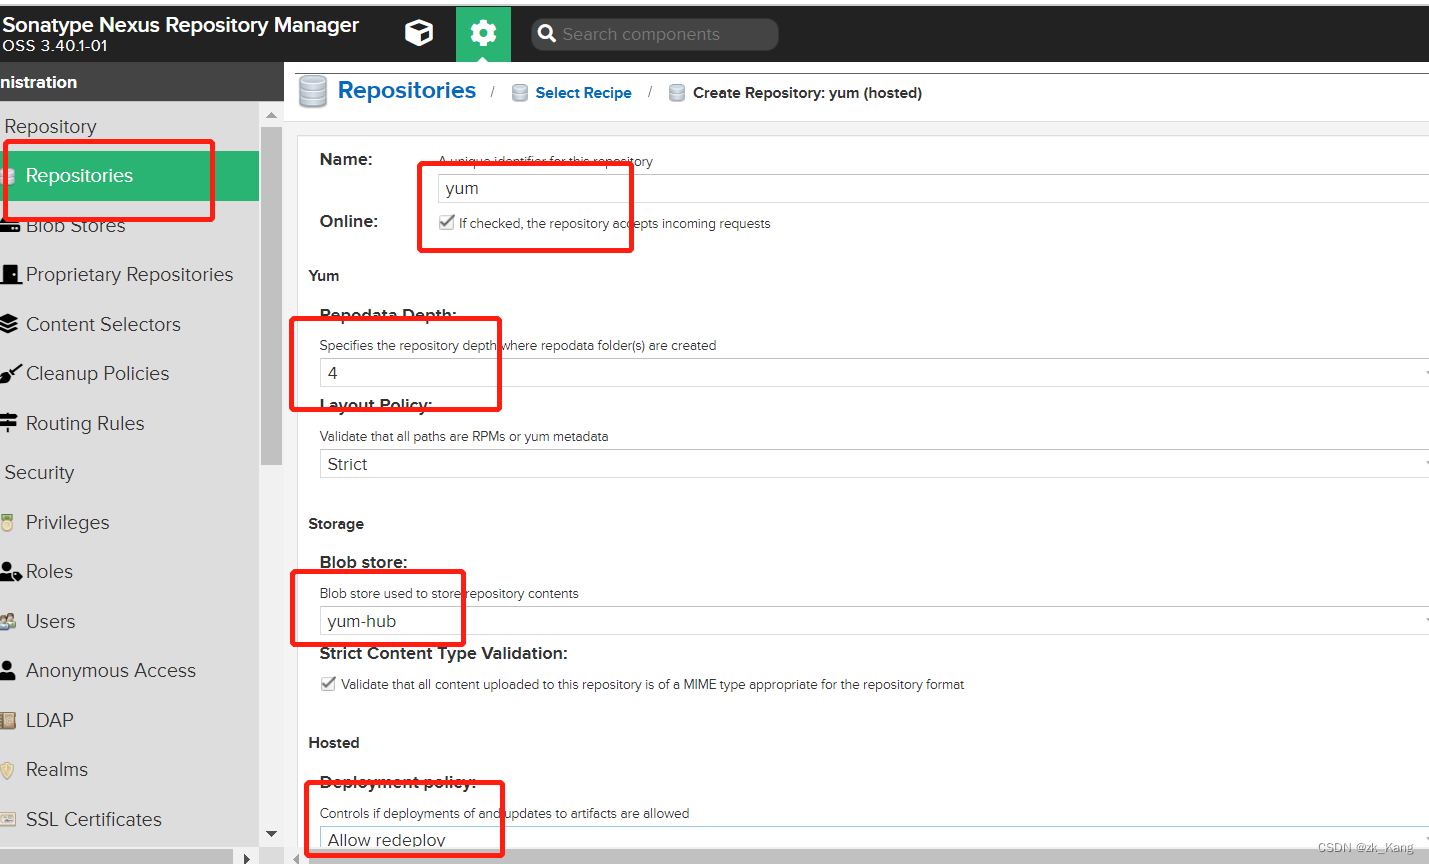
3.hosted- Local mirror source
I circled all the important places with red boxes ,
Here we need to pay attention to the following allow redeplov, The meaning of contract awarding can be repeated here
4. Build a group
hold proxy( agent ) hosted( Local mirror source ) All joined group
Remember hosted( Local mirror source ) On, ha , If you are an intranet, there is no proxy 了 , There is no need to establish , Not to mention .
Who's on , Who are you looking for first , I found it locally , Don't download , This is the role of private servers , Save bandwidth .
LAN downloads are faster than networking

5. After the foundation of

Now ,yum It's empty

3. Download Image Source
Machine with internet , I was in liunx Operated on the machine .
For details, please refer to this blog written by this blogger , I downloaded it according to what he wrote . I didn't install all his downloads , I downloaded a base library
#  Download Alibaba image source
curl -o /etc/yum.repos.d/CentOS-Base.repo http://mirrors.aliyun.com/repo/Centos-7.repo
#  Download Ali epel Source
curl -o /etc/yum.repos.d/epel.repo http://mirrors.aliyun.com/repo/epel-7.repo
#  Delete cache
yum clean all
#  Update cache
yum makecache
#  View the list of image sources
yum repolist
#  Install the synchronization tool
yum install -y yum-utils
#  install repo Production tools
yum install -y createrepo
#  install wget
yum install -y wget
#  Create directory
mkdir -p /home/repos_local/centos/7
#  Sync
reposync -r base -p /home/repos_local/centos/7
#  establish repo data
createrepo /home/repos_local/centos/7/base
I'll be done here , Put... Directly /home/repos_local This package can be delivered to the intranet . I'm going to home Give orders .
Compress command :tar -cvf xx.tar.gz repos_local
4. Batch upload to intranet server
First turn on the decompression
tar -zxvf xx.tar.gz
After decompression, enter the directory and directly execute the command , Copy all , Direct execution , You may write a document , Perform the same , I compare lazy , I will directly execute . Remember *** For your password , hinder ip The address has to be changed .
The directory hierarchy here , You can define yourself , I also defined myself .
#! /bin/bash
for i in `ls /home/repos_local/CentOS7/base/Packages`;
do curl -v --user 'admin:***' --upload-file /home/repos_local/CentOS7/base/Packages/$i http://ip:8081/repository/yum/CentOS7/base/Packages/$i;
done
When you're done, you can yum-hosted Next, I see what you uploaded rpm It's packed
5. Use yum Private clothes
All the previous work is for this step
Get into /etc/yum.repos.d Under the table of contents ,
If there is a suffix in this directory repo The file of , Build a mkdir bak Put... In this directory repo File move to bak Under the table of contents
stay /etc/yum.repos.d Create a new one in the directory repo file , Name at will
vi centos.repo
The contents are as follows , Here I see some places that write base, But through my actual discovery, I wrote base layer yum Can not use , If this happens to you , You can write first base layer , hinder Packages, If not , Re reform .
My address here is yum Of group route
#  Unnecessary warehouses can be commented out
#  All intranet warehouses are closed gpgcheck check
# base Warehouse
[base]
name=Local CentOS-7  Base
baseurl=http://xxx:8081/repository/yum-group/CentOS7/base/Packages/
enabled=1
gpgcheck=0
After writing , You can use it
Test it , The following two clear the cache , Let the new yum Download from the new configuration .
yum clean all
yum makecache
# Test a download
yum -y install httpd
That's it , I hope this article can help you .
yum repolist-- Execute this command , Check your image source
边栏推荐
猜你喜欢

sql注入

『怎么用』装饰者模式

对称式加密与非对称式加密的对比

activemq--消息重试机制

Probe into Druid query timeout configuration → who is the querytimeout of datasource and jdbctemplate effective?

Opencv realizes simple face tracking

『每日一问』ReentrantLock加锁解锁

Troubleshooting error: NPM install emojis list failed

mysql中的数据结果排名

Programmers can't SQL? Ashes Engineer: all waiting to be eliminated! This is a must skill!
随机推荐
TCP网络应用程序开发流程
nacos2.1.0集群搭建
ActiveMQ -- leveldb of persistence mechanism
yarn : 无法加载文件 yarn.ps1,因为在此系统上禁止运行脚本。
有误差的字符串型时间比较方法String.compareTo
C language and SQL Server database technology
Leetcode组合总和+剪枝
Silicon Valley class lesson 11 - official account news and wechat authorization
ActiveMQ -- persistent mechanism
Nacos搭建配置中心出现client error: invalid param. endpoint is blank
Arrange the array into the smallest number
【线程知识点】-- 自旋锁
深入理解static关键字
C#语言和SQL Server数据库技术
Shell脚本
API健康状态自检
sqli-labs安装 环境:ubuntu18 php7
『怎么用』装饰者模式
什么是贫血模型和充血模型?
registration status: 204