当前位置:网站首页>3Dunity游戏项目实战——第一人称射击游戏
3Dunity游戏项目实战——第一人称射击游戏
2022-07-26 10:52:00 【ha_lee】
一、游戏策划
1.1 游戏介绍
在游戏场景中,会有若干个敌人出生点,定时生成一些敌人,敌人会主动寻找并攻击主角。游戏目的就是生存下去,消灭僵尸敌人,获得更高的积分。
1.2 UI界面
在游戏界面,包括主角的生命值,弹药数量,得分以及瞄准星。
游戏失败后,出现一个重新开始的按钮。
1.3 主角
第一人称视角无法看到主角自己,在屏幕上只能看到一致端起来的M16枪械,键盘W、S、A、D键控住主角上下左右移动,鼠标移动来旋转视角。
1.4 敌人
敌人是一个护士模样的僵尸,具有自动寻路的功能,躲避障碍物,并攻击主角。
二、游戏场景
- 打开工程,导入模型、动画、音效等资源。
- 打开场景Scene,该场景中使用
Lightmap和Light Probe表现静态和动态模型的光影效果。 - 选择场景模型,为其添加
Mesh Collider多边形碰撞组件。在开发中,模型通常复杂,会准备两组模型,一组质量较高用于显示,另一组用于物理碰撞。
三、主角
主角是看不见的,只能看到主角手里的枪械,尽管如此还是要为主角创建碰撞体,并控制其移动。
3.1 角色控制器
- 创建一个空游戏体,Tag设为
player - 为主角添加
Character Controller角色控制器,这样主角行走时就不会穿模 - 为主角添加
Rigidbody组件,取消重力模拟,选中Is Kinermaic使其不受物理推演影响。 - 创建Player脚本
//Player.cs 完整代码
using System.Collections;
using System.Collections.Generic;
using UnityEngine;

public class Player : MonoBehaviour
{


    //组件
    public Transform m_transform;
    CharacterController m_ch;

    //枪口transform
    Transform m_muzzlepoint;
    //射击时,射线能射到的碰撞层
    public LayerMask m_layer;
    //射中目标后的粒子效果
    public Transform m_fx;
    //射击音效
    public AudioSource m_audio;
    public AudioClip m_shootClip; //声音
    //射击间隔时间
    float m_shootTimer = 0;

    //摄像机Transform
    Transform m_camTransform;
    Vector3 m_camRot; //相机旋转角度
    float m_camHeight = 1.4f; //相机高度

    //角色移动速度
    float m_movSpeed = 3.0f;

    //重力
    float m_grivity = 2.0f;

    //生命值
    public int m_life = 5;

    // Start is called before the first frame update
    void Start()
    {

        //获取组件
        m_transform = this.transform;
        m_ch = this.GetComponent<CharacterController>();
        m_audio = this.GetComponent<AudioSource>();


        //获取摄像机
        m_camTransform = Camera.main.transform;

        //获取枪口
        m_muzzlepoint = m_camTransform.transform.Find("M16/weapon/muzzlepoint").transform;

        //设置相机初始位置
        Vector3 pos = m_transform.position;
        pos.y += m_camHeight;
        m_camTransform.position = pos;

        //设置摄像机的初始旋转角度
        /* * rotation是Quaternion类型,可以随时改变旋转角度 * eulerAngles是Vector3类型,不能随时变化的,是一个定值 */
        m_camTransform.rotation = m_transform.rotation;
        m_camRot = m_camTransform.eulerAngles;

        //锁定鼠标
        Cursor.lockState = CursorLockMode.Locked;

    }


    // Update is called once per frame
    void Update()
    {

        //如果生命值为0,什么也不做
        if (m_life <= 0) return;


        //更新射击间隔时间
        m_shootTimer -= Time.deltaTime;
        //鼠标左键射击
        if(Input.GetMouseButton(0) && m_shootTimer <= 0)
        {

            m_shootTimer = 0.1f;
            //射击音效
            m_audio.PlayOneShot(m_shootClip);
            //减少弹药,更新UI
            GameManager.Instance.SetAmmo(1);

            //RaycastHit用来保存射线探测结果
            RaycastHit info;

            //从muzzlepoint的位置,向摄像机面向的正方向射出一根射线
            //射线只能与m_layer指定的层碰撞,Vector3.forward指(0,0,1)即z方向的单位向量
            bool hit = Physics.Raycast(m_muzzlepoint.position,
                m_camTransform.TransformDirection(Vector3.forward), out info, 100, m_layer);

            //如果射中了Tag为enemy的物体
            if (info.transform.tag.CompareTo("enemy") == 0)
            {

                Enemy enemy = info.transform.GetComponent<Enemy>();
                //敌人减少生命
                enemy.OnDamage(1);
            }
            //在射中的地方释放一个粒子效果
            Instantiate(m_fx, info.point, info.transform.rotation);
        }
        Control();

    }


    //控制角色移动以及视角变化
    void Control()
    {

        float xm = 0, ym = 0, zm = 0;

        //获取鼠标移动距离
        float rh = Input.GetAxis("Mouse X"); //右为正
        float rv = Input.GetAxis("Mouse Y"); // 上为正


        //旋转摄像机,z控制着倾斜程度,使保持不变
        m_camRot.x -= rv;   //上下旋转镜头是x控制,上为减
        m_camRot.y += rh;   //左右旋转镜头是y控制,左为减
        m_camTransform.eulerAngles = m_camRot;

        //使主角面向方向与摄像机一致,即只有y轴跟着镜头转动,其他两个方向轴不动
        Vector3 camrot = m_camTransform.eulerAngles;
        camrot.x = 0;
        camrot.z = 0;
        m_transform.eulerAngles = camrot;

        //重力运动
        ym -= m_grivity * Time.deltaTime;

        //上下左右运动
        if (Input.GetKey(KeyCode.W))
        {

            zm += m_movSpeed * Time.deltaTime;
        }
        if (Input.GetKey(KeyCode.S))
        {

            zm -= m_movSpeed * Time.deltaTime;
        }
        if (Input.GetKey(KeyCode.A))
        {

            xm -= m_movSpeed * Time.deltaTime;
        }
        if (Input.GetKey(KeyCode.D))
        {

            xm += m_movSpeed * Time.deltaTime;
        }

        //移动,会根据角色的朝向,相对前后左右移动
        m_ch.Move(m_transform.TransformDirection(new Vector3(xm, ym, zm)));

        //使摄像机位置与主角一致
        Vector3 pos = m_transform.position;
        pos.y += m_camHeight;
        m_camTransform.position = pos;
    }

    public void OnDamage(int damage)
    {

        m_life -= damage;

        //更新UI
        GameManager.Instance.setLife(m_life);

        //如果生命值为0,取消鼠标锁定
        if(m_life <= 0)
        {

            Cursor.lockState = CursorLockMode.None;
        }
    }
    private void OnDrawGizmos()
    {

        Gizmos.DrawIcon(this.transform.position, "Spawn.tif");
    }
}
3.2 摄像机
在Player.cs脚本中添加部分代码,使摄像机伴随主角移动
具体实现部分代码:
void Control()
    {

        float xm = 0, ym = 0, zm = 0;

        //获取鼠标移动距离
        float rh = Input.GetAxis("Mouse X"); //右为正
        float rv = Input.GetAxis("Mouse Y"); // 上为正


        //旋转摄像机,z控制着倾斜程度,使保持不变
        m_camRot.x -= rv;   //上下旋转镜头是x控制,上为减
        m_camRot.y += rh;   //左右旋转镜头是y控制,左为减
        m_camTransform.eulerAngles = m_camRot;

        //使主角面向方向与摄像机一致,即只有y轴跟着镜头转动,其他两个方向轴不动
        Vector3 camrot = m_camTransform.eulerAngles;
        camrot.x = 0;
        camrot.z = 0;
        m_transform.eulerAngles = camrot;

        //重力运动
        ym -= m_grivity * Time.deltaTime;

        //上下左右运动
        if (Input.GetKey(KeyCode.W))
        {

            zm += m_movSpeed * Time.deltaTime;
        }
        if (Input.GetKey(KeyCode.S))
        {

            zm -= m_movSpeed * Time.deltaTime;
        }
        if (Input.GetKey(KeyCode.A))
        {

            xm -= m_movSpeed * Time.deltaTime;
        }
        if (Input.GetKey(KeyCode.D))
        {

            xm += m_movSpeed * Time.deltaTime;
        }

        //移动,会根据角色的朝向,相对前后左右移动
        m_ch.Move(m_transform.TransformDirection(new Vector3(xm, ym, zm)));

        //使摄像机位置与主角一致
        Vector3 pos = m_transform.position;
        pos.y += m_camHeight;
        m_camTransform.position = pos;
    }
3.3 武器
把武器绑定到摄像机上,使其能够伴随主角移动
- 摄像机的位置和旋转角度设为0
- 摄像机的
Clipping Plane/Near设为0.1,使其可以看到更近处的物体 - 将武器Prefab托入场景中
- 将武器Prefeb位置和旋转都设为0,置于摄像机的下层子物体,调整其在屏幕中的位置直到满意。
四、敌人
4.1 寻路
Unity提供了非常实用的寻路功能,其寻路系统分为两个部分,一部分是对场景进行设置,使其满足寻路算法的需求,另一部分是设置寻路者。
- 在Inspector窗口小三角显示下拉菜单,确定Navigation Static被选中。
- 选择【Window】-【AI】-【Navigation】,这个窗口主要定义地形对寻路的影响。设置好选项后,选择Bake对地形进行计算。
- 对敌人的对象拖入场景,选择【Component】-【Nav Mesh Agent】将寻路组件指定给敌人。
- 创建敌人的脚本。
//Enemy.cs
using System.Collections;
using System.Collections.Generic;
using UnityEngine;

public class Enemy : MonoBehaviour
{


    Transform m_transform;
    Player m_player;
    UnityEngine.AI.NavMeshAgent m_agent;  //寻路组件
    float m_movSpeed = 0.5f; //敌人移动速度
    float m_rotSpeed = 120;  //角色旋转速度
    float m_timer = 2; //计时器
    int m_life = 5; //生命值

    //出生点
    protected EnemySpawn m_spawn;

    //初始化
    public void Init(EnemySpawn spawn)
    {

        m_spawn = spawn;
        m_spawn.m_enemyCount++;
    }

    Animator m_ani; //动画组件

    // Start is called before the first frame update
    void Start()
    {

        //获取组件
        m_transform = this.transform;
        m_ani = GetComponent<Animator>(); //获取动画组件

        //获取主角类实例
        m_player = GameObject.FindGameObjectWithTag("player").GetComponent<Player>();
        //获取寻路组件
        m_agent = GetComponent<UnityEngine.AI.NavMeshAgent>();
        //设置寻路目标
        m_agent.SetDestination(m_player.m_transform.position);
    }

    // Update is called once per frame
    void Update()
    {

        // 如果主角生命为0,什么也不做
        if (m_player.m_life <= 0)
            return;

        // 获取当前动画状态
        AnimatorStateInfo stateInfo = m_ani.GetCurrentAnimatorStateInfo(0);

        // 如果处于待机状态
        if (stateInfo.fullPathHash == Animator.StringToHash("Base Layer.idle") && !m_ani.IsInTransition(0))
        {

            m_ani.SetBool("idle", false);

            // 待机一定时间
            m_timer -= Time.deltaTime;
            if (m_timer > 0)
                return;

            // 如果距离主角小于1.5米,进入攻击动画状态
            if (Vector3.Distance(m_transform.position, m_player.m_transform.position) < 1.5f)
            {

                m_ani.SetBool("attack", true);
            }
            else
            {

                // 重置定时器
                m_timer = 1;

                // 设置寻路目标点
                m_agent.SetDestination(m_player.m_transform.position);

                // 进入跑步动画状态
                m_ani.SetBool("run", true);
            }
        }

        // 如果处于跑步状态
        if (stateInfo.fullPathHash == Animator.StringToHash("Base Layer.run") && !m_ani.IsInTransition(0))
        {

            m_ani.SetBool("run", false);


            // 每隔1秒重新定位主角的位置
            m_timer -= Time.deltaTime;
            if (m_timer < 0)
            {

                m_agent.SetDestination(m_player.m_transform.position);

                m_timer = 1;
            }

            // 追向主角
            MoveTo();

            // 如果距离主角小于1.5米,向主角攻击
            if (Vector3.Distance(m_transform.position, m_player.m_transform.position) <= 1.5f)
            {

                //停止寻路
                m_agent.ResetPath();
                m_ani.SetBool("attack", true);
            }
        }

        // 如果处于攻击状态
        if (stateInfo.fullPathHash == Animator.StringToHash("Base Layer.attack") && !m_ani.IsInTransition(0))
        {

            // 面向主角
            RotateTo();

            m_ani.SetBool("attack", false);

            // 如果攻击动画播完,重新进入待机状态
            if (stateInfo.normalizedTime >= 1.0f)
            {

                m_ani.SetBool("idle", true);

                // 重置计时器
                m_timer = 2;

                //更新主角生命
                m_player.OnDamage(1);

            }
        }

        if (stateInfo.fullPathHash == Animator.StringToHash("Base Layer.death") && !m_ani.IsInTransition(0))
        {

            //当播放完死亡动画
            if (stateInfo.normalizedTime >= 1.0f)
            {

                OnDeath();
            }
        }
    }

    //寻路移动
    void MoveTo()
    {

        float speed = m_movSpeed * Time.deltaTime;
        //TransformDirection从自身坐标到世界坐标变换方向
        m_agent.Move(m_transform.TransformDirection(new Vector3(0, 0, speed)));
    }

    //始终转向主角位置
    void RotateTo()
    {

        //当前角度
        Vector3 oldangle = m_transform.eulerAngles;

        //获得面向主角的角度
        m_transform.LookAt(m_player.m_transform);
        float target = m_transform.eulerAngles.y;

        //转向主角
        float speed = m_rotSpeed * Time.deltaTime;
        float angle = Mathf.MoveTowardsAngle(oldangle.y, target, speed); //计算出当前角度转向目标角度的旋转角度
        m_transform.eulerAngles = new Vector3(0, angle, 0);

    }

    public void OnDamage(int damage)
    {

        // 伤害
        m_life -= damage;
        if (m_life <= 0)
        {

            m_ani.SetBool("death", true);
        }
    }

    //当被销毁时
    public void OnDeath()
    {

        //更新敌人数量
        m_spawn.m_enemyCount--;
        //加分
        GameManager.Instance.SetScore(100);
        //销毁
        Destroy(this.gameObject);
    }
}
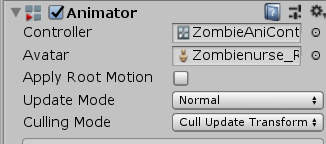
4.2 设置动画
为敌人的不同动作设置不同的动画
在场景中选中敌人,默认它有一个Animator组件,在Controller中设置好一个Animator Controller,取消选择Apply Root Motion选项,强迫使其受脚本控制。
【window】-【Animation】-【Animator】打开Animator窗口,添加动画过渡。点击状态方格,为其添加动画;点击箭头为其添加过渡条件。

点击【parameter】,为几个状态添加参数。
注意:不要把旁边的选项勾上
设置动画过渡条件

4.3 行为
修改敌人的脚本,在不同状态时使敌人的行为也发生改变。
- 添加动画组件等属性
- 添加
RotateTo函数,使敌人始终转到面向主角的角度
//始终转向主角位置
    void RotateTo()
    {

        //当前角度
        Vector3 oldangle = m_transform.eulerAngles;

        //获得面向主角的角度
        m_transform.LookAt(m_player.m_transform);
        float target = m_transform.eulerAngles.y;

        //转向主角
        float speed = m_rotSpeed * Time.deltaTime;
        float angle = Mathf.MoveTowardsAngle(oldangle.y, target, speed); //计算出当前角度转向目标角度的旋转角度
        m_transform.eulerAngles = new Vector3(0, angle, 0);

    }
- 添加条件进行动画过渡
// 获取当前动画状态
        AnimatorStateInfo stateInfo = m_ani.GetCurrentAnimatorStateInfo(0);

        // 如果处于待机状态
        if (stateInfo.fullPathHash == Animator.StringToHash("Base Layer.idle") && !m_ani.IsInTransition(0))
        {

            m_ani.SetBool("idle", false);

            // 待机一定时间
            m_timer -= Time.deltaTime;
            if (m_timer > 0)
                return;

            // 如果距离主角小于1.5米,进入攻击动画状态
            if (Vector3.Distance(m_transform.position, m_player.m_transform.position) < 1.5f)
            {

                m_ani.SetBool("attack", true);
            }
            else
            {

                // 重置定时器
                m_timer = 1;

                // 设置寻路目标点
                m_agent.SetDestination(m_player.m_transform.position);

                // 进入跑步动画状态
                m_ani.SetBool("run", true);
            }
        }

        // 如果处于跑步状态
        if (stateInfo.fullPathHash == Animator.StringToHash("Base Layer.run") && !m_ani.IsInTransition(0))
        {

            m_ani.SetBool("run", false);


            // 每隔1秒重新定位主角的位置
            m_timer -= Time.deltaTime;
            if (m_timer < 0)
            {

                m_agent.SetDestination(m_player.m_transform.position);

                m_timer = 1;
            }

            // 追向主角
            MoveTo();

            // 如果距离主角小于1.5米,向主角攻击
            if (Vector3.Distance(m_transform.position, m_player.m_transform.position) <= 1.5f)
            {

                //停止寻路
                m_agent.ResetPath();
                m_ani.SetBool("attack", true);
            }
        }

        // 如果处于攻击状态
        if (stateInfo.fullPathHash == Animator.StringToHash("Base Layer.attack") && !m_ani.IsInTransition(0))
        {

            // 面向主角
            RotateTo();

            m_ani.SetBool("attack", false);

            // 如果攻击动画播完,重新进入待机状态
            if (stateInfo.normalizedTime >= 1.0f)
            {

                m_ani.SetBool("idle", true);

                // 重置计时器
                m_timer = 2;

                //更新主角生命
                m_player.OnDamage(1);

            }
        }

        if (stateInfo.fullPathHash == Animator.StringToHash("Base Layer.death") && !m_ani.IsInTransition(0))
        {

            //当播放完死亡动画
            if (stateInfo.normalizedTime >= 1.0f)
            {

                OnDeath();
            }
        }
五、UI界面
使用2D贴图的方式展示UI效果,比使用OnGUI更节省资源。
- 创建一个GameManager空物体,为其添加【Component】-【UI】-【Image】组件,在组件中插入图片,也可以使用【Component】-【UI】-【Text】添加文字组件
- 调整UI图片和文字的位置。小技巧:点击位置方块,可以使用【shft】+【Alt】确定其相对位置

- 创建GameManager的脚本文件
//GameManager.cs
using System.Collections;
using System.Collections.Generic;
using UnityEngine;

public class GameManager : MonoBehaviour
{


    public static GameManager Instance = null;

    //游戏得分
    int m_score = 0;

    //游戏最高分
    static int m_hiscore = 0;

    //弹药数量
    int m_ammo = 100;

    //游戏主角
    Player m_player;

    //UI文字
    UnityEngine.UI.Text txt_ammo;
    UnityEngine.UI.Text txt_hiscore;
    UnityEngine.UI.Text txt_life;
    UnityEngine.UI.Text txt_score;

    // Start is called before the first frame update
    void Start()
    {

        Instance = this;

        //获取主角
        m_player = GameObject.FindGameObjectWithTag("player").GetComponent<Player>();

        //获得设置的UI文字
        txt_ammo = this.transform.Find("Canvas/txt_ammo").GetComponent<UnityEngine.UI.Text>();
        txt_hiscore = this.transform.Find("Canvas/txt_hiscore").GetComponent<UnityEngine.UI.Text>();
        txt_life = this.transform.Find("Canvas/txt_life").GetComponent<UnityEngine.UI.Text>();
        txt_score = this.transform.Find("Canvas/txt_score").GetComponent<UnityEngine.UI.Text>();
    }

    //更新分数
    public void SetScore(int score)
    {

        m_score += score;

        if(m_score > m_hiscore)
        {

            m_hiscore = m_score;
        }

        txt_score.text = "Score " + m_score;
        txt_hiscore.text = "High Score " + m_hiscore;
    }

    //更新弹药
    public void SetAmmo(int ammo)
    {

        m_ammo -= ammo;

        //如果弹药为负数,重新填弹
        if(m_ammo <= 0)
        {

            m_ammo = 100 - m_ammo;
        }

        txt_ammo.text = m_ammo.ToString() + "/100";
    }

    //更新生命
    public void setLife(int life)
    {

        txt_life.text = life.ToString();
    }

    private void OnGUI()
    {

        if(m_player.m_life <= 0)
        {

            //显示游戏结束
            GUI.skin.label.alignment = TextAnchor.MiddleCenter;
            GUI.skin.label.fontSize = 40;
            GUI.Label(new Rect(0, 0, Screen.width, Screen.height), "Game Over");

            //显示游戏重新开始
            GUI.skin.label.fontSize = 30;
            if (GUI.Button(new Rect(Screen.width * 0.5f - 150, Screen.height * 0.75f, 300, 40), "Try Again"))
            {

                //Application.LoadLevel(Application.loadedLevelName);
                UnityEngine.SceneManagement.SceneManager.LoadScene("Demo");

            }
        }
    }
    // Update is called once per frame
    void Update()
    {


    }
}
六、交互
6.1 主角的射击
- 打开Player.cs,添加
OnDamage函数,用于减少主角生命,并更新UI - 武器模型的枪口射出一根射线,实现射击功能,射线只能与m_layer指定的层碰撞,具体看前文Player.cs完整代码
- 创建两个碰撞层,enemy和level,分别指定给敌人和场景模型,再创建一个enemy的Tag指定给敌人,为脚本的m_lay指定碰撞层

- 在脚本中指定音乐源以及子弹射击特效
- 创建一个AutoDestroy.cs将其指定给射击特效,让其一秒后销毁
//AutoDestroy.cs
using System.Collections;
using System.Collections.Generic;
using UnityEngine;

public class AutoDestroy : MonoBehaviour
{


    public float m_timer = 1.0f;
    // Start is called before the first frame update
    void Start()
    {


    }

    // Update is called once per frame
    void Update()
    {

        m_timer -= Time.deltaTime;
        if (m_timer <= 0)
            Destroy(this.gameObject);
    }
}
6.2 敌人的进攻和死亡
- 选择敌人,添加 Capsule Collider 组件,添加刚体组件并设置好

- 在enemy.cs脚本中添加OnDamage函数更新敌人伤害,生命为0时,进入死亡状态,播放相应动画,更新UI分数,并销毁
七、出生地
为了能控制敌人数量,每个出生点都需要清楚生成了多少敌人,达到最大值时停止产生敌人,敌人被消灭时提示产生新的敌人。
- 创建脚本EnemySpawn.cs
using System.Collections;
using System.Collections.Generic;
using UnityEngine;

public class EnemySpawn : MonoBehaviour
{


    public Transform m_enemy; //放入敌人预设
    public int m_enemyCount = 0; //敌人的数量
    public int m_maxEnemy = 3;//敌人的最大生成数量
    public float m_timer = 0; //敌人生成间隔时间
    protected Transform m_transform;
    // Start is called before the first frame update
    void Start()
    {

        m_transform = this.transform;
    }

    // Update is called once per frame
    void Update()
    {

        //如果生成敌人数量达到最大值,停止生成敌人
        if (m_enemyCount >= m_maxEnemy)
            return;

        //每隔一段时间,生成敌人
        m_timer -= Time.deltaTime;
        if(m_timer <= 0)
        {

            m_timer = 5+Random.value * 10.0f;
            Transform obj = (Transform)Instantiate(m_enemy, m_transform.position, Quaternion.identity);
            //获得敌人脚本
            Enemy enemy = obj.GetComponent<Enemy>();
            enemy.Init(this);
        }
    }

    private void OnDrawGizmos()
    {

        Gizmos.DrawIcon(this.transform.position, "item.png",true);
    }
}
- 创建一个空游戏体,指定脚本EnemySpawn.cs,并关联敌人的Prefab
八、小地图
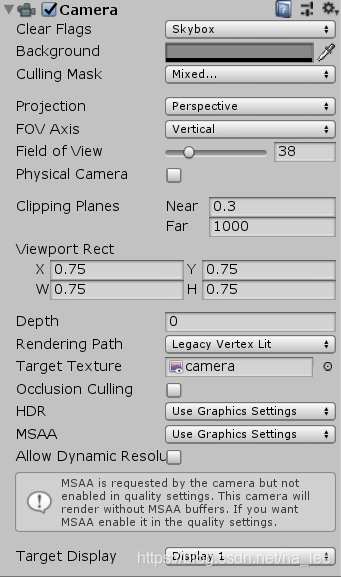
创建一个新的【Camera】,放在地图的正上方,对其进行设置
在敌人和主角的子项中分别创建不同颜色的球体对象,命名为dummy,作为主角和敌人的“替代品”,注意要把球体的【Sphere Colider】去掉
创建一个新的Layer,命名为dummy,并设置球体对象的Layer为dummy
选择主摄像机,使其不显示dummy层
选择新的摄像机,使其只显示dummy层和场景level层
显示小地图:
6.1首先创建一个新的【Render Texture】,命名为camera;
6.2在GameManager中添加一个【Image】,并用camera为其赋值,调整大小;
6.3为新的相机的【Target Texture】赋值
代码及资料
边栏推荐
- 微信公众号消息通知 “errcode“:40164,“errmsg“:“invalid ip
- logging基本使用
- 面试知识点
- Kali view IP address
- MySQL quick learning notes-2021-08-31
- Newbie sees the source code arraydeque
- mysql20210906
- Sword finger offer (twenty): stack containing min function
- Sword finger offer (8): jump the steps
- Implementing queues with two stacks
猜你喜欢

@NotBlank、@NotNull 、@NotEmpty 区别和使用
Capture ZABBIX performance monitoring chart with selenium

Why do I need automated testing? Software testers take you to evaluate different software testing tools

pytest fixture装饰器

Implementing queues with two stacks

Bash shell learning notes (4)

The problem of formatting IAR sprintf floating point to 0.0 in UCOS assembly

LE Audio规范概述

35. Search the insertion position

Disable usbjatg in Altium Designer
随机推荐
MySQL quick learning notes-2021-08-31
Flutter集成极光推送
Kali view IP address
RT thread learning notes (VIII) -- start the elmfat file system based on SPI flash (Part 2)
MySQL quicklearn-2021-09-01
看源码之LinkedList
C#委托与匿名方法浅析
RT thread learning notes (VI) -- start the elmfat file system based on SPI flash (Part 1)
Wireshark basic tutorial Ethernet frame analysis.
Bash shell learning notes (6)
WIRESHARK基础教程以太帧的分析。
Fragment lazy load
104. Maximum depth of binary tree
用两个栈实现队列
Flutter CachedNetworkImage圆角
104.二叉树的最大深度
BigDecimal's addition, subtraction, multiplication and division, size comparison, rounding up and down, and BigDecimal's set accumulation, judge whether BigDecimal has decimal
The assignment of member pointer defined in C structure and the use of structure pointer as member function parameter
Definition and use of C language namespace
Solve the problem of the popularity of org.apache.commons.codec.binary.base64