当前位置:网站首页>第60章 ApplicationPart自动集成整体性和独立性插件项
第60章 ApplicationPart自动集成整体性和独立性插件项
2022-08-01 19:35:00 【zhoujian_911】
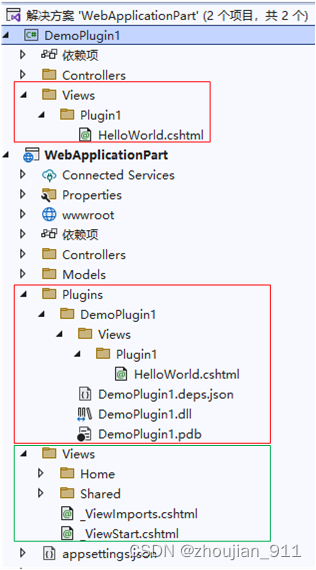
上章的示例把插件项的Razor展示页面定义在了Web主程序中,这样做虽然能够简化插件集成的实现,但是破坏了插件功能实现的整体性和独立性,为了保证插件项功能实现的整体性和独立性,并自动集成到Web主程序,nopCommerce程序采用的方式是通过对插件项的csproj文件进行相应的定义和配置,在整个程序执行生成操作时会把插件项的dll文件和Razor展示页面,自动复制到Web主程序的指定文件夹中,以供ApplicationPart把插件项集成到Web主程序提供支撑。下面将参照nopCommerce程序的实现方式 ,对上章的示例程序进行重构,保证集成的插件项定义实现的整体性和独立性。最终实现程序结构如下图所示:
1 自动复制插件项到Web主程序的定义配置
1.1 重构DemoPlugin1.csproj文件
<ProjectSdk="Microsoft.NET.Sdk">
<PropertyGroup>
<TargetFramework>net6.0</TargetFramework>
<ImplicitUsings>enable</ImplicitUsings>
<Nullable>enable</Nullable>
<!--在执行生成操作时,定义插件类库项dll文件在主程序中,自动复制到主程序文件夹目录的路径字符串-->
<OutputPath>..\WebApplicationPart\Plugins\DemoPlugin1</OutputPath>
<!--自动复制到主程序文件夹目录的路径字符串的变量实例-->
<OutDir>$(OutputPath)</OutDir>
<CopyLocalLockFileAssemblies>false</CopyLocalLockFileAssemblies>
</PropertyGroup>
<!--需要被自动复制插件项Razor展示页-->
<ItemGroup>
<ContentInclude="Views\Plugin1\HelloWorld.cshtml">
<CopyToOutputDirectory>PreserveNewest</CopyToOutputDirectory>
</Content>
</ItemGroup>
<ItemGroup>
<PackageReferenceInclude="Microsoft.AspNetCore.Mvc.NewtonsoftJson"Version="6.0.7" />
</ItemGroup>
</Project>
1.2 执行生成操作自动复制插件项中的指定文件到主程序
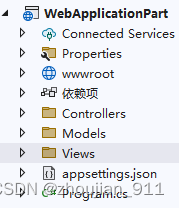
1.2.1 生成操作执行前
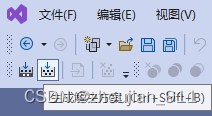
1.2.2 执行生成操作
右键单击“解决方案”,然后选择“生成解决方案”;或直接点击“生成解决方案”图标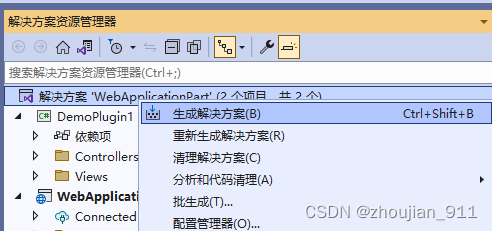
或
1.2.3 生成操作执行后
由生成操作自动把插件项中的指定文件,自动复制到主程序中

2 重构ApplicationPart加载插件项的dll文件
var builder = WebApplication.CreateBuilder(args);
string _pluginRootDirectoryPath = builder.Environment.ContentRootPath + @"Plugins";
string _pluginDirectoryPath = builder.Environment.ContentRootPath + @"Plugins\DemoPlugin1";
if (Directory.Exists(_pluginRootDirectoryPath) && Directory.Exists(_pluginDirectoryPath))
{
var assembly = Assembly.LoadFile(_pluginDirectoryPath + @"\DemoPlugin1.dll");
var mvcBuilders = builder.Services.AddMvc();
var controllerAssemblyPart = new AssemblyPart(assembly);
mvcBuilders.ConfigureApplicationPartManager(apm =>
{
apm.ApplicationParts.Add(controllerAssemblyPart);
});
}
3 主程序通过默认路由规则映射模式渲染插件项Razor页面
.Net(Core)6框架主程序MVC模板所提供的默认路由映射规则模式为:
app.MapControllerRoute(
name: "default",
pattern: "{controller=Home}/{action=Index}/{id?}");
3.1 插件项控件器行为方法渲染插件项Razor页面
namespace DemoPlugin1.Controllers
{
publicclassPlugin1Controller : Controller
{
public IActionResult HelloWorld()
{
return View();
}
public IActionResult LibraryPlugin1()
{
return View("~/Plugins/DemoPlugin1/Views/Plugin1/HelloWorld.cshtml");
}
}
}
<liclass="nav-item">
<aclass="nav-link text-dark"asp-area=""asp-controller="Plugin1"asp-action="LibraryPlugin1">插件项控件器行为方法渲染</a>

</li>
3.2 主程序控件器行为方法渲染插件项Razor页面
namespace WebApplicationPart.Controllers
{
publicclassHomeController : Controller
{
privatereadonly ILogger<HomeController> _logger;
publicHomeController(ILogger<HomeController> logger)
{
_logger = logger;
}
public IActionResult Index()
{
return View();
}
public IActionResult WebPlugin1()
{
return View("~/Plugins/DemoPlugin1/Views/Plugin1/HelloWorld.cshtml");
}
}
}
<liclass="nav-item">
<aclass="nav-link text-dark"asp-area=""asp-controller="Home"asp-action="WebPlugin1">主程序控件器行为方法渲染</a>

</li>
注意:本人建议通过默认路由映射规则模式,来让主程序在浏览器渲染插件项Razor页面,毕竟这种实现方式相对简单。
对以上功能更为具体实现和注释见:22-07-31-059_WebApplicationPart(默认路由规则映射模式渲染插件项Razor页面)。
4 主程序通过自定义配置路由规则映射模式渲染插件项Razor页面
1、自定义和配置插件项控件器行为方法与Razor页面的映射规则:
//参照MVC默认"Aaers"映射规则,自定义和配置插件项控件器行为方法与Razor页面的映射规则,以主程序能够通过配置插件项控件器行为方法,在浏览器中渲染出插件项的Razor页面。
builder.Services.Configure<RazorViewEngineOptions>(o =>
{
//o.AreaViewLocationFormats.Add("/Plugins/{2}/{1}/Views/{0}" + RazorViewEngine.ViewExtension);
o.AreaViewLocationFormats.Add("/Plugins/{2}/Views/{1}/{0}.cshtml"/*+ RazorViewEngine.ViewExtension=“.cshtml”*/);
});
///MVC模板自定义路由映射规则模式,该映射规则模型实际上是对"Aaers"默认映射模式的参考,也可以理解"Aaers"默认映射模式的变种,第1种被注释掉模式也是可以被正常被使用的。
//app.MapControllerRoute(
// name: "PluginsArea",
// pattern: "plugins/{area=DemoPlugin1}/{controller=Home}/{action=Index}/{id?}");
app.MapControllerRoute(
name: "PluginsArea",
pattern: "plugins/{area:exists}/{controller=Home}/{action=Index}/{id?}");
2、重构控件器类:DemoPlugin1.Controllers.Plugin1Controller:
[Area("DemoPlugin1")]
publicclassPlugin1Controller : Controller
{
public IActionResult HelloWorld()
{
return View();
}
public IActionResult LibraryPlugin1()
{
return View("~/Plugins/DemoPlugin1/Views/Plugin1/HelloWorld.cshtml");
}
}

3、删除Web主程序中的“Plugins”文件夹。
4、更新执行程序的生成操作在Web主程序中重新生成“Plugins”文件夹及其文件。
5、按F5执行程序,在浏览器地址栏输入:https://localhost:7239/plugins/DemoPlugin1/Plugin1/HelloWorld。
6、注意:默认自定义路由映射规则模式,来让主程序在浏览器渲染插件项Razor页面,这种实现方式需要更加复杂的配置定义,但是却省掉了额外的控制器行为方法。
7、更多、更详细技术实现见:“https://www.cnblogs.com/lwqlun/p/11260750.html”。
8、对以上功能更为具体实现和注释见:22-07-31-060_WebApplicationPart(自定义路由规则映射模式渲染插件项Razor页面)。
边栏推荐
- 17. Load balancing
- Website construction process
- LabVIEW 使用VISA Close真的关闭COM口了吗
- 智能硬件开发怎么做?机智云全套自助式开发工具助力高效开发
- 常用命令备查
- BN BatchNorm + BatchNorm的替代新方法KNConvNets
- 终于有人把AB实验讲明白了
- In the background of the GBase 8c database, what command is used to perform the master-slave switchover operation for the gtm and dn nodes?
- OSPO 五阶段成熟度模型解析
- nacos安装与配置
猜你喜欢


随机推荐
有序双向链表的实现。
Greenplum Database Source Code Analysis - Analysis of Standby Master Operation Tools
Creo5.0草绘如何绘制正六边形
MLX90640 Infrared Thermal Imager Temperature Measurement Module Development Notes (Complete)
【周赛复盘】LeetCode第304场单周赛
TestNG多个xml进行自动化测试
18、分布式配置中心nacos
突破边界,华为存储的破壁之旅
Website construction process
Greenplum数据库源码分析——Standby Master操作工具分析
mysql自增ID跳跃增长解决方案
SQL的 ISNULL 函数
MySQL开发技巧——存储过程
工作5年,测试用例都设计不好?来看看大神的用例设计总结
#yyds干货盘点# 面试必刷TOP101: 链表中倒数最后k个结点
随时随地写代码--基于Code-server部署自己的云开发环境
安装win32gui失败,解决问题
Choosing the right DevOps tool starts with understanding DevOps
Compose实战-实现一个带下拉加载更多功能的LazyColumn
openresty 动态黑白名单