当前位置:网站首页>[redis learning 13] redis builds master-slave cluster, sentinel cluster and partition cluster
[redis learning 13] redis builds master-slave cluster, sentinel cluster and partition cluster
2022-06-09 09:07:00 【Little boy】
List of articles
Redis colony
This chapter is based on CentOS7 Under the Redis Cluster tutorial , Include :
- Stand alone installation Redis
- Redis Master-slave
- Redis Fragmentation cluster
1. Stand alone installation Redis
Installation is required first Redis The dependence needed :
yum install -y gcc tcl
And then Redis Upload the installation package to any directory of the virtual machine :

for example , I put it /tmp Catalog :

decompression :
tar -xzf redis-6.2.4.tar.gz
After decompressing :

Get into redis Catalog :
cd redis-6.2.4
Run the compile command :
make && make install
If there is no error , The installation should be successful .
And then modify redis.conf Some configurations in the file :
#  Binding address , The default is 127.0.0.1, Will result in local access only . It is amended as follows 0.0.0.0 It can be in any IP visit
bind 0.0.0.0
#  Protected mode , Turn off protection mode
protected-mode no
#  Number of databases , Set to 1
databases 1
start-up Redis:
redis-server redis.conf
stop it redis service :
redis-cli shutdown
2.Redis Master-slave cluster
2.1. Cluster structure
The master-slave cluster structure we built is shown in the figure :
There are three nodes , A master node , Two slave nodes .
Here we will start in the same virtual machine 3 individual redis example , Simulate master-slave cluster , The information is as follows :
| IP | PORT | role |
|---|---|---|
| 192.168.150.101 | 7001 | master |
| 192.168.150.101 | 7002 | slave |
| 192.168.150.101 | 7003 | slave |
2.2. Prepare the instance and configuration
To start on the same virtual machine 3 An example , Three different configuration files and directories must be prepared , The directory where the configuration file is located is the working directory .
1) Create directory
We create three folders , The names are 7001、7002、7003:
#  Get into /tmp Catalog
cd /tmp
#  Create directory
mkdir 7001 7002 7003
Pictured :

2) Restore the original configuration
modify redis-6.2.4/redis.conf file , Change the persistence mode to the default RDB Pattern ,AOF Keep it off .
#  Turn on RDB
# save ""
save 3600 1
save 300 100
save 60 10000

#  close AOF
appendonly no
3) Copy the configuration file to each instance Directory
And then redis-6.2.4/redis.conf Copy files to three directories ( stay /tmp Directory execute the following command ):
#  Mode one : Copy one by one
cp redis-6.2.4/redis.conf 7001
cp redis-6.2.4/redis.conf 7002
cp redis-6.2.4/redis.conf 7003

#  Mode two : Pipe combination command , One click Copy
echo 7001 7002 7003 | xargs -t -n 1 cp redis-6.2.4/redis.conf
4) Modify the port of each instance 、 working directory
Modify the configuration file in each folder , Change the ports to 7001、7002、7003, take rdb Change the file storage location to your own directory ( stay /tmp Directory execute the following command ):
sed -i -e 's/6379/7001/g' -e 's/dir .\//dir \/tmp\/7001\//g' 7001/redis.conf
sed -i -e 's/6379/7002/g' -e 's/dir .\//dir \/tmp\/7002\//g' 7002/redis.conf
sed -i -e 's/6379/7003/g' -e 's/dir .\//dir \/tmp\/7003\//g' 7003/redis.conf
5) Modify the declaration of each instance IP
The virtual machine itself has multiple IP, To avoid future chaos , We need to be in redis.conf Specify the binding of each instance in the file ip Information , The format is as follows :
# redis Instance declaration  IP
replica-announce-ip 192.168.150.101
Every directory has to be changed , We can finish the modification with one click ( stay /tmp Directory execute the following command ):
#  Do it one by one
sed -i '1a replica-announce-ip 192.168.150.101' 7001/redis.conf
sed -i '1a replica-announce-ip 192.168.150.101' 7002/redis.conf
sed -i '1a replica-announce-ip 192.168.150.101' 7003/redis.conf

#  Or one click modification
printf '%s\n' 7001 7002 7003 | xargs -I{} -t sed -i '1a replica-announce-ip 192.168.150.101' {}/redis.conf
2.3. start-up
For the convenience of viewing the log , We turn on 3 individual ssh window , To start, respectively, 3 individual redis example , Start command :
#  The first 1 individual
redis-server 7001/redis.conf
#  The first 2 individual
redis-server 7002/redis.conf
#  The first 3 individual
redis-server 7003/redis.conf
After starting :

If you want to stop with one key , You can run the following command :
printf '%s\n' 7001 7002 7003 | xargs -I{} -t redis-cli -p {} shutdown
2.4. Open the master-slave relationship
Now the three instances have nothing to do with , To configure master-slave, you can use replicaof perhaps slaveof(5.0 before ) command .
There are temporary and permanent modes :
Modify the configuration file ( permanent )
- stay redis.conf Add a line of configuration :
slaveof <masterip> <masterport>
- stay redis.conf Add a line of configuration :
Use redis-cli The client connects to redis service , perform slaveof command ( Failure after restart ):
slaveof <masterip> <masterport>
Be careful : stay 5.0 Add new commands in the future replicaof, And salveof The effect is consistent .
Here we are for the convenience of demonstration , Mode 2 .
adopt redis-cli Command connection 7002, Execute the following command :
#  Connect  7002
redis-cli -p 7002
#  perform slaveof
slaveof 192.168.150.101 7001
adopt redis-cli Command connection 7003, Execute the following command :
#  Connect  7003
redis-cli -p 7003
#  perform slaveof
slaveof 192.168.150.101 7001
Then connect 7001 node , View the cluster status :
#  Connect  7001
redis-cli -p 7001
#  Check the status
info replication
result :

2.5. test
Do the following to test :
utilize redis-cli Connect 7001, perform
set num 123utilize redis-cli Connect 7002, perform
get num, Re executionset num 666utilize redis-cli Connect 7003, perform
get num, Re executionset num 888
You can find , Only in 7001 This master Write operations can be performed on nodes ,7002 and 7003 these two items. slave Nodes can only perform read operations .
3. Build sentry clusters
3.1. Cluster structure
Here we build a three node Sentinel colony , To supervise the previous Redis Master-slave cluster . Pictured :

Three sentinel The example information is as follows :
| node | IP | PORT |
|---|---|---|
| s1 | 192.168.150.101 | 27001 |
| s2 | 192.168.150.101 | 27002 |
| s3 | 192.168.150.101 | 27003 |
3.2. Prepare the instance and configuration
To start on the same virtual machine 3 An example , Three different configuration files and directories must be prepared , The directory where the configuration file is located is the working directory .
We create three folders , The names are s1、s2、s3:
#  Get into /tmp Catalog
cd /tmp
#  Create directory
mkdir s1 s2 s3
Pictured :

And then we were in s1 Create a directory sentinel.conf file , Add the following :
port 27001
sentinel announce-ip 192.168.150.101
sentinel monitor mymaster 192.168.150.101 7001 2
sentinel down-after-milliseconds mymaster 5000
sentinel failover-timeout mymaster 60000
dir "/tmp/s1"
Reading :
port 27001: It is the present. sentinel The port of the instancesentinel monitor mymaster 192.168.150.101 7001 2: Specify the master node informationmymaster: Master node name , Customize , Write at will192.168.150.101 7001: The master node ip And port2: The election master At the time of the quorum value
And then s1/sentinel.conf File copy to s2、s3 In both directories ( stay /tmp Directory execute the following command ):
#  Mode one : Copy one by one
cp s1/sentinel.conf s2
cp s1/sentinel.conf s3
#  Mode two : Pipe combination command , One click Copy
echo s2 s3 | xargs -t -n 1 cp s1/sentinel.conf
modify s2、s3 Configuration files in two folders , Change the ports to 27002、27003:
sed -i -e 's/27001/27002/g' -e 's/s1/s2/g' s2/sentinel.conf
sed -i -e 's/27001/27003/g' -e 's/s1/s3/g' s3/sentinel.conf
3.3. start-up
For the convenience of viewing the log , We turn on 3 individual ssh window , To start, respectively, 3 individual redis example , Start command :
#  The first 1 individual
redis-sentinel s1/sentinel.conf
#  The first 2 individual
redis-sentinel s2/sentinel.conf
#  The first 3 individual
redis-sentinel s3/sentinel.conf
After starting :
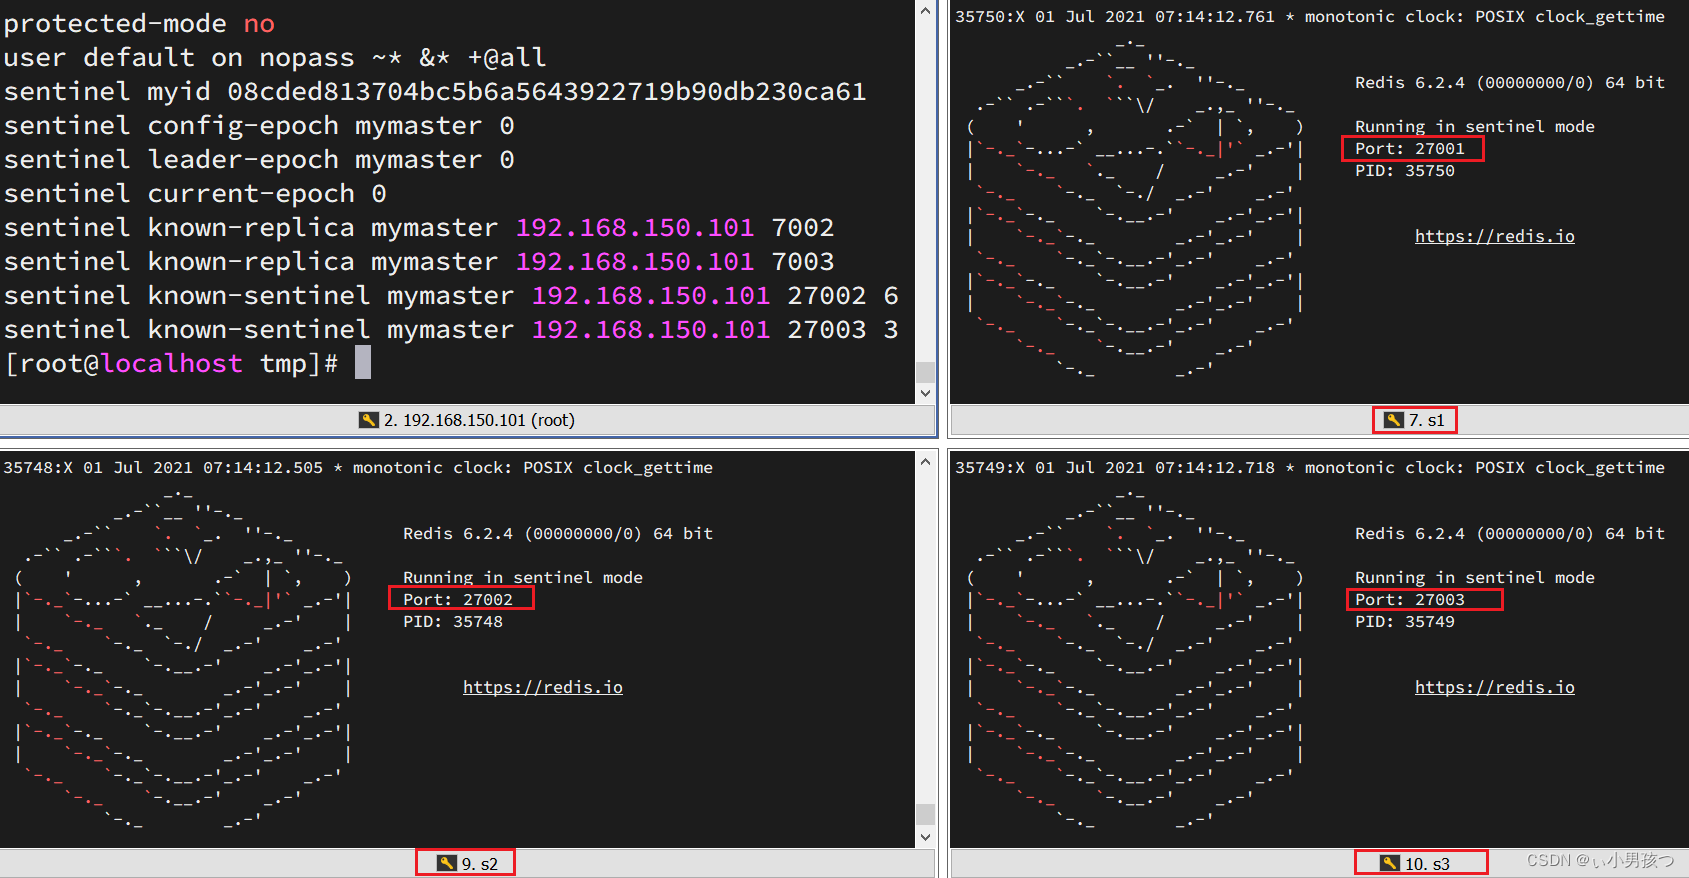
3.4. test
Try to make master node 7001 Downtime , see sentinel journal :

see 7003 Log :
see 7002 Log :
4. Build a cluster
4.1. Cluster structure
A fragmented cluster requires a large number of nodes , Here we set up a minimal fragment cluster , contain 3 individual master node , Every master Contains a slave node , The structure is as follows :

Here we will start in the same virtual machine 6 individual redis example , Simulate fragment cluster , The information is as follows :
| IP | PORT | role |
|---|---|---|
| 192.168.150.101 | 7001 | master |
| 192.168.150.101 | 7002 | master |
| 192.168.150.101 | 7003 | master |
| 192.168.150.101 | 8001 | slave |
| 192.168.150.101 | 8002 | slave |
| 192.168.150.101 | 8003 | slave |
4.2. Prepare the instance and configuration
Delete the previous 7001、7002、7003 These directories , Recreate 7001、7002、7003、8001、8002、8003 Catalog :
#  Get into /tmp Catalog
cd /tmp
#  Delete the old , Avoid configuration interference
rm -rf 7001 7002 7003
#  Create directory
mkdir 7001 7002 7003 8001 8002 8003
stay /tmp Next, prepare a new redis.conf file , The contents are as follows :
port 6379
#  Turn on the cluster function
cluster-enabled yes
#  The name of the configuration file for the cluster , We don't need to create , from redis Self maintenance
cluster-config-file /tmp/6379/nodes.conf
#  Timeout for node heartbeat failure
cluster-node-timeout 5000
#  Persistent file storage directory
dir /tmp/6379
#  Binding address
bind 0.0.0.0
#  Give Way redis Background operation
daemonize yes
#  Registered instance ip
replica-announce-ip 192.168.150.101
#  Protected mode
protected-mode no
#  Number of databases
databases 1
#  journal
logfile /tmp/6379/run.log
Copy this file to each directory :
#  Get into /tmp Catalog
cd /tmp
#  Execute Copy
echo 7001 7002 7003 8001 8002 8003 | xargs -t -n 1 cp redis.conf
Modify... Under each directory redis.conf, Will be one of the 6379 Change to be consistent with the directory :
#  Get into /tmp Catalog
cd /tmp
#  Modify the configuration file
printf '%s\n' 7001 7002 7003 8001 8002 8003 | xargs -I{} -t sed -i 's/6379/{}/g' {}/redis.conf
4.3. start-up
Because the background startup mode has been configured , So you can start the service directly :
#  Get into /tmp Catalog
cd /tmp
#  Start all services with one click
printf '%s\n' 7001 7002 7003 8001 8002 8003 | xargs -I{} -t redis-server {}/redis.conf
adopt ps Check the status :
ps -ef | grep redis
The discovery service has been started normally :

If you want to shut down all processes , Can execute orders :
ps -ef | grep redis | awk '{print $2}' | xargs kill
perhaps ( This is recommended ):
printf '%s\n' 7001 7002 7003 8001 8002 8003 | xargs -I{} -t redis-cli -p {} shutdown
4.4. Create clusters
Although the service started , But at present, each service is independent , No connection whatsoever .
We need to execute the command to create the cluster , stay Redis5.0 It was troublesome to create clusters before ,5.0 Then the cluster management commands are integrated into redis-cli in .
1)Redis5.0 Before
Redis5.0 Before, cluster commands used redis Under the installation package src/redis-trib.rb To achieve . because redis-trib.rb Yes, there is ruby Language, so you need to install ruby Environmental Science .
#  Installation dependency
yum -y install zlib ruby rubygems
gem install redis
Then use the command to manage the cluster :
#  Get into redis Of src Catalog
cd /tmp/redis-6.2.4/src
#  Create clusters
./redis-trib.rb create --replicas 1 192.168.150.101:7001 192.168.150.101:7002 192.168.150.101:7003 192.168.150.101:8001 192.168.150.101:8002 192.168.150.101:8003
2)Redis5.0 in the future
We use Redis6.2.4 edition , Cluster management and integration into redis-cli in , The format is as follows :
redis-cli --cluster create --cluster-replicas 1 192.168.150.101:7001 192.168.150.101:7002 192.168.150.101:7003 192.168.150.101:8001 192.168.150.101:8002 192.168.150.101:8003
Command specification :
redis-cli --clusterperhaps./redis-trib.rb: Represents the cluster operation commandcreate: The representative is to create a cluster--replicas 1perhaps--cluster-replicas 1: Specify each node in the cluster master The number of copies of is 1, hereTotal number of nodes ÷ (replicas + 1)What you get is master The number of . Therefore, the top in the node list n One is master, Other nodes are slave node , Randomly assigned to different master
After running :

Input here yes, Then the cluster starts to create :

You can view the cluster status through the command :
redis-cli -p 7001 cluster nodes

4.5. test
Try to connect 7001 node , Store a piece of data :
#  Connect
redis-cli -p 7001
#  Store the data
set num 123
#  Reading data
get num
#  Store it again
set a 1
It turned out to be tragic :
During cluster operation , Need to give redis-cli add -c Parameters only :
redis-cli -c -p 7001
This time it's OK :

The number of copies of is 1, here Total number of nodes ÷ (replicas + 1) What you get is master The number of . Therefore, the top in the node list n One is master, Other nodes are slave node , Randomly assigned to different master
You can view the cluster status through the command :
redis-cli -p 7001 cluster nodes
边栏推荐
- RMAN backup concept_ About image copy
- 项目面试题
- FreeRtos任务通知复习
- 测试不会被开发取代吗?
- ESP32学习笔记【WiFi网络篇】-01AP&STA
- Modifier le tableau des activités de marché
- C pointer review
- 修改市场活动表
- Open application for "cloud native technology application and practice" demonstration course project in Colleges and Universities
- RMAN backup concept_ Online backup and backup mode
猜你喜欢

3D編程模式:依賴隔離模式

修改市場活動錶

C pointer review

Will testing not be replaced by development?

面向高校 | “云原生技术应用与实践”示范课程项目开放申报

FreeRTOS semaphore review

Application of acrel bus intelligent lighting control system in hospital

Creation of JS class and use of constructor constructor

Residual current relay uses residual current transformer to detect residual current and prevent electrical fire

web知识点123
随机推荐
Oracle locally managed tablespaces
微信小程序开发之菜单的创建
Introduction to framework: the update expression is invalid. At least one column must be updated
Configure CONDA environment and pytoch installation
MySQL在存储过程中使用while批量插入数据(批量提交和单个提交的性能差异)
C language pointer
Mock interview plan; Campus simulated interview plan; Job search simulation interview contest plan; Planning book of simulated job hunting competition of School of economics and management; College st
LeetCode 第 295 场周赛
[antenna] [1] explanation of some nouns and simple concepts
SSM实现选中删除
剩余电流继电器用剩余电流互感器来检测剩余电流防止电气火灾的发生
FreeRtos信号量复习
Direct application of 10 kinds of question type explosive text title sentence patterns
Esp32 learning notes [WiFi network] - 01ap & sta
[texstudio] [1] fractional dfrac, tfrac undefined control square error
.NET C#基础(6):命名空间 - 组织代码的利器
Application of acrel bus intelligent lighting control system in hospital
Hj22 water bottle
安科瑞综合能效管理系统在数据中心的应用
Greenplus vacuum cleaning and deleting data command of system operation and maintenance series