当前位置:网站首页>8. AI doctor case
8. AI doctor case
2022-06-23 18:53:00 【C--G】
Background introduction
- What is an intelligent dialogue system ?
- With the development of artificial intelligence technology , chatbot , Voice assistant and other applications can be seen everywhere in life , For example, baidu Xiaodu , Ali's honey , Microsoft's Xiaobing, etc .
Its purpose is to make machines, like human beings, be able to respond intelligently through artificial intelligence technology , Solve all kinds of problems in reality .
- With the development of artificial intelligence technology , chatbot , Voice assistant and other applications can be seen everywhere in life , For example, baidu Xiaodu , Ali's honey , Microsoft's Xiaobing, etc .

- From the perspective of dealing with problems , The intelligent dialogue system can be divided into :
- Task oriented : Complete tasks with clear direction , Such as hotel reservation consultation , Online consultation, etc .
- Non task oriented : Without a clear purpose , Such as arithmetic , Play music , Question answering .
Unit dialogue API Use
- Unit Platform related knowledge :
- Unit The platform is an open intelligent dialogue customization and service platform for Baidu brain , It is also one of the largest open platforms for dialogue in the Chinese field . Unit Provide free dialog interface service for registered users , Such as Chinese chat API, Encyclopedia Q & A API, Verse generation API etc. , Through these API We can feel the charm of intelligent dialogue , At the same time, it can also be used as the final choice when the task oriented dialogue system cannot match the user input .

- Unit The platform is an open intelligent dialogue customization and service platform for Baidu brain , It is also one of the largest open platforms for dialogue in the Chinese field . Unit Provide free dialog interface service for registered users , Such as Chinese chat API, Encyclopedia Q & A API, Verse generation API etc. , Through these API We can feel the charm of intelligent dialogue , At the same time, it can also be used as the final choice when the task oriented dialogue system cannot match the user input .
- Unit gossip API demonstration
 User input  >>> " Hello "
Unit reply  >>> " Hello , What do you want to talk about ~"
 User input  >>> " I want to have a girlfriend !"
Unit reply  >>> " I also want a girlfriend ~"
 User input  >>> " What do you have for dinner? Think about it "
Unit reply  >>> " I want to eat hot pot "
call Unit API Implementation process :
- First step : Register and log in to baidu account , Get into Unit The console creates its own robot .
- The second step : Make the relevant configuration , Get the request API Interface needs API Key And Secret Key.
- The third step : Write... On the server API Call the script and test .
First step : Register and log in to baidu account , Get into Unit The console creates its own robot
https://ai.baidu.com/tech/unit
The second step : Make the relevant configuration , Get the request API Interface needs API Key And Secret Key.


- The third step : Write... On the server API Call the script and test
import json
import random
import requests

# client_id  Obtained for the official website AK, client_secret  Obtained for the official website SK
client_id = "uryd9RRIXmz6xO7cdvCv3nuo"
client_secret = "UTp2EqpWtb4ApZoIezrmfpKPDE21lNg0"


def unit_chat(chat_input, user_id="88888"):
    """ description: Call Baidu UNIT Interface , Reply to chat  Parameters ---------- chat_input : str  Users send day content  user_id : str  Initiate chat user ID, It can be defined arbitrarily  Return ----------  return unit Reply content  """
    #  Set the default reply content ,  Once an interface exception occurs ,  Reply to the content
    chat_reply = " sorry , We are learning , Then reply to you ."
    #  according to  client_id  And  client_secret  obtain access_token
    url = "https://aip.baidubce.com/oauth/2.0/token?grant_type=client_credentials&client_id=%s&client_secret=%s" % (
    client_id, client_secret)
    res = requests.get(url)
    access_token = eval(res.text)["access_token"]
    #  according to  access_token  Get chat robot interface data
    unit_chatbot_url = "https://aip.baidubce.com/rpc/2.0/unit/service/chat?access_token=" + access_token
    #  Assemble the chat interface to send data corresponding to the request , Mainly filling  query  value
    post_data = {

                "log_id": str(random.random()),
                "request": {

                    "query": chat_input,
                    "user_id": user_id
                },
                "session_id": "",
                "service_id": "S71326",
                "version": "2.0"
            }
    #  Take the encapsulated data as the request content ,  Send to Unit Chat robot interface ,  And get the return result
    res = requests.post(url=unit_chatbot_url, json=post_data)


    #  Get the data returned by the chat interface
    unit_chat_obj = json.loads(res.content)
    # print(unit_chat_obj)
    #  Print the returned results
    #  Judge whether there is an error in the data returned by the chat interface  error_code == 0  Indicates that the request is correct
    if unit_chat_obj["error_code"] != 0: return chat_reply
    #  Parsing the data returned from the chat interface , Find the returned text content  result -> response_list -> schema -> intent_confidence(>0) -> action_list -> say
    unit_chat_obj_result = unit_chat_obj["result"]
    unit_chat_response_list = unit_chat_obj_result["response_list"]
    #  Choose one at random " Intention confidence "[+response_list[].schema.intent_confidence] Not for 0 Skills as an answer
    unit_chat_response_obj = random.choice(
       [unit_chat_response for unit_chat_response in unit_chat_response_list if
        unit_chat_response["schema"]["intent_confidence"] > 0.0])
    unit_chat_response_action_list = unit_chat_response_obj["action_list"]
    unit_chat_response_action_obj = random.choice(unit_chat_response_action_list)
    unit_chat_response_say = unit_chat_response_action_obj["say"]
    return unit_chat_response_say


if __name__ == '__main__':
    while True:
        chat_input = input(" Please enter a chat or q(Q) sign out :")
        if chat_input == 'Q' or chat_input == 'q':
            break
        chat_reply = unit_chat(chat_input)
        print(" User input  >>>", chat_input)
        print("Unit reply  >>>", chat_reply)

Online doctor needs analysis

Architecture diagram analysis :
- The whole project is divided into : Online part and offline part
- The online section includes : werobot Service module , Main logic service modules , Sentence related model service module , Session management module (redis),
Figure database module and Rule dialog /Unit modular . The offline part includes : Structured and unstructured data acquisition modules , NER The model uses modules , And entity audit model usage module . - Online part data flow : Start with the user request , adopt werobot service , stay werobot The service internally requests the main service , The session management database will be called in the main service redis, Call the sentence related model service , And call graph database , Finally, send the query results to the dialog rule template or use Unit dialogue API reply .
- Offline partial data flow : Start with data collection , Will get structured and unstructured data , For structured data, entity audit model will be directly used for audit , Then write to the graph database ; For unstructured data , Will use NER Model for entity extraction , Then it is written to the graph database after the entity audit .
Tools

Flask web Service Framework

- install
pip install flask==2.0.2
- Test code
#  Import
from flask import Flask

#  Create an instance of this class app  Parameter is  __name__  This parameter is required
#  Only pass in this parameter ,Flask To know where to find templates and static files
app = Flask(__name__)


#  Use route() Decorator to tell flask Trigger function url
@app.route("/")
def hello_world():
    return "hello world"


if __name__ == "__main__":
    app.run(host="0.0.0.0", port=5000)

redis

- install
yum install redis -y

- python Medium redis drive
pip install redis
- start-up redis service
redis-server
- Test code
# coding=utf-8
REDIS_CONFIG = {

    "host": "0.0.0.0",
    "port": 6379
}
import redis

#  Create a redis Connection pool
pool = redis.ConnectionPool(**REDIS_CONFIG)

#  Create an active object
r = redis.StrictRedis(connection_pool=pool)

#  utilize r.hset() Write data , Pass in three parameters uid,key,value
# uid  User unique identification
uid = "8888"

# key It is the description information of the data to be recorded
key = " The last thing the user said :".encode("utf-8")

# value It is the data content that needs to be recorded
value = " bye , Miss Dong ".encode("utf-8")

r.hset(uid, key, value)

#  utilize r.hget() Reading data
result = r.hget(uid, key)
print(result.decode("utf-8"))

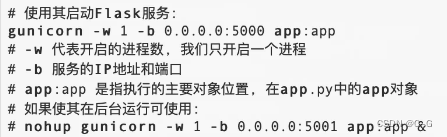
Gunicorn Service components

- install
pip install gunicorn==20.0.4
- Use

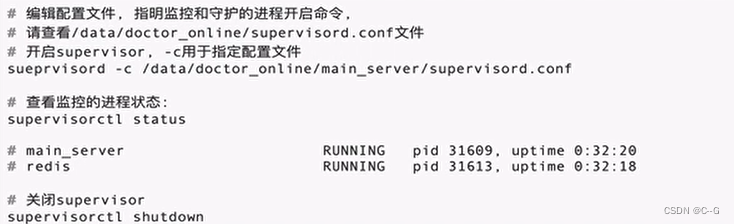
Supervisor Service monitoring

- install
yum install supervisor
- Usage method

Neo4j Graph database


- install
First step : Prepare the environment
sudo su
$ wget --no-check-certificate -O - https://debian.neo4j.org/neotechnology.gpg.key | sudo apt-key add -
$ echo 'deb http://debian.neo4j.org/repo stable/' > /etc/apt/sources.list.d/neo4j.list
$ apt update
$ apt install neo4j

sudo apt-get install openjdk-8-jdk
java -version
sudo su
wget -O - https://debian.neo4j.org/neotechnology.gpg.key | sudo apt-key add -
echo 'deb https://debian.neo4j.org/repo stable/' | sudo tee -a /etc/apt/sources.list.d/neo4j.list
sudo apt-get update
The second step : apt-get install
sudo apt-get install neo4j=3.1.4   # Enterprise Edition
sudo apt-get install neo4j-enterprise=1:3.5.12  # Community Edition
The third step : Modify the configuration file in by default /etc/neo4j/neo4j.conf
#  The repository storage location of the database 、 Log location, etc
dbms.directories.data=/var/lib/neo4j/data
dbms.directories.plugins=/var/lib/neo4j/plugins
dbms.directories.certificates=/var/lib/neo4j/certificates
dbms.directories.logs=/var/log/neo4j
dbms.directories.lib=/usr/share/neo4j/lib
dbms.directories.run=/var/run/neo4j

#  The location of the import
dbms.directories.import=/var/lib/neo4j/import

#  Initialize memory size
dbms.memory.heap.initial_size=512m

# Bolt  Connection address
dbms.connector.bolt.enabled=true
dbms.connector.bolt.tls_level=OPTIONAL
dbms.connector.bolt.listen_address=192.168.81.129:7687
After installation, enter cypher-shell, After entering, you can go through CALL dbms.changePassword(‘new password’) Change new password , Otherwise, data cannot be written , The initial user name and password are neo4j
Step four : start-up neo4j database
#  Start command
neo4j start

#  The terminal displays as follows ,  On behalf of a successful startup
Active database: graph.db
Directories in use:
  home:         /usr/neo4j
  config:       /etc/neo4j
  logs:         /var/log/neo4j
  plugins:      /var/lib/neo4j/plugins
  import:       /var/lib/neo4j/import
  data:         /var/lib/neo4j/data
  certificates: /var/lib/neo4j/certificates
  run:          /var/run/neo4j
Starting Neo4j.


If the password is wrong :
- Cypher Use

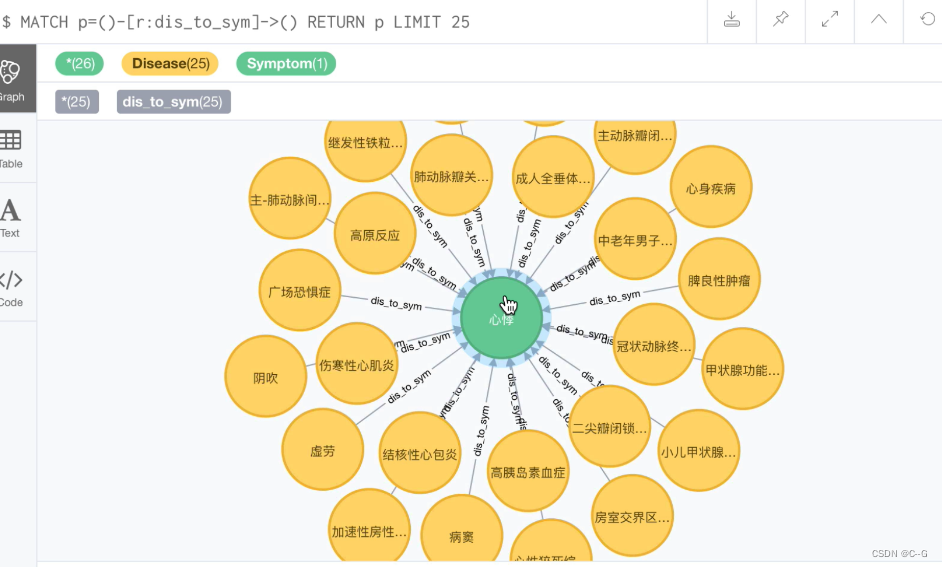
create command : Create nodes in graph data .
#  Create command format :
#  here create Is the key word ,  Create node name node_name,  Node labels Node_Label,  Put it in parentheses ()
#  Then put all the attributes belonging to the node label in curly braces '{}' Inside ,  Write out the attribute names in turn : Property value ,  Use commas for different attributes ',' Separate
#  For example, the following command creates a node e,  The node label is Employee,  Have id, name, salary, deptnp Four properties :
CREATE (e:Employee{
    id:222, name:'Bob', salary:6000, deptnp:12})

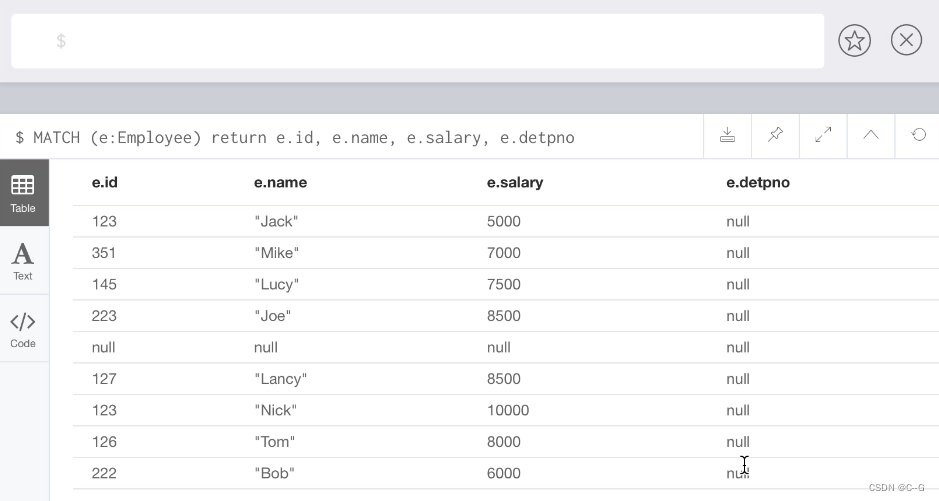
match command : matching ( Inquire about ) There are data
# match Special query commands are used to match ,  The name of the node : Node labels ,  Still in parentheses ,  And then use return Statement returns the query result ,  and SQL Very similar .
MATCH (e:Employee) RETURN e.id, e.name, e.salary, e.deptno
merge command : If the node exists , Then equivalent to match command ; Node does not exist , Equivalent to create command
MERGE (e:Employee {
    id:146, name:'Lucer', salary:3500, deptno:16})

Then use... Again merge Inquire about , It is found that the data in the database has not increased , Because the same data already exists , merge The match is successful
MERGE (e:Employee {
    id:146, name:'Lucer', salary:3500, deptno:16})

Use create Create relationships : Directional relationships must be created , Otherwise, the report will be wrong
#  Create a node p1 To p2 There is a directional relationship between ,  This relationship r The label for Buy,  representative p1 bought p2,  Direction is p1 Point to p2
CREATE (p1:Profile1)-[r:Buy]->(p2:Profile2)

Use merge Create relationships : Can be created with / Non directional relationship .
#  Create a node p1 To p2 Non directional relationship ,  This relationship r The label for miss,  representative p1-miss-p2,  The directions are mutual
MERGE (p1:Profile1)-[r:miss]-(p2:Profile2)

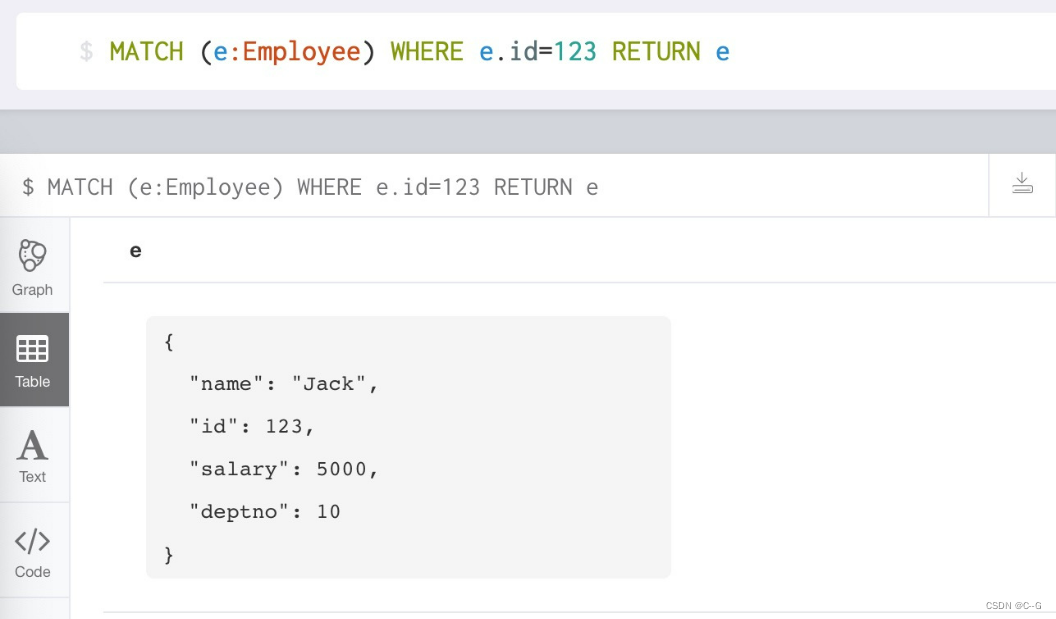
where command : Be similar to SQL Add query criteria in
#  Query nodes Employee in , id The value is equal to 123 That node of
MATCH (e:Employee) WHERE e.id=123 RETURN e
delete command : Delete node / Relationships and their associated properties
#  Be careful :  Delete nodes at the same time ,  Also delete the Associated Relationship Edge
MATCH (c1:CreditCard)-[r]-(c2:Customer) DELETE c1, r, c2

sort command : Cypher The sort in the command uses order by
#  Match query tags Employee,  Follow all matching results as id The result is returned after the values are arranged in ascending order
MATCH (e:Employee) RETURN e.id, e.name, e.salary, e.deptno ORDER BY e.id

#  If you want to sort in descending order ,  Only need to ORDER BY e.salary to ORDER BY e.salary DESC
MATCH (e:Employee) RETURN e.id, e.name, e.salary, e.deptno ORDER BY e.salary DESC


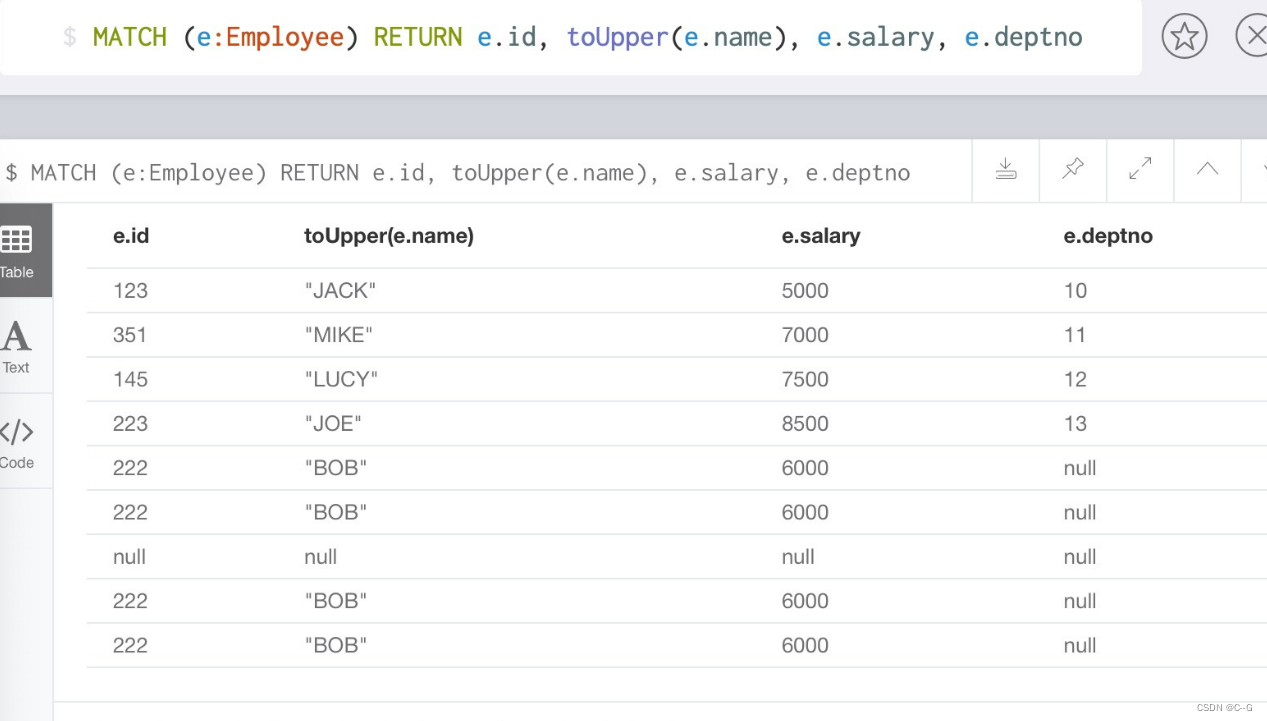
toUpper() function : Converts an input string to uppercase letters
MATCH (e:Employee) RETURN e.id, toUpper(e.name), e.salary, e.deptno
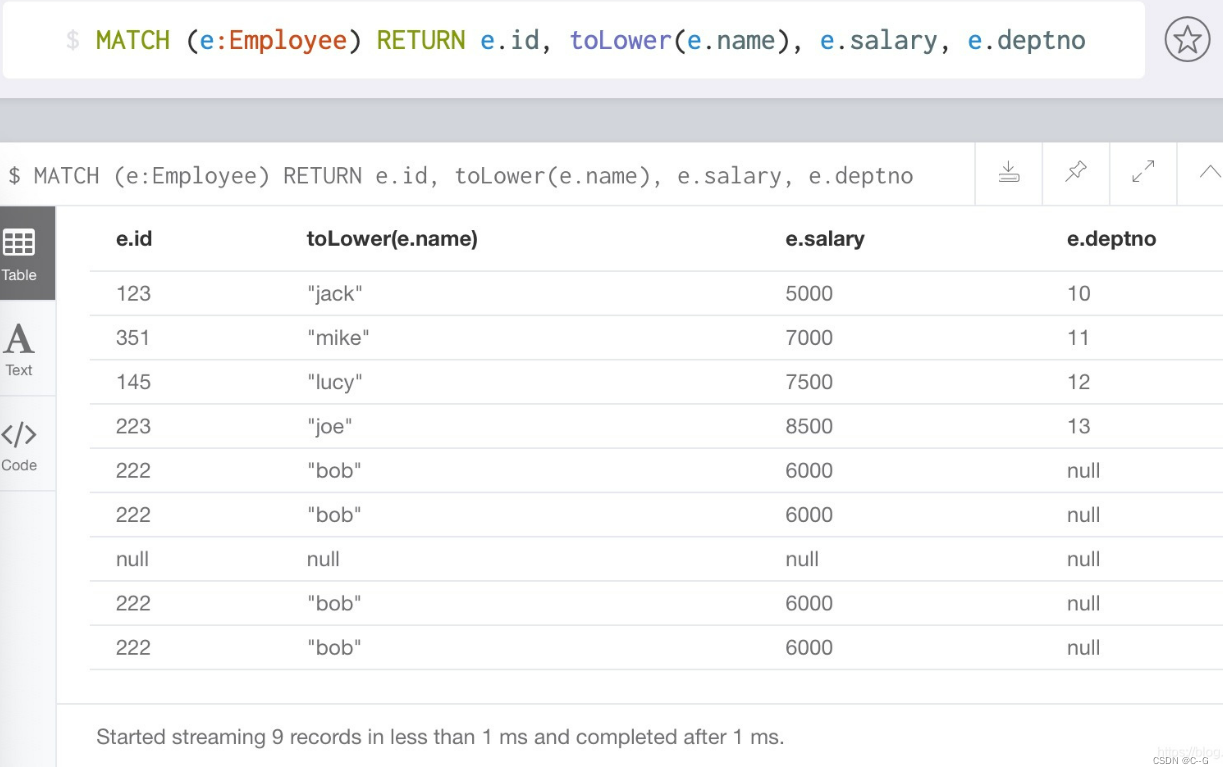
toLower() function : Talk about converting an input string to lowercase letters
MATCH (e:Employee) RETURN e.id, toLower(e.name), e.salary, e.deptno
substring() function : Returns a substring
#  The input string is input_str,  Return from index start_index Start ,  To end_index-1 The ending substring
substring(input_str, start_index, end_index)

#  Sample code ,  Return the first two letters of the employee's name
MATCH (e:Employee) RETURN e.id, substring(e.name,0,2), e.salary, e.deptno

replace() function : Replace substring
#  The input string is input_str,  Match the input string with origin_str Part of ,  Replace with new_str
replace(input_str, origin_str, new_str)

#  Sample code ,  Replace the employee's name with the suffix _HelloWorld
MATCH (e:Employee) RETURN e.id, replace(e.name,e.name,e.name + "_HelloWorld"), e.salary, e.deptno


count() function : Return from match Number of successful command matches
#  Label matching Employee Number of successful records
MATCH (e:Employee) RETURN count( * )

max() function : Return from match The command matches the maximum value in the successful record
#  Label matching Employee In the record of success ,  The highest salary figure
MATCH (e:Employee) RETURN max(e.salary)

min() function : Return from match The command matches the minimum value in the successful record
#  Label matching Employee In the record of success ,  Minimum wage figures
MATCH (e:Employee) RETURN min(e.salary)

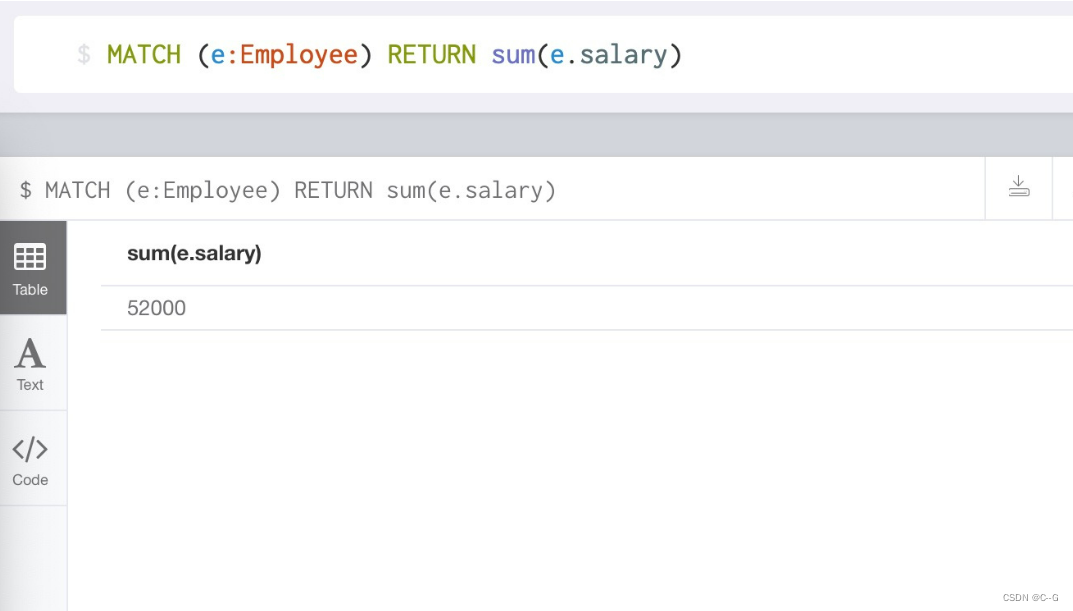
sum() function : Return from match Command matches all the summation values of a field in a successful record
#  Label matching Employee In the record of success ,  The sum of wages of all employees
MATCH (e:Employee) RETURN sum(e.salary)
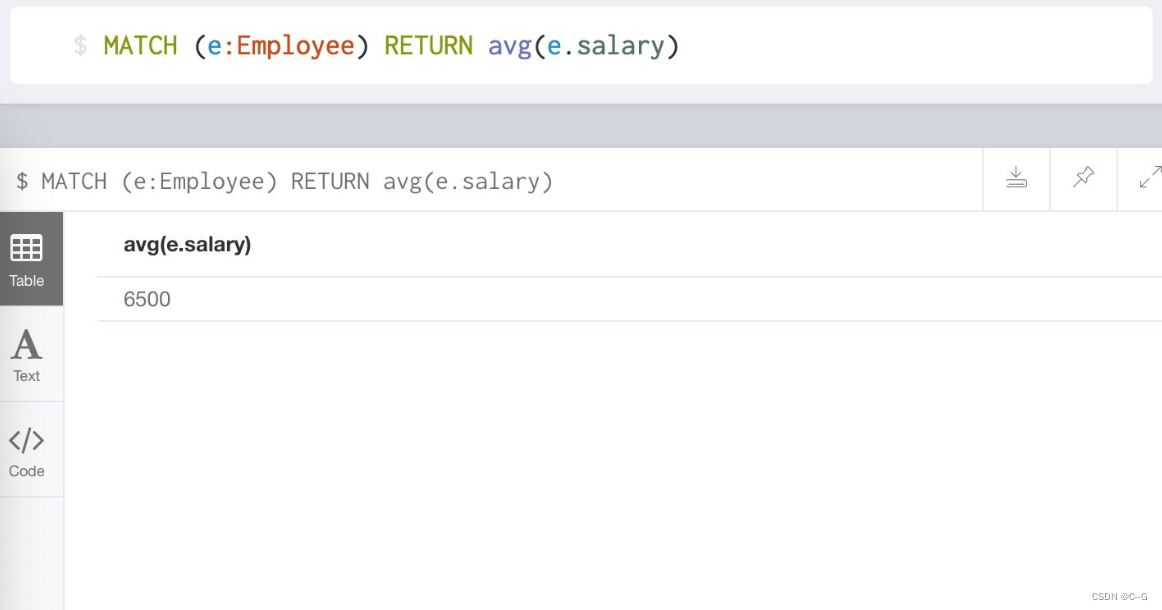
avg() function : Return from match The average value of a field in the record with successful command matching
#  Label matching Employee In the record of success ,  The average salary of all employees
MATCH (e:Employee) RETURN avg(e.salary)

Create index : Use create index on To create an index
#  Create nodes Employee Properties above id The index of
CREATE INDEX ON:Employee(id)

Delete index : Use drop index on To delete an index
#  Delete node Employee Properties above id The index of
DROP INDEX ON:Employee(id)

- stay Python Use in neo4j

install
pip install neo4j-driver
Configuration class
#  Set up neo4j Figure configuration information of database
NEO4J_CONFIG = {

    "uri": "bolt://192.168.81.129:7687",
    "auth": ("neo4j", "cgneo4j"),
    "encrypted": False
}
from neo4j import GraphDatabase

#  About neo4j The user name of the database , The password information has been configured in the same directory config.py In file
from config import NEO4J_CONFIG

driver = GraphDatabase.driver(**NEO4J_CONFIG)

#  Direct use python Code access node Company,  And return all node information
with driver.session() as session:
    cypher = "CREATE(c:Company) SET c.name=' Online doctors ' RETURN c.name"
    record = session.run(cypher)
    result = list(map(lambda x: x[0], record))
    print("result:", result)
result: [' Online doctors ']
- Business
If a set of database operations either all occur or no step is performed , We call this group of processing steps a transaction , It is the guarantee of database consistency
def _some_operations(tx, cat_name, mouse_name):
    tx.run("MERGE (a:Cat{name: $cat_name})"
           "MERGE (b:Mouse{name: $mouse_name})"
           "MERGE (a)-[r:And]-(b)",
           cat_name=cat_name, mouse_name=mouse_name)


with driver.session() as session:
    session.write_transaction(_some_operations, "Tom", "Jerry")

Offline part


Structured data pipeline
Data content to be audited by the named entity
...
 Acute ligament injury of ankle .csv
 Sprained ankle .csv
 Ankle fracture .csv
 Horseshoe shaped kidney .csv
 Webbed penis .csv
 Manic depression .csv
 Mania .csv
 Bipolar disorder .csv
 Somatoform disorders .csv
 Mental disorders associated with somatic infections .csv
 Mental disorder caused by physical infection .csv
 somatesthesia disorder  .csv
 Mental disorders associated with physical diseases .csv
 Switching disorder .csv
 Metastatic small bowel tumor .csv
 Metastatic cutaneous calcification .csv
 Metastatic liver cancer .csv
 Metastatic pleural tumor .csv
 Metastatic bone tumor .csv
 Rotavirus enteritis .csv
 Gastroenteritis caused by rotavirus .csv
 Abnormal dystocia of soft birth canal .csv
...
With mania .csv For example , It has the following contents
 Manic melancholy
 mania
 Behavioral and emotional abnormalities
 The mood is high
 Emotional ups and downs
 Technical mania
 Aggression
 Irritable
 Thinking is easy
 Uncontrollable associations
 Psychomotor excitement

Delete the audited empty file
# Linux  command --  Delete the empty file in the current folder
find ./ -name "*" -type f -size 0c | xargs -n 1 rm -f
Named entities are written to the database
The written data is available for query in the online section , Match the corresponding disease according to the symptoms entered by the user
#  Import correlation package
import os
import fileinput
from neo4j import GraphDatabase
from config import NEO4J_CONFIG

driver = GraphDatabase.driver( **NEO4J_CONFIG)

def _load_data(path):
    """ description:  take path In the catalog csv The file is loaded into memory in the specified format  :param path:  The disease after review corresponds to the symptom csv file  :return:  Return to the disease Dictionary , A dictionary that stores each disease and its corresponding symptoms  { disease 1: [ symptoms 1,  symptoms 2, ...],  disease 2: [ symptoms 1,  symptoms 2, ...] """
    #  Get disease csv list
    disease_csv_list = os.listdir(path)
    #  The suffix .csv Get rid of ,  Get a list of diseases
    disease_list = list(map(lambda x: x.split(".")[0], disease_csv_list))

    #  Initialize a symptom list ,  It contains a list of symptoms for each disease
    symptom_list = []
    #  Traverse the disease csv list
    for disease_csv in disease_csv_list:
        #  Will the disease csv Each symptom in is taken out and stored in symptom In the list
        symptom = list(map(lambda x : x.strip(), fileinput.FileInput(os.path.join(path, disease_csv), openhook= fileinput.hook_encoded('utf-8'))))
        # symptom = list(map(lambda x: x.strip(),
                           fileinput.FileInput(os.path.join(path, disease_csv))))
        #  Filter out all symptom names with abnormal length
        symptom = list(filter(lambda x: 0<len(x)<100, symptom))
        symptom_list.append(symptom)
    #  Returns data in the specified format  { disease : Corresponding symptoms }
    return dict(zip(disease_list, symptom_list))


def write(path):
    """ description:  take csv Data written to neo4j,  And form a map  :param path:  Data file path  """
    #  Use _load_data Load data from persistent file
    disease_symptom_dict = _load_data(path)
    #  To start a neo4j Of session
    with driver.session() as session:

        for key, value in disease_symptom_dict.items():
            cypher = "MERGE (a:Disease{name:%r}) RETURN a" %key
            session.run(cypher)
            for v in value:
                cypher = "MERGE (b:Symptom{name:%r}) RETURN b" %v
                session.run(cypher)
                cypher = "MATCH (a:Disease{
    name:%r}) MATCH (b:Symptom{
    name:%r}) \
                          WITH a,b MERGE(a)-[r:dis_to_sym]-(b)" %(key, v)
                session.run(cypher)
        cypher = "CREATE INDEX ON:Disease(name)"
        session.run(cypher)
        cypher = "CREATE INDEX ON:Symptom(name)"
        session.run(cypher)
#  Input parameters path by csv Data path
path = "/data/doctor_offline/structured/reviewed/"
write(path)
Unstructured data pipeline
Data content requiring named entity recognition
...
 Measles like erythematous drug eruption .txt
 Measles virus pneumonia .txt
 Paralytic brachial plexus neuritis .txt
 Leprous peripheral neuropathy .txt
 Leprous uveitis .txt
 Corpus luteum cyst .txt
 Cystoid macular edema .txt
 Macular hole retinal detachment .txt
 Ossification of the ligamentum flavum .txt
 Mucopolysaccharide storage disease .txt
 Mucopolysaccharide storage disease Ⅰ type .txt
 Mucopolysaccharide storage disease Ⅱ type .txt
 Mucopolysaccharide storage disease Ⅵ type .txt
 Mucopolysaccharide storage disease Ⅲ type .txt
 Mucopolysaccharide storage disease Ⅶ type .txt
 Black papular dermatosis .txt
...
With black papular dermatosis .txt For example
The initial appearance is tiny 、 circular 、 Dark or dark skin papules , It occurs singly or rarely in the jaw or cheek , The skin lesions gradually increased , It can reach hundreds in a few years , It is also distributed in the face except around the orbit 、 Neck and upper chest . The size and shape of the lesions are similar to seborrheic keratosis and verruca plana . No scaling occurs , Scabs and ulcers , No itching or other subjective symptoms
Named entity recognition

Training data set
- The style of the training dataset
1	 Hand muscle atrophy
0	 Retractor muscle inner hand
1	 Black acid in urine
0	 Acid black urine
1	 Black shadow in front of one eye
0	 The shadow darkens the front eye
1	 melancholy
0	 Melancholy
1	 Shortened red blood cell life
0	 Short life span cell fine red
1	 Mucin deposition in skin
0	 Accumulated white eggs cling to skin
1	 Abnormal eyes
0	 Often different eyes
1	 Scrotal distention and pain
0	 Pain distention and falling of capsule Yin
1	 Decreased arterial oxygen saturation
0	 Low blood pressure and oxygen saturation
- Load data set into memory
import pandas as pd
from collections import Counter

#  Reading data
train_data_path = "./train_data.csv"
train_data= pd.read_csv(train_data_path, header=None, sep="\t")

#  Print positive and negative label scale
print(dict(Counter(train_data[0].values)))

#  Convert data to list form
train_data = train_data.values.tolist()
print(train_data[:10])
#  Positive and negative label scale
{
    1: 5740, 0: 5740}

#  Take out 10 View training data
[[1, ' Occipital pain '], [0, ' The pillow of the painful part '], [1, ' Tauser sign is positive '], [0, ' Sexual Yang is a sign of Cerro '], [1, ' An animal loving perversion '], [0, ' State change animal love '], [1, ' It's difficult to eat '], [0, ' It's hard to eat '], [1, ' Perineal fistula or sinus formation '], [0, ' Forming sinus or tube fistula of the perineum ']]
BERT Chinese pre training model

- Use BERT Chinese pre training model encodes sentences
import torch
import torch.nn as nn


#  adopt torch.hub(pytorch Tools that focus on transfer in secondary schools ) Get trained bert-base-chinese Model
model =  torch.hub.load('huggingface/pytorch-transformers', 'model', 'bert-base-chinese')


#  Get the corresponding character mapper ,  It will map every Chinese word into a number
tokenizer = torch.hub.load('huggingface/pytorch-transformers', 'tokenizer', 'bert-base-chinese')


def get_bert_encode_for_single(text):
    """ description:  Use bert-chinese Encoded Chinese text  :param text:  Text to encode  :return:  Use bert The encoded text tensor represents  """
    #  First, use the character mapper to map each Chinese character
    #  Here we need to pay attention to , bert Of tokenizer After mapping, start and end tags will be added before and after the results, that is 101 and 102
    #  This is meaningful for the coding of multi segment text ,  But it doesn't make sense here ,  Therefore use [1:-1] Slice the head and tail
    indexed_tokens = tokenizer.encode(text)[1:-1]
    #  Then the list structure is converted to tensor
    tokens_tensor = torch.tensor([indexed_tokens])
    print(tokens_tensor)
    #  Make the model not automatically calculate the gradient
    with torch.no_grad():
        #  Call the model to obtain hidden layer output
        encoded_layers, _ = model(tokens_tensor)
    #  The output hidden layer is a three-dimensional tensor ,  The outermost dimension is 1,  We use [0] Drop it .
    print(encoded_layers.shape)
    encoded_layers = encoded_layers[0]
    return encoded_layers
text = " Hello ,  Jay Chou "
outputs = get_bert_encode_for_single(text)
print(outputs)
print(outputs.shape)
tensor([[ 3.2731e-01, -1.4832e-01, -9.1618e-01,  ..., -4.4088e-01,
         -4.1074e-01, -7.5570e-01],
        [-1.1287e-01, -7.6269e-01, -6.4861e-01,  ..., -8.0478e-01,
         -5.3600e-01, -3.1953e-01],
        [-9.3012e-02, -4.4381e-01, -1.1985e+00,  ..., -3.6624e-01,
         -4.7467e-01, -2.6408e-01],
        [-1.6896e-02, -4.3753e-01, -3.6060e-01,  ..., -3.2451e-01,
         -3.4204e-02, -1.7930e-01],
        [-1.3159e-01, -3.0048e-01, -2.4193e-01,  ..., -4.5756e-02,
         -2.0958e-01, -1.0649e-01],
        [-4.0006e-01, -3.4410e-01, -3.8532e-05,  ...,  1.9081e-01,
          1.7006e-01, -3.6221e-01]])

torch.Size([6, 768])
bert Pre training model address
PRETRAINED_VOCAB_ARCHIVE_MAP = {

    'bert-base-uncased': "https://s3.amazonaws.com/models.huggingface.co/bert/bert-base-uncased-vocab.txt",
    'bert-large-uncased': "https://s3.amazonaws.com/models.huggingface.co/bert/bert-large-uncased-vocab.txt",
    'bert-base-cased': "https://s3.amazonaws.com/models.huggingface.co/bert/bert-base-cased-vocab.txt",
    'bert-large-cased': "https://s3.amazonaws.com/models.huggingface.co/bert/bert-large-cased-vocab.txt",
    'bert-base-multilingual-uncased': "https://s3.amazonaws.com/models.huggingface.co/bert/bert-base-multilingual-uncased-vocab.txt",
    'bert-base-multilingual-cased': "https://s3.amazonaws.com/models.huggingface.co/bert/bert-base-multilingual-cased-vocab.txt",
    'bert-base-chinese': "https://s3.amazonaws.com/models.huggingface.co/bert/bert-base-chinese-vocab.txt",
}
PRETRAINED_MODEL_ARCHIVE_MAP = {

    'bert-base-uncased': "https://s3.amazonaws.com/models.huggingface.co/bert/bert-base-uncased.tar.gz",
    'bert-large-uncased': "https://s3.amazonaws.com/models.huggingface.co/bert/bert-large-uncased.tar.gz",
    'bert-base-cased': "https://s3.amazonaws.com/models.huggingface.co/bert/bert-base-cased.tar.gz",
    'bert-large-cased': "https://s3.amazonaws.com/models.huggingface.co/bert/bert-large-cased.tar.gz",
    'bert-base-multilingual-uncased': "https://s3.amazonaws.com/models.huggingface.co/bert/bert-base-multilingual-uncased.tar.gz",
    'bert-base-multilingual-cased': "https://s3.amazonaws.com/models.huggingface.co/bert/bert-base-multilingual-cased.tar.gz",
    'bert-base-chinese': "https://s3.amazonaws.com/models.huggingface.co/bert/bert-base-chinese.tar.gz",
}
structure RNN Model
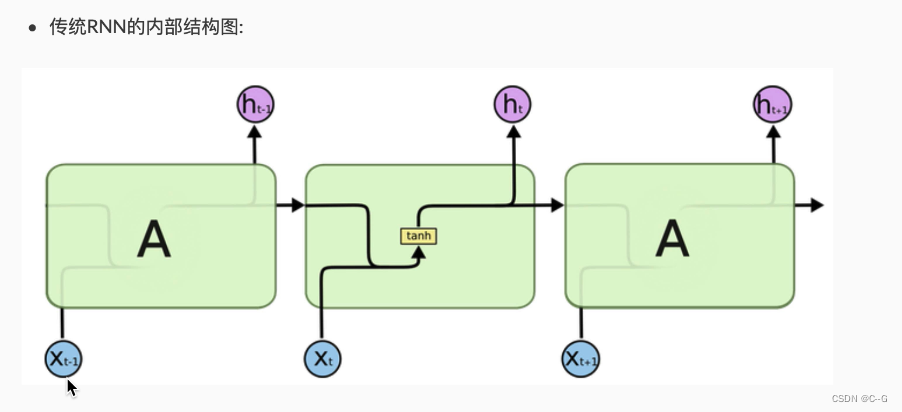


- structure RNN Model
class RNN(nn.Module):
    def __init__(self, input_size, hidden_size, output_size):
        """ There are three parameters in the initialization function , Are the size of the last dimension of the input tensor ,  The size of the last dimension of the hidden layer tensor ,  The size of the last dimension of the output tensor """
        super(RNN, self).__init__()
        #  Pass in the hidden layer size
        self.hidden_size = hidden_size
        #  Construct a linear variation from input to hidden layer ,  The input dimension of this linear layer is input_size + hidden_size
        #  This is because in a circular network ,  Each input has two parts , These are the inputs at this time xt And the output generated at the previous moment ht-1.
        #  The output size of this linear layer is hidden_size
        self.i2h = nn.Linear(input_size + hidden_size, hidden_size)
        #  Build a linear variation from the input to the output layer ,  The input dimension of this linear layer is still input_size + hidden_size
        #  The output size of this linear layer is output_size.
        self.i2o = nn.Linear(input_size + hidden_size, output_size)
        #  Finally, the output needs to be softmax Handle ,  Get the results .
        self.softmax = nn.LogSoftmax(dim=-1)

    def forward(self, input, hidden):
        """ stay forward Function ,  The parameters are input tensors of specified size respectively ,  And the initial hidden layer tensor of specified size """
        #  use first torch.cat take input And hidden Perform tensor splicing
        combined = torch.cat((input, hidden), 1)
        #  Through the transformation from input layer to hidden layer hidden tensor
        hidden = self.i2h(combined)
        #  Through the input to output layer transformation output tensor
        output = self.i2o(combined)
        #  The output is softmax Handle
        output = self.softmax(output)
        #  Returns the output tensor and the final hidden layer result
        return output, hidden

    def initHidden(self):
        """ Hidden layer initialization function """
        #  Initialize the hidden layer into a 1xhidden_size Of all the 0 tensor
        return torch.zeros(1, self.hidden_size)
input_size = 768
hidden_size = 128
n_categories = 2   # ner Pass or fail the review

input = torch.rand(1, input_size)
hidden = torch.rand(1, hidden_size)

from RNN_MODEL import RNN
rnn = RNN(input_size, hidden_size, n_categories)
outputs, hidden = rnn(input, hidden)
print("outputs:", outputs)
print("hidden:", hidden)
outputs: tensor([[-0.7858, -0.6084]], grad_fn=<LogSoftmaxBackward>) # [1, 2]

hidden: tensor([[-4.8444e-01, -5.9609e-02,  1.7870e-01,
                 -1.6553e-01,  ... , 5.6711e-01]], grad_fn=<AddmmBackward>)) # [1, 128]
- torch.cat demonstration
>>> x = torch.randn(2, 3)
>>> x
tensor([[ 0.6580, -1.0969, -0.4614],
        [-0.1034, -0.5790,  0.1497]])
>>> torch.cat((x, x, x), 0)
tensor([[ 0.6580, -1.0969, -0.4614],
        [-0.1034, -0.5790,  0.1497],
        [ 0.6580, -1.0969, -0.4614],
        [-0.1034, -0.5790,  0.1497],
        [ 0.6580, -1.0969, -0.4614],
        [-0.1034, -0.5790,  0.1497]])
>>> torch.cat((x, x, x), 1)
ensor([[ 0.6580, -1.0969, -0.4614,  0.6580, -1.0969, -0.4614,  0.6580,-1.0969, -0.4614],
       [-0.1034, -0.5790,  0.1497, -0.1034, -0.5790,  0.1497, -0.1034,-0.5790,  0.1497]])
model training
- First step : Build a random data selection function
import pandas as pd
import random
from bert_chinese_encode import get_bert_encode_for_single
import torch


#  Reading data
train_data_path = './train_data.csv'
train_data = pd.read_csv(train_data_path, header = None, sep = '\t', encoding = 'utf-8')
trian_data = train_data.values.tolist()


def randomTrainingExample(train_data):
    """ Select data function randomly , train_data Is the tabular data of the training set """
    #  from train_data Randomly select a piece of data
    category, line = random.choice(train_data)
    #  Use the words inside bert Encoding ,  Get the encoded tensor Type data
    line_tensor = get_bert_encode_for_single(line)
    #  Package the classification label into tensor
    category_tensor = torch.tensor([int(category)])
    #  Return four results
    return category, line, category_tensor, line_tensor
- The second step : Build model training function
#  Select the loss function as NLLLoss()
criterion = nn.NLLLoss()
#  The learning rate is 0.005
learning_rate = 0.005


def train(category_tensor, line_tensor):
    """ Model training function , category_tensor Represents the category tensor , line_tensor Represents the encoded text tensor """
    #  Initialize hidden layer
    hidden = rnn.initHidden()
    #  Model gradient reduction 0
    rnn.zero_grad()
    #  Traverse line_tensor The tensor representation of each word in
    for i in range(line_tensor.size()[0]):
        #  Then input it into rnn In the model ,  Because the model requires that the input must be a two-dimensional tensor ,  So we need to expand a dimension ,  Cycle call rnn Until the last word
        output, hidden = rnn(line_tensor[i].unsqueeze(0), hidden)
    #  Calculate the loss according to the loss function ,  The inputs are rnn Output results and real category labels
    loss = criterion(output, category_tensor)
    #  Back propagation of error
    loss.backward()

    #  Update all parameters in the model
    for p in rnn.parameters():
        #  The tensor representation of the parameter is added to the result of multiplying the gradient of the parameter by the learning rate to update the parameter
        p.data.add_(-learning_rate, p.grad.data)

    #  Returns the value of the result and loss
    return output, loss.item()
- The third step : Model validation function
def valid(category_tensor, line_tensor):
    """ Model validation function , category_tensor Represents the category tensor , line_tensor Represents the encoded text tensor """
    #  Initialize hidden layer
    hidden = rnn.initHidden()
    #  The validation model does not automatically solve the gradient
    with torch.no_grad():
        #  Traverse line_tensor The tensor representation of each word in
        for i in range(line_tensor.size()[0]):
            #  Then input it into rnn In the model ,  Because the model requires that the input must be a two-dimensional tensor ,  So we need to expand a dimension ,  Cycle call rnn Until the last word
            output, hidden = rnn(line_tensor[i].unsqueeze(0), hidden)
        #  Gain a loss
        loss = criterion(output, category_tensor)
     #  Returns the value of the result and loss
    return output, loss.item()
- Step four : Call training and validation functions
import time
import math

def timeSince(since):
    " It takes time to get the training for each print , since It's the start time of training "
    #  Get the current time
    now = time.time()
    #  Gain time difference , Is that training takes time
    s = now - since
    #  Convert seconds into minutes ,  And round it up
    m = math.floor(s / 60)
    #  The rest of the calculation is not enough to make up 1 Seconds in minutes
    s -= m * 60
    #  Returns the time-consuming data in the specified format
    return '%dm %ds' % (m, s)
#  Suppose that the start time of model training is 10min Before
since = time.time() - 10*60

period = timeSince(since)
print(period)
10m 0s
Call the training and validation functions and print the log
#  Set the number of iterations to 50000 Step
n_iters = 50000

#  The printing interval is 1000 Step
plot_every = 1000


#  Initialize the loss and accuracy of training and verification in the printing interval
train_current_loss = 0
train_current_acc = 0
valid_current_loss = 0
valid_current_acc = 0


#  Initialize the average loss and accuracy of each print interval
all_train_losses = []
all_train_acc = []
all_valid_losses = []
all_valid_acc = []

#  Get the start timestamp
start = time.time()


#  Loop traversal n_iters Time
for iter in range(1, n_iters + 1):
    #  Call two random functions to generate a training and verification data respectively
    category, line, category_tensor, line_tensor = randomTrainingExample(train_data)
    category_, line_, category_tensor_, line_tensor_ = randomTrainingExample(train_data)
    #  Call the training and verification functions respectively ,  Gain output and loss
    train_output, train_loss = train(category_tensor, line_tensor)
    valid_output, valid_loss = valid(category_tensor_, line_tensor_)
    #  Training losses ,  Verify the loss , The training accuracy and verification accuracy are accumulated respectively
    train_current_loss += train_loss
    train_current_acc += (train_output.argmax(1) == category_tensor).sum().item()
    valid_current_loss += valid_loss
    valid_current_acc += (valid_output.argmax(1) == category_tensor_).sum().item()
    #  When the number of iterations is an integral multiple of the specified print interval
    if iter % plot_every == 0:
        #  Divide the just accumulated loss and accuracy by the number of interval steps to get the average value
        train_average_loss = train_current_loss / plot_every
        train_average_acc = train_current_acc/ plot_every
        valid_average_loss = valid_current_loss / plot_every
        valid_average_acc = valid_current_acc/ plot_every
        #  Print iteration steps ,  Time consuming ,  Training loss and accuracy ,  Verify loss and accuracy
        print("Iter:", iter, "|", "TimeSince:", timeSince(start))
        print("Train Loss:", train_average_loss, "|", "Train Acc:", train_average_acc)
        print("Valid Loss:", valid_average_loss, "|", "Valid Acc:", valid_average_acc)
        #  Store the results in the corresponding list , Convenient for subsequent drawing
        all_train_losses.append(train_average_loss)
        all_train_acc.append(train_average_acc)
        all_valid_losses.append(valid_average_loss)
        all_valid_acc.append(valid_average_acc)
        #  The training and verification losses of this interval and their accuracy are attributed to 0
        train_current_loss = 0
        train_current_acc = 0
        valid_current_loss = 0
        valid_current_acc = 0
Iter: 1000 | TimeSince: 0m 56s
Train Loss: 0.6127021567507527 | Train Acc: 0.747
Valid Loss: 0.6702297774022868 | Valid Acc: 0.7
Iter: 2000 | TimeSince: 1m 52s
Train Loss: 0.5190641692602076 | Train Acc: 0.789
Valid Loss: 0.5217500487511397 | Valid Acc: 0.784
Iter: 3000 | TimeSince: 2m 48s
Train Loss: 0.5398398997281778 | Train Acc: 0.8
Valid Loss: 0.5844468013737023 | Valid Acc: 0.777
Iter: 4000 | TimeSince: 3m 43s
Train Loss: 0.4700755337187358 | Train Acc: 0.822
Valid Loss: 0.5140456306522071 | Valid Acc: 0.802
Iter: 5000 | TimeSince: 4m 38s
Train Loss: 0.5260879981063878 | Train Acc: 0.804
Valid Loss: 0.5924804099237979 | Valid Acc: 0.796
Iter: 6000 | TimeSince: 5m 33s
Train Loss: 0.4702717279043861 | Train Acc: 0.825
Valid Loss: 0.6675750375208704 | Valid Acc: 0.78
Iter: 7000 | TimeSince: 6m 27s
Train Loss: 0.4734503294042624 | Train Acc: 0.833
Valid Loss: 0.6329268293256277 | Valid Acc: 0.784
Iter: 8000 | TimeSince: 7m 23s
Train Loss: 0.4258338176879665 | Train Acc: 0.847
Valid Loss: 0.5356959595441066 | Valid Acc: 0.82
Iter: 9000 | TimeSince: 8m 18s
Train Loss: 0.45773495503464817 | Train Acc: 0.843
Valid Loss: 0.5413714128659645 | Valid Acc: 0.798
Iter: 10000 | TimeSince: 9m 14s
Train Loss: 0.4856756244019302 | Train Acc: 0.835
Valid Loss: 0.5450502399195044 | Valid Acc: 0.813
- Step five : Draw the comparison curve of loss and accuracy of training and verification
plt.title(“your title name”, y=-0.1) Set up y The position can be title Set below the image
import matplotlib.pyplot as plt

plt.figure(0)
plt.plot(all_train_losses, label="Train Loss")
plt.plot(all_valid_losses, color="red", label="Valid Loss")
plt.legend(loc='upper left')

plt.savefig("./loss.png")


plt.figure(1)
plt.plot(all_train_acc, label="Train Acc")
plt.plot(all_valid_acc, color="red", label="Valid Acc")
plt.legend(loc='upper left')

plt.savefig("./acc.png")
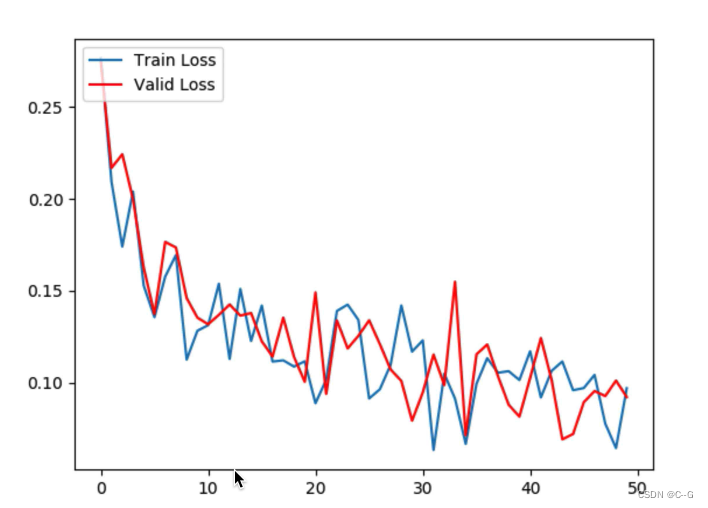
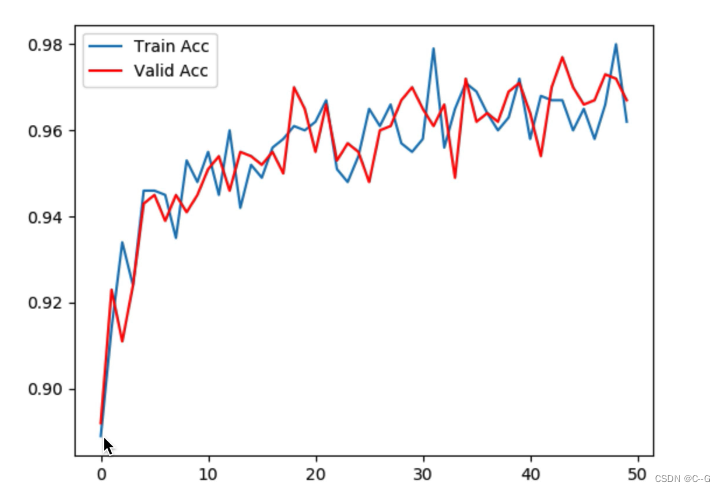
The loss control curve has been declining , It shows that the model can obtain rules from the data , Converging , The verification accuracy in the accuracy comparison curve has been rising , Finally maintained at 0.98 about
- Step six : Model preservation
#  Save the path
MODEL_PATH = './BERT_RNN.pth'
#  Save model parameters
torch.save(rnn.state_dict(), MODEL_PATH)
Model USES
- The implementation process of model prediction
import os
import torch
import torch.nn as nn

#  Import RNN Model structure
from RNN_MODEL import RNN
#  Import bert Pre training model coding function
from bert_chinese_encode import get_bert_encode_for_single


#  Preloaded model parameter path
MODEL_PATH = './BERT_RNN.pth'

#  Number of hidden layer nodes ,  Enter the layer size ,  The number of categories is the same as that during training
n_hidden = 128
input_size = 768
n_categories = 2

#  Instantiation RNN Model ,  And load and save model parameters
rnn = RNN(input_size, n_hidden, n_categories)
rnn.load_state_dict(torch.load(MODEL_PATH))


def _test(line_tensor):
    """ Model test function ,  It will be used in the model prediction function ,  Used to invoke RNN Model and return results . Its parameters line_tensor Represents the tensor representation of the input text """
    #  Initialize hidden layer tensor
    hidden = rnn.initHidden()
    #  Same as during training ,  Traverse each character of the input text
    for i in range(line_tensor.size()[0]):
        #  Send it to... One by one rnn Model
        output, hidden = rnn(line_tensor[i].unsqueeze(0), hidden)
    #  get rnn The final output of the model
    return output


def predict(input_line):
    """ Model prediction function ,  Input parameters input_line Represents the text that needs to be predicted """
    #  Do not automatically solve the gradient
    with torch.no_grad():
        #  take input_line Use bert Model coding
        output = _test(get_bert_encode_for_single(input_line))
        #  from output Get the index corresponding to the maximum value ,  The comparison dimension is 1
        _, topi = output.topk(1, 1)
        #  Returns the result value
        return topi.item()
input_line = " Point blood stasis like sharp needle hair more "
result = predict(input_line)
print("result:", result)
result: 0
tensor.topk
>>> tr = torch.randn(1, 2)
>>> tr
tensor([[-0.1808, -1.4170]])
>>> tr.topk(1, 1)
torch.return_types.topk(values=tensor([[-0.1808]]), indices=tensor([[0]]))
- The implementation process of model batch prediction
def batch_predict(input_path, output_path):
    """ Batch forecast function ,  In original text ( A file consisting of named entities to be identified ) Input path   And prediction filtering ( Remove the files of unnamed entities ) The output path of is the parameter """
    #  The file composed of the named entity to be identified is named as csv file name ,
    #  Each line in the file is the symptom named entity corresponding to the disease
    #  Read each under the path csv file name ,  Load csv In the list
    csv_list = os.listdir(input_path)
    #  Go through each one csv file
    for csv in csv_list:
        #  Open each by reading csv file
        with open(os.path.join(input_path, csv), "r") as fr:
            #  Then open the output path with the same name by writing csv file
            with open(os.path.join(output_path, csv), "w") as fw:
                #  Read csv Every line of the document
                input_line = fr.readline()
                #  Use models to predict
                res = predict(input_line)
                #  If the result is 1
                if res:
                    #  It indicates that the audit was successful ,  Write to output csv in
                    fw.write(input_line + "\n")
                else:
                    pass
input_path = "/data/doctor_offline/structured/noreview/"
output_path = "/data/doctor_offline/structured/reviewed/"
batch_predict(input_path, output_path)
Generate the same name as the input path under the output path csv file , The internal symptom entity is the audited available entity
边栏推荐
- Heavyweight: the domestic ide was released, developed by Alibaba, and is completely open source! (high performance + high customization)
- 亚香香料深交所上市:市值40亿 鼎龙博晖与涌耀投资是股东
- Dataease template market officially released
- Five star certification! Know that Chuangyu has passed the evaluation of the content audit service system of China Academy of Communications
- When Jerry's serial port is set up, it prints garbled code, and the internal crystal oscillator is not calibrated [chapter]
- 产品设计- 需求分析
- golang set type implementation
- 机器学习工作岗位
- Basic knowledge of penetration test
- Nanxin semiconductor rushes to the scientific innovation board: its annual revenue is RMB 980 million. Sequoia Xiaomi oppo is the shareholder
猜你喜欢

vPROM笔记

STM32(九)------- CAN
![Jerry's broadcast MP3 prompt sound function [chapter]](/img/25/58c0f15a6fb2449ac505a06bb15887.png)
Jerry's broadcast MP3 prompt sound function [chapter]

【NOI2014】15.起床困難綜合症【二進制】

IOT platform construction equipment, with source code

How far is the rise of cloud native industry applications from "available" to "easy to use"?

Shunted Self-Attention | 源于 PvT又高于PvT,解决小目标问题的ViT方法

【翻译】一种减小运动伪影的新方法基于AS-LMS自适应滤波器的PPG信号
物联网平台搭建设备,附源代码

今年,安徽母基金大爆发
随机推荐
PISCES: A Programmable, Protocol-Independent Software Switch(总结)
Obtain equipment information
Jerry's DAC output mode setting [chapter]
test
STM32(八)------- PWM输出
vPROM笔记
Leetcode: hash table 06 (ransom letter)
Leetcode 1218. Longest definite difference subsequence (providing an idea)
Jerry's serial port communication serial port receiving IO needs to set digital function [chapter]
杰理之进入 soft off 后插拔 sd 卡会复位【篇】
各种解背包问题
Rancher2.6 new monitoring QuickStart
How far is the rise of cloud native industry applications from "available" to "easy to use"?
Shell process control - 39. Special process control statements
Halcon knowledge: contour operator on region (1)
Yapi installation
用软件可编程FPGA加速网络边缘的移动应用总结
Heavyweight: the domestic ide was released, developed by Alibaba, and is completely open source! (high performance + high customization)
微机原理第六章笔记整理
元宇宙大杀器来了!小扎祭出4款VR头显,挑战视觉图灵测试