当前位置:网站首页>Simple Android weather app (III) -- city management and database operation
Simple Android weather app (III) -- city management and database operation
2022-06-21 09:56:00 【roydon_ Guo】
Easy Android weather app( One )—— analysis Json data 、 Data class encapsulation
Easy Android weather app( Two )—— Adapter 、 Hourly data display
Easy Android weather app( 3、 ... and )—— city management 、 Database operation
demand ️
When we look at the weather , We all have our own mobile phones , We all know that today's smart phones can automatically query the weather information of the location according to the location , This depends on the location function of the mobile phone , The project here is purely for practicing , It does not involve positioning operations , I gave up all those steps , So we can sneak around with this function ,,, incorrect , Opportunistic from the weather api Try to get the interface .( See the end of the page for the source code )
The weather used in this project api Interface The weather api
See Chapter 1 for details -->🧿 Easy Android weather app( One )—— analysis Json data<--
When we default not to splice parameters for this interface , Direct access will get the temperature of the current location Json data , This makes up for our shortcomings in positioning , So good , When we add parameters ( this api According to the parameters of city query, you need +&city=( The city name )) that , When we add only parameters but no parameter values (&city=) He will still position himself according to his current position , It's wonderful .
So the next step is Android SQLite Some operations of the database , Save the current location information to the database ( City name , City temperature , Update time )
To be achieved :
The database successfully inserts the current location data information ( In the previous test, a test reference data from Beijing was inserted ):
The information of location Shangqiu has been successfully inserted , After insertion , The subsequent operation is to update the database in real time 
Contents involved
- SQLite Database operation , Create database , new table , Add, delete, check and change operations
- Adapter adapter Add click event
- Page value transfer jump
Project structure

Other contents are not involved for the time being , This article only covers urban management , A series of operations to add cities to the database, etc , The previous basic content moves to the top address
Interface design
Interface design of urban management city_manager.xml
city_manager.xml Interface layout source code :
<?xml version="1.0" encoding="utf-8"?>
<LinearLayout xmlns:android="http://schemas.android.com/apk/res/android" android:layout_width="match_parent" android:layout_height="match_parent" android:background="@mipmap/bg" android:orientation="vertical">

    <LinearLayout android:layout_width="match_parent" android:layout_height="wrap_content" android:layout_marginTop="5dp" android:orientation="horizontal">

        <ImageView android:id="@+id/iv_add" android:layout_width="35dp" android:layout_height="30dp" android:layout_marginLeft="20dp" android:src="@drawable/add" />

        <TextView android:layout_width="wrap_content" android:layout_height="wrap_content" android:gravity="center" android:text=" city management " android:layout_gravity="center" android:layout_weight="1" android:textColor="@color/purple_200" android:textSize="20dp" />

        <ImageView android:id="@+id/iv_more" android:layout_width="35dp" android:layout_height="30dp" android:layout_marginRight="20dp" android:src="@drawable/more" />
    </LinearLayout>

    <View android:layout_width="390dp" android:layout_height="8px" android:layout_gravity="center" android:layout_marginBottom="5dp" android:alpha="0.6" android:background="@color/white" />

    <androidx.recyclerview.widget.RecyclerView android:layout_width="match_parent" android:layout_height="match_parent" android:id="@+id/city_manager"/>

</LinearLayout>
added_city.xml The page represents the city data to be displayed :
Source code :
<?xml version="1.0" encoding="utf-8"?>
<LinearLayout xmlns:android="http://schemas.android.com/apk/res/android" android:layout_width="match_parent" android:layout_height="55dp" android:textSize="20sp" android:layout_marginLeft="40dp" android:layout_marginRight="40dp" android:layout_marginTop="5dp" android:background="@drawable/blackground" android:gravity="center_vertical" android:paddingLeft="10dp" >

    <LinearLayout android:layout_width="match_parent" android:layout_height="wrap_content" android:orientation="horizontal">
        <TextView android:layout_width="220dp" android:layout_height="wrap_content" android:id="@+id/city_city" android:layout_marginLeft="10dp" android:textSize="22dp" android:textColor="@color/white" android:text=" Xi'an " />
        <TextView android:layout_width="wrap_content" android:layout_height="match_parent" android:text="16°C" android:textSize="24dp" android:textColor="@color/white" android:id="@+id/city_tem"/>


    </LinearLayout>

</LinearLayout>
The effect of getting information from the database :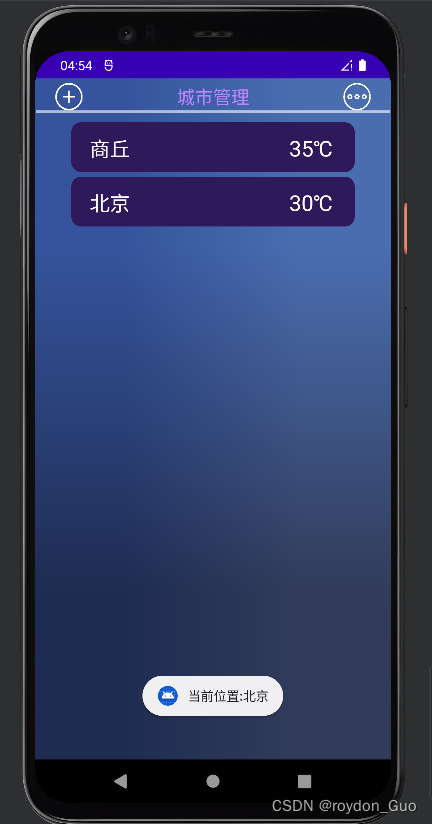
Adapter AddCityAdapter
After the interface layout design is completed, the next step is the adapter AddCityAdapterpublic class AddCityAdapter extends RecyclerView.Adapter<AddCityAdapter.AddViewHolder>
The adapter is the one that determines this city management page RecyclerView Which page is displayed in , Same as before , The previous articles all have space to summarize , Some basic operations are ,
Add a constructor ,
	private Context mContext;
    private List<CityBean> mCityBeans;

    public AddCityAdapter(Context context, List<CityBean> cityBeans) {

        mContext = context;
        this.mCityBeans = cityBeans;
    }
Create a class class AddViewHolder extends RecyclerView.ViewHolder To bind the control , At this point, click a city on the city management page , The value needs to be transferred to MainActivity, And get the weather information of the designated city
So add a click event to the adapter , First, add an interface to the adapter
	public interface OnItemClickListener {


        /** *  When RecyclerView Call back when a certain item is clicked  * @param view  Click on item The view of  * @param position  Click to get the data , Parameter customization  */
        public void onItemClick(View view, int position);

    }

    private OnItemClickListener onItemClickListener;

    public void setOnItemClickListener(OnItemClickListener onItemClickListener) {

        this.onItemClickListener = onItemClickListener;
    }
Then the class in the adapter AddViewHolder Bind click event in
	class AddViewHolder extends RecyclerView.ViewHolder {


        TextView cityCity,cityTem;// City name , temperature

        public AddViewHolder(@NonNull View itemView) {

            super(itemView);
            // Binding controls
            cityCity=itemView.findViewById(R.id.city_city);
            cityTem = itemView.findViewById(R.id.city_tem);
            // Bind click event
            itemView.setOnClickListener(new View.OnClickListener() {

                @Override
                public void onClick(View view) {

                    if (onItemClickListener!=null) {

                        onItemClickListener.onItemClick(view,getLayoutPosition());
                    }
                }
            });
        }
    }
Then, as always, rewrite the three methods
	@NonNull
    @Override
    public AddViewHolder onCreateViewHolder(@NonNull ViewGroup parent, int viewType) {

    	// Binding controls , Which page is displayed in RecyclerView in ,R.layout.added_city
        View view = LayoutInflater.from(mContext).inflate(R.layout.added_city, parent, false);
        AddViewHolder cityViewHolder = new AddViewHolder(view);
        return cityViewHolder;
    }

    @Override
    public void onBindViewHolder(@NonNull AddViewHolder holder, int position) {

        CityBean cityBean = mCityBeans.get(position);
        // Control
        holder.cityCity.setText(cityBean.getName());
        holder.cityTem.setText(cityBean.getTem());
    }

    @Override
    public int getItemCount() {

        return (mCityBeans == null) ? 0 : mCityBeans.size();
    }
Adapter AddCityAdapter Source code :
public class AddCityAdapter extends RecyclerView.Adapter<AddCityAdapter.AddViewHolder>{


    private Context mContext;
    private List<CityBean> mCityBeans;

    public AddCityAdapter(Context context, List<CityBean> cityBeans) {

        mContext = context;
        this.mCityBeans = cityBeans;
    }

    @NonNull
    @Override
    public AddViewHolder onCreateViewHolder(@NonNull ViewGroup parent, int viewType) {

        View view = LayoutInflater.from(mContext).inflate(R.layout.added_city, parent, false);
        AddViewHolder cityViewHolder = new AddViewHolder(view);
        return cityViewHolder;
    }

    @Override
    public void onBindViewHolder(@NonNull AddViewHolder holder, int position) {

        CityBean cityBean = mCityBeans.get(position);

        holder.cityCity.setText(cityBean.getName());
        holder.cityTem.setText(cityBean.getTem());
    }

    @Override
    public int getItemCount() {

        return (mCityBeans == null) ? 0 : mCityBeans.size();
    }

    class AddViewHolder extends RecyclerView.ViewHolder {


        TextView cityCity,cityTem;

        public AddViewHolder(@NonNull View itemView) {

            super(itemView);

            cityCity=itemView.findViewById(R.id.city_city);
            cityTem = itemView.findViewById(R.id.city_tem);

            // Bind click event
            itemView.setOnClickListener(new View.OnClickListener() {

                @Override
                public void onClick(View view) {

                    if (onItemClickListener!=null) {

                        onItemClickListener.onItemClick(view,getLayoutPosition());
                    }
                }
            });
        }
    }
    /** *  Click to respond to the event  */
    public interface OnItemClickListener {


        /** *  When RecyclerView Call back when a certain item is clicked  * @param view  Click on item The view of  * @param position  Click to get the data  */
        public void onItemClick(View view, int position);

    }

    private OnItemClickListener onItemClickListener;

    public void setOnItemClickListener(OnItemClickListener onItemClickListener) {

        this.onItemClickListener = onItemClickListener;
    }
}
Operating the database
Then build the database tools , To operate the database , General methods need entity classes , Then there is the encapsulation of urban entity classes , When obtaining the current positioning weather information , Save this data class to the database
So first build the urban entity class CityBean
public class CityBean {


    private String name;// The city name
    private String[] area;// county / District
    private String tem;// temperature
    private String updateTime;// Update time

// Constructor customization , It mainly focuses on database operation and new Time transmission value
    public CityBean() {

    }

    public CityBean(String name) {

        this.name = name;
    }

    public CityBean(String name, String tem, String updateTime) {

        this.name = name;
        this.tem = tem;
        this.updateTime = updateTime;
    }
//get and set、toString notes

}

Then there is the database CityDatabaseConfig, There is a database name , Table name information , In case the operation database writes the wrong name , So it is written under this configuration :
public class CityDatabaseConfig {

    // Database name
    public static final String DATABASE_NAME = "cityDb";
    // Table name
    public static final String TABLE_NAME = "city_weather";
}
And then there was CityDbHelper Inherited from SQLiteOpenHelper
public class CityDbHelper extends SQLiteOpenHelper {


    public CityDbHelper(Context context) {

    	// Create database CityDatabaseConfig.DATABASE_NAME
        super(context, CityDatabaseConfig.DATABASE_NAME, null, 1);
    }

    @Override
    public void onCreate(SQLiteDatabase db) {

    // Create table , Field (cityName text,tem text,updateTime text)
        String sql = "create table if not exists "+CityDatabaseConfig.TABLE_NAME+"(cityName text,tem text,updateTime text)";
        db.execSQL(sql);
        Log.i(CityDatabaseConfig.DATABASE_NAME,"created success!!");
    }

    @Override
    public void onUpgrade(SQLiteDatabase db, int oldVersion, int newVersion) {


        Log.i(CityDatabaseConfig.DATABASE_NAME,"updated success!!");
    }

}
Then there are some database operation tools , There are some methods that can be used , You can expand it by yourself
public class DBUtils {


    private Context context;
    private CityDbHelper helper;

    /** *  The singleton pattern  * @param context */
    public DBUtils(Context context) {

        this.context = context;
        helper = new CityDbHelper(context) {

        };
    }

    /** *  Insert... Into the table  * * @param * @return */
    public boolean insertData(String cityName,String tem,String updateTime) {

        SQLiteDatabase db = helper.getReadableDatabase();
        ContentValues values = new ContentValues();

        values.put("cityName", cityName);
        values.put("tem", tem);
        values.put("updateTime", updateTime);
        long insert = db.insert(CityDatabaseConfig.TABLE_NAME, null, values);
        if (insert > 0) {

            return true;
        }
        return false;
    }

// Update data according to city name
    public boolean updateByName(String cityName,String tem,String updateTime){

        SQLiteDatabase db = helper.getReadableDatabase();
        ContentValues values = new ContentValues();

        values.put("cityName", cityName);
        values.put("tem", tem);
        values.put("updateTime", updateTime);
        long update = db.update(CityDatabaseConfig.TABLE_NAME,values,"cityName=?", new String[]{
    cityName});

        if (update>0){

            return true;
        }return false;
    }

    /** *  Query all the information  * * @return */
    public List<CityBean> getAllCity() {

        List<CityBean> list = new ArrayList<>();
        SQLiteDatabase db = helper.getReadableDatabase();
        Cursor cursor = db.rawQuery("select * from " + CityDatabaseConfig.TABLE_NAME, null);
        if (cursor != null && cursor.getCount() > 0) {

            while (cursor.moveToNext()) {


                String cityName = cursor.getString(0);
                String tem = cursor.getString(1);
                String updateTime = cursor.getString(2);

                CityBean cityBean = new CityBean(cityName,tem,updateTime);
                list.add(cityBean);
            }
        }
        return list;
    }

    /** *  Query a message according to the city name  */
    public CityBean getCityByName(String cityName) {

        CityBean cityBean = new CityBean();
        SQLiteDatabase db = helper.getReadableDatabase();
        Cursor cursor = db.rawQuery("select * from " + CityDatabaseConfig.TABLE_NAME + " where cityName=?", new String[]{
    cityName});
        if (cursor != null && cursor.getCount() > 0) {

            while (cursor.moveToFirst()) {


                String cityNameResult = cursor.getString(0);
                cityBean.setName(cityName);
                break;
            }

        }
        return cityBean;

    }

	/** *  Delete a piece of data according to the city name  * @param cityName * @return */
    public boolean delCityByName(String cityName){

        SQLiteDatabase db = helper.getReadableDatabase();

        long delRow = db.delete(CityDatabaseConfig.TABLE_NAME, "cityName=?", new String[]{
    cityName});
        if (delRow > 0) {

            return true;
        }
        return false;

    }

}
Jump to the page , Display data
After some basic methods are written MainActivity.java file , use Intent Jump to the city management interface , Pay attention to introducing the database operation tool first
DBUtils dbUtils = new DBUtils(MainActivity.this);
Set the click event of the icon in the upper right corner , This dot icon is bound to ivMore
	ivMore.setOnClickListener(new View.OnClickListener() {

            @Override
            public void onClick(View view) {

                if (null == dbUtils.getCityByName(tvCity.getText().toString()).getName()) {

                    // If the database does not exist, insert this city
                    dbUtils.insertData(tvCity.getText().toString(),tvTem.getText().toString(),tvTime.getText().toString());
                }
                else {

                    // Update when there is
                    dbUtils.updateByName(tvCity.getText().toString(),tvTem.getText().toString(),tvTime.getText().toString());
// dbUtils.insertData(" Beijing ","30°C","2022-06-19 21:23:35"); Test use
// dbUtils.delCityByName(" Shangqiu "); Test use
                    List<CityBean> list = dbUtils.getAllCity();
                    Log.d("getAllCity", "allList<CityBean>>>>》》》" + list.toString());

                    ToastUtil.showShortToast(MainActivity.this, " The current position :" + tvCity.getText());
                    Intent intent = new Intent(MainActivity.this, CityManagerActivity.class);
                    Log.d("getNowCity", "nowCity<CityBean>>>>》》》" + tvCity.getText());
//  It is required to jump to the page and pass the value back ,requestCode:200;
                    startActivityForResult(intent, 200);
                }
            }
        });
Jump to the city management page , add to activity.java file , name CityManagerActivity
public class CityManagerActivity extends AppCompatActivity {


    private AddCityAdapter addCityAdapter;// Adapter
    private RecyclerView rvAddedCity;

    private List<CityBean> cityDbBeanList;
    DBUtils dbUtils= new DBUtils(CityManagerActivity.this);

    @Override
    protected void onCreate(Bundle savedInstanceState) {

        super.onCreate(savedInstanceState);
        setContentView(R.layout.city_manager);

        initView();
    }


    public void initView() {


        rvAddedCity = findViewById(R.id.city_manager);

        cityDbBeanList = dbUtils.getAllCity();
        Log.d("cityList",">>>>> Data in the database 》》》》》》"+cityDbBeanList);
        addCityAdapter = new AddCityAdapter(CityManagerActivity.this,cityDbBeanList);
        rvAddedCity.setAdapter(addCityAdapter);
        LinearLayoutManager layoutManager = new LinearLayoutManager(this, LinearLayoutManager.VERTICAL, false);
        rvAddedCity.setLayoutManager(layoutManager);
		// Set click event
        addCityAdapter.setOnItemClickListener(new AddCityAdapter.OnItemClickListener() {

            @Override
            public void onItemClick(View view, int position) {

// ToastUtil.showShotToast(CityManagerActivity.this, cityDbBeanList.get(position).getName());
                Intent intent = new Intent(CityManagerActivity.this,MainActivity.class);
                intent.putExtra("selectedCity",cityDbBeanList.get(position).getName());
				// return MainActivity Page and transfer values setResult(200,intent); Set up resultCode:200;
                setResult(200,intent);
                finish();

// ToastUtil.showShotToast(CityManagerActivity.this,"finish");
            }
        });
    }

}
Then, since the page is required to return the value ,MainActivity You have to rewrite the method onActivityResult Accept the incoming value
	@Override
    protected void onActivityResult(int requestCode, int resultCode, @Nullable Intent data) {

        super.onActivityResult(requestCode, resultCode, data);
        if (requestCode == 200 && resultCode == 200) {

        //getString Get the transmitted value
            String dt = data.getExtras().getString("selectedCity");
            tvCity.setText(dt);
            nowCity=dt;
            // From again api Get the weather according to the city name
            getWeather(nowCity);
            ToastUtil.showLongToast(this,dt+" Weather update ~");
        }
    }
Since then, some functions have been realized , Jump to the city management page , Exhibition City , Specify the city to display weather information ,
Database operation realizes :
- Get all the city information in the database 、
- Insert a piece of data 、
- Update data according to city name 、
- Delete a piece of data to be completed ,, Self expanding , As long as the tool class deletion method is written correctly , Nothing more than adding an event to call the delete method
More refined search of cities , Actively add cities to the database according to the searched cities , Later articles will be gradually improved , This article is mainly about some database operations and adapter adding click events , Subscribe to this column to synchronously obtain the project construction process
Source code address :Gitee
边栏推荐
- On the problem of class member variable pollution in the context of one-time concurrence
- js正则-梳理
- 2. the development of the meta universe
- Unity VUFORIA 推荐设备
- Stm32mp1 cortex M4 development part 8: LED lamp control experiment of expansion board
- Signal power spectrum estimation
- abnormal
- Lodash real on demand approach
- 流式编程:流支持,创建,中间操作以及终端操作
- uni-app进阶之创建组件/原生渲染【day9】
猜你喜欢

About Alipay - my savings plan - interest rate calculation instructions

TC软件概要设计文档(手机群控)

DSP online upgrade (2) -- design framework of bootloader

Coordinate system transformation, application in inertial navigation antenna

Introduction to ground plane in unity

基因型填充前的质控条件简介

Stm32mp1 cortex M4 development part 12: expansion board vibration motor control

111. solve the problem of prohibiting scripts from running on vs code. For more information, see error reporting
Brief introduction of quality control conditions before genotype filling

DSP online upgrade (1) -- understand the startup process of DSP chip
随机推荐
TC软件概要设计文档(手机群控)
为什么 C# 访问 null 字段会抛异常?
Unity vuforia recommended equipment
ArCore支持的设备
TC软件详细设计文档(手机群控)
Advanced part of concurrent programming: parallel flow, tasks and executors, and completabilefuture classes
POI implements operation to generate word tables and operate chart data in word
并发-条件变量
The memory allocation of the program, the storage of local const and global const in the system memory, and the perception of pointers~
Concurrency - condition variable
How to convert mindspire model to onnx format and use onnxruntime reasoning - development test
leetcode:715. Range 模块【无脑segmentTree】
2. the development of the meta universe
Haplotype analysis using shapeit
Style penetration of vant UI components -- that is, some styles in vant UI components cannot be modified
Mythical Games宣布与韩国领先游戏发行商Kakao Games合作,推动亚太区业务扩张
stm32mp1 Cortex M4开发篇9:扩展板空气温湿度传感器控制
程序员新人周一优化一行代码,周三被劝退?
Clipboard learning records and pit encountered
Uni app advanced creation component / native rendering [Day9]