当前位置:网站首页>Realizing deep learning framework from zero -- RNN from theory to practice [practice]
Realizing deep learning framework from zero -- RNN from theory to practice [practice]
2022-06-29 22:23:00 【Angry coke】
introduction
In line with “ Everything I can't create , I can't understand ” Thought , This series The article will be based on pure Python as well as NumPy Create your own deep learning framework from zero , The framework is similar PyTorch It can realize automatic derivation .
Deep understanding and deep learning , The experience of creating from scratch is very important , From an understandable point of view , Try not to use an external complete framework , Implement the model we want . This series The purpose of this article is through such a process , Let us grasp the underlying realization of deep learning , Instead of just being a switchman .
Last article in , We learned RNN Theoretical part , This article looks at how to implement it , Include stack RNN And two way RNN. To understand their principles . Finally, let's take a look at an application to the part of speech tagging task .
RNNCell
First, implement a single time step RNN Calculation class , This is a public class :
class RNNCell(Module):
    def __init__(self, input_size, hidden_size: int, bias: bool = True, nonlinearity: str = 'tanh') -> None:
        ''' RNN Single time step abstraction  :param input_size:  Input x The characteristic number of  :param hidden_size:  The number of features in the hidden state  :param bias:  Whether the linear layer contains offset  :param nonlinearity:  Nonlinear activation function  tanh | relu '''
        super(RNNCell, self).__init__()
        #  Input x Linear transformation of
        self.input_trans = Linear(input_size, hidden_size, bias=bias)
        #  Linear transformation of hidden states
        self.hidden_trans = Linear(hidden_size, hidden_size, bias=bias)

        if nonlinearity == 'tanh':
            self.activation = F.tanh
        else:
            self.activation = F.relu

    def forward(self, x: Tensor, h: Tensor) -> Tensor:
        '''  Single RNN Forward propagation of  :param x:  shape  [batch_size, input_size] :param h:  shape  [batch_size, hidden_size] :return: '''
        # [batch_size, input_size] x [input_size, hidden_size] + [batch_size, hidden_size] x [hidden_size, hidden_size]
        # = [batch_size, hidden_size]
        h_next = self.activation(self.input_trans(x) + self.hidden_trans(h))
        return h_next
The activation function supports tanh and relu, This is only a single time step RNN Calculation ,RNN The model is based on it .
RNN
Here is a simple implementation RNN.
class RNN(Module):
    def __init__(self, input_size: int, hidden_size: int, batch_first: bool = False, num_layers: int = 1,
                 nonlinearity: str = 'tanh',
                 bias: bool = True, dropout: float = 0) -> None:
        ''' :param input_size:  Input x The characteristic number of  :param hidden_size:  The number of features in the hidden state  :param batch_first: :param num_layers:  The layer number  :param nonlinearity:  Nonlinear activation function  tanh | relu :param bias:  Whether the linear layer contains offset  :param dropout:  For multi-layer stacking RNN, The default is 0 Does not use dropout '''
        super(RNN, self).__init__()
        self.num_layers = num_layers
        self.hidden_size = hidden_size
        self.batch_first = batch_first
        #  Multi tier support
        self.cells = ModuleList([RNNCell(input_size, hidden_size, bias, nonlinearity)] +
                                [RNNCell(hidden_size, hidden_size, bias, nonlinearity) for _ in range(num_layers - 1)])
        self.dropout = dropout
        if dropout:
            # Dropout layer
            self.dropout_layer = Dropout(dropout)
From the parameters, you can see , We support multi tier RNN, At the same time, in multiple layers RNN There is a layer between them Dropout.
  def forward(self, input: Tensor, h_0: Tensor) -> Tuple[Tensor, Tensor]:
        ''' RNN Forward propagation of  :param input:  shape  [n_steps, batch_size, input_size]  if batch_first=False :param h_0:  shape  [num_layers, batch_size, hidden_size] :return: output: (n_steps, batch_size, hidden_size) if batch_first=False  or  (batch_size, n_steps, hidden_size) if batch_first=True h_n: (num_layers, batch_size, hidden_size) '''

        is_batched = input.ndim == 3
        batch_dim = 0 if self.batch_first else 1
        if not is_batched:
            #  Convert to batch size 1 The input of
            input = input.unsqueeze(batch_dim)
            if h_0 is not None:
                h_0 = h_0.unsqueeze(1)
        if self.batch_first:
            batch_size, n_steps, _ = input.shape
            input = input.transpose((1, 0, 2))  #  take batch Put it in the middle dimension
        else:
            n_steps, batch_size, _ = input.shape

        if h_0 is None:
            h = [Tensor.zeros((batch_size, self.hidden_size), device=input.device) for _ in range(self.num_layers)]
        else:
            h = h_0
            h = list(F.unbind(h))  #  Split by layers h

        output = []
        for t in range(n_steps):
            inp = input[t]

            for layer in range(self.num_layers):
                h[layer] = self.cells[layer](inp, h[layer])
                inp = h[layer]
                if self.dropout and layer != self.num_layers - 1:
                    inp = self.dropout_layer(inp)

            #  Collect the output of the final layer
            output.append(h[-1])

        output = F.stack(output)
        if self.batch_first:
            output = output.transpose((1, 0, 2))
        h_n = F.stack(h)

        return output, h_n
To simplify implementation , take batch Dimension to dimension 1.
Because it contains multiple layers , Each layer contains different hidden states , So you need to split it by the number of layers h.
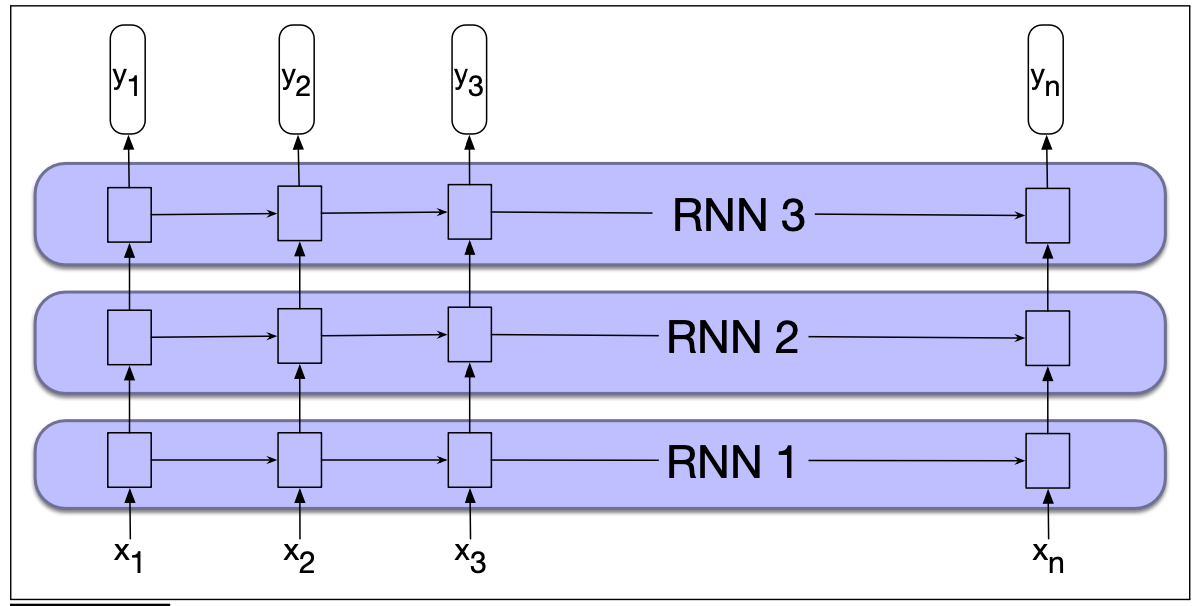
In the case of multiple layers , Need to add... In the right place Dropout. For example, in the example above , stay RNN1 and RNN2 as well as RNN2 and RNN3 At the connection of Dropout.
two-way RNN

two-way RNN In fact, there is another reverse processing RNN, So we first add a new for processing reverse order input RNN:
#  Multi tier support
self.cells = ModuleList([RNNCell(input_size, hidden_size, bias, nonlinearity)] +
[RNNCell(hidden_size, hidden_size, bias, nonlinearity) for _ in range(num_layers - 1)])
if self.bidirectional:
	#  Support two-way
	self.back_cells = copy.deepcopy(self.cells)
The easiest way , Is to reverse the input order , And then according to the forward process , Run it again in reverse RNN The process . But there will be duplicate code , So we put RNN The operation along a certain direction is drawn into a function .
    def forward(self, input: Tensor, h_0: Tensor) -> Tuple[Tensor, Tensor]:
        ''' RNN Forward propagation of  :param input:  shape  [n_steps, batch_size, input_size]  if batch_first=False :param h_0:  shape  [num_layers, batch_size, hidden_size] :return: num_directions = 2 if self.bidirectional else 1 output: (n_steps, batch_size, num_directions * hidden_size) if batch_first=False  or  (batch_size, n_steps, num_directions * hidden_size) if batch_first=True  Contains the last layer of each time step ( Multi-storey RNN) Output h_t h_n: (num_directions * num_layers, batch_size, hidden_size)  Contains the final hidden state  '''

        is_batched = input.ndim == 3
        batch_dim = 0 if self.batch_first else 1
        if not is_batched:
            #  Convert to batch size 1 The input of
            input = input.unsqueeze(batch_dim)
            if h_0 is not None:
                h_0 = h_0.unsqueeze(1)
        if self.batch_first:
            batch_size, n_steps, _ = input.shape
            input = input.transpose((1, 0, 2))  #  take batch Put it in the middle dimension
        else:
            n_steps, batch_size, _ = input.shape

        if h_0 is None:
            num_directions = 2 if self.bidirectional else 1
            h = Tensor.zeros((self.num_layers * num_directions, batch_size, self.hidden_size), dtype=input.dtype,
                             device=input.device)
        else:
            h = h_0

        hs = list(F.unbind(h))  #  Split by layers h

        if not self.bidirectional:
            #  If it's one-way
            output, h_n = one_directional_op(input, self.cells, n_steps, hs, self.num_layers, self.dropout_layer,
                                             self.batch_first)
        else:
            output_f, h_n_f = one_directional_op(input, self.cells, n_steps, hs[:self.num_layers], self.num_layers,
                                                 self.dropout_layer, self.batch_first)

   					output_b, h_n_b = one_directional_op(F.flip(input, 0), self.back_cells, n_steps, hs[self.num_layers:],self.num_layers, self.dropout_layer, self.batch_first, reverse=True)


            output = F.cat([output_f, output_b], 2)
            h_n = F.cat([h_n_f, h_n_b], 0)

        return output, h_n
The dimensions we output here and PyTorch bring into correspondence with . So one of them one_directional_op How to achieve it ?
def one_directional_op(input, cells, n_steps, hs, num_layers, dropout, batch_first, reverse=False):
    '''  A one-way RNN operation  Args: input: [n_steps, batch_size, input_size] cells: n_steps: hs: num_layers: dropout: batch_first: reverse: Returns: '''
    output = []
    for t in range(n_steps):
        inp = input[t]

        for layer in range(num_layers):
            hs[layer] = cells[layer](inp, hs[layer])
            inp = hs[layer]
            if dropout and layer != num_layers - 1:
                inp = dropout(inp)

        #  Collect the output of the final layer
        output.append(hs[-1])

    output = F.stack(output)

    if reverse:
        output = F.flip(output, 0) #

    if batch_first:
        output = output.transpose((1, 0, 2))

    h_n = F.stack(hs)

    return output, h_n
What we should pay attention to here is output = F.flip(output, 0) ` Reverse the output by time step dimension , Make time step t=0 On , It's the result of looking at the whole sequence .
Finally, we apply our..., through the part of speech tagging task RNN.
Part of speech tagging practice
Part of speech tagging can be regarded as a multi category text classification problem , We use NLTK Pennsylvania tree library provided (Penn Treebank) Sample data , First, load the part of speech tagging corpus :
def load_treebank():
    from nltk.corpus import treebank
    sents, postags = zip(*(zip(*sent) for sent in treebank.tagged_sents()))

    vocab = Vocabulary.build(sents, reserved_tokens=["<pad>"])

    tag_vocab = Vocabulary.build(postags)

    train_data = [(vocab.to_ids(sentence), tag_vocab.to_ids(tags)) for sentence, tags in
                  zip(sents[:3000], postags[:3000])]
    test_data = [(vocab.to_ids(sentence), tag_vocab.to_ids(tags)) for sentence, tags in
                 zip(sents[3000:], postags[3000:])]

    return train_data, test_data, vocab, tag_vocab
Before we adopt 3000 Sentences as training data , The rest is used as test data . Then we implement our dataset class :
class RNNDataset(Dataset):
    def __init__(self, data):
        self.data = np.asarray(data)

    def __len__(self):
        return len(self.data)

    def __getitem__(self, i):
        return self.data[i]

    @staticmethod
    def collate_fn(examples):
        inputs = [Tensor(ex[0]) for ex in examples]
        targets = [Tensor(ex[1]) for ex in examples]
        inputs = pad_sequence(inputs)
        targets = pad_sequence(targets)
        mask = inputs.data != 0
        return inputs, targets, Tensor(mask)
In order to align the length of the data in the batch , Input sequence and output sequence need to be complemented , Simultaneous use mask It records which marks have been supplemented .
Then based on the above implementation RNN To implement the part of speech tagging classification model , It is also called RNN:
class RNN(nn.Module):
    def __init__(self, vocab_size: int, embedding_dim: int, hidden_dim: int, output_dim: int, n_layers: int,
                 dropout: float, bidirectional: bool = False):
        super(RNN, self).__init__()
        self.embedding = nn.Embedding(vocab_size, embedding_dim)
        #  Call... In our model library RNN
        self.rnn = nn.RNN(embedding_dim, hidden_dim, batch_first=True, num_layers=n_layers, dropout=dropout, bidirectional=bidirectional)

        num_directions = 2 if bidirectional else 1
        self.output = nn.Linear(num_directions * hidden_dim, output_dim)

    def forward(self, input: Tensor, hidden: Tensor = None) -> Tensor:
        embeded = self.embedding(input)
        output, _ = self.rnn(embeded, hidden)  # pos tag The task takes advantage of all the time steps output
        outputs = self.output(output)
        log_probs = F.log_softmax(outputs, axis=-1)
        return log_probs
Here, in the sequence annotation task , You need to use the hidden layer of all States of the sequence , Stored in variables output in .
Last , In the training and prediction phase , Need to use mask To ensure that only valid marks are lost 、 Count the correct prediction results and the total marks .
The training code is as follows :
embedding_dim = 128
hidden_dim = 128
batch_size = 32
num_epoch = 10
n_layers = 2
dropout = 0.2

#  Load data
train_data, test_data, vocab, pos_vocab = load_treebank()
train_dataset = RNNDataset(train_data)
test_dataset = RNNDataset(test_data)
train_data_loader = DataLoader(train_dataset, batch_size=batch_size, collate_fn=train_dataset.collate_fn, shuffle=True)
test_data_loader = DataLoader(test_dataset, batch_size=batch_size, collate_fn=test_dataset.collate_fn, shuffle=False)

num_class = len(pos_vocab)

#  Load model
device = cuda.get_device("cuda:0" if cuda.is_available() else "cpu")
model = RNN(len(vocab), embedding_dim, hidden_dim, num_class, n_layers, dropout, bidirectional=True)
model.to(device)

#  Training process
nll_loss = NLLLoss()
optimizer = SGD(model.parameters(), lr=0.1)

model.train()  #  Make sure that... Is applied dropout
for epoch in range(num_epoch):
    total_loss = 0
    for batch in tqdm(train_data_loader, desc=f"Training Epoch {
      epoch}"):
        inputs, targets, mask = [x.to(device) for x in batch]
        log_probs = model(inputs)
        loss = nll_loss(log_probs[mask], targets[mask])  #  adopt bool choice ,mask Part does not need to be calculated
        optimizer.zero_grad()
        loss.backward()
        optimizer.step()
        total_loss += loss.item()
    print(f"Loss: {
      total_loss:.2f}")

#  Testing process
acc = 0
total = 0
model.eval()  #  Unwanted dropout
for batch in tqdm(test_data_loader, desc=f"Testing"):
    inputs, targets, mask = [x.to(device) for x in batch]
    with no_grad():
        output = model(inputs)
        acc += (output.argmax(axis=-1).data == targets.data)[mask.data].sum().item()
        total += mask.sum().item()

#  The accuracy of the output on the test set
print(f"Acc: {
      acc / total:.2f}")
We go through model.train() Come on model.eval() To control whether it is necessary to Dropout. Final , In two directions RNN Training in 10 Lots , The result is :
Training Epoch 9: 94it [02:00,  1.29s/it]
Loss: 103.25
Testing: 29it [00:05,  5.02it/s]
Acc: 0.70
Because there is no GPU, So it's slower , Just training 10 Lots , It looks good , The accuracy on the test set has reached 70%.
Complete code
https://github.com/nlp-greyfoss/metagrad
Reference resources
- Speech and Language Processing
- natural language processing : Method based on pre training model
- https://nn.labml.ai/lstm/index.html
边栏推荐
- Summary of basic concepts of moosefs
- 89. (cesium article) cesium aggregation diagram (custom picture)
- LeetCode85+105+114+124
- With the rise of China's database, Alibaba cloud lifeifei: China's cloud database has taken the lead in various mainstream technological innovations abroad
- 在线文本数字识别列表求和工具
- The MySQL data cannot be read after the checkpoint recovery. Do you know the reason
- leetcode:91. Decoding method [DFS + memorization]
- Build a short video platform, fade in and fade out, and support left sliding and right pulley to broadcast pictures
- Structure the fifth operation of the actual camp module
- The inadvertently discovered [tidb cache table] can solve the read / write hotspot problem
猜你喜欢

2022年第一季度保险服务数字化跟踪分析

论文浅尝 | KR-GCN: 知识感知推理的可解释推荐系统

中国数据库崛起,阿里云李飞飞:中国云数据库多种主流技术创新已领先国外

If you master these 28 charts, you will no longer be afraid to be asked about TCP knowledge during the interview

89. (cesium article) cesium aggregation diagram (custom picture)

JD alliance API - universal chain transfer interface - Jingpin library interface - Interface Customization

How to use SMS to deliver service information to customers? The guide is here!

Cout ambiguous problem

合宙AIR32F103CBT6开发板上手报告

【无工具搭建PHP8+oracle11g+Windows环境】内网/无网络/Win10/PHP连接oracle数据库实例
随机推荐
static关键字续、继承、重写、多态
5分钟快速上手 pytest 测试框架
This time, I will talk about technology and life
MySQL,MVCC详解,快照读在RC、RR下的区别
Huawei cloud AOM version 2.0 release
The inadvertently discovered [tidb cache table] can solve the read / write hotspot problem
Code sharing for making and developing small programs on the dating platform
阶段性总结与思考
Low code, end-to-end, one hour to build IOT sample scenarios, and the sound network released lingfalcon Internet of things cloud platform
软件测试方法和技术知识点有哪些?
Reading notes on how to connect the network - Web server request and response (V)
ASP.NET 跨页面提交(Button控件页面重定向)
How to use SMS to deliver service information to customers? The guide is here!
生产环境AIX小机报错B6267342问题处理
5-minute quick start pytest testing framework
ASP using panel to realize simple registration page
Does rapid software delivery really need to be at the cost of security?
分析安装包LNMP中的apache.sh脚本
为什么在局域网(ERP服务器)共享文件夹上拷贝文件时导致全局域英特网断网
With the rise of China's database, Alibaba cloud lifeifei: China's cloud database has taken the lead in various mainstream technological innovations abroad