当前位置:网站首页>Space shooting lesson 07: add graphics
Space shooting lesson 07: add graphics
2022-07-23 23:51:00 【acktomas】
Space shooting The first 07 course : Add graphics
This is us. “Shmup” Project No 4 part . If you haven't read through the previous section , Please from The first 1 part Start . In this lesson , We will discuss how to use pre drawn graphics in the game .
Select graphics
In our about elves Introduction class On , We talked about Opengameart.org, This is an important source of free game art , It is also one of our favorite artists “ Kenny ”.Kenney Made a perfect art bag for our game “ Space shooting bag ”, You can find... Here :
http://opengameart.org/content/space-shooter-redux
It has many very beautiful images , Including spacecraft , laser , Asteroids and so on .
When you download the package , It will be unzipped into a bunch of different folders . What we want is PNG Folder , It contains all the individual images . We will choose three images for three sprites , And contains for the game background “ Star domain ” Images .


These images need to be copied to where our game can find them . The easiest way to do this is to create a new folder in the same location as the game code . We named the folder “img”.
Load image
As we are Sprites brief introduction What is discussed in the course , To ensure that our code can run on any operating system , We need to use os.path Function to find the correct location and path of the file . At the top of the program , We will define folders img The location of :
from os import path

img_dir = path.join(path.dirname(__file__), 'img')
Draw the background
Now? , We can start by loading the background image . We will finish loading all components before the existing game loop and initialization code :
# Load all game graphics
background = pygame.image.load(path.join(img_dir, 'starfield.png')).convert()
background_rect = background.get_rect()
Now? , We can draw any sprite Before , Draw the background in the drawing part of the game cycle :
# Draw / render
screen.fill(BLACK)
screen.blit(background, background_rect)
all_sprites.draw(screen)
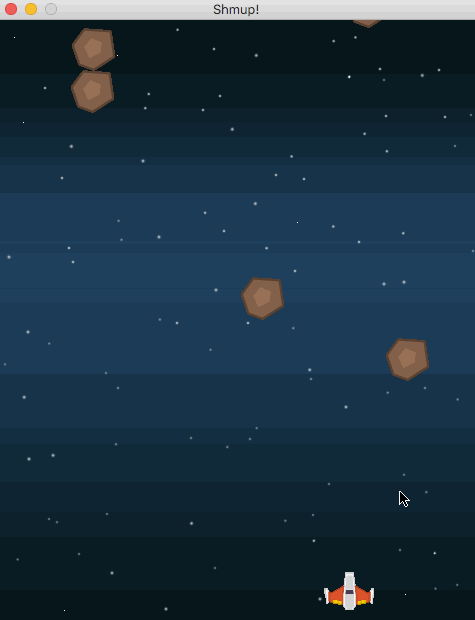
blit Is an old-fashioned computer graphics term , It means to draw the pixels of one image onto the pixels of another image , Draw the background image on the screen . Now our background looks much better :
Sprite image
Now we can load the image of the sprite :
# Load all game graphics
background = pygame.image.load(path.join(img_dir, 'starfield.png')).convert()
background_rect = background.get_rect()
player_img = pygame.image.load(path.join(img_dir, "playerShip1_orange.png")).convert()
meteor_img = pygame.image.load(path.join(img_dir, "meteorBrown_med1.png")).convert()
bullet_img = pygame.image.load(path.join(img_dir, "laserRed16.png")).convert()
Start with player sprites - We want to replace the green rectangle , So we changed self.image , And don't forget to delete image.fill(GREEN) , We don't need it anymore :
class Player(pygame.sprite.Sprite):
    def __init__(self):
        pygame.sprite.Sprite.__init__(self)
        self.image = player_img
        self.rect = self.image.get_rect()

however , Now we see several problems . First , The image is much larger than we want . We have two options :1) In the graphic editor (Photoshop,GIMP etc. ) Open and resize the image ; or 2) Resize the image in our code . We will choose the option 2, Use Pygame Of transform.scale() The command makes the image about half its size , namely 50x30 Pixels .
Another problem is that there is a black rectangle around our ship , Because we didn't use it set_colorkey Set transparent color :
self.image = pygame.transform.scale(player_img, (50, 38))
self.image.set_colorkey(BLACK)
If we're right Bullet and Mob Class takes the same process , We will finally get a more beautiful game :
Conclusion
Now we have graphics , You may have noticed a new problem : Sometimes meteors will destroy our spacecraft , Even if it doesn't look like touching . Try it on your own - How frustrating ! In the next lesson , We will learn how to adjust the conflict to work properly .
The complete code of this part
# KidsCanCode - Game Development with Pygame video series
# Shmup game - part 4
# Video link: https://www.youtube.com/watch?v=mOckdKp3V38
# Adding graphics
import pygame
import random
from os import path

img_dir = path.join(path.dirname(__file__), 'img')

WIDTH = 480
HEIGHT = 600
FPS = 60

# define colors
WHITE = (255, 255, 255)
BLACK = (0, 0, 0)
RED = (255, 0, 0)
GREEN = (0, 255, 0)
BLUE = (0, 0, 255)
YELLOW = (255, 255, 0)

# initialize pygame and create window
pygame.init()
pygame.mixer.init()
screen = pygame.display.set_mode((WIDTH, HEIGHT))
pygame.display.set_caption("Shmup!")
clock = pygame.time.Clock()

class Player(pygame.sprite.Sprite):
    def __init__(self):
        pygame.sprite.Sprite.__init__(self)
        self.image = pygame.transform.scale(player_img, (50, 38))
        self.image.set_colorkey(BLACK)
        self.rect = self.image.get_rect()
        self.rect.centerx = WIDTH / 2
        self.rect.bottom = HEIGHT - 10
        self.speedx = 0

    def update(self):
        self.speedx = 0
        keystate = pygame.key.get_pressed()
        if keystate[pygame.K_LEFT]:
            self.speedx = -8
        if keystate[pygame.K_RIGHT]:
            self.speedx = 8
        self.rect.x += self.speedx
        if self.rect.right > WIDTH:
            self.rect.right = WIDTH
        if self.rect.left < 0:
            self.rect.left = 0

    def shoot(self):
        bullet = Bullet(self.rect.centerx, self.rect.top)
        all_sprites.add(bullet)
        bullets.add(bullet)

class Mob(pygame.sprite.Sprite):
    def __init__(self):
        pygame.sprite.Sprite.__init__(self)
        self.image = meteor_img
        self.image.set_colorkey(BLACK)
        self.rect = self.image.get_rect()
        self.rect.x = random.randrange(WIDTH - self.rect.width)
        self.rect.y = random.randrange(-100, -40)
        self.speedy = random.randrange(1, 8)
        self.speedx = random.randrange(-3, 3)

    def update(self):
        self.rect.x += self.speedx
        self.rect.y += self.speedy
        if self.rect.top > HEIGHT + 10 or self.rect.left < -25 or self.rect.right > WIDTH + 20:
            self.rect.x = random.randrange(WIDTH - self.rect.width)
            self.rect.y = random.randrange(-100, -40)
            self.speedy = random.randrange(1, 8)

class Bullet(pygame.sprite.Sprite):
    def __init__(self, x, y):
        pygame.sprite.Sprite.__init__(self)
        self.image = bullet_img
        self.image.set_colorkey(BLACK)
        self.rect = self.image.get_rect()
        self.rect.bottom = y
        self.rect.centerx = x
        self.speedy = -10

    def update(self):
        self.rect.y += self.speedy
        # kill if it moves off the top of the screen
        if self.rect.bottom < 0:
            self.kill()

# Load all game graphics
background = pygame.image.load(path.join(img_dir, "starfield.png")).convert()
background_rect = background.get_rect()
player_img = pygame.image.load(path.join(img_dir, "playerShip1_orange.png")).convert()
meteor_img = pygame.image.load(path.join(img_dir, "meteorBrown_med1.png")).convert()
bullet_img = pygame.image.load(path.join(img_dir, "laserRed16.png")).convert()

all_sprites = pygame.sprite.Group()
mobs = pygame.sprite.Group()
bullets = pygame.sprite.Group()
player = Player()
all_sprites.add(player)
for i in range(8):
    m = Mob()
    all_sprites.add(m)
    mobs.add(m)

# Game loop
running = True
while running:
    # keep loop running at the right speed
    clock.tick(FPS)
    # Process input (events)
    for event in pygame.event.get():
        # check for closing window
        if event.type == pygame.QUIT:
            running = False
        elif event.type == pygame.KEYDOWN:
            if event.key == pygame.K_SPACE:
                player.shoot()

    # Update
    all_sprites.update()

    # check to see if a bullet hit a mob
    hits = pygame.sprite.groupcollide(mobs, bullets, True, True)
    for hit in hits:
        m = Mob()
        all_sprites.add(m)
        mobs.add(m)

    # check to see if a mob hit the player
    hits = pygame.sprite.spritecollide(player, mobs, False)
    if hits:
        running = False

    # Draw / render
    screen.fill(BLACK)
    screen.blit(background, background_rect)
    all_sprites.draw(screen)
    # *after* drawing everything, flip the display
    pygame.display.flip()

pygame.quit()
The first 5 part : Improved collision
边栏推荐
- iptables防止nmap扫描以及binlog
- logback
- 为什么大多数人都认为编程很难?
- Stm32mp1 M4 bare metal cubeide Development Guide Chapter 6 stm32cube firmware package
- 难怪国内企业ERP应用效果普遍不理想
- 树形DP
- js把数字转大写
- Idea cannot be switched to Chinese
- Longest increasing subsequence variant [deep understanding of the longest increasing sequence]
- JS learning notes -- bottom implementation of array method
猜你喜欢

![最长递增子序列变种[深刻理解最长递增序列]](/img/73/1480ec319a2860fec5667d6f2fb2ba.png)


![[Fifth space 2019 finals]pwn5](/img/51/03e6078961a8eab991fa08bb178a7b.png)


随机推荐
JS Learning Notes - - the Underlying Implementation of Array Method
Qt创建背景遮罩,弹出子窗口,父窗口背景变黑变暗
Chapter 4: implementation use cases
[computer three-level information security] access control model
Qt | 设置部件大小 sizeHint、minimumSizeHint、sizePolicy、stretch factor
Network security class assignment
Open source embedded sig in the openeuler community. Let's talk about its multi OS hybrid deployment framework
树形DP
Problems encountered in pytorch
最长递增子序列变种[深刻理解最长递增序列]
第五章、实现Web适配器
[OGeek2019]babyrop
warmup_csaw_2016
[ssm] joint debugging of front and rear protocols ①
[数组]NC95 数组中的最长连续子序列-较难
Notes on cmake compilation tool
Ubtun update source
[details] radio label, change the default selected background color
How are you preparing for the Android golden nine silver ten interview? The latest Android Interview Questions Summary helps you prepare for the war
PHP(2)