当前位置:网站首页>The fortress machine installs pytorch, mmcv, and mmclassification, and trains its own data sets
The fortress machine installs pytorch, mmcv, and mmclassification, and trains its own data sets
2022-06-23 23:14:00 【A scholar】
Fortress machine creation conda Environmental Science , And activate access to the environment
conda create -n mmclassification python=3.7
conda activate mmclassification
Fortress machine installation pytorch,torchvision,cudatoolkit
download torch,torchvision Installation package
In this website pytorch | Tsinghua University open source software image station , First download the version you need to install , Then upload it to the fortress machine . For example, I downloaded :
Upload and install
Enter your... In the fortress conda Environmental Science ( Below mmclassification Change it to your own conda Environment name ), Then install it .
conda activate mmclassification
conda install pytorch-1.10.0-py3.7_cuda11.3_cudnn8.2.0_0.tar.bz2
conda install torchvision-0.11.0-py37_cu113.tar.bz2
#  Install it again cudatoolkit
conda install cudatoolkit=10.2
Fortress machine installation mmcv
download mmcv Installation package
Also the same , Go to mmcv GitHub Official website download mmcv The version you want , Copy -f The web address at the back opens , Then choose what you want to install mmcv edition , download .
Upload to the fortress machine and install .
install mmcv
conda install mmcv
Fortress machine installation mmclassification
1️⃣ Go first mmclassification GitHub Download the latest version of the compressed package from the website , And upload it to the fortress machine .
open-mmlab/mmclassification: OpenMMLab Image Classification Toolbox and Benchmark (github.com)
2️⃣ Switch to... In the fortress machine mmclassification The root directory , Run command installation
pip3 install -e .
function mmclassification demo file
Download Pre Workout
stay mmclassification Create a new... In the root directory checkpoints Folder , Then download the pre training weights locally and upload them to the fortress machine . To download resnet18_8xb32_in1k_20210831-fbbb1da6.pth For example
resnet All pre training download addresses : mmclassification/resnet
resnet18_8xb32_in1k_20210831-fbbb1da6.pth Download address : resnet18_8xb32_in1k_20210831-fbbb1da6.pth
mkdir checkpoints
function demo Code
Remember to modify the command checkpoints/ The following file name , follow-up mmclassification It may be updated .
python demo/image_demo.py demo/demo.JPEG configs/resnet/resnet18_8xb32_in1k.py checkpoints/resnet18_8xb32_in1k_20210831-fbbb1da6.pth
demo Running results :
load checkpoint from local path: checkpoints/resnet18_8xb32_in1k_20210831-fbbb1da6.pth
{

    "pred_label": 58,
    "pred_score": 0.3810223340988159,
    "pred_class": "water snake"
}
Make your own dataset
Data set partitioning
It was like this before the division : Format of data set before partition : I have two classes , So there are two folders . Put your data in the following format .
root_path
    ├── benign
    │    ├── B_zsvinno_1.jpg
    │    ├── B_zsvinno_2.jpg
    │    └── ...
    │
    ├── malignant
    │    ├── M_zsvinno_1.jpg
    │    ├── M_zsvinno_2.jpg
    │    └── ...
    └── split_data.py
Script for partitioning data sets :【train:val:test=7:2:1】, Look carefully at the notes where you want to change them
import glob
import os
import shutil
import random
import re


##################################  Divide train,val,test #########################################
#  Parameter setting
train_prop = 0.7
val_prop = 2 / 3  # val stay val and test Accounting for
class_num = 2  #################  Change to your own category number
class_name = ["benign", "malignant"]  #################  Change to your own class name
root_dir = os.getcwd()
work_dir = os.path.join(root_dir, 'data')


def split():
    class_data_dir = []
    for i in range(class_num):
        class_data_dir.append(os.path.join(root_dir, class_name[i]))
    print(class_data_dir)

    images_data = []
    for i in class_data_dir:
        images_data.append(os.listdir(i))

    #  Divide the training set 、 Verification set 、 Test set picture subscript
    train_index, valtest_index, val_index, test_index = [], [], [], []
    for i in range(class_num):
        train_index.append(random.sample(range(len(images_data[i])), int(len(images_data[i]) * train_prop)))
        valtest_index = list(set(range(len(images_data[i]))) - set(train_index[i]))
        val_index.append(random.sample(valtest_index, int(len(valtest_index) * val_prop)))
        test_index.append(list(set(valtest_index) - set(val_index[i])))

    #  Recreate train,val,test Folder
    os.makedirs(os.path.join(work_dir, "train"))
    os.makedirs(os.path.join(work_dir, "val"))
    os.makedirs(os.path.join(work_dir, "test"))

    #  Create a folder for each class , from 0 Start
    for i in range(class_num):
        os.makedirs(os.path.join(work_dir, "train", class_name[i]))
        os.makedirs(os.path.join(work_dir, "val", class_name[i]))
        os.makedirs(os.path.join(work_dir, "test", class_name[i]))

    #  Copy pictures to train,val,test Folder
    for i in range(class_num):
        for j in train_index[i]:
            shutil.copy(os.path.join(class_data_dir[i], images_data[i][j]),
                        os.path.join(work_dir, "train", class_name[i]))
        for j in val_index[i]:
            shutil.copy(os.path.join(class_data_dir[i], images_data[i][j]),
                        os.path.join(work_dir, "val", class_name[i]))
        for j in test_index[i]:
            shutil.copy(os.path.join(class_data_dir[i], images_data[i][j]),
                        os.path.join(work_dir, "test", class_name[i]))

    #  Print the results
    print('-' * 50)
    for i in range(class_num):
        print('|' + class_name[i] + ' train num' + ': ' + str(len(train_index[i])))
        print('|' + class_name[i] + ' val num' + ': ' + str(len(val_index[i])))
        print('|' + class_name[i] + ' test num' + ': ' + str(len(test_index[i])))
        print()
    print('-' * 50)


##################################  establish classes.txt file  #########################################
def create_clsses_txt():
    #  establish classes.txt file
    with open(os.path.join(work_dir, 'classes.txt'), 'w') as f:
        for i in range(class_num):
            f.write(f'{
      class_name[i]}\n')
    print('| classes.txt File created successfully ')
    print('| classes.txt File path :' + os.path.join(work_dir, 'classes.txt'))
    print('-' * 50)


##################################  establish train.txt, val.txt, test.txt ############################
def create_txt():
    def generate_txt(images_dir, map_dict):
        #  Read all file names
        imgs_dirs = glob.glob(images_dir + "/*/*.jpg")
        # print(imgs_dirs)
        #  Open write file
        typename = images_dir.split("/")[-1]
        target_txt_path = os.path.join(work_dir, typename + ".txt")
        f = open(target_txt_path, "w")
        #  Traverse all picture names
        for img_dir in imgs_dirs:
            #  Get the first level directory name
            filename = img_dir.split("/")[-2]
            num = map_dict[filename]
            #  write file
            relate_name = re.findall(typename + "/([\w / - .]*)", img_dir)
            f.write(relate_name[0] + " " + num + "\n")

    train_dir = os.path.join(work_dir, "train")
    val_dir = os.path.join(work_dir, "val")
    test_dir = os.path.join(work_dir, "test")

    #  Create a dictionary , Used to map category names to category numbers
    class_map_dict = {
    }
    for i in range(class_num):
        class_map_dict[class_name[i]] = str(i)
    generate_txt(images_dir=train_dir, map_dict=class_map_dict)
    generate_txt(images_dir=val_dir, map_dict=class_map_dict)
    generate_txt(images_dir=test_dir, map_dict=class_map_dict)
    print('| train.txt, val.txt, test.txt File created successfully ')
    print('| train dir', train_dir)
    print('| val dir', val_dir)
    print('| test dir', test_dir)
    print('-' * 50)

if __name__ == '__main__':
    split() #  Divide the data set into train,val,test Three folders
    create_clsses_txt() #  establish classes.txt file
    create_txt()    #  establish train.txt, val.txt, test.txt file
After division :
root_path
    ├── benign
    ├── data
    │   ├── train
    │   │   ├── benign
    │   │   └── malignant
    │   ├── train.txt
    │   ├── val
    │   │   ├── benign
    │   │   └── malignant
    │   ├── val.txt
    │   ├── test
    │   │   ├── benign
    │   │   └── malignant
    │   ├── test.txt
    │   └── classes.txt
    ├── malignant
    └── split_data.py
So our data set is ready ️
Create a training profile
create profile
To find the model we want to use , Then copy the file name to modify the contents of the following code : I take convnext-large_64xb64_in1k.py For example
I want to be in mmclassification/ Create one in the directory work_dirs Catalog , And then create a create_config.py file , Used to create a series of mmclassification Configuration file for .
create_config.py The contents are as follows :, Look carefully at the notes where you want to change them
import os
from mmcv import Config

###########################  Here are some super parameters , Can be modified by yourself  #############################

# model Internal parameter setting
num_classes = 2  #  Change to your own category number
topk = (1,)  #  Change it to your own topk,
# datasets Internal parameter setting
root_path = os.getcwd()
model_name = 'convnext-large_64xb64_in1k'  #  Change to the name of the model you want to use
work_dir = os.path.join(root_path, "work_dirs", 'convnext-large_64xb64_in1k_job2')  #  The path to the training save file ,job1,job2,, Modify by yourself .
baseline_cfg_path = os.path.join('configs', 'convnext', 'convnext-large_64xb64_in1k.py')  #  Change to the path of the model you want to use
save_cfg_path = os.path.join(work_dir, 'config.py')  #  The path where the generated configuration file is saved

train_data_prefix = os.path.join(root_path, 'data', 'thyroid_cls', 'data', 'train')  #  Change to the directory of your own training set pictures .
val_data_prefix = os.path.join(root_path, 'data', 'thyroid_cls', 'data', 'val')  #  Change to the directory of your own verification set pictures .
test_data_prefix = os.path.join(root_path, 'data', 'thyroid_cls', 'data', 'test')  #  Change to the directory of your own test set pictures , There is no test machine , You can use a validation set .

train_ann_file = os.path.join(root_path, 'data', 'thyroid_cls', 'data', 'train.txt')  #  Modify the training set as your own data set txt file
val_ann_file = os.path.join(root_path, 'data', 'thyroid_cls', 'data', 'val.txt')  #  Modify the validation set for your own dataset txt file
test_ann_file = os.path.join(root_path, 'data', 'thyroid_cls', 'data', 'test.txt')  #  Modify the test set as your own data set txt file , Without a test set , You can use a validation set .

classes = os.path.join(root_path, 'data', 'thyroid_cls', 'data', 'classes.txt')  #  Create a category file in your dataset Directory classes.txt, One category per line .

#  Find a website to find the website of your corresponding model : https://mmclassification.readthedocs.io/en/latest/model_zoo.html
#  After downloading , Put it in work_dir below , And change the name to checkpoint.pth.
load_from = os.path.join(work_dir, 'checkpoint.pth')

#  Some super parameters , Can be modified by yourself
gpu_num = 8  #  Change it to your own gpu Number
total_epochs = 100  #  Change to the total you want to train epoch Count
batch_size = 2 ** 4  #  According to your own video memory , Change to the appropriate value , Suggestion is 2 Multiple .
num_worker = 8  #  Than batch_size Small , According to CPU Core number adjustment .
log_interval = 5  #  Log printing interval
checkpoint_interval = 15  #  The interval between saving weight files


# lr = 0.02 #  Learning rate


###########################  Above are some super parameters , Can be modified by yourself  #############################


def create_config():
    cfg = Config.fromfile(baseline_cfg_path)

    if not os.path.exists(work_dir):
        os.makedirs(work_dir)

    cfg.work_dir = work_dir

    # model Internal parameter setting
    cfg.model.head.num_classes = num_classes
    cfg.model.head.topk = topk
    if num_classes < 5:
        cfg.evaluation = dict(metric_options={
    'topk': (1,)})

    # datasets Internal parameter setting
    cfg.data.train.data_prefix = train_data_prefix
    # cfg.data.train.ann_file = train_ann_file
    cfg.data.train.classes = classes

    cfg.data.val.data_prefix = val_data_prefix
    cfg.data.val.ann_file = val_ann_file
    cfg.data.val.classes = classes

    cfg.data.test.data_prefix = test_data_prefix
    cfg.data.test.ann_file = test_ann_file
    cfg.data.test.classes = classes

    cfg.data.samples_per_gpu = batch_size  # Batch size of a single GPU used in testing
    cfg.data.workers_per_gpu = num_worker  # Worker to pre-fetch data for each single GPU

    #  Super parameter settings
    cfg.log_config.interval = log_interval
    cfg.load_from = load_from
    cfg.runner.max_epochs = total_epochs
    cfg.total_epochs = total_epochs
    # cfg.optimizer.lr = lr
    cfg.checkpoint_config.interval = checkpoint_interval

    #  Save configuration file
    cfg.dump(save_cfg_path)

    print("—" * 80)
    print(f'CONFIG:\n{
      cfg.pretty_text}')
    print("—" * 80)
    print("| Save config path:", save_cfg_path)
    print("—" * 80)
    print("| Load pretrain model path:", load_from)
    print("—" * 80)
    print('Please download the model pre-training weights, rename the "checkpoint.pth" '
          'and put it in the following directory:', save_cfg_path[:-9])
    print("—" * 80)


if __name__ == '__main__':
    create_config()
stay mmclassification The root directory , Run it from the command line create_mmclassification_config.py file
python work_dirs/create_config.py
Download Pre Workout weights
Download the pre training weight of the model in the configuration file , And put it in the working directory of the configuration file , That is to say work_dirs/convnext-large_64xb64_in1k_job1/ Under the table of contents , And rename to checkpoint.pth
convnext-large_64xb64_in1k Download address for pre training , The model you use , Go to mmclassification Github Find it on the official website :https://download.openmmlab.com/mmclassification/v0/convnext/convnext-large_in21k-pre-3rdparty_64xb64_in1k_20220124-2412403d.pth
Start training
Stand alone single card :
python tools/train.py work_dirs/convnext-large_64xb64_in1k_job1/config.py
Single machine multi card
bash tools/dist_train.sh work_dirs/convnext-large_64xb64_in1k_job1/config.py 8
Image reasoning
In image reasoning ,–out,–metrics Must assign a .
–metrics Some options are as follows
evaluation metrics, which depends on the dataset, e.g.,
“accuracy”, “precision”, “recall”, “f1_score”, “support” for single label dataset,
“mAP”, “CP”, “CR”, “CF1”, “OP”, “OR”, “OF1” for multi-label dataset
Single image reasoning
python demo/image_demo.py  ${
    IMAGE_FILE}  ${
    CONFIG_FILE}  ${
    CHECKPOINT_FILE}
Single machine single card reasoning test set
python tools/test.py ${
    CONFIG_FILE} ${
    CHECKPOINT_FILE} [--metrics ${
    METRICS}] [--out ${
    RESULT_FILE}]

 example 1:python tools/test.py work_dirs/convnext-large_64xb64_in1k_job1/config.py work_dirs/convnext-large_64xb64_in1k_job1/checkpoint.pth --out result.pkl

 example 2:python tools/test.py work_dirs/convnext-large_64xb64_in1k_job1/config.py work_dirs/convnext-large_64xb64_in1k_job1/checkpoint.pth --metrics precision
Single machine multi card reasoning test set
bash tools/dist_test.sh ${
    CONFIG_FILE} ${
    CHECKPOINT_FILE} ${
    GPU_NUM} [--metrics ${
    METRICS}] [--out ${
    RESULT_FILE}]

 example 1:bash tools/dist_test.sh work_dirs/convnext-large_64xb64_in1k_job1/config.py work_dirs/convnext-large_64xb64_in1k_job1/checkpoint.pth 8 --out result.pkl

 example 2:bash tools/dist_test.sh work_dirs/convnext-large_64xb64_in1k_job1/config.py work_dirs/convnext-large_64xb64_in1k_job1/checkpoint.pth 8 --metrics precision
边栏推荐
- Website construction column setting form which website construction company is better
- The technical design and practice of decrypting the red envelopes of Tiktok Spring Festival
- How to set up a website construction map
- The Sandbox 与 BAYZ 达成合作,共同带动巴西的元宇宙发展
- The national post office and other three departments: strengthen the security management of personal information related to postal express delivery, and promote the de identification technology of per
- Use elastic security to detect the vulnerability exploitation of cve-2021-44228 (log4j2)
- How to set the website construction title bar drop-down
- MySQL数据库配置信息查看与修改方法详解
- Heat transfer oil electric heater
- The principle of async and await
猜你喜欢
Summary of cloud native pipeline tools
Detailed usage of exists in SQL statements

kubernetes之常用核心资源对象

C#/VB.NET Word转Text

专业“搬砖”老司机总结的 12 条 SQL 优化方案,非常实用!

SAVE: 软件分析验证和测试平台
Detailed process of deploying redis cluster and micro service project in docker
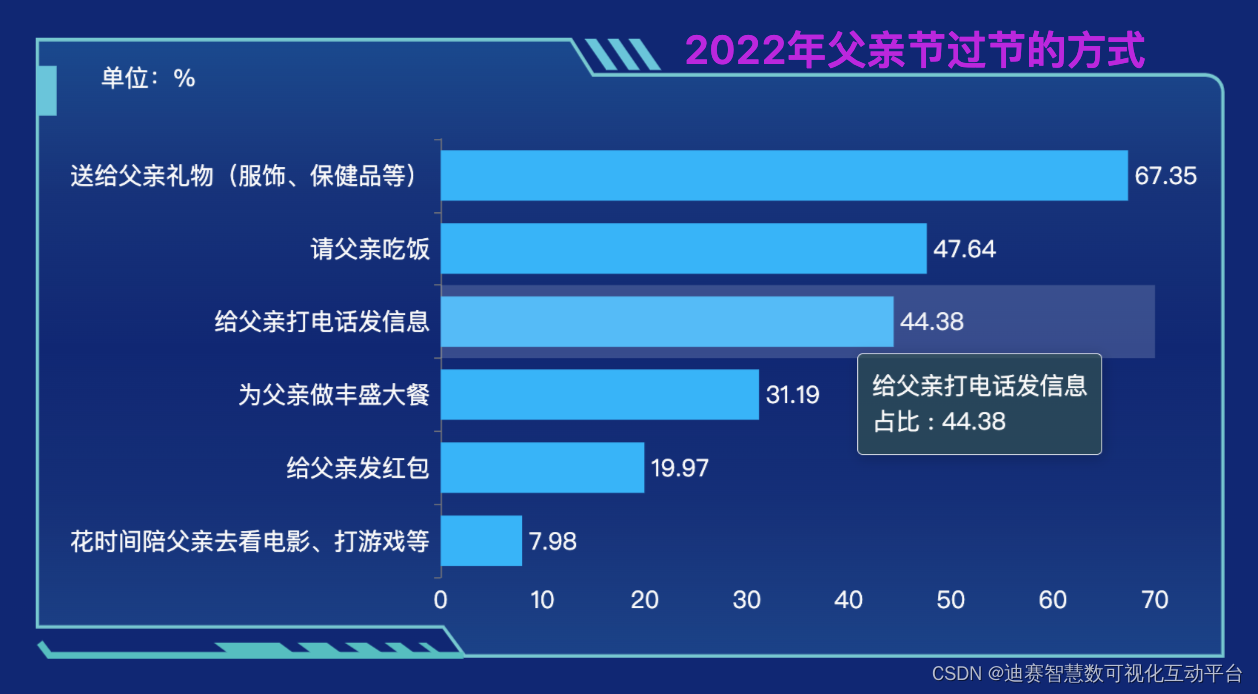
迪赛智慧数——柱状图(基本柱状图):2022年父亲节过节的方式
Detailed quaternion

The Sandbox 归属周来啦!


随机推荐
The 12 SQL optimization schemes summarized by professional "brick moving" old drivers are very practical!
Recommended | January activity 2-core 4G lightweight application server, enterprise nationwide purchase 6.7 yuan / month!!!
Website construction column setting form which website construction company is better
How to access the top-level domain name and automatically jump to the secondary domain name?
Save: software analysis, verification and test platform
Website construction is not set to inherit the superior column. How to find a website construction company
How to set up links for website construction how to build a website
Notes to nodejs (IV)
Operation and maintenance failure experience sharing
What server is used for website construction? What is the price of the server
2021-12-10: which can represent a 64 bit floating point number or a 64 bit signed integer
Three ways to enable IPv6 on Tencent cloud
Summary of cloud native pipeline tools
Phpmailer sends mail PHP
Production of labels for table products
How to set the website construction title bar drop-down
Docker中部署Redis集群与部署微服务项目的详细过程
The technical design and practice of decrypting the red envelopes of Tiktok Spring Festival
Performance test - LoadRunner obtains the return value and user-defined parameters (parameter operation)
Payment industry tuyere project: smart digital operation 3.0