当前位置:网站首页>Draw a wave ball with the curve of flutter and Bessel
Draw a wave ball with the curve of flutter and Bessel
2022-07-23 07:33:00 【biyezuopinvip】
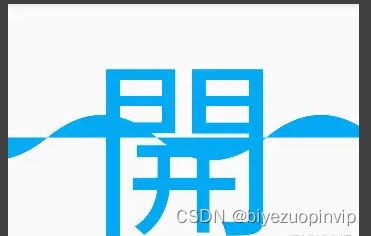
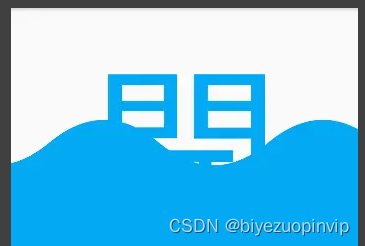
When flutter The existing components of cannot meet the requirements of the product UI In effect , We need to implement it through self drawing components . This article will introduce how to use flutter Custom implementation of a wave ball with text , The effect is as follows :

Let's summarize WaveLoadingWidget Characteristics , In this way, the steps required to achieve this effect can be summarized :
- widget The main body of is an irregular semicircle , The top curve moves up and down from left to right in a wave like form
- The wave ball can customize the color , Here to waveColor name
- The undulating line of the wave ball divides the embedded text into upper and lower colors , The color of the upper part is in backgroundColor name , The color of the lower part is in foregroundColor name , The overall color of the text has been changing dynamically according to the operation of the waves
Although the overall color of the text is constantly changing , But as long as you can draw one of the frames , The dynamic effect can be realized by changing the position parameters of the wave curve , So here's the widget As static , First realize its static effect
Disassemble the drawing steps into the following steps :
- The drawing color is backgroundColor The text of , Draw it on canvas The bottom of the
- according to widget The width and height information constructs a maximum circular path within the range circlePath
- With circlePath The horizontal middle line of the wave is used as the reference fluctuation line of the wave , Draw a continuous wave with Bessel curve on the upper and lower sides of the fluctuation line path, take path The ends of the are connected together in a rectangular way , constitute wavePath,wavePath The bottom of the will circlePath Intersect at the bottom of
- take circlePath and wavePath Intersection combinePath, use waveColor fill , At this point, you get a semicircular spherical wave
- utilize
canvas.clipPath(combinePath)Method to cut the canvas , Then draw the color as foregroundColor The text of , Drawn at this time foregroundColor The text will only show combinePath Part of the scope , That is, only the lower part will be displayed , Make the text drawn at two different times overlap , Thus, text with different color ranges is obtained - utilize AnimationController Constantly changing wavePath The starting point of X coordinate , At the same time, refresh UI, The undulating motion from left to right
Now let's implement the above drawing steps step by step
One 、 draw backgroundColor Text
flutter adopt CustomPainter It provides self drawing for developers UI Entrance , Inside void paint(Canvas canvas, Size size) Method provides a canvas canvas Object and contains widget Wide and high information size object
Here comes the inheritance CustomPainter class , stay paint Method, first draw the color as backgroundColor The text of .flutter Of canvas Object does not provide a direct drawText Of API, Therefore, the steps of drawing text are relatively native customization View A little more trouble
class _WaveLoadingPainter extends CustomPainter {
  final String text;

  final double fontSize;

  final double animatedValue;

  final Color backgroundColor;

  final Color foregroundColor;

  final Color waveColor;

  _WaveLoadingPainter({
    required this.text,
    required this.fontSize,
    required this.animatedValue,
    required this.backgroundColor,
    required this.foregroundColor,
    required this.waveColor,
  });

  @override
  void paint(Canvas canvas, Size size) {
    final side = min(size.width, size.height);
    _drawText(canvas: canvas, side: side, color: backgroundColor);
  }

  void _drawText(
      {required Canvas canvas, required double side, required Color color}) {
    ParagraphBuilder paragraphBuilder = ParagraphBuilder(ParagraphStyle(
      textAlign: TextAlign.center,
      fontStyle: FontStyle.normal,
      fontSize: fontSize,
    ));
    paragraphBuilder.pushStyle(ui.TextStyle(color: color));
    paragraphBuilder.addText(text);
    ParagraphConstraints pc = ParagraphConstraints(width: fontSize);
    Paragraph paragraph = paragraphBuilder.build()..layout(pc);
    canvas.drawParagraph(
      paragraph,
      Offset((side - paragraph.width) / 2.0, (side - paragraph.height) / 2.0),
    );
  }

  @override
  bool shouldRepaint(CustomPainter oldDelegate) {
    return animatedValue != (oldDelegate as _WaveLoadingPainter).animatedValue;
  }
}

Two 、 structure circlePath
take widget The minimum value of width and height is taken as the diameter of the circle , In order to build a system that does not exceed widget The maximum circular path of the range circlePath
  @override
  void paint(Canvas canvas, Size size) {
    final side = min(size.width, size.height);
    _drawText(canvas: canvas, side: side, color: backgroundColor);

    final circlePath = Path();
    circlePath.addArc(Rect.fromLTWH(0, 0, side, side), 0, 2 * pi);
  }
3、 ... and 、 Draw wave lines
The width and height of the wave are evaluated according to a fixed proportional value , With circlePath The middle separation line of is used as the horizontal line , Draw a continuous wave line up and down the horizontal line according to the Bessel curve
  @override
  void paint(Canvas canvas, Size size) {
    final side = min(size.width, size.height);
    _drawText(canvas: canvas, side: side, color: backgroundColor);

    final circlePath = Path();
    circlePath.addArc(Rect.fromLTWH(0, 0, side, side), 0, 2 * pi);

    final waveWidth = side * 0.8;
    final waveHeight = side / 6;
    final wavePath = Path();
    final radius = side / 2.0;
    wavePath.moveTo(-waveWidth, radius);
    for (double i = -waveWidth; i < side; i += waveWidth) {
      wavePath.relativeQuadraticBezierTo(
          waveWidth / 4, -waveHeight, waveWidth / 2, 0);
      wavePath.relativeQuadraticBezierTo(
          waveWidth / 4, waveHeight, waveWidth / 2, 0);
    }
    // For the convenience of the reader , Here is the  wavePath  Draw it out , There is no need for
    final paint = Paint()
      ..isAntiAlias = true
      ..style = PaintingStyle.fill
      ..strokeWidth = 3
      ..color = waveColor;
    canvas.drawPath(wavePath, paint);
  }
At this time, the drawn curve is still in an open state , Need to put wavePath Connect the ends of the , In this way, we can communicate with circlePath intersect
wavePath.relativeLineTo(0, radius);
wavePath.lineTo(-waveWidth, side);
wavePath.close();
// For the convenience of the reader , Here is the  wavePath  Draw it out , There is no need for
final paint = Paint()
  ..isAntiAlias = true
  ..style = PaintingStyle.fill
  ..strokeWidth = 3
  ..color = waveColor;
canvas.drawPath(wavePath, paint);
wavePath After closing , At this time, the color of the semicircle will be covered
Four 、 intersect
take circlePath and wavePath Intersection , You get a semicircular wave ball
final paint = Paint()
  ..isAntiAlias = true
  ..style = PaintingStyle.fill
  ..strokeWidth = 3
  ..color = waveColor;
final combinePath = Path.combine(PathOperation.intersect, circlePath, wavePath);
canvas.drawPath(combinePath, paint);

5、 ... and 、 draw foregroundColor Text
The color of the text is divided into two parts , The color of the upper part is backgroundColor, The second half is foregroundColor. In the first step, the color has been drawn as backgroundColor The text of ,foregroundColor The text does not need to show the top half , So I'm drawing foregroundColor Before text, you need to limit the drawing area to combinePath Inside , Make the text drawn at two different times overlap , To get text with different color ranges
canvas.clipPath(combinePath);
_drawText(canvas: canvas, side: side, color: foregroundColor);

6、 ... and 、 Add animation
Now you have drawn the effect of static time , Consider how to make widget It's moving
It's also easy to achieve dynamic effects , Just keep changing the coordinates of the starting point of the Bezier curve , Keep it moving from left to right , You can create the effect of waves moving forward from left to right ._WaveLoadingPainter According to the animation value passed in from the outside animatedValue To set up wavePath The starting coordinate point of , Generate animatedValue The logic and other drawing parameters are determined by _WaveLoadingState To provide
class _WaveLoadingState extends State<WaveLoading>
    with SingleTickerProviderStateMixin {
  String get _text => widget.text;

  double get _fontSize => widget.fontSize;

  Color get _backgroundColor => widget.backgroundColor;

  Color get _foregroundColor => widget.foregroundColor;

  Color get _waveColor => widget.waveColor;

  late AnimationController _controller;

  late Animation<double> _animation;

  @override
  void initState() {
    super.initState();
    _controller = AnimationController(
        duration: const Duration(milliseconds: 700), vsync: this);
    _animation = Tween(
      begin: 0.0,
      end: 1.0,
    ).animate(_controller)
      ..addListener(() {
        setState(() => {});
      });
    _controller.repeat();
  }

  @override
  void dispose() {
    _controller.dispose();
    super.dispose();
  }

  @override
  Widget build(BuildContext context) {
    return RepaintBoundary(
      child: CustomPaint(
        painter: _WaveLoadingPainter(
          text: _text,
          fontSize: _fontSize,
          animatedValue: _animation.value,
          backgroundColor: _backgroundColor,
          foregroundColor: _foregroundColor,
          waveColor: _waveColor,
        ),
      ),
    );
  }
}
_WaveLoadingPainter according to animatedValue To set up wavePath The starting coordinate point of
wavePath.moveTo((animatedValue - 1) * waveWidth, radius);
7、 ... and 、 Use
The final will be _WaveLoadingState Package to StatefulWidget in , stay StatefulWidget Just open the parameters that can be customized in
class WaveLoading extends StatefulWidget {
  final String text;

  final double fontSize;

  final Color backgroundColor;

  final Color foregroundColor;

  final Color waveColor;

  WaveLoading({
    Key? key,
    required this.text,
    required this.fontSize,
    required this.backgroundColor,
    required this.foregroundColor,
    required this.waveColor,
  }) : super(key: key) {
    assert(text.isNotEmpty && fontSize > 0);
  }

  @override
  State<StatefulWidget> createState() {
    return _WaveLoadingState();
  }
}
Usage mode :
SizedBox(
	width: 300,
	height: 300,
	child: WaveLoading(
  		text: " Open ",
  		fontSize: 210,
  		backgroundColor: Colors.lightBlue,
  		foregroundColor: Colors.white,
  		waveColor: Colors.lightBlue,
)
边栏推荐
- Redis五大基本数据类型的基本命令
- 奇瑞艾瑞泽8产品力超能打,“全优”可不是白叫的
- Codeforces Round #808 (Div. 2) A - D
- W25q128fv translation (II)
- Persistence of redis
- Vector3.Lerp
- LAN SDN technology hard core insider - 02 forward multi-core technology for Moore's law for one second
- Redis——JedisConnectionException Could not get a resource from the pool
- 【随笔】再见IE浏览器,一个时代的印记从此消失
- redis基本类型常用命令
猜你喜欢

支持多数不规则用户的隐私保护联邦学习框架

SDN application layer DDoS attack defense mechanism based on API call management

Attack and defense scheme based on Ethereum status database

VIM text editor

上采样方式(反卷积、插值、反池化)

After 100 billion of revenue, Alibaba cloud ecosystem has a new way to play

小程序毕设作品之微信校园二手书交易小程序毕业设计成品(1)开发概要

智能商务的数据分析平台设计与实现
电子招标采购商城系统:优化传统采购业务,提速企业数字化升级
使用Flutter与贝塞尔曲线画一个波浪球
随机推荐
Vector3.Lerp
VR panoramic zoo, a zoo business card with different achievements
自定义View:悬浮球与加速球
A survey of copyright protection research on deep learning model
“外卖员的时间没有程序员值钱”:读过书就把自己当人上人?得电
Ambire 钱包开启 Twitter Spaces 系列
W25q128fv translation (II)
10个Live Demo都展示了啥?看过没看过的都值得再看一遍
【无标题】
VR全景动物园,成就不一样的动物园名片
Image processing solution veimagex technology evolution Road
再学电商项目之谷粒商城之ES6新特性
使用Flutter与贝塞尔曲线画一个波浪球
基于证据理论物联网安全态势感知方法研究
小程序毕设作品之微信酒店预订小程序毕业设计(6)开题答辩PPT
导出功能单独调用
国泰君安证券股票开户怎么样安全吗
-bash: wget: 未找到命令
RS485 communication OSI model network layer
Null and nullptr