当前位置:网站首页>Complete and detailed installation steps for kubeneter version 1.7
Complete and detailed installation steps for kubeneter version 1.7
2022-06-21 14:34:00 【Internet Walker】
| Use kubeadm install kuberneters1.17.3 | |
| # System environment preparation | |
| Use 3 platform centos7.2 operating system , The roles of the machine are master,worknode,worknode | |
| 1、 Set host name | |
| hostnamectl set-hostname master | |
| 2、 edit /etc/hosts | |
| cat <<EOF >>/etc/hosts | |
| 10.10.10.1 master | |
| 10.10.10.2 node1 | |
| 10.10.10.3 node2 | |
| EOF | |
| 3、 Turn off firewall , No exchange swap | |
| systemctl stop firewalld | |
| systemctl disable firewalld | |
| setenforce 0 | |
| sed -i "s/^SELINUX=enforcing/SELINUX=disabled/g" /etc/selinux/config | |
| swapoff -a | |
| sed -i 's/.*swap.*/#&/' /etc/fstab | |
| The above operations are generally not required for virtual machines , Swap memory is turned off by default , Turn off firewall . | |
| 4、 Configure kernel parameters ,IPv4 Flow to iptables On the chain | |
| cat > /etc/sysctl.d/k8s.conf <<EOF | |
| net.bridge.bridge-nf-call-ip6tables = 1 | |
| net.bridge.bridge-nf-call-iptables = 1 | |
| net.ipv4.ip_forward = 1 | |
| EOF | |
| sysctl --system | |
| If you encounter /proc/sys/net/bridge/bridge-nf-call-iptables contents are not set to 1 | |
| Solution : | |
| echo 1 > /proc/sys/net/bridge/bridge-nf-call-iptables | |
| echo 1 > /proc/sys/net/bridge/bridge-nf-call-ip6tables | |
| 5、 Add domestic Kubernetes Source | |
| cat <<EOF > /etc/yum.repos.d/kubernetes.repo | |
| [kubernetes] | |
| name=Kubernetes | |
| baseurl=https://mirrors.aliyun.com/kubernetes/yum/repos/kubernetes-el7-x86_64/ | |
| enabled=1 | |
| gpgcheck=1 | |
| repo_gpgcheck=1 | |
| gpgkey=https://mirrors.aliyun.com/kubernetes/yum/doc/yum-key.gpg https://mirrors.aliyun.com/kubernetes/yum/doc/rpm-package-key.gpg | |
| EOF | |
| 6、 add to docker Source | |
| cat <<EOF > /etc/yum.repos.d/docker.repo | |
| [docker-ce-stable] | |
| name=Docker CE Stable - $basearch | |
| baseurl=https://mirrors.aliyun.com/docker-ce/linux/centos/7/$basearch/stable | |
| enabled=1 | |
| gpgcheck=1 | |
| gpgkey=https://mirrors.aliyun.com/docker-ce/linux/centos/gpg | |
| EOF | |
| k8s install | |
| 7、 Each machine is equipped with | |
| yum install kubelet kubeadm kubectl | |
| systemctl enable kubelet | |
| # k8s install | |
| 1、 Deploy master node | |
| stay master Node initialization | |
| kubeadm init --kubernetes-version=1.17.3 --apiserver-advertise-address=10.192.126.118 --image-repository registry.aliyuncs.com/google_containers --service-cidr=10.1.0.0/16 --pod-network-cidr=10.244.0.0/16 | |
| If appear | |
| detected "cgroupfs" as the Docker cgroup driver. The recommended driver is "systemd" | |
| terms of settlement : | |
| Modify or create /etc/docker/daemon.json, Add the following : | |
| { | |
| "exec-opts": ["native.cgroupdriver=systemd"] | |
| } | |
| [ERROR DirAvailable--var-lib-etcd]: /var/lib/etcd is not empty | |
| terms of settlement : | |
| rm -rf /var/lib/etcd | |
| After successful installation, the following information should be kept in mind | |
| Your Kubernetes control-plane has initialized successfully! | |
| To start using your cluster, you need to run the following as a regular user: | |
| mkdir -p $HOME/.kube | |
| sudo cp -i /etc/kubernetes/admin.conf $HOME/.kube/config | |
| sudo chown $(id -u):$(id -g) $HOME/.kube/config | |
| You should now deploy a pod network to the cluster. | |
| Run "kubectl apply -f [podnetwork].yaml" with one of the options listed at: | |
| https://kubernetes.io/docs/concepts/cluster-administration/addons/ | |
| Then you can join any number of worker nodes by running the following on each as root: | |
| kubeadm join 10.192.126.118:6443 --token cjcepg.zlpbj2advlh0k5e5 \ | |
| --discovery-token-ca-cert-hash sha256:825f8a4ebe2da9187cde8351805df71e099a81c2a9f9d33f7456eb3fbf4cae0c | |
| If you encounter kubectl get nodes And so on error: the server doesn't have a resource type "nodes" | |
| This is because of the permission problem , Need to use sudo, Now it's root Account number also needs sudo function , You can try to run sudo -s | |
| 1、 Use... After creation kubectl get pods --all-namespaces see pod Health of , In practice, I encountered | |
| kube-system coredns-9d85f5447-mk9cq 0/1 ContainerCreating 0 12m | |
| kube-system coredns-9d85f5447-wjpk7 0/1 ContainerCreating 0 12m | |
| Yes, it is kubectl describe pod coredns-9d85f5447-mk9cq -n kube-system see pod Information , The main mistake is | |
| network: error getting ClusterInformation,https://10.43.0.1:443/apis/crd.projectcalico.org/v1/clusterinformations/default | |
| This is generally an analysis netowrkplugin, Profile path /etc/cni/net.d, My situation is because of the previous machine CNI The plug-in doesn't have | |
| Clean up , The current selection is canal, So you need to delete 10-calico.conflist, modify 10-canal.yaml Content . | |
| Revision reference https://docs.projectcalico.org/reference/cni-plugin/configuration | |
| 2、 Log view journalctl -f -u kubelet |grep -i error -C 500 | |
| # k8s Cluster uninstall | |
| kubeadm reset -f | |
| modprobe -r ipip | |
| lsmod | |
| rm -rf ~/.kube/ | |
| rm -rf /etc/kubernetes/ | |
| rm -rf /etc/systemd/system/kubelet.service.d | |
| rm -rf /etc/systemd/system/kubelet.service | |
| rm -rf /usr/bin/kube* | |
| rm -rf /etc/cni | |
| rm -rf /opt/cni | |
| rm -rf /var/lib/etcd | |
| rm -rf /var/etcd | |
| ifconfig flannel.1 down | |
| ip link delete flannel.1 | |
| yum clean all | |
| Use the configuration file for cluster initialization | |
| 1、kubeadm config print init-defaults ClusterConfiguration >kubeadm-config.conf | |
| 2、 modify kubeadm-config.conf | |
| kubeadm init --config kubeadm-config.yaml | |
| apiVersion: kubeadm.k8s.io/v1beta2 | |
| bootstrapTokens: | |
| - groups: | |
| - system:bootstrappers:kubeadm:default-node-token | |
| token: abcdef.0123456789abcdef | |
| ttl: 24h0m0s | |
| usages: | |
| - signing | |
| - authentication | |
| kind: InitConfiguration | |
| localAPIEndpoint: | |
| advertiseAddress: 10.192.126.118 | |
| bindPort: 6443 | |
| nodeRegistration: | |
| criSocket: /var/run/dockershim.sock | |
| name: test4.leapmotor.com | |
| taints: | |
| - effect: NoSchedule | |
| key: node-role.kubernetes.io/master | |
| --- | |
| apiServer: | |
| timeoutForControlPlane: 4m0s | |
| apiVersion: kubeadm.k8s.io/v1beta2 | |
| certificatesDir: /etc/kubernetes/pki | |
| clusterName: kubernetes | |
| controllerManager: {} | |
| dns: | |
| type: CoreDNS | |
| etcd: | |
| local: | |
| dataDir: /var/lib/etcd | |
| imageRepository: registry.aliyuncs.com/google_containers | |
| kind: ClusterConfiguration | |
| kubernetesVersion: v1.17.0 | |
| networking: | |
| dnsDomain: cluster.local | |
| serviceSubnet: 10.96.0.0/12 | |
| podSubnet: 10.244.0.0/16 | |
| scheduler: {} | |
| 3、 modify kubelet Start parameter of | |
| vim /usr/lib/systemd/system/kubelet.service.d/10-kubeadm.conf | |
| ExecStart=/usr/bin/kubelet --logtostderr=false --log-dir=/var/log/kubernetes( Make sure /var/log/kubernetes The path is correct ) | |
| systemctl daemon-reload |
边栏推荐
- Write a code hot deployment
- Judge password strength - Optimization
- Define structure dynamically when macro is defined
- Detailed explanation of dynamic planning
- Cool background shadow effect [second with layered feeling] [picture hover style]
- Never change
- STM32F0-DAY1
- Nmap scan port tool
- Getting started with qt-1-ui
- Fflush(), fflush (stdin), fflush (stdout) in C language
猜你喜欢

Comprehensively analyze the key points of knowledge required for interface testing and interface testing

Win10 install tensorflow

Reverse generate the corresponding DTD constraint according to the XML file

. bash_ profile
Getting started with qt-1-ui

MySQL failover and master-slave switchover based on MHA
![[graduation project recommendation] - personnel management system](/img/b5/4235b54fa0da9e4637010a68bf848b.jpg)
[graduation project recommendation] - personnel management system
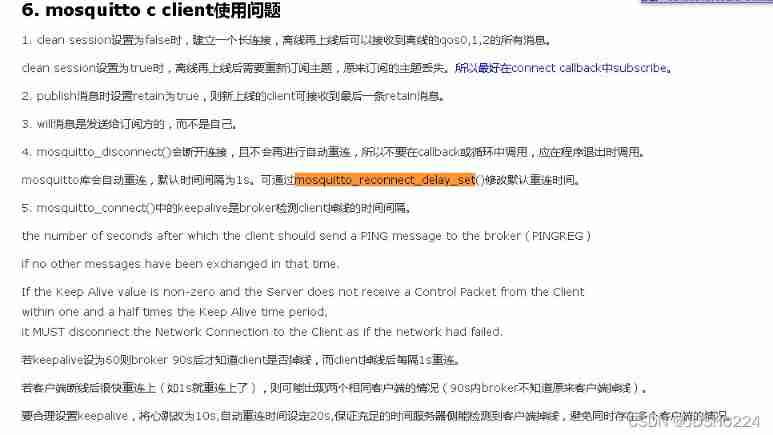
Mqtt keepalive and reconnect

Leetcode hot topic Hot 100, to be updated

Use ant for running program with command line arguments
随机推荐
P24 de noise
Cmake upgrade
STM32F0-DAY1
[untitled] fish pond forwarding command
Mr. Ali taught you how to use JMeter for pressure test (detailed drawing)
Qt-5-multi window programming
Postman reports error write eproto 93988952error10000f7ssl routinesopenssl_ internalWRONG_ VERSION_ NUM
Reptile Foundation_ Requests Library
"My" C code specification
Machine learning model training template
Win10 install tensorflow
C language function fgets
Getting started with qt-1-ui
Compile time annotation automatically generates dataholder
Record the troubleshooting process of excessive CPU usage
Qt-6-file IO
Pyqt5 learning notes of orange_ Connect to SQL Server database
Promotion guide for large enterprises: material preparation, PPT writing and on-site defense
Qt-4-common classes and components
Design and implementation of object system in redis