当前位置:网站首页>SSM整合案例分析(详解)
SSM整合案例分析(详解)
2022-07-29 16:13:00 【不会压弯的小飞侠】

博客主页:不会压弯的小飞侠
欢迎关注:点赞收藏留言
系列专栏:SSM框架整合专栏
如果觉得博主的文章还不错的话,请三连支持一下博主。
欢迎大佬指正,一起 学习!一起加油!

目录
整合配置
创建Maven的web项目
创建好项目之后,可根据自己的编程习惯,进行下一步。
创建项目包结构
- config:相关配置类
- controller:Controller类
- dao:Dao接口
- service:Service接口
- impl:Service实现类
- resources:配置文件
- webapp:静态资源
- test/java:测试类

添加依赖
<?xml version="1.0" encoding="UTF-8"?>
<project xmlns="http://maven.apache.org/POM/4.0.0" xmlns:xsi="http://www.w3.org/2001/XMLSchema-instance"
         xsi:schemaLocation="http://maven.apache.org/POM/4.0.0 http://maven.apache.org/xsd/maven-4.0.0.xsd">
  <modelVersion>4.0.0</modelVersion>
  <groupId>com.jkj</groupId>
  <artifactId>ssm</artifactId>
  <version>1.0-SNAPSHOT</version>
  <packaging>war</packaging>
  <dependencies>
    <dependency>
      <groupId>org.springframework</groupId>
      <artifactId>spring-webmvc</artifactId>
      <version>5.2.10.RELEASE</version>
    </dependency>
    <dependency>
      <groupId>org.springframework</groupId>
      <artifactId>spring-jdbc</artifactId>
      <version>5.2.10.RELEASE</version>
    </dependency>
    <dependency>
      <groupId>org.springframework</groupId>
      <artifactId>spring-test</artifactId>
      <version>5.2.10.RELEASE</version>
    </dependency>
    <dependency>
      <groupId>org.mybatis</groupId>
      <artifactId>mybatis</artifactId>
      <version>3.5.6</version>
    </dependency>
    <dependency>
      <groupId>org.mybatis</groupId>
      <artifactId>mybatis-spring</artifactId>
      <version>1.3.0</version>
    </dependency>
    <dependency>
      <groupId>mysql</groupId>
      <artifactId>mysql-connector-java</artifactId>
      <version>5.1.47</version>
    </dependency>
    <dependency>
      <groupId>com.alibaba</groupId>
      <artifactId>druid</artifactId>
      <version>1.1.16</version>
    </dependency>
    <dependency>
      <groupId>junit</groupId>
      <artifactId>junit</artifactId>
      <version>4.12</version>
      <scope>test</scope>
    </dependency>
    <dependency>
      <groupId>javax.servlet</groupId>
      <artifactId>javax.servlet-api</artifactId>
      <version>3.1.0</version>
      <scope>provided</scope>
    </dependency>
    <dependency>
      <groupId>com.fasterxml.jackson.core</groupId>
      <artifactId>jackson-databind</artifactId>
      <version>2.9.0</version>
    </dependency>
    <dependency>
      <groupId>org.testng</groupId>
      <artifactId>testng</artifactId>
      <version>RELEASE</version>
      <scope>compile</scope>
    </dependency>
    <dependency>
      <groupId>junit</groupId>
      <artifactId>junit</artifactId>
      <version>4.12</version>
      <scope>compile</scope>
    </dependency>
    <dependency>
      <groupId>org.slf4j</groupId>
      <artifactId>slf4j-log4j12</artifactId>
      <version>1.7.21</version>
      <scope>test</scope>
    </dependency>
  </dependencies>
</project>
创建相关配置类
SpringConfig配置类
@Configuration- 定义配置类,代替xml配置文件
@ComponentScan- 扫描指定注解的类注册到IOC容器中
package com.jkj.config;
import org.springframework.context.annotation.ComponentScan;
import org.springframework.context.annotation.Configuration;
import org.springframework.context.annotation.Import;
import org.springframework.context.annotation.PropertySource;
import org.springframework.transaction.annotation.EnableTransactionManagement;

@Configuration
@ComponentScan({
    "com.jkj.service"})
public class SpringConfig {

}
resources编写jdbc.properties
jdbc.driver=com.mysql.jdbc.Driver
jdbc.url=jdbc:mysql://localhost:3306/springboot
jdbc.username=root
jdbc.password=root
JdbcConfig的配置类
@Bean- 指示一个方法产生一个由spring容器管理的bean
@Value- 取值
package com.jkj.config;

import com.alibaba.druid.pool.DruidDataSource;
import org.springframework.beans.factory.annotation.Value;
import org.springframework.context.annotation.Bean;
import org.springframework.jdbc.datasource.DataSourceTransactionManager;
import org.springframework.transaction.PlatformTransactionManager;

import javax.sql.DataSource;

public class JdbcConfig {

    @Value("${jdbc.driver}")
    private String driver;
    @Value("${jdbc.url}")
    private String url;
    @Value("${jdbc.username}")
    private String username;
    @Value("${jdbc.password}")
    private String password;

    @Bean
    public DataSource datasource() {

        DruidDataSource datasource = new DruidDataSource();
        datasource.setDriverClassName(driver);
        datasource.setUrl(url);
        datasource.setUsername(username);
        datasource.setPassword(password);
        return datasource;
    }
    }
MyBatisConfig配置类
- SqlSessionFactory是MyBatis的核心对象,用于初始化MyBatis,读取配置文件,创建SqlSession对象,SqlSession使用JDBC方式与数据库交互,也提供了数据表的增删改查方法。
第一个@Bean- 创建sqlSessionFactory对象
第二个@Bean- 创建数据源对象
package com.jkj.config;
import org.mybatis.spring.SqlSessionFactoryBean;
import org.mybatis.spring.mapper.MapperScannerConfigurer;
import org.springframework.context.annotation.Bean;
import javax.sql.DataSource;
public class MyBatisConfig {


    @Bean  //创建sqlSessionFactory对象
    public SqlSessionFactoryBean sqlSessionFactory(DataSource dataSource){

        SqlSessionFactoryBean factoryBean = new SqlSessionFactoryBean();
        factoryBean.setDataSource(dataSource) ;
        factoryBean.setTypeAliasesPackage( "com.jkj.domain");
        return factoryBean;
    }
    @Bean  //创建数据源对象
    public MapperScannerConfigurer mapperScannerConfigurer(){

        MapperScannerConfigurer msc = new MapperScannerConfigurer();
        msc.setBasePackage( "com.jkj.dao" ) ;
        return msc;
    }
}
SpringMvcConfig配置类
@EnableWebMvc- 开启自定义配置,功能比较强大,还有其他功能
package com.jkj.config;
import org.springframework.context.annotation.ComponentScan;
import org.springframework.context.annotation.Configuration;
import org.springframework.web.servlet.config.annotation.EnableWebMvc;
@Configuration
@ComponentScan({
    "com.jkj.controller"})
@EnableWebMvc
public class SpringMvcConfig  {


}
Web项目入口ControllerConfig配置类
- getRootConfigClasses加载的是Spring的核心配置
- getServletConfigClasses加载的是SpringMVC的核心配置
- getServletMappings就是定义SpringMVC要拦截的请求
package com.jkj.config;
import org.springframework.web.filter.CharacterEncodingFilter;
import org.springframework.web.servlet.support.AbstractAnnotationConfigDispatcherServletInitializer;

import javax.servlet.Filter;

public class ControllerConfig extends AbstractAnnotationConfigDispatcherServletInitializer {

    //加载Spring配置类
    @Override
    protected Class<?>[] getRootConfigClasses() {

        return new Class[]{
    SpringConfig.class};
    }
    //加载SpringMvc配置类
    @Override
    protected Class<?>[] getServletConfigClasses() {

        return new Class[]{
    SpringMvcConfig.class};
    }
    //设置SpringMVC请求地址拦截规则
    @Override
    protected String[] getServletMappings() {

        return new String[]{
    "/"};
    }
    //设置post请求中文乱码过滤器
    @Override
    protected Filter[] getServletFilters() {

        CharacterEncodingFilter filter = new CharacterEncodingFilter();
        filter.setEncoding("utf-8");
        return new Filter[]{
    filter};
    }

}
SpringConfig配置类
@PropertySource- 用于指定jdbc.properties的位置
- classpath
- 类路径下
- value
- 指定文件的名称和路径
@Import- @Import注解的类都是父配置类,导入的都是子配置类
- 加载JdbcConfig、MyBatisConfig配置类
@EnableTransactionManagement- 开启事务的支持
package com.jkj.config;
import org.springframework.context.annotation.ComponentScan;
import org.springframework.context.annotation.Configuration;
import org.springframework.context.annotation.Import;
import org.springframework.context.annotation.PropertySource;
import org.springframework.transaction.annotation.EnableTransactionManagement;

@Configuration
@ComponentScan({
    "com.jkj.service"})
@PropertySource("classpath:jdbc.properties")
@Import({
    JdbcConfig.class,MyBatisConfig.class})
public class SpringConfig {

}
功能模块的开发
创建数据库及表
tbl_book表
往表里插入数据
编写实体类
package com.jkj.domain;
public class Book {

    private Integer id;
    private String name;
    private String type;
    private String description;
    public Integer getId() {

        return id;
    }
    public void setId(Integer id) {

        this.id = id;
    }
    public String getName() {

        return name;
    }
    public void setName(String name) {

        this.name = name;
    }
    public String getType() {

        return type;
    }
    public void setType(String type) {

        this.type = type;
    }
    public String getDescription() {

        return description;
    }
    public void setDescription(String description) {

        this.description = description;
    }
    @Override
    public String toString() {

        return "Book{" +
                "id=" + id +
                ", name='" + name + '\'' +
                ", type='" + type + '\'' +
                ", description='" + description + '\'' +
                '}';
    }
}
实体类也可以用注解形式
需要导入lombok依赖
 <dependency>
      <groupId>org.projectlombok</groupId>
      <artifactId>lombok</artifactId>
      <version>1.18.16</version>
    </dependency>
@Data- 简化实体类的编写
package com.jkj.domain;

import lombok.Data;

@Data
public class Book {

    private Integer id;
    private String name;
    private String type;
    private String description;
 }
编写Dao接口
- 有时在项目中,执行一些相对简单的SQL语句时,使用Mybatis的相关注解在Dao层的直接使用注解实现
@Select@Insert@Update@Delete- 使用格式:@+执行类型+括号+SQL
package com.jkj.dao;

import com.jkj.domain.Book;
import org.apache.ibatis.annotations.Delete;
import org.apache.ibatis.annotations.Insert;
import org.apache.ibatis.annotations.Select;
import org.apache.ibatis.annotations.Update;

import java.util.List;

public interface BookDao {

    @Insert("insert into tbl_book values(null,#{type},#{name},#{description})")
    public int save(Book book);
    @Update("update tbl_book set type=#{type},name=#{name},description=#{description}")
    public int update(Book book);
    @Delete("delete from tbl_book where id=#{id}")
    public int delete(Integer id);
    @Select("select * from tbl_book where id=#{id}")
    public Book getById(Integer id);
    @Select("select * from tbl_book")
    public List<Book> getAll();
}
编写Service接口
package com.jkj.service;
import com.jkj.domain.Book;
import org.springframework.transaction.annotation.Transactional;

import java.util.List;
@Transactional
public interface BookService {

    /** *保存 * @param book * @return */
    public Boolean save(Book book);

    /** *修改 * @param book * @return */

    public Boolean update(Book book);

    /** *删除 * @param id * @return */

    public Boolean delete(Integer id);

    /** *id查询 * @param id * @return */

    public Book getById(Integer id);

    /** * 查询全部 * @return */

    public List<Book> getAll();
}
编写Service实现类
@Service- 将实现类自动注入到Spring容器中
@Autowired- 它可以对类成员变量、方法及构造函数进行标注,让 spring 完成 bean 自动装配的工作
- 默认是按照类去匹配,配合 @Qualifier 指定按照名称去装配 bean
package com.jkj.service.impl;
import com.jkj.controller.Code;
import com.jkj.dao.BookDao;
import com.jkj.domain.Book;
import com.jkj.excption.BusinessException;
import com.jkj.service.BookService;
import org.apache.ibatis.annotations.Insert;
import org.springframework.beans.factory.annotation.Autowired;
import org.springframework.stereotype.Service;
import java.util.List;
@Service
public class BookServiceImpl implements BookService {

    @Autowired
    private BookDao bookDao;
    @Override
    public Boolean save(Book book) {

        bookDao.save(book);
        return true;
    }

    @Override
    public Boolean update(Book book) {

        bookDao.update(book);
        return true;
    }

    @Override
    public Boolean delete(Insert id) {

        bookDao.delete(id);
        return true;
    }

    @Override
    public Book getById(Integer id) {

        return bookDao.getById(id);
    }

    @Override
    public List<Book> getAll() {

        return bookDao.getAll();
    }
}
编写Contorller类
@RestController- 类型:类注解
- 位置:基于SpringMVC的SRESTful开发控制器类定义上方
- 作用:设置当前控制器类为RESTful风格,等同于@Controller与ResponseBody两个注解组合功能
@RequestMapping- 类型: 方法注解
- 位置: SpringMVC控制器方法定义上方
- 作用: 设置当前控制器方法请求访问路径范例:
- 属性:
- value (默认)︰请求访问路径
- method: http请求动作,标准动作(GET/POST/PUT/DELETE)
@PathVariable- 类型:形参注解
- 位置: SpringMVC控制器方法形参定义前面
- 作用:绑定路径参数与处理器方法形参间的关系,要求路径参数名与形参名一一对应。
@[email protected] @Pathvariable区别区别
- @RequestParam用于接收url地址传参或表单传参
- @RequestBody用于接收json数据
- @Pathvariable用于接收路径参数,使用{参数名称]描述路径参数
应用
- 后期开发中,发送请求参数超过1个时,以json格式为主,@RequestBody
- 应用较广如果发送非json格式数据。选用@RequestParam接收请求参数
- 采用RESTful进行开发,当参数数量较少时,例如1个,可以采用@PathVariable接收请求路径变量,通常用于传递id值
@XXXMapping- 名称:@[email protected]@[email protected]
- 类型:方法注解
- 位置:基于SpringMVC的RESTful开发控制器方法定义上方
- 作用:设置当前控制器方法请求访问路径与请求动作,每种对应一个请求动作,例如@GetMapping对应GET请求
- 属性
- value(默认):请求访问路径
package com.jkj.controller;
import com.jkj.domain.Book;
import com.jkj.service.BookService;
import org.apache.ibatis.annotations.Insert;
import org.springframework.beans.factory.annotation.Autowired;
import org.springframework.web.bind.annotation.*;
import java.util.List;
@RestController
@RequestMapping("/books")
public class BookController {

    @Autowired
    private BookService bookService;
    @PostMapping
    public Boolean save(@RequestBody Book book) {

        return bookService.save(book);
    }
   @PutMapping
    public Boolean update(@RequestBody Book book) {

        return bookService.update(book);
    }

    @DeleteMapping("/{id}")
    public Boolean delete(@PathVariable Insert id) {

        return  bookService.delete(id);
    }

    @GetMapping("/{id}")
    public Book getById(@PathVariable Integer id) {

        return bookService.getById(id);
    }

    @GetMapping
    public List<Book> getAll() {

        return bookService.getAll();
    }
接口测试
创建测试类
- @RunWith就是一个运行器
- @RunWith(JUnit4.class)就是指用JUnit4来运行
@RunWith(SpringJUnit4ClassRunner.class),让测试运行于Spring测试环境@ContextConfiguration- 加载Spring的核心配置
@Autowired- 自动装配注入Service类
package com.jkj.test;

import com.jkj.config.SpringConfig;
import com.jkj.domain.Book;
import com.jkj.service.BookService;
import org.junit.Test;
import org.junit.runner.RunWith;
import org.springframework.beans.factory.annotation.Autowired;
import org.springframework.test.context.ContextConfiguration;
import org.springframework.test.context.junit4.SpringJUnit4ClassRunner;

import java.util.List;

@RunWith(SpringJUnit4ClassRunner.class)
@ContextConfiguration(classes = SpringConfig.class)
public class BookTest {

    @Autowired
    private BookService bookService;
    @Test
    public void getById(){

        Book byId = bookService.getById(7);
        System.out.println(byId);
    }

    @Test
    public void getAll(){

        List<Book> all = bookService.getAll();
        for (Book book : all) {

            System.out.println(book);
        }
    }
}
测试结果:
- id查询:

- 查询全部:

新增,修改,删除需要在PostMan软件中测试,在这就不过多叙述,详细步骤在Springboot专栏里。
事务处理
开启注解式事务驱动
@EnableTransactionManagement- 开启事务支持
package com.jkj.config;
import org.springframework.context.annotation.ComponentScan;
import org.springframework.context.annotation.Configuration;
import org.springframework.context.annotation.Import;
import org.springframework.context.annotation.PropertySource;
import org.springframework.transaction.annotation.EnableTransactionManagement;

@Configuration
@ComponentScan({
    "com.jkj.service"})
@PropertySource("classpath:jdbc.properties")
@Import({
    JdbcConfig.class,MyBatisConfig.class})
@EnableTransactionManagement
public class SpringConfig {

}
配置事务的管理器
- 事务管理器控制事务时需要使用数据源对象,需要配置在JdbcConfig中
package com.jkj.config;

import com.alibaba.druid.pool.DruidDataSource;
import org.springframework.beans.factory.annotation.Value;
import org.springframework.context.annotation.Bean;
import org.springframework.jdbc.datasource.DataSourceTransactionManager;
import org.springframework.transaction.PlatformTransactionManager;

import javax.sql.DataSource;

public class JdbcConfig {

    @Value("${jdbc.driver}")
    private String driver;
    @Value("${jdbc.url}")
    private String url;
    @Value("${jdbc.username}")
    private String username;
    @Value("${jdbc.password}")
    private String password;

    @Bean
    public DataSource datasource() {

        DruidDataSource datasource = new DruidDataSource();
        datasource.setDriverClassName(driver);
        datasource.setUrl(url);
        datasource.setUsername(username);
        datasource.setPassword(password);
        return datasource;
    }
    @Bean
    public PlatformTransactionManager transactionManager(DataSource dataSource) {

        DataSourceTransactionManager ds = new DataSourceTransactionManager();
        ds.setDataSource(dataSource);
        return ds;
    }

    }
添加事务
- @Transactional
- 事务正常起作用,无异常时正常提交,有异常时数据回滚
package com.jkj.service;
import com.jkj.domain.Book;
import org.springframework.transaction.annotation.Transactional;

import java.util.List;
@Transactional
public interface BookService {

    /** * * @param book * @return */
    public Boolean save(Book book);

    /** * * @param book * @return */

    public Boolean update(Book book);

    /** * * @param id * @return */

    public Boolean delete(Integer id);

    /** * * @param id * @return */

    public Book getById(Integer id);

    /** * * @return */

    public List<Book> getAll();

}
表现层数据封装
创建Result类,放在controller包下,可以不写toString方法,因为最后会被被转为json格式,getter和setter方法要写。
public class Result {

    //描述统一格式中的数据
    private Object data;
    //描述统一格式中的编码,用于区分操作,可以简化配置0或1表示成功失败
    private Integer code;
    //描述统一格式中的消息,可选属性
    private String msg;

    public Result() {

    }
    //构造方法是方便对象的创建
    public Result(Integer code,Object data) {

        this.data = data;
        this.code = code;
    }
    //构造方法是方便对象的创建
    public Result(Integer code, Object data, String msg) {

        this.data = data;
        this.code = code;
        this.msg = msg;
    }

    public Object getData() {

        return data;
    }

    public void setData(Object data) {

        this.data = data;
    }

    public Integer getCode() {

        return code;
    }

    public void setCode(Integer code) {

        this.code = code;
    }

    public String getMsg() {

        return msg;
    }

    public void setMsg(String msg) {

        this.msg = msg;
    }

    @Override
    public String toString() {

        return "Result{" +
                "data=" + data +
                ", code=" + code +
                ", msg='" + msg + '\'' +
                '}';
    }
}
定义返回码Code类,
//状态码
public class Code {

    public static final Integer SAVE_OK = 20011;
    public static final Integer DELETE_OK = 20021;
    public static final Integer UPDATE_OK = 20031;
    public static final Integer GET_OK = 20041;

    public static final Integer SAVE_ERR = 20010;
    public static final Integer DELETE_ERR = 20020;
    public static final Integer UPDATE_ERR = 20030;
    public static final Integer GET_ERR = 20040;
}
修改Controller类的返回值
package com.jkj.controller;

import com.jkj.domain.Book;
import com.jkj.service.BookService;
import org.apache.ibatis.annotations.Insert;
import org.springframework.beans.factory.annotation.Autowired;
import org.springframework.web.bind.annotation.*;

import java.util.List;

@RestController
@RequestMapping("/books")
public class BookController {

  /* @Autowired private BookService bookService; @PostMapping public Boolean save(@RequestBody Book book) { return bookService.save(book); } @PutMapping public Boolean update(@RequestBody Book book) { return bookService.update(book); } @DeleteMapping("/{id}") public Boolean delete(@PathVariable Insert id) { return bookService.delete(id); } @GetMapping("/{id}") public Book getById(@PathVariable Integer id) { return bookService.getById(id); } @GetMapping public List<Book> getAll() { return bookService.getAll(); }*/

    @Autowired
    private BookService bookService;
    @PostMapping
    public Result save(@RequestBody Book book) {

        Boolean flag = bookService.save(book);
        return new Result(flag?Code.SAVE_OK:Code.SAVE_ERROR,flag);
    }
    @PutMapping
    public Result update(@RequestBody Book book) {

        Boolean flag = bookService.update(book);
        return new Result(flag?Code.UPDATE_OK:Code.UPDATE_ERROR,flag);
    }

    @DeleteMapping("/{id}")
    public Result delete(@PathVariable Integer id) {

        Boolean flag = bookService.delete(id);
        return new Result(flag?Code.DELETE_OK:Code.DELETE_ERROR,flag);
    }

    @GetMapping("/{id}")
    public Result getById(@PathVariable Integer id) {

        Book book = bookService.getById(id);
        Integer code=book !=null?Code.SELECT_OK:Code.SAVE_ERROR;
        String msg=book !=null ? " " : "数据查询失败";
        return new Result(code,book,msg);
    }

    @GetMapping
    public Result getAll() {

        List<Book> bookList = bookService.getAll();
        Integer code=bookList !=null?Code.SELECT_OK:Code.SAVE_ERROR;
        String msg=bookList !=null ? " " : "数据查询失败";
        return new Result(code,bookList,msg);
    }

}
下面是一个查询全部的测试,其他的操作就省略了:
异常处理
异常处理器
- 修改BookController类的getById方法,手动添加一个错误信息。
@GetMapping("/{id}")
public Result getById(@PathVariable Integer id) {

    //手动添加一个错误信息
    if(id==1){

        int i = 1/0;
    }
    Book book = bookService.getById(id);
    Integer code = book != null ? Code.GET_OK : Code.GET_ERR;
    String msg = book != null ? "" : "数据查询失败,请重试!";
    return new Result(code,book,msg);
}
测试结果报错:
异常的种类及出现异常的原因:
- 框架内部抛出的异常:因使用不合规导致
- 数据层抛出的异常:因外部服务器故障导致(例如:服务器访问超时)
- 业务层抛出的异常:因业务逻辑书写错误导致(例如:遍历业务书写操作,导致索引异常等)
- 表现层抛出的异常:因数据收集、校验等规则导致(例如:不匹配的数据类型间导致异常)
- 工具类抛出的异常:因工具类书写不严谨不够健壮导致(例如:必要释放的连接长期未释放等)
SpringMVC提供了一套解决方案:
异常处理器:
集中的、统一的处理项目中出现的异常。
@RestControllerAdvice- 类型:类注解
- 位置: Rest风格开发的控制器增强类定义上方
- 作用:为Rest风格开发的控制器类做增强
- 说明:此注解自带@ResponseBody注解与@Component注解,具备对应的功能
@ExceptionHandler- 类型:方法注解
- 位置:专用于异常处理的控制器方法上方
- 作用:设置指定异常的处理方案,功能等同于控制器方法,出现异常后终止原始控制器执行,并转入当前方法执行
package com.jkj.controller;
import org.springframework.web.bind.annotation.ExceptionHandler;
import org.springframework.web.bind.annotation.RestControllerAdvice;

@RestControllerAdvice
public class ProjectExceptionAdvice {

    @ExceptionHandler(Exception.class)
    public Result doException(Exception e){

        return new Result(666,null);
    }
}
项目异常处理
业务异常(BusinessException)
- 发送对应消息传递给用户,提醒规范操作
- 提示用户名已存在或密码格式不正确等
系统异常(SystemException)
- 发送固定消息传递给用户,安抚用户
- 系统繁忙,请稍后再试
- 系统正在维护升级,请稍后再试
- 发送特定消息给运维人员,提醒维护
- 记录日志
其他异常(Exception)
- 发送固定消息传递给用户,安抚用户
- 发送特定消息给编程人员,提醒维护(纳入预期范围内)
- 记录日志
异常解决方案的具体实现
- 先通过自定义异常,完成BusinessException和SystemException的定义
- 将其他异常包装成自定义异常类型
- 在异常处理器类中对不同的异常进行处理
- BusinessException和SystemException创建在exception包下。
- 让自定义异常类继承RuntimeException后面抛异常直接throws就OK了。
- 自定义异常类中添加code属性为了更好的区分异常是来自哪个业务的
BusinessException
package com.jkj.excption;
//自定义异常处理器,用于封装异常信息,对异常进行分类
public class BusinessException extends RuntimeException{

    private Integer code;

    public Integer getCode() {

        return code;
    }

    public void setCode(Integer code) {

        this.code = code;
    }

    public BusinessException(Integer code, String message) {

        super(message);
        this.code = code;
    }

    public BusinessException(Integer code, String message, Throwable cause) {

        super(message, cause);
        this.code = code;
    }

}
SystemException
package com.jkj.excption;
//自定义异常处理器,用于封装异常信息,对异常进行分类
public class SystemException extends RuntimeException{

    private Integer code;

    public Integer getCode() {

        return code;
    }

    public void setCode(Integer code) {

        this.code = code;
    }

    public SystemException(Integer code, String message) {

        super(message);
        this.code = code;
    }

    public SystemException(Integer code, String message, Throwable cause) {

        super(message, cause);
        this.code = code;
    }

}
在BookServiceImpl的getById方法抛异常模拟异常系统和业务异常
public Book getById(Integer id) {

    //模拟业务异常,包装成自定义异常
    if(id == 1){

        throw new BusinessException(Code.BUSINESS_ERR,"请不要使用你的技术挑战我的耐性!");
    }
    //模拟系统异常,将可能出现的异常进行包装,转换成自定义异常
    try{

        int i = 1/0;
    }catch (Exception e){

        throw new SystemException(Code.SYSTEM_TIMEOUT_ERR,"服务器访问超时,请重试!",e);
    }
    return bookDao.getById(id);
}
新增Code类需要的属性
package com.jkj.controller;

public class Code {

    public static final Integer SAVE_OK =20011;
    public static final Integer UPDATE_OK =20011;
    public static final Integer DELETE_OK =20011;
    public static final Integer SELECT_OK =20011;

    public static final Integer SAVE_ERROR =20010;
    public static final Integer UPDATE_ERROR =20010;
    public static final Integer DELETE_ERROR =20010;
    public static final Integer SELECT_ERROR =20010;

    public static final Integer SYSTEM_ERR = 50001;
    public static final Integer SYSTEM_TIMEOUT_ERR = 50002;
    public static final Integer SYSTEM_UNKNOW_ERR = 59999;

    public static final Integer BUSINESS_ERR = 60002;


}
处理器类中处理自定义异常
package com.jkj.controller;

import com.jkj.excption.BusinessException;
import com.jkj.excption.SystemException;
import org.springframework.web.bind.annotation.ExceptionHandler;
import org.springframework.web.bind.annotation.RestControllerAdvice;

@RestControllerAdvice
public class ProjectExceptionAdvice {

       //@ExceptionHandler用于设置当前处理器类对应的异常类型
    @ExceptionHandler(SystemException.class)
    public Result doSystemException(SystemException ex){

        //记录日志
        //发送消息给运维
        //发送邮件给开发人员,ex对象发送给开发人员
        return new Result(ex.getCode(),null,ex.getMessage());
    }

    @ExceptionHandler(BusinessException.class)
    public Result doBusinessException(BusinessException ex){

        return new Result(ex.getCode(),null,ex.getMessage());
    }

    //除了自定义的异常处理器,保留对Exception类型的异常处理,用于处理非预期的异常
    @ExceptionHandler(Exception.class)
    public Result doOtherException(Exception ex){

        //记录日志
        //发送消息给运维
        //发送邮件给开发人员,ex对象发送给开发人员
        return new Result(Code.SYSTEM_UNKNOW_ERR,null,"系统繁忙,请稍后再试!");
    }
}
运行测试: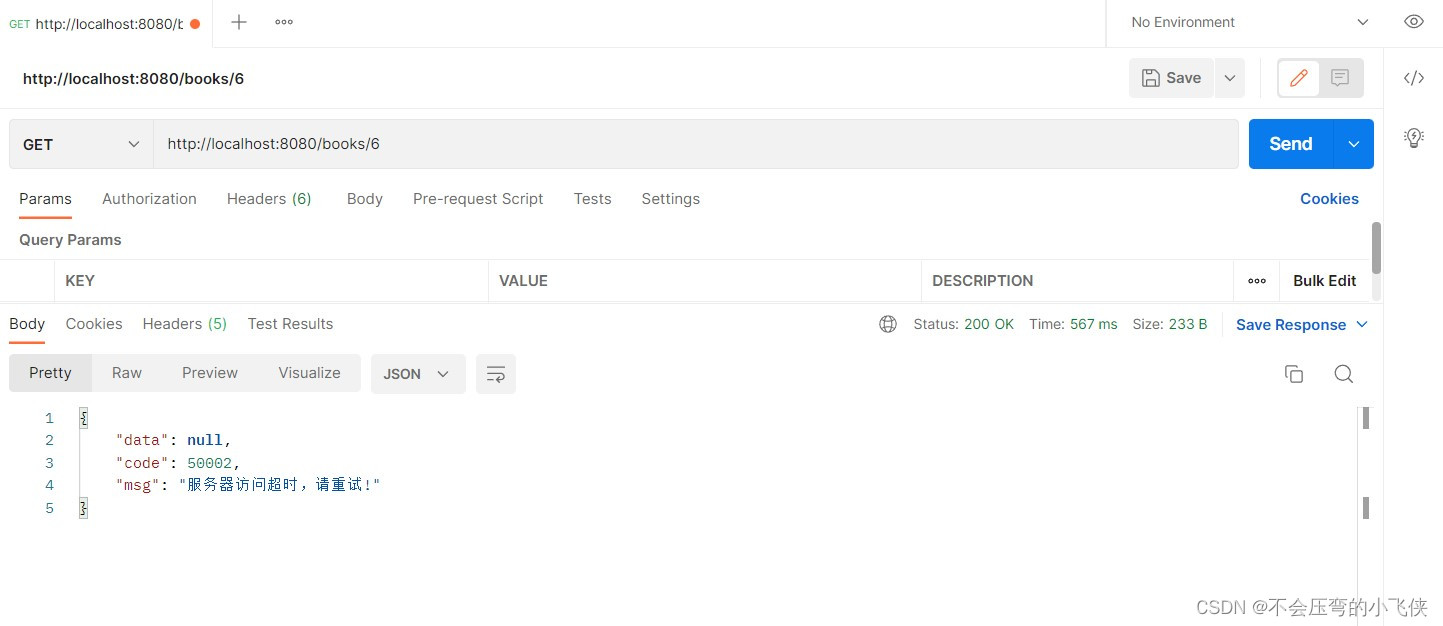
前后台协议联调
添加静态资源
静态资源这里就不过多描述,篇末会把整个项目传入GitHub中,需要的自取。

添加静态资源后SpringMVC会拦截,需要在SpringConfig的配置类中将静态资源进行放行
- 在config包下创建
package com.jkj.config;

import org.springframework.context.annotation.Configuration;
import org.springframework.web.servlet.config.annotation.ResourceHandlerRegistry;
import org.springframework.web.servlet.config.annotation.WebMvcConfigurationSupport;

@Configuration
public class SpringMvcSupport extends WebMvcConfigurationSupport {

    @Override
    protected void addResourceHandlers(ResourceHandlerRegistry registry) {

        registry.addResourceHandler("/pages/**").addResourceLocations("/pages/");
        registry.addResourceHandler("/css/**").addResourceLocations("/css/");
        registry.addResourceHandler("/js/**").addResourceLocations("/js/");
        registry.addResourceHandler("/plugins/**").addResourceLocations("/plugins/");
    }
}
- 在SpringMvcConfig中扫描SpringMvcSupport
package com.jkj.config;
import org.springframework.context.annotation.ComponentScan;
import org.springframework.context.annotation.Configuration;
import org.springframework.context.annotation.Import;
import org.springframework.context.annotation.PropertySource;
import org.springframework.transaction.annotation.EnableTransactionManagement;

@Configuration
@ComponentScan({
    "com.jkj.service"})
@PropertySource("classpath:jdbc.properties")
@Import({
    JdbcConfig.class,MyBatisConfig.class})
@EnableTransactionManagement
public class SpringConfig {

}
列表功能
- 页面加载完后发送异步请求到后台获取列表数据进行展示:
1.created()方法中调用了this.getAll()方法
         // 钩子函数,VUE对象初始化完成后自动执行
            created() {

                this.getAll();
            },
2.在getAll()方法中使用axios发送异步请求从后台获取数据
  //列表
                getAll() {

                    //发送ajax请求
                    axios.get("/books").then((res)=>{

                        this.dataList=res.data.data;
                    });
                },
运行测试:

新增功能
再此操作之前,需要修改一下前端页面
1.Dao层的增删改方法返回值从void改成int
package com.jkj.dao;
import com.jkj.domain.Book;
import org.apache.ibatis.annotations.Delete;
import org.apache.ibatis.annotations.Insert;
import org.apache.ibatis.annotations.Select;
import org.apache.ibatis.annotations.Update;
import java.util.List;
public interface BookDao {

    @Insert("insert into tbl_book values(null,#{type},#{name},#{description})")
    public int save(Book book);
    @Update("update tbl_book set type=#{type},name=#{name},description=#{description} where id=#{id}")
    public int update(Book book);
    @Delete("delete from tbl_book where id=#{id}")
    public int delete(Integer id);
    @Select("select * from tbl_book where id=#{id}")
    public Book getById(Integer id);
    @Select("select * from tbl_book")
    public List<Book> getAll();
}
2.BookServiceImpl中增删改方法根据DAO的返回值来决定返回true/false
package com.jkj.service.impl;

import com.jkj.controller.Code;
import com.jkj.dao.BookDao;
import com.jkj.domain.Book;
import com.jkj.excption.BusinessException;
import com.jkj.excption.SystemException;
import com.jkj.service.BookService;
import org.apache.ibatis.annotations.Insert;
import org.springframework.beans.factory.annotation.Autowired;
import org.springframework.stereotype.Service;

import java.util.List;
@Service
public class BookServiceImpl implements BookService {

   @Autowired
   private BookDao bookDao;

    public Boolean save(Book book) {

        return bookDao.save(book) > 0;
    }

    public Boolean update(Book book) {

        return bookDao.update(book) > 0;
    }

    @Override
    public Boolean delete(Integer id) {

        return bookDao.delete(id) > 0;
    }

    public Book getById(Integer id) {

        return bookDao.getById(id);

    }

    public List<Book> getAll() {

        return bookDao.getAll();
    }
}
3.找到页面上的新建按钮,按钮上绑定了@click="handleCreate()"方法,在method中找到handleCreate方法,将控制表单设为可见
 //弹出添加窗口
                handleCreate() {

                    this.dialogFormVisible=true;
                },
4.新增面板中找到确定按钮,按钮上绑定了@click="handleAdd()"方法,在method中找到handleAdd方法,发送请求和数据
axios.post("/books",this.formData).then((res)=>{

                        //如果操作成功,关闭弹层,显示数据
                        if(res.data.code == 20011){

                            this.$message.success("添加成功");
                            this.dialogFormVisible = false;
                        }else if(res.data.code == 20010){

                            this.$message.error("添加失败");
                        }else{

                            this.$message.error(res.data.msg);
                        }
                    }).finally(()=>{

                        this.getAll();
                    });


                },
测试:
新增数据:

新增成功:

添加成功后会有信息提示:

新增失败,会有提示信息:

4.小Bug: 每次点击新增的时候,表单都会显示上次新增的信息,需要在 resetForm方法中先清空输入框,在 handleCreate方法中调用 resetForm,来达到每次点击新增功能,表单信息为空。
            //弹出添加窗口
                handleCreate() {

                    this.dialogFormVisible=true;
                    this.resetForm();
                },

                //重置表单
                resetForm() {

                    //清空输入框
                    this.formData = {
    };
                },
测试:
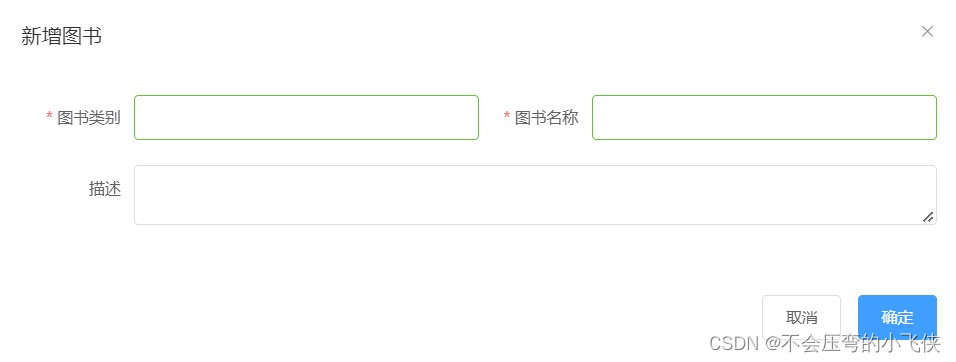
修改功能
1.弹出编辑窗口
找到页面中的编辑按钮,该按钮绑定了@click=“handleUpdate(scope.row)”,在method的handleUpdate方法中发送异步请求根据ID查询图书信息,根据后台返回的结果,判断是否查询成功,如果查询成功打开修改面板回显数据,如果失败提示错误信息。
 //弹出编辑窗口
                handleUpdate(row){

                    // console.log(row); //row.id 查询条件
                    //查询数据,根据id查询
                    axios.get("/books/"+row.id).then((res)=>{

                        if(res.data.code == 20041){

                            //展示弹层,加载数据
                            this.formData = res.data.data;
                            this.dialogFormVisible4Edit = true;
                        }else{

                            this.$message.error(res.data.msg);
                        }
                    });

                },
测试: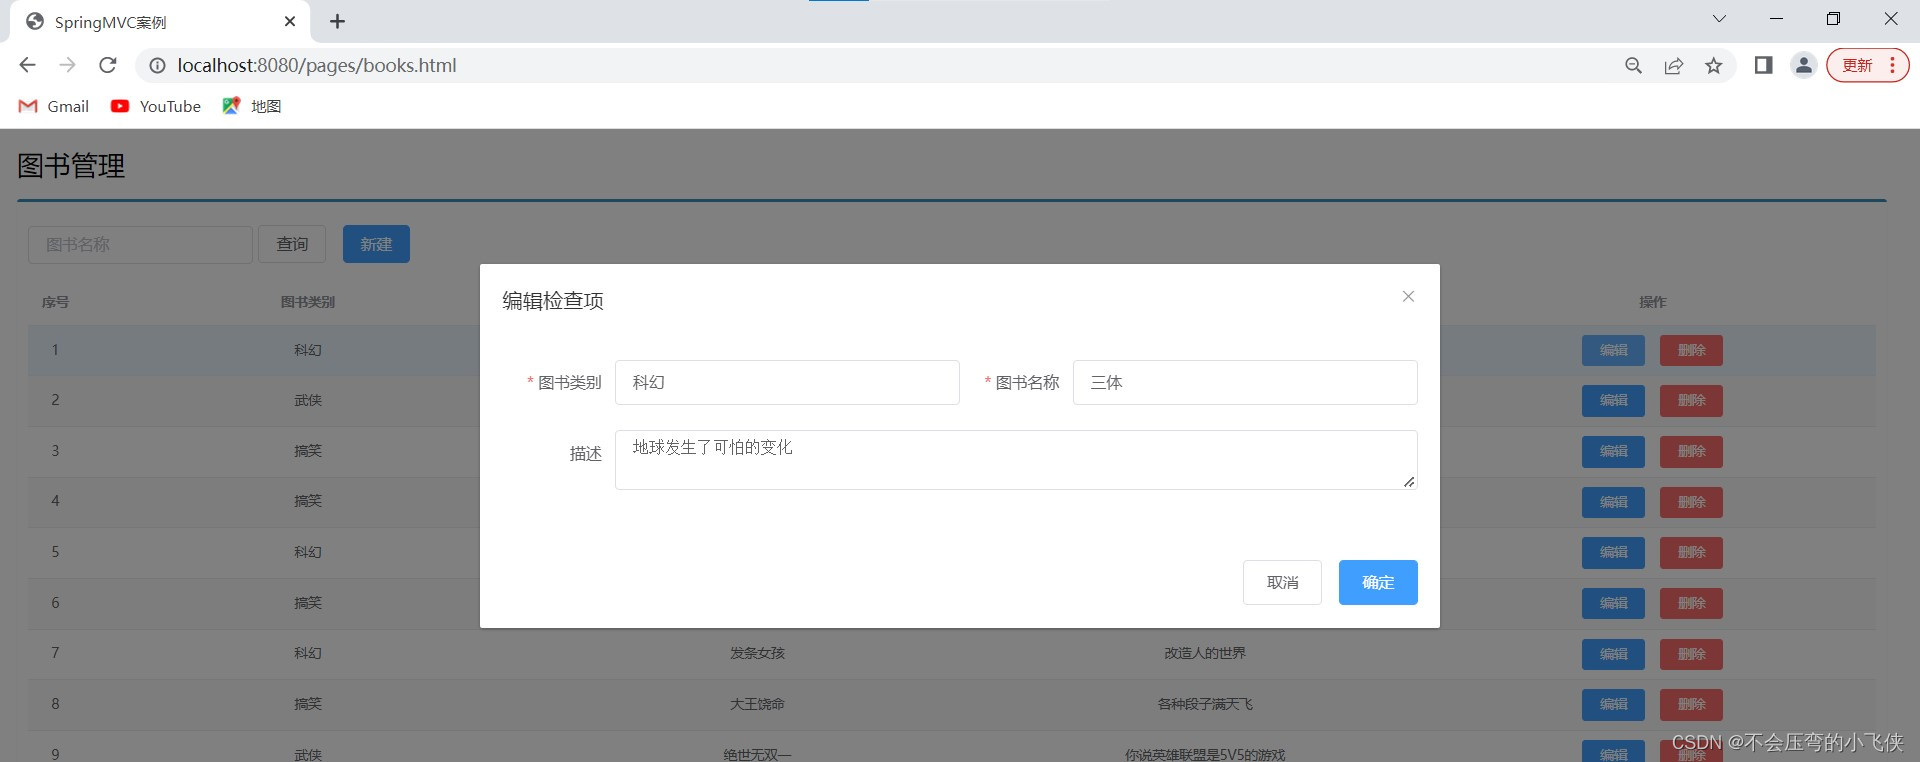
2.修改后找到修改面板的确定按钮,该按钮绑定了@click=“handleEdit()”,在method,handleEdit方法中发送异步请求提交修改数据,根据后台返回的结果,判断是否修改成功。如果成功提示错误信息,关闭修改面板,重新查询数据,如果失败提示错误信息
 //编辑
                handleEdit() {

                    axios.put("/books",this.formData).then((res)=>{

                    if(res.data.code == 20021){

                        this.$message.success("修改成功");
                        this.dialogFormVisible4Edit = false;
                    }else if(res.data.code == 20020){

                        this.$message.error("修改失败");
                    }else{

                        this.$message.error(res.data.msg);
                    }
                }).finally(()=>{

            this.getAll();
        });
        },
测试:
出bug:结果全部都给修改了。
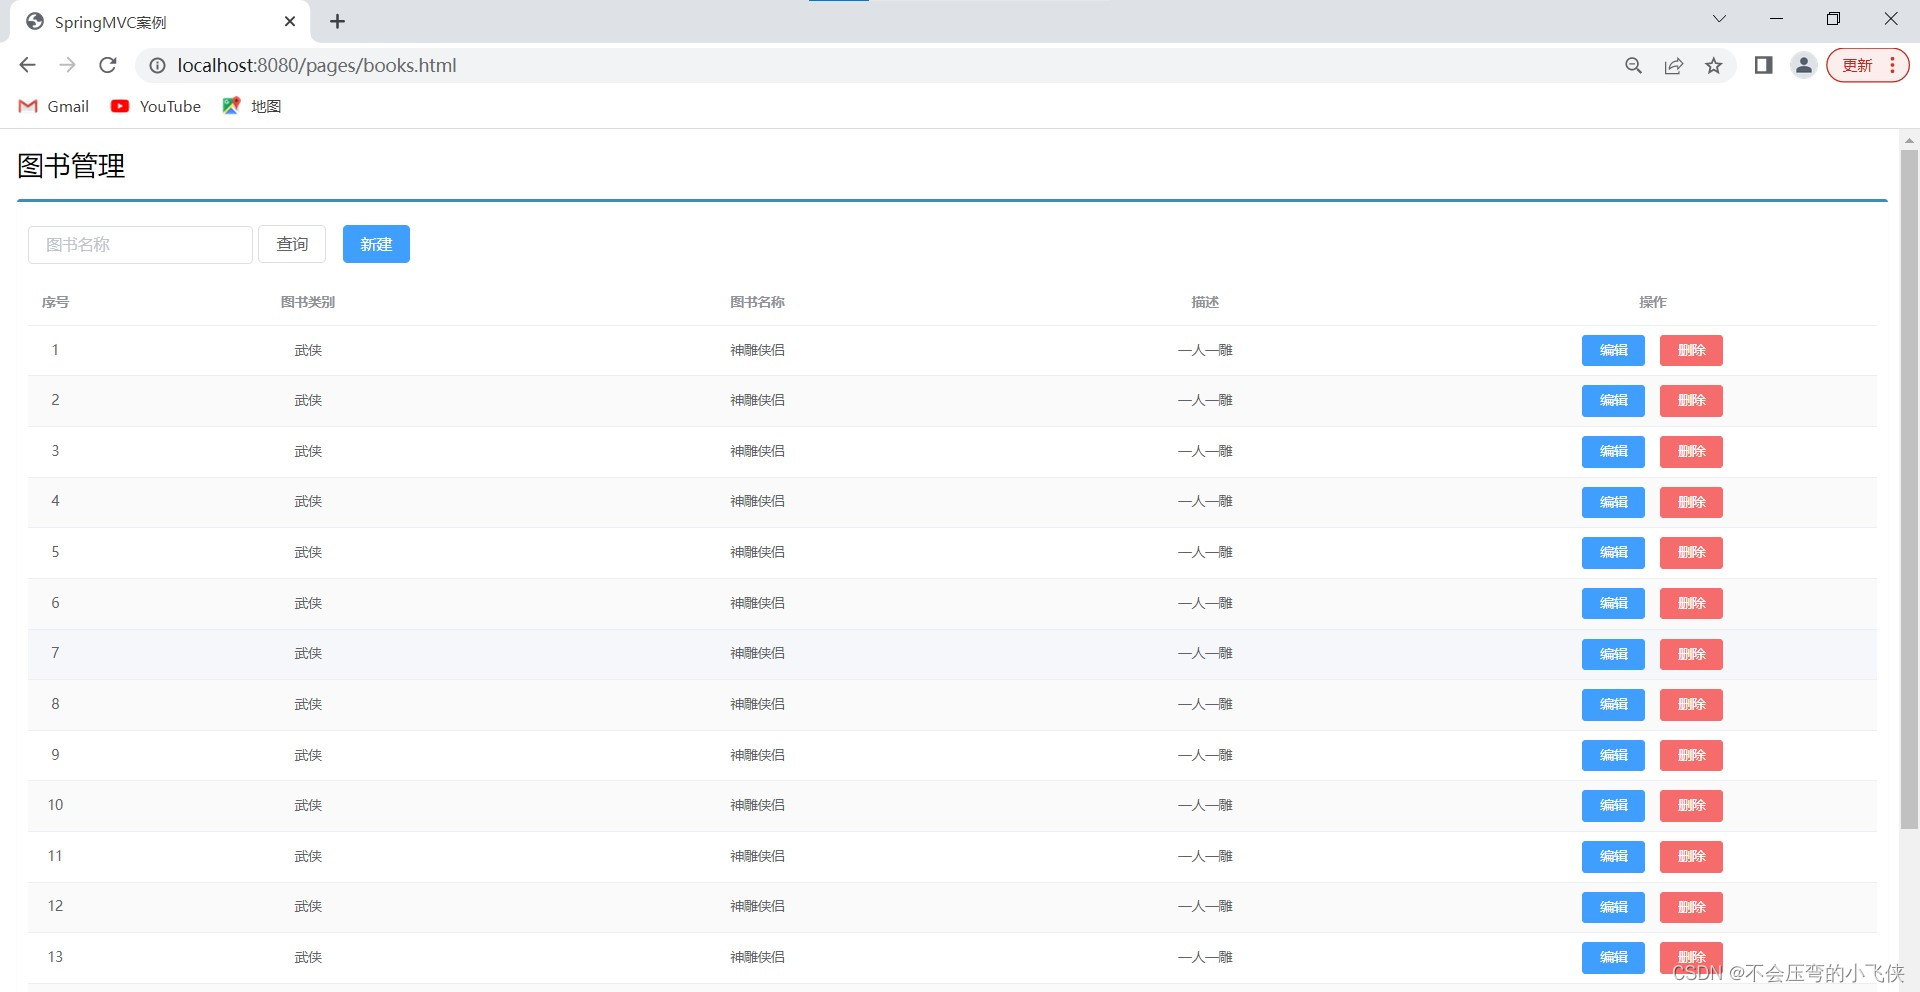
3.查bug
最终发现通过id修改数据的SQL语句写错了
@Update("update tbl_book set type=#{type},name=#{name},description=#{description} ")
    public int update(Book book);
细心的小伙伴会发现忘了写修改条件了:
正确代码:
@Update("update tbl_book set type=#{type},name=#{name},description=#{description} where id=#{id}")
    public int update(Book book);
测试:图书名称改为:三体III

测试成功:

删除功能
找到页面的删除按钮,按钮上绑定了@click=“handleDelete(scope.row)”,method的handleDelete方法弹出提示框,发送异步请求并携带需要删除数据的主键ID
// 删除
                handleDelete(row) {

                    //1.弹出提示框
                    this.$confirm("此操作永久删除当前数据,是否继续?","提示",{

                        type:'info'
                    }).then(()=>{

                        //2.做删除业务
                        axios.delete("/books/"+row.id).then((res)=>{

                            if(res.data.code == 20031){

                                this.$message.success("删除成功");
                            }else{

                                this.$message.error("删除失败");
                            }
                        }).finally(()=>{

                            this.getAll();
                        });
                    }).catch(()=>{

                        //3.取消删除
                        this.$message.info("取消删除操作");
                    });
                }
项目已分享到GitHub需要的自取
想要全面的学习IDEA集成GitHub,这个Git专栏(点击直接学习)里有详细教程。

https://github.com/cainiaolianmengdaduizhang/ssm.git

边栏推荐
- Flutter动态化 | Fair 2.6.0 新版本特性
- 参加Ultimate Harvest Moon活动,立即赢取终极版月光女神NFT
- win10 校验sha256
- 兆易创新2021年将从长鑫存储采购3亿美元DRAM产品
- Nuggets quantification: Obtain data through the history method, and use the same proportional weighting factor as Sina Finance and Snowball.different from a flush
- sorting and searching 二分查找法
- 商城商品的知识图谱构建
- Recall i2i
- 【服务器存储数据恢复】华为OceanStor某型号存储raid5硬盘故障离线,热备盘同步数据失败导致raid崩溃的数据恢复案例
- 虚拟偶像的歌声原来是这样生成的!
猜你喜欢

factorial factorization

虚拟偶像的歌声原来是这样生成的!

生产者消费代码

贪心(1)区间完全覆盖问题

揭秘 | 2019 To B 年度盛宴那些人和那些事

Win10 check sha256
Flutter dynamic | Fair server new version features

(notes) Build the was configured to -- Settings repositories over project repositories but solutions

MySQL外键约束怎么创建

Review | Tech Talk activities based on Amazon KVS create intelligent visual products
随机推荐
CRM如何帮助企业营销获客
Turbine Aggregation Monitoring
Loadrunner与Jmeter区别与相同
uni-app进阶之Weex/nvu
Turbine聚合监控
中国厂商统治印度智能手机市场,份额提升至77%
Twin all things digital visual | join the real world and the digital space
中小型金融企业该如何进行灾备建设?
Win10 check sha256
Recall i2i
Tech Talk 活动回顾|基于 Amazon KVS 打造智能视觉产品
2020年Mobileye收入近10亿美元,EyeQ芯片出货1930万颗
Automated win training script log
LinkedList 5-141. The circular linked list
闻泰科技拟收购欧菲光摄像头业务资产,或将进入苹果供应链!
木棒
pjax无法生效解决办法,butterfly主题维护你的pjax
掘金量化:通过history方法获取数据,和新浪财经,雪球同用等比复权因子。不同于同花顺
兆易创新2021年将从长鑫存储采购3亿美元DRAM产品
(笔记)Build was configured to prefer settings repositories over project repositories but 解决方法