当前位置:网站首页>基于Arduino的温度、湿度测量显示装置
基于Arduino的温度、湿度测量显示装置
2022-07-27 06:43:00 【xitianqu】
分享一个基于Arduino的温度、湿度测量显示装置,可以对装置所在环境中的温度、湿度、气压及光照等数据进行采集并显示。


主控装置:Arduino Pro;
温湿度传感器:AHT20;
光照传感器:BH1750;
气压传感器:BMP180;
显示装置:OLED128X32;
人体感应检测:红外热释电传感器模块;
RGB彩灯:4位RGB。

几种传感器均为I2C接口,在电路连接时直接与Arduino Pro的I2C接口相连既可;
RGB彩灯控制引脚:4号引脚;
红外热释电传感器检测引脚:2号引脚;
震动电机控制引脚:3号引脚。
系统上电以后首先会进行传感器初始化,同时控制迷你震动电机转动用作开机提示。初始化完成以后系统启动定时器开始进行采样周期定时,定时周期到时系统会控制传感器进行数据采集并显示,显示界面为两种,其中界面一显示温度和湿度;界面二显示光照强度和压强。两个显示界面会交替切换显示。伴随着数据和显示的同时,系统的RGB彩灯会随机变化颜色进行显示。当装置的红外热释电传感器检测到周围一定时间内没有人活动时会自动熄灭OLED显示器和RGB彩灯进入节电模式,一旦检测到有人活动后会立刻切换至正常工作模式。
使用飞线将各个模块连接,最后又使用亚克力板做了一个简单的外壳进行固定。下面是几张效果图。


4
#include <MsTimer2.h>
#include <Adafruit_AHTX0.h>
#include <Adafruit_BMP085.h>
#include <Adafruit_NeoPixel.h>
#include <BH1750.h>
#include <Adafruit_GFX.h>
#include <Adafruit_SSD1306.h>
#include "stdlib.h"

#define SCREEN_WIDTH 128      // OLED display width, in pixels
#define SCREEN_HEIGHT 32      // OLED display height, in pixels
#define OLED_RESET     4      // Reset pin # (or -1 if sharing Arduino reset pin)
#define SCREEN_ADDRESS 0x3C   ///< See datasheet for Address; 0x3D for 128x64, 0x3C for 128x32

#define PIN       4
#define NUMPIXELS 4
#define motor 3
#define red_pin 2

uint8_t r=200,g=100,b=50;

Adafruit_AHTX0 aht;
Adafruit_BMP085 bmp;
Adafruit_NeoPixel pixels(NUMPIXELS, PIN, NEO_GRB + NEO_KHZ800);
BH1750 lightMeter;
Adafruit_SSD1306 display(SCREEN_WIDTH, SCREEN_HEIGHT, &Wire, OLED_RESET);
sensors_event_t humidity, temp;

float press_data = 0 ;
float lux =0;
bool sample = false ;
bool Device_State[4] = {false,false,false,false};
uint8_t State = 0 ;
uint8_t vision_cnt = 0 ;
bool flash = false ;
uint32_t Time_Out = 0 ;
bool withOut = false ;
uint32_t RGB_Color(uint8_t r, uint8_t g, uint8_t b) {
    return ((uint32_t)g << 16) | ((uint32_t)r << 8) | b;
  }
void Sample_State(void)
{
  switch(State)
  {
    case 0 : State = 1 ;
             if(Device_State[0]==true)
             {
                aht.getEvent(&humidity, &temp);// populate temp and humidity objects with fresh data
             }
    break ;
    case 1 : State = 2 ;
             if(Device_State[1]==true)
             {
                press_data = bmp.readPressure()/100 ;
             }
             break ;
    case 2 :
             State = 0 ;
             if(Device_State[2]==true)
             {
               lux = lightMeter.readLightLevel();
               if(lux>100)
               {
                 pixels.setBrightness(5);
               }else
               {
                 pixels.setBrightness(30);
               }
             }
             break ;
    default : ;
  }
  r=random(0, 255);
  g=random(0, 255);
  b=random(0, 255);
  flash = !flash ;
  if(vision_cnt<60)
  {
    vision_cnt ++ ;
  }else
  {
    vision_cnt = 0 ;
  }
  if(withOut==false)
  {
    pixels.setPixelColor(0, RGB_Color(r, g, b));
    pixels.setPixelColor(1, RGB_Color(g, r, b));
    pixels.setPixelColor(2, RGB_Color(g, b, r));
    LED_CTRL(flash);
    pixels.show();
    if(vision_cnt<30)
    {
      updat_data() ;
    }else
    {
      vision_data();
    }
  }else
  {
    pixels.setPixelColor(0, RGB_Color(0, 0, 0));
    pixels.setPixelColor(1, RGB_Color(0, 0, 0));
    pixels.setPixelColor(2, RGB_Color(0, 0, 0));
    pixels.setPixelColor(3, RGB_Color(0, 0, 0));
    pixels.show();
    display.clearDisplay();
    display.display();
  }
}
void Timer_ISR(void)          // timer compare interrupt service routine
{
  sample = true ;
}
void LED_CTRL(bool ctrl)
{
   if(ctrl)
   {
      if(digitalRead(red_pin)==1)
      {
        pixels.setPixelColor(3, RGB_Color(r, g, b));
      }else
      {
        pixels.setPixelColor(3, RGB_Color(b, g, r));
      }
   }else
   {
     pixels.setPixelColor(3, RGB_Color(0, 0, 0));
   }
}
void Device_Init(void)
{
  //**************************************************
  if (!aht.begin()) {
    Serial.println("Could not find AHT? Check wiring");
    Device_State[0] = false ;
    pixels.setPixelColor(0, RGB_Color(255, 0, 0));
  }else
  {
    Device_State[0] = true ;
    pixels.setPixelColor(0, RGB_Color(0, 0, 255));
  }
  //**************************************************
  if (!bmp.begin()) {
    Serial.println("Could not find a valid BMP085 sensor, check wiring!");
    Device_State[1] = false ;
    pixels.setPixelColor(1, RGB_Color(255, 0, 0));
  }else
  {
    Device_State[1] = true ;
    pixels.setPixelColor(1, RGB_Color(0, 0, 255));
  }
  if(!lightMeter.begin())
  {
     Serial.println("Could not find a valid BH1750 sensor, check wiring!");
     Device_State[2] = false ;
     pixels.setPixelColor(2, RGB_Color(255, 0, 0));
  }else
  {
    Device_State[2] = true ;
    pixels.setPixelColor(2, RGB_Color(0, 0, 255));
  }
  pixels.begin();
  pixels.setBrightness(50);
  pixels.clear();
  if(!display.begin(SSD1306_SWITCHCAPVCC, SCREEN_ADDRESS)) {
    Serial.println(F("SSD1306 allocation failed"));
    Device_State[3] = false ;
    pixels.setPixelColor(3, RGB_Color(255, 0, 0));
  }else
  {
    pixels.setPixelColor(3, RGB_Color(0, 0, 255));
    Device_State[3] = true ;
    display.clearDisplay();
    vision_init();
  }
  pixels.show();
  delay(3000);
  display.clearDisplay();
  updat_data();
  //**************************************************
}
void vision_init(void)
{
  display.setTextSize(2); // Draw 2X-scale text
  display.setTextColor(SSD1306_WHITE);
  display.setCursor(0, 0);
  display.println(F(" Hello DG "));

  display.setTextSize(1); // Draw 2X-scale text
  display.setCursor(15,20);
  display.println(F("Have a good day!"));
  display.display();      // Show initial text
}
void vision_data(void)
{
  display.clearDisplay();
  display.setTextSize(2); // Draw 2X-scale text
  display.setCursor(0,0);
  display.print(F("L:"));
  display.print(lux);
  display.println(F("lx"));

  display.setCursor(0,16);
  display.print(F("P:"));
  display.print(press_data);
  display.println(F("hPa"));
  display.display();      // Show initial text
}
void updat_data(void)
{
  display.clearDisplay();
  display.setTextSize(2); // Draw 2X-scale text
  display.setCursor(0,0);
  display.print(F("T:"));
  display.print(temp.temperature);
  display.println(F(" C"));

  display.setCursor(0,16);
  display.print(F("H:"));
  display.print(humidity.relative_humidity);
  display.println(F("%"));
  display.display();      // Show initial text

}
void setup() {
  // put your setup code here, to run once:
  sample = false ;
  pinMode(motor, OUTPUT);
  digitalWrite(motor, LOW);
  pinMode(red_pin, INPUT);
  Serial.begin(9600);
  MsTimer2::set(200, Timer_ISR); // 500ms period
  MsTimer2::start();
  Device_Init();
  digitalWrite(motor, HIGH);

}

void loop() {
  // put your main code here, to run repeatedly:
  if(sample)
  {

    sample=false ;
    Sample_State();
    if(digitalRead(red_pin)==0)
    {
      if(Time_Out<100)
        Time_Out ++;
      else
        withOut = true ;
    }else
    {
        withOut = false ;
        Time_Out = 0 ;

    }
  }
}边栏推荐
猜你喜欢
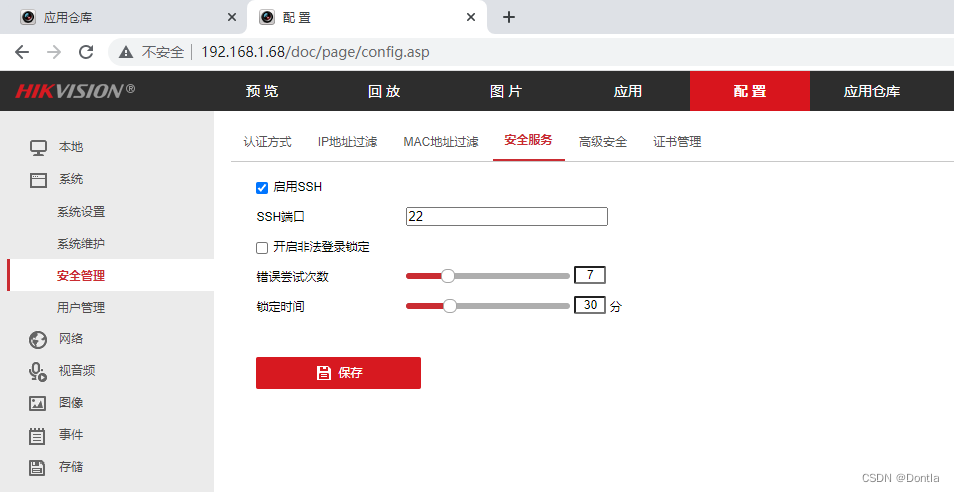
海康h9摄像头用xshell无法连接(没有启用ssh)

C# 常用功能整合-3

vlan间路由(讲解+验证)

Quickly update the information in a field in kettle

零号培训平台课程-2、SSRF基础

Tcp/ip protocol analysis (tcp/ip three handshakes & four waves + OSI & TCP / IP model)

连接MySQL时报错:Public Key Retrieval is not allowed 【解决方法】

Codeforces Round #810 (Div.2) A-C

Chapter 6 Shell Logic and Arithmetic

(posted) comparison of Eureka, consumer and Nacos 2
随机推荐
Advanced IO outline
Perl: 将要执行的外部命令拆分为多行
(posted) comparison of Eureka, consumer and Nacos 1
(2022 Hangdian multi school III) 1009.package delivery (greedy)
Using soci to connect Oracle with PostgreSQL and SQLite on rhel8
Synchronized锁
UUID与secrets模块
Jmeter: interface automation test - BeanShell compares database data and return data
Guava的基础功能与集合
一个优先级顺序的SQL问题
C# 常用功能整合-3
36 - new promise method: allsettled & any & race
Logcat tool
jjwt 生成token
Esp8266 (esp-12f) third party library use -- sparkfun_ Apds9960 (gesture recognition)
Tcp/ip protocol analysis (tcp/ip three handshakes & four waves + OSI & TCP / IP model)
Pg_relation_size 问题
利用 Amazon DynamoDB 和 Amazon S3 结合 gzip 压缩,最大化存储玩家数据
js正则表达式实现每三位数字加一个逗号
冰冰学习笔记:类与对象(中)