当前位置:网站首页>Pyqt5 basic learning
Pyqt5 basic learning
2022-06-10 07:33:00 【Wangxiaoxi】
PyQt5 Based on learning
List of articles
- PyQt5 Based on learning
- Pycharm To configure External Tools: Qt Designer and pyUIC
- PyQt5 Control introduction
- PyQt5 Layout introduction (4 General layout )
- 1、QMainWindow and QWidget The relationship between
- 2、QHBoxLayout: Horizontal layout ,addWidget
- 3、QVBoxLayout: Vertical layout ,addWidget
- 4、QHBoxLayout and QVBoxLayout A mixture of : Nesting layout ( Grid layout ),addLayout
- 5、QGridLayout:QGridLayout Show grid locations for each location ,addWidget
- 6、QStackedLayout: Stack layout , It's allowed to put the second z Parts are placed on top
- PyQt5 Event handling
- Common controls use
- 1、QImage,QPixmap Drawing pictures
- 2、 Page Jump event basic logic
- 3、 by QPushButton Set icon
- 4、 Click the "identify" button in the message pop-up box
- 5、 Pop up the drop-down box
- 6、 Adaptive window size control
- 7、 Adjust under layout / Fixed control size
- 8、 utilize ScollArea Dynamically increasing QLabel
- 9、 Delete all controls in the layout
- 10、textBrower Use of control
- 11、QSlider Use of control
- 12、 About MainWindow Code and Ui Corresponding understanding of layout
Pycharm To configure External Tools: Qt Designer and pyUIC
pyUIC To configure :
Qt Designer To configure :
Yes pyQt Interface development , It is recommended to understand the following chapters first :
- PyQt5 What are the main controls used in
- PyQt5 How to layout these controls
- PyQt How to bind events to these controls
In the development process , The general steps are as follows
- use Qt Designer draw MainWindow Interface diagram , Complete the selection of the control 、 Property settings 、 And layout adjustment .
- Then the generated multiple
qt_mainwindow.uiconvert to python Code , obtain Multiple interface objects ( These interface objects inherit object class , Not at all QtWidget class ). - We just need to create the page Inherit the interface object generated in the previous step , And again Inherit one
QMainWidowclass , Can be usedself.show()Realize the drawing of the interface . - Then in the page class , Define the slot function ( Inherit / Customize ) Complete the interface objects Control ; By increasing the Pop up window control (QMessageBox、QInputDialog、QFileDialog) To improve the interface process .
Here's a reminder : In the use of pycharm Conduct pyqt5 When developing , Run if there is a jam , Description operation error , But the console will not output , need Open the debug run project to see the error message .
PyQt5 Control introduction
Reference resources
It mainly includes :
Button control :
- QPushButton: Just to be clicked
- QCommandLinkButton: Add details
- QRadioButton: Radio button , You can select a single menu
- QCheckBox: Check box , You can select multiple at the same time .
Input control :
- QLineEdit: Single line input box
- QTextEdit: Multi-line input box , Not only can you enter text , You can also enter hyperlinks 、 Rich text such as pictures
- QPlainTextEdit: Normal multiline text
- QKeySequenceEdit: Acquisition shortcuts ( Shortcut key )
- Step adjustment (QAbstractSpinBox) ( keyboard + mouse )
- QDateTimeEdit: Collection date and time
- QDateEdit: Separate dates .
- QTimeEdit: Time alone .
- QSpinBox: Enter an integer number .
- QDoubleSpinBox: Enter a floating point number .
- QComboBox: Combo box ( Drop down to select input ), It is often used to fill in the address
- QFontComboBox: Combo box ,Font Font means
- QColorDialog: Dialog box for selecting color .
- QFileDialog: choice File dialog .
- QFontDialog: choice Dialog box for detailed font settings
- QInputDialog: eject Input box dialog box ( Modal frame ).
Show controls :
- QLabel: Plain text ( Only for display , Generally, it cannot be edited ), Digital rich text ( Formatted text 、 Hyperlinks ),QLabel- Hyperlinks , picture ,QLabel- Animation (.gif)
- QLCDNumber: image LCD Like a lamp
- QProgressBar: Progress bar
- QMessageBox: Message box
- QErrorMessage: Error dialog
- QProgressDialog: Process dialog
other :
QLineEdit Control settings Password asterisk :
passwordLineEdit.setEchoMode(QLineEdit.Password)
PyQt5 Layout introduction (4 General layout )
Reference resources
1、QMainWindow and QWidget The relationship between
In understanding Qt Before the basic layout in , We have to understand QMainWindow and QWidget The relationship between
If A window contains one or more windows , So this window is the parent window , The included window is a child window . A window without a parent window is a top-level window ,QMainWindow It is a top-level window , It can contain many interface elements , Such as menu bar 、 The toolbar 、 status bar 、 Sub windows, etc .
QWidget class
QWidget Class is the base class for all user interface objects . It is inherited from QObject and QPaintDevice.

There is no parent QWidget be called Independent Window( Independent window ), Window title can be set , Icon, etc ; Those with a parent class are called Child Widgets( Subassemblies ), Show in parent class .
QWidget Many subassemblies can be embedded , These subassemblies need to pass Layout( Layout ) To join the QWidget in .
QMainWindow class
QMainWindow from QWidget Class inheritance :

- QMainWindow Is the main form , There's a menu bar 、 The toolbar 、 status bar , Floating form area , Central window area, etc . If this class needs to be the main form , So use QMainWindow.
- QMainWindow The central form must be set , adopt setCentralWidget Function settings . The central form is QWidget Class .
- QMainWindow You can use saveState() Store the status of the layout ; You can use later restoreState() recovery .
QMainWindow Inherited from QWidget class , Has all its derived methods and properties , The more important methods are as follows :
- addToolBar(): Add Tool Bar
- centralWidget(): Return to a control in the center of the window , If not set, return NULL
- menuBar(): Return to the menu bar of the main window
- setCentralWidget(): Set controls for window center
- setStatusBar(): Set status bar
- statusBar(): After getting the status bar object , Calling the
- showMessage(message,int timeout=0): Method , Display status bar information . The first parameter is the status bar information to be displayed , The second parameter is the time of information stay , In milliseconds (ms), The default is 0, Indicates that the status bar information is always displayed .
Note:QMainWindow Cannot set layout ( Use setLayout() Method ), because It has its own layout .
QMainWindow There are two main ways to write a class :
adopt setCentralwidget, Place the component in QMainWindows Right center ( Relative layout )
This step is often done by layout The components are laid out , Finally using setCentralwidget, take layout The embedded widget in , Then embed into QMainWindows Right in the middle of .
import sys
from PyQt5.QtWidgets import QApplication, QMainWindow, QWidget, QVBoxLayout, QHBoxLayout
from PyQt5.QtGui import QPalette, QColor

class Color(QWidget):
    def __init__(self,color):
        super(Color,self).__init__()
        self.setAutoFillBackground(True)

        palette = self.palette()
        palette.setColor(QPalette.Window, QColor(color))
        self.setPalette(palette)

class MainWindow(QMainWindow):

    def __init__(self):
        super(MainWindow, self).__init__()

        self.setWindowTitle("My App")

        layout = QHBoxLayout()

        layout.addWidget(Color('red'))   # Add custom Widget Control (Color)
        layout.addWidget(Color('green'))   # Add custom Widget Control (Color)
        layout.addWidget(Color('blue'))   # Add custom Widget Control (Color)
        layout.addWidget(Color('yellow'))

        self.setObjectName("MainWindow")
        self.resize(100, 100)

        #  take widget Put components into mainWindows in , Use relative position layout
        widget = QWidget()
        widget.setLayout(layout)
        self.setCentralWidget(widget)

if __name__ == '__main__':
    app = QApplication(sys.argv)
    window = MainWindow()
    window.show()
    app.exec()

Place components in QMainWindow in (QWidget(self) ), Then use the absolute position layout
If you change the above code to
# take widget Component in QMainWindow in , Use absolute position layout
widget = QWidget(self)
widget.setLayout(layout)
The effect is as follows :

Other code references are as follows :
import sys
from PyQt5.QtWidgets import QMainWindow,QApplication,QDesktopWidget,QPushButton

class MainWindow(QMainWindow):
    def __init__(self):
        super(MainWindow,self).__init__()

        self.resize(400,400)
        self.setWindowTitle(" The second main window ")
        button = QPushButton(" Close the main window ",self)
        button.move(100,200)
        button.clicked.connect(self.close)

if __name__ == "__main__":
    app = QApplication(sys.argv)
    form = MainWindow()
    form.show()
    sys.exit(app.exec_())
Qt Medium 4 A basic layout ( level , vertical , grid , grid , Stack )

2、QHBoxLayout: Horizontal layout ,addWidget
QHBoxLayout: Horizontal layout (widget.setLayout,setCentralwidget and QWidget(self) )
QHBoxLayout It's the same , Except for horizontal movement . Adding a widget adds it to the right .

import sys
from PyQt5.QtWidgets import QApplication, QMainWindow, QWidget, QVBoxLayout, QHBoxLayout
from PyQt5.QtGui import QPalette, QColor

class Color(QWidget):
    def __init__(self,color):
        super(Color,self).__init__()
        self.setAutoFillBackground(True)

        palette = self.palette()
        palette.setColor(QPalette.Window, QColor(color))
        self.setPalette(palette)

class MainWindow(QMainWindow):

    def __init__(self):
        super(MainWindow, self).__init__()

        self.setWindowTitle("My App")

        layout = QHBoxLayout()

        layout.addWidget(Color('red'))   # Add custom Widget Control (Color)
        layout.addWidget(Color('green'))   # Add custom Widget Control (Color)
        layout.addWidget(Color('blue'))   # Add custom Widget Control (Color)
        layout.addWidget(Color('yellow'))

        widget = QWidget()
        widget.setLayout(layout)   # Set up Widget Layout
        self.setCentralWidget(widget)  #setCentralWidget You can put Qwidget Set to QMainWindow The central control in the main window

if __name__ == '__main__':
    app = QApplication(sys.argv)
    window = MainWindow()
    window.show()  # perform widget Of show Method
    app.exec()
3、QVBoxLayout: Vertical layout ,addWidget
Use QVBoxLayout, You can arrange widgets linearly . Adding a widget will add it to the bottom of the column .

...
layout = QVBoxLayout()

layout.addWidget(Color('red'))   # Add custom Widget Control (Color)
layout.addWidget(Color('green'))   # Add custom Widget Control (Color)
layout.addWidget(Color('blue'))   # Add custom Widget Control (Color)
layout.addWidget(Color('yellow'))
...
4、QHBoxLayout and QVBoxLayout A mixture of : Nesting layout ( Grid layout ),addLayout

...
super(MainWindow, self).__init__()

self.setWindowTitle("My App")

layout1 = QHBoxLayout()
layout2 = QVBoxLayout()
layout3 = QVBoxLayout()

layout2.addWidget(Color('red'))
layout2.addWidget(Color('yellow'))
layout2.addWidget(Color('purple'))

layout1.addLayout( layout2 )   #layout2 Vertical layout , Nested vertical layout in horizontal layout

layout1.addWidget(Color('green'))  # Direct nesting of rentals in horizontal layout

layout3.addWidget(Color('red'))
layout3.addWidget(Color('purple'))

layout1.addLayout(layout3)

widget = QWidget()
widget.setLayout(layout1)
self.setCentralWidget(widget)  #setCentralWidget You can put Qwidget Set to QMainWindow The central control in the main window
Set the spacing around the layout :
layout1.setContentsMargins(15, 0, 15, 15) # Set the spacing around the horizontal layout ( Left , On , Right , Next )

Set the spacing between elements :
layout1.setSpacing(20) # Set the spacing between horizontal layout elements

5、QGridLayout:QGridLayout Show grid locations for each location ,addWidget
QGridLayout Allows you to locate items in the grid . Specify row and column positions for each widget . You can skip elements , They will be left blank . What's useful is , about QGridLayout, you You don't need to fill all the positions in the grid .

layout = QGridLayout()

layout.addWidget(Color('red'), 0, 3)
layout.addWidget(Color('green'), 1, 1)
layout.addWidget(Color('blue'), 2, 2)
layout.addWidget(Color('purple'), 3, 0)
6、QStackedLayout: Stack layout , It's allowed to put the second z Parts are placed on top
This layout Allows you to place an element directly in front of another element . You can then select the widget to display . You can use it to draw layers in a graphics application , or Mimic a tab like interface . Notice also that qStackedWidget, It is a container widget , Working in exactly the same way . If you want to use setCentralwidget Add a stack directly to QMainWindow, It's very useful .

Qstackkedlayout - In the use of , Only the top widget is visible , By default, it is the first widget added to the layout .
layout = QStackedLayout()

layout.addWidget(Color("red"))
layout.addWidget(Color("green"))
layout.addWidget(Color("blue"))
layout.addWidget(Color("yellow"))

# layout.setCurrentIndex(3) #yellow At the top
layout.setCurrentIndex(2)  #blue At the top

PyQt5 Event handling
Reference resources
Event handling is inseparable from listening ( The signal ) And callback ( Slot function ), Slot functions include custom slot functions and QWidget Slot function provided , among The former needs to be bound to the specified component signal , The latter need not .
1、 The window closed - Button event ( Custom slot function )
- textedit Of components textChanged The signal → binding → on_textchanged_func Slot function
- button Of components clicked The signal → binding → on_clicked_func Slot function
import sys
from PyQt5.QtWidgets import QApplication, QWidget, QTextEdit, QPushButton, QMessageBox, QVBoxLayout

class Demo(QWidget):
    def __init__(self):
        super(Demo, self).__init__()

        self.is_saved = True

        # Instantiate a QTextEdit Control for text editing , Put it textChanged Signals are connected to custom slot functions
        self.textedit = QTextEdit(self)
        self.textedit.textChanged.connect(self.on_textchanged_func)

        # Instantiate a button to save the operation , take clicked The signal is connected with a custom slot function
        self.button = QPushButton('Save', self)
        self.button.clicked.connect(self.on_clicked_func)

        self.v_layout = QVBoxLayout()
        self.v_layout.addWidget(self.textedit)
        self.v_layout.addWidget(self.button)
        self.setLayout(self.v_layout)

    def on_textchanged_func(self):
        if self.textedit.toPlainText():
            self.is_saved = False
        else:
            self.is_saved = True

    def on_clicked_func(self):
        self.save_func(self.textedit.toPlainText())  # If the text box is not empty , Save as a file
        self.is_saved = True

    def save_func(self, text):
        with open('saved.txt', 'w') as f:
            f.write(text)

    def closeEvent(self, QCloseEvent):    #  Window closing event
        if not self.is_saved:
            choice = QMessageBox.question(self, '', 'Do you want to save the text?',
                                          QMessageBox.Yes | QMessageBox.No | QMessageBox.Cancel)
            if choice == QMessageBox.Yes:
                self.save_func(self.textedit.toPlainText())
                QCloseEvent.accept()
            elif choice == QMessageBox.No:
                QCloseEvent.accept()
            else:
                QCloseEvent.ignore()

if __name__ == '__main__':
    app = QApplication(sys.argv)
    demo = Demo()
    demo.show()
    sys.exit(app.exec_())

- is_saved Variables are used to record whether the user has saved ;
- Instantiate a QTextEdit Control for text editing , Put it textChanged The signal And a custom slot function ;
- Instantiate a button to save the operation , take clicked The signal is connected with a custom slot function :
- Here we redefine QWidget Window closing function of closeEvent(), If the user has not saved , Pop up a QMessageBox The window asks whether to save .
2、 Mouse events (QWidget Built in slot function )
import sys
from PyQt5.QtCore import Qt
from PyQt5.QtWidgets import QApplication, QWidget, QLabel, QVBoxLayout
class Demo(QWidget):
def __init__(self):
super(Demo, self).__init__()
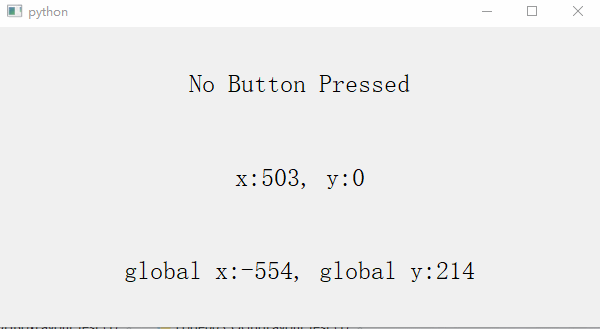
self.button_label = QLabel('No Button Pressed', self) # 1、button_label Used to display mouse click and release actions
self.button_label.setStyleSheet("font-size:25px;")
self.xy_label = QLabel('x:0, y:0', self) # 2、xy_label Used to record the mouse relative to QWidget The coordinates of the window
self.xy_label.setStyleSheet("font-size:25px;")
self.global_xy_label = QLabel('global x:0, global y:0', self) # 3、global_xy_label It is used to record the coordinates of the mouse relative to the display screen
self.global_xy_label.setStyleSheet("font-size:25px;")
self.button_label.setAlignment(Qt.AlignCenter) #button_label Center
self.xy_label.setAlignment(Qt.AlignCenter) #xy_label Center
self.global_xy_label.setAlignment(Qt.AlignCenter)
self.v_layout = QVBoxLayout()
self.v_layout.addWidget(self.button_label)
self.v_layout.addWidget(self.xy_label)
self.v_layout.addWidget(self.global_xy_label)
self.setLayout(self.v_layout)
self.resize(300, 300)
self.setMouseTracking(True) # 4、setMouseTracking(True) Method to make the window always track the mouse , Otherwise, you can only wait for the mouse to be clicked each time , The window will start to record the changes of mouse movements ; When the mouse is released , The window will not be recorded again , It's a little bit of a hassle
def mouseMoveEvent(self, QMouseEvent): # 5、mouseMoveEvent() It is the response function triggered when the mouse moves
x = QMouseEvent.x()
y = QMouseEvent.y()
global_x = QMouseEvent.globalX()
global_y = QMouseEvent.globalY()
self.xy_label.setText('x:{}, y:{}'.format(x, y))
self.global_xy_label.setText('global x:{}, global y:{}'.format(global_x, global_y))
def mousePressEvent(self, QMouseEvent): # 6、mousePressEvent() Is the response function triggered when the mouse is pressed
if QMouseEvent.button() == Qt.LeftButton:
self.button_label.setText('Left Button Pressed')
elif QMouseEvent.button() == Qt.MidButton:
self.button_label.setText('Middle Button Pressed')
elif QMouseEvent.button() == Qt.RightButton:
self.button_label.setText('Right Button Pressed')
def mouseReleaseEvent(self, QMouseEvent): # 7、mouseReleaseEvent() It is the response function triggered when the mouse is released
if QMouseEvent.button() == Qt.LeftButton:
self.button_label.setText('Left Button Released')
elif QMouseEvent.button() == Qt.MidButton:
self.button_label.setText('Middle Button Released')
elif QMouseEvent.button() == Qt.RightButton:
self.button_label.setText('Right Button Released')
def mouseDoubleClickEvent(self, QMouseEvent): # 8、mouseDoubleClickEvent() It is the response function triggered when the mouse is double clicked
if QMouseEvent.button() == Qt.LeftButton:
self.button_label.setText('Left Button Double Clikced')
elif QMouseEvent.button() == Qt.MidButton:
self.button_label.setText('Middle Button Double Clicked')
elif QMouseEvent.button() == Qt.RightButton:
self.button_label.setText('Right Button Double Clikced')
if __name__ == '__main__':
app = QApplication(sys.argv)
demo = Demo()
demo.show()
sys.exit(app.exec_())
- button_label Used to display mouse click and release actions
- xy_label Used to record the mouse relative to QWidget The coordinates of the window
- global_xy_label It is used to record the coordinates of the mouse relative to the display screen
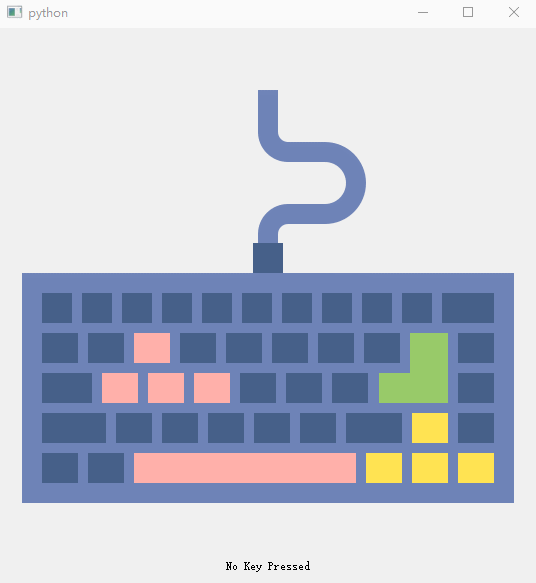
3、 Keyboard events (setPixmap Set pictures , Built in slot function )
import sys
from PyQt5.QtCore import Qt
from PyQt5.QtWidgets import QApplication, QWidget, QLabel, QVBoxLayout

''' Keyboard events '''
import sys
from PyQt5.QtCore import Qt
from PyQt5.QtGui import QPixmap
from PyQt5.QtWidgets import QApplication, QWidget, QLabel, QVBoxLayout

class Demo(QWidget):
    def __init__(self):
        super(Demo, self).__init__()
        self.pic_label = QLabel(self)  # 1、pic_label Used to set the picture , First set the initialized picture to temp.png;
        self.pic_label.setPixmap(QPixmap('images/keyboard.png'))
        self.pic_label.setAlignment(Qt.AlignCenter)

        self.key_label = QLabel('No Key Pressed', self)  # 2、key_label Used to record the key status ;
        self.key_label.setAlignment(Qt.AlignCenter)

        self.v_layout = QVBoxLayout()
        self.v_layout.addWidget(self.pic_label)
        self.v_layout.addWidget(self.key_label)
        self.setLayout(self.v_layout)

    def keyPressEvent(self, QKeyEvent):  # 3、keyPressEvent() It is the response function triggered when a key of the keyboard is pressed , In this function, we determine the type of key pressed ,
                                        #  And will pic_label Set as the corresponding arrow picture , take key_label Set to the corresponding text ;
        if QKeyEvent.key() == Qt.Key_Up:   #↑ key
            self.pic_label.setPixmap(QPixmap('images/up.png'))
            self.key_label.setText('Key Up Pressed')
        elif QKeyEvent.key() == Qt.Key_Down:  #↓ key
            self.pic_label.setPixmap(QPixmap('images/down.png'))
            self.key_label.setText('Key Down Pressed')
        elif QKeyEvent.key() == Qt.Key_Left:  #← key
            self.pic_label.setPixmap(QPixmap('images/left.png'))
            self.key_label.setText('Key Left Pressed')
        elif QKeyEvent.key() == Qt.Key_Right:   #→ key
            self.pic_label.setPixmap(QPixmap('images/right.png'))
            self.key_label.setText('Key Right Pressed')

    def keyReleaseEvent(self, QKeyEvent):  # 4. keyReleasedEvent() The response function triggered when any key on the keyboard is released , In this function , We will pic_label Set as initial picture keyboard.png, And will key_label The text is set to ‘Key Released'.
        self.pic_label.setPixmap(QPixmap('images/keyboard.png'))
        self.key_label.setText('Key Released')

if __name__ == '__main__':
    app = QApplication(sys.argv)
    demo = Demo()
    demo.show()
    sys.exit(app.exec_())
- pic_label Used to set the picture , First set the initialized picture to keyboard.png;
- key_label Used to record the key status
- keyPressEvent() A key for the keyboard is Press down Response function triggered by , In this function, we determine the type of key pressed , And will pic_label Set as the corresponding arrow picture , take key_label Set to the corresponding text ;
- keyReleasedEvent() Any key on the keyboard is Release Response function triggered by , In this function , We will pic_label Set as initial picture keyboard.png, And will key_label The text is set to ‘Key Released’.
Common controls use
1、QImage,QPixmap Drawing pictures
Reference resources
- PyQT5 ( One hundred and one ) Zoom in and out Case study
- PyQt5 stay label How to draw a rectangle in the displayed picture
take cv2 The read picture is loaded into QImage Control , The code is as follows :
img = cv2.imread('images/up.png')
height, width, bytesPerComponent = img.shape
bytesPerLine = 3 * width
cv2.cvtColor(img, cv2.COLOR_BGR2RGB, img)

# utilize QImage Load pictures into components
QImg = QImage(img.data, width, height, bytesPerLine, QImage.Format_RGB888)  #PIL image

pixmap = QPixmap.fromImage(QImg)  # take QImage Load pictures into QPixmap In the component , utilize QPixmap Component drawing pictures
self.lb.setPixmap(pixmap)
But the picture drawn in this way is similar to Qlabel The size of the control does not match , You need to zoom the image , The code is as follows ( The return result is still QImage Components ):
qImg_scaled = qImg.scaled(draw_label.width(), draw_label.height(), Qt.IgnoreAspectRatio, Qt.SmoothTransformation)

pixmap = QtGui.QPixmap.fromImage(qImg_scaled)
draw_label.setPixmap(pixmap)   # utilize QPixmap Component drawing pictures
eliminate draw_label “ binding “ Pictures of the
draw_label.clear()
2、 Page Jump event basic logic
Reference resources
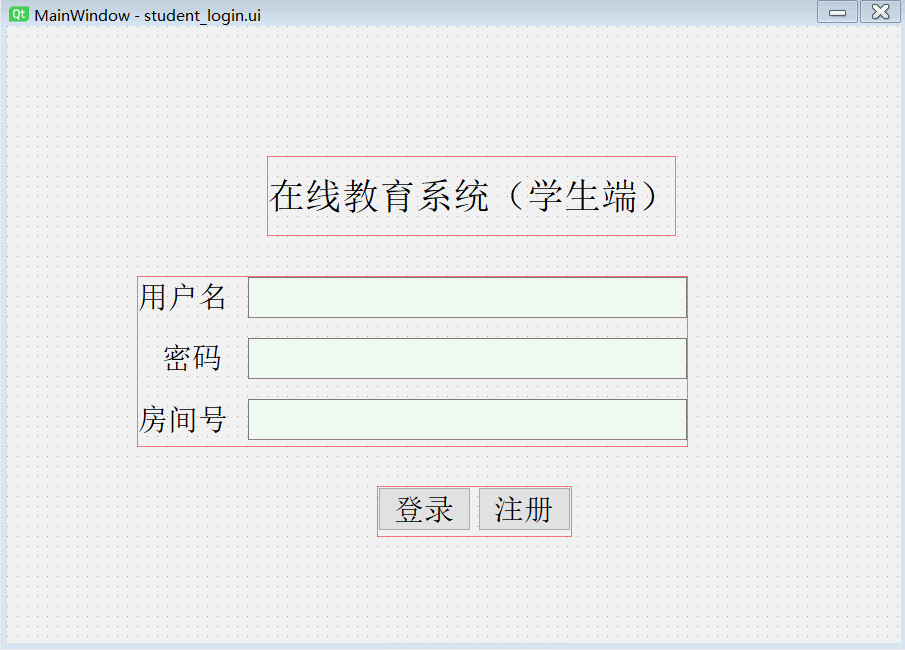
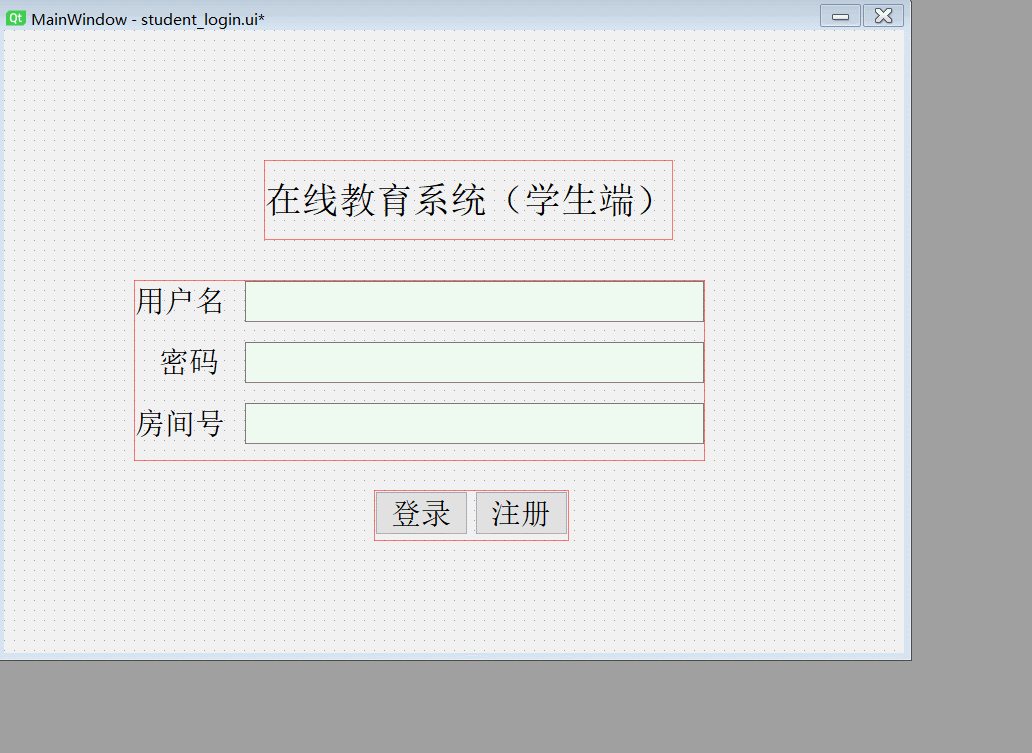
Suppose the login page is as follows :
# -*- coding: utf-8 -*-

# Form implementation generated from reading ui file 'student_login.ui'
#
# Created by: PyQt5 UI code generator 5.15.6
#
# WARNING: Any manual changes made to this file will be lost when pyuic5 is
# run again. Do not edit this file unless you know what you are doing.


from PyQt5 import QtCore, QtGui, QtWidgets


class Ui_MainWindow(object):
    def setupUi(self, MainWindow):
        MainWindow.setObjectName("MainWindow")
        MainWindow.resize(800, 600)
        self.centralwidget = QtWidgets.QWidget(MainWindow)
        self.centralwidget.setObjectName("centralwidget")
        self.label = QtWidgets.QLabel(self.centralwidget)
        self.label.setGeometry(QtCore.QRect(260, 70, 331, 111))
        font = QtGui.QFont()
        font.setFamily("Arial")
        font.setPointSize(22)
        self.label.setFont(font)
        self.label.setObjectName("label")
        self.label_2 = QtWidgets.QLabel(self.centralwidget)
        self.label_2.setGeometry(QtCore.QRect(120, 210, 91, 51))
        font = QtGui.QFont()
        font.setFamily("Arial")
        font.setPointSize(18)
        self.label_2.setFont(font)
        self.label_2.setObjectName("label_2")
        self.textEdit = QtWidgets.QTextEdit(self.centralwidget)
        self.textEdit.setGeometry(QtCore.QRect(220, 210, 371, 51))
        self.textEdit.setObjectName("textEdit")
        self.label_3 = QtWidgets.QLabel(self.centralwidget)
        self.label_3.setGeometry(QtCore.QRect(120, 290, 91, 51))
        font = QtGui.QFont()
        font.setFamily("Arial")
        font.setPointSize(18)
        self.label_3.setFont(font)
        self.label_3.setObjectName("label_3")
        self.textEdit_2 = QtWidgets.QTextEdit(self.centralwidget)
        self.textEdit_2.setGeometry(QtCore.QRect(220, 290, 371, 51))
        self.textEdit_2.setObjectName("textEdit_2")
        self.label_4 = QtWidgets.QLabel(self.centralwidget)
        self.label_4.setGeometry(QtCore.QRect(120, 370, 91, 51))
        font = QtGui.QFont()
        font.setFamily("Arial")
        font.setPointSize(18)
        self.label_4.setFont(font)
        self.label_4.setObjectName("label_4")
        self.textEdit_3 = QtWidgets.QTextEdit(self.centralwidget)
        self.textEdit_3.setGeometry(QtCore.QRect(220, 370, 371, 51))
        self.textEdit_3.setObjectName("textEdit_3")
        self.pushButton = QtWidgets.QPushButton(self.centralwidget)
        self.pushButton.setGeometry(QtCore.QRect(230, 480, 101, 41))
        font = QtGui.QFont()
        font.setFamily("Arial")
        font.setPointSize(18)
        self.pushButton.setFont(font)
        self.pushButton.setObjectName("pushButton")
        self.pushButton_2 = QtWidgets.QPushButton(self.centralwidget)
        self.pushButton_2.setGeometry(QtCore.QRect(460, 480, 101, 41))
        font = QtGui.QFont()
        font.setFamily("Arial")
        font.setPointSize(18)
        self.pushButton_2.setFont(font)
        self.pushButton_2.setObjectName("pushButton_2")
        MainWindow.setCentralWidget(self.centralwidget)

        self.retranslateUi(MainWindow)
        QtCore.QMetaObject.connectSlotsByName(MainWindow)

    def retranslateUi(self, MainWindow):
        _translate = QtCore.QCoreApplication.translate
        MainWindow.setWindowTitle(_translate("MainWindow", "MainWindow"))
        self.label.setText(_translate("MainWindow", " Online education system ( Student side )"))
        self.label_2.setText(_translate("MainWindow", " user name "))
        self.label_3.setText(_translate("MainWindow", "  password "))
        self.label_4.setText(_translate("MainWindow", " Your room number, "))
        self.pushButton.setText(_translate("MainWindow", " Sign in "))
        self.pushButton_2.setText(_translate("MainWindow", " register "))
The page effect is as follows :
The event binding code for the login button is as follows :
class LoginWindow(QtWidgets.QMainWindow, Ui_MainWindow):

    def __init__(self):
        self.pushButton.clicked.connect(lambda : self.login_clicked())   # Bind the login button login_clicked  Custom slot function
        self.pushButton_2.clicked.connect(lambda : self.register_redirect())    # Bind... To the registration button register_redirect  Custom slot function
button Errors may be reported when binding events :argument 1 has unexpected type ‘NoneType’, Reference resources https://www.shuzhiduo.com/A/pRdBYpyP5n/
3、 by QPushButton Set icon
Reference resources
- QtWidgets.QPushButton() Set the background image
- pyqt5 Two ways to insert pictures ( Introducing resources and not introducing resources ) Hyperdetail
4、 Click the "identify" button in the message pop-up box
Reference resources
choice = QMessageBox.question(self, " Tips ", " You have created this room , Whether to enter ", QMessageBox.Yes | QMessageBox.No | QMessageBox.Cancel)
if choice == QMessageBox.Yes:
    print("Yes")
	self.join_channel()   # Jump to the page
else:
	print("No")
Be careful , There's no need to write choice.show() To display the pop-up window , And it will report errors .
Pay special attention here :QMessageBox.question in ,question,warning,information It's lowercase , If written QMessageBox.Question, Will be submitted to the :TypeError: 'Icon' object is not callable
5、 Pop up the drop-down box
Reference resources
# 1 Is the default selected item ,True/False  Whether the list box is editable .
items = ["Spring", "Summer", "Fall", "Winter"]
value, ok = QInputDialog.getItem(self, " Input box title ", " This is a message \n\n Please choose the season :", items, 1, True)
Be careful : There are two options after input , Click on OK In the code value Enter content for ,ok by True; Click on Cancel be value It's empty ,ok by False.
6、 Adaptive window size control
Reference resources
- PyQt: Create adaptive sized windows ( Nanny level pit experience )
- Pyqt5 The self-adaptive size of the actual training window ——Qtdesigner
- Qtdesigner Design interface preview and py Solution to inconsistent file operation results
Adaptive adjustment QLabel typeface
- Adaptively adjust according to the interface size Qlabel font size : take Qlabel Of scaledContents Attribute is set to True
Adaptive adjustment lineEdit The size of the input box
First Change the input box font size , The height of the input box will change
take
lineEditPut it in Form layout perhaps Grid layout in , By scaling this layout , Adjust the width and height of the input box
When scaling the window adaptive adjustment control , it is to be noted that :
If you put the control in MainWindow Inside , because MainWindow Built in layout (centerWidget),MainWindow The scaling of does not drive MainWindow Scaling of internal layout , The controls in the layout cannot be scaled .
The effect is as follows :
So for
QMainWindowA better way to control is Fix the size of the window , Make it impossible to zoom .
7、 Adjust under layout / Fixed control size
Reference resources PyQt Resize control under layout
Modify the control directly (QMainWindow,lineEdit Other controls ) Of minimumSize and maximumSize Long in 、 wide , When the two are consistent , The size of the control will not change with the scaling of the layout .
If the main page (MainWindow) Set it up , If max,min Same length and width , be This window does not support scaling .
8、 utilize ScollArea Dynamically increasing QLabel
Reference resources Pyqt5 scroll slide ( rolling ) Bar controls dynamically added controls ( Nanny class course )
I need to use scrollArea Containers , Reference resources
- QT Auto scroll area of QScrollArea Usage of , Graphic,
- PyQt5 Technology -scrollArea Do not show scroll bar workaround ,Qt Designer Don't show scroll bar , Display and hide the scroll bar
- PYQT5 QscrollArea( Scroll bar ) Use
If scrollArea The container does not display a scroll bar , Mainly check the following two steps :
scrollArea Of
widgetResizableSet to FalseHold up scrollArea The size of the internal area , Setting the
scrollAreaWidgetContentsOfgeometryOfheight,width, When greater than a certain value , There will be a horizontal axis / Vertical scroll bar .If you want to There is no scroll bar on the horizontal axis , Just want the scroll bar to appear on the vertical axis , You can set :
- HorizontalScrollBarPolicy:ScrollBarAlwaysOff
- HorizontalScrollBarPolicy:ScrollBarAlwaysOn
Small cases :
1) Wrong way : Direct will QLabel and scrollAreaWidgetContents binding
stay scrollArea Add inside QLabel( First use Qt Designer Finish it scrollArea Property settings )
     def add_button(self):
        print("add_button")
        self.num += 1
        button = QtWidgets.QPushButton(self.scrollAreaWidgetContents)
        button.setGeometry(QtCore.QRect(0,0,500,100))
        button.setMinimumSize(500,100)
        button.setMaximumSize(500,100)
        button.setStyleSheet("color:Red")
        button.setText("Hello World")
        button.setObjectName("button_" + str(self.num))
        self.scrollAreaWidgetContents.setGeometry(QtCore.QRect(0, 0, 500, 100 * self.num))   #scrollAreaWidgetContents open
        return None
The overall code see 《 The correct approach 》.
The effect is as follows : Although there is a layout , But I can't see where the button is
2) The correct approach : Use scrollAreaWidgetContents Medium VertialLayout add to QLabel
Here we use VertialLayout Come on addWidget, Realization QPushButton Control is dynamically added to scrollArea in , The overall code is as follows :
import sys
from PyQt5.QtWidgets import QApplication, QMainWindow, QWidget, QVBoxLayout, QHBoxLayout
from PyQt5 import QtWidgets,QtCore,QtGui
from PyQt5.QtWidgets import QPushButton


class Ui_Display_MainWindow(object):
    def setupUi(self, MainWindow):
        MainWindow.setObjectName("MainWindow")
        MainWindow.resize(500, 900)
        MainWindow.setMinimumSize(QtCore.QSize(500, 500))
        MainWindow.setMaximumSize(QtCore.QSize(500, 500))
        self.centralwidget = QtWidgets.QWidget(MainWindow)
        self.centralwidget.setObjectName("centralwidget")
        self.scrollArea = QtWidgets.QScrollArea(self.centralwidget)
        self.scrollArea.setGeometry(QtCore.QRect(0, 0, 500, 500))
        self.scrollArea.setVerticalScrollBarPolicy(QtCore.Qt.ScrollBarAlwaysOn)
        self.scrollArea.setHorizontalScrollBarPolicy(QtCore.Qt.ScrollBarAlwaysOff)
        self.scrollArea.setWidgetResizable(False)
        self.scrollArea.setObjectName("scrollArea")
        self.scrollAreaWidgetContents = QtWidgets.QWidget()
        self.scrollAreaWidgetContents.setGeometry(QtCore.QRect(0, 0, 500, 500))
        self.scrollAreaWidgetContents.setObjectName("scrollAreaWidgetContents")

        self.verticalLayoutWidget = QWidget(self.scrollAreaWidgetContents)
        self.verticalLayoutWidget.setGeometry(QtCore.QRect(0, 0, 500, 500))
        self.verticalLayoutWidget.setObjectName("verticalBoxLayoutWidget")
        self.verticalLayout = QVBoxLayout(self.verticalLayoutWidget)
        self.verticalLayout.setContentsMargins(0,0,0,0)
        self.verticalLayout.setObjectName("verticalLayout")

        self.scrollArea.setWidget(self.scrollAreaWidgetContents)
        self.addButton = QPushButton(self.scrollAreaWidgetContents)
        self.addButton.setGeometry(QtCore.QRect(0,0,50,50))
        self.addButton.setObjectName("addButton")
        MainWindow.setCentralWidget(self.centralwidget)

        self.retranslateUi(MainWindow)
        QtCore.QMetaObject.connectSlotsByName(MainWindow)

    def retranslateUi(self, MainWindow):
        _translate = QtCore.QCoreApplication.translate
        MainWindow.setWindowTitle(_translate("MainWindow", "MainWindow"))
        self.addButton.setText(_translate("MainWindow", " add to "))


class MainWindow(QMainWindow,Ui_Display_MainWindow):

    def __init__(self):
        super(MainWindow, self).__init__()
        self.setupUi(self)
        self.init()
        self.num = 0
        self.widget = QWidget()

    def init(self):
        self.addButton.clicked.connect(lambda : self.add_button())

    def add_button(self):
        print("clicked")
        self.num += 1
        button = QtWidgets.QPushButton()
        button.setGeometry(QtCore.QRect(0,0,500,100))
        button.setMinimumSize(500,100)
        button.setMaximumSize(500,100)
        button.setStyleSheet("color:Red")
        button.setText("Hello World")
        button.setObjectName("button_" + str(self.num))
        self.verticalLayout.addWidget(button)
        self.scrollAreaWidgetContents.setGeometry(QtCore.QRect(0,0,500, 100 * self.num))   #scrollAreaWidgetContents open
        self.verticalLayoutWidget.setGeometry(QtCore.QRect(0, 0, 500, 100 * self.num))   #verticalLayoutWidget Stay with me
        return None

if __name__ == '__main__':
    app = QApplication(sys.argv)
    window = MainWindow()
    window.show()
    app.exec()
What we should pay attention to here is :
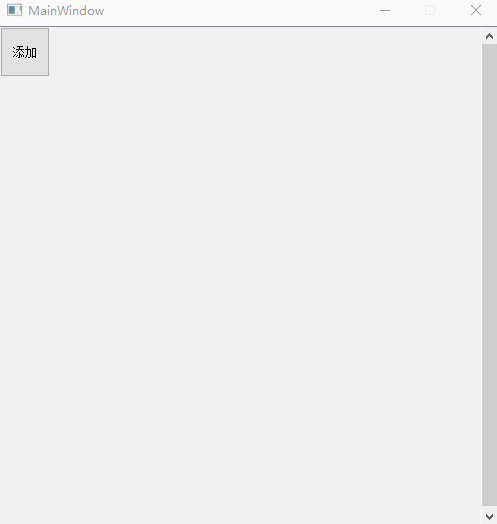
scrollAreaWidgetContents and verticalLayoutWidget Keep it open at the same time , otherwise button Even if the fixed size is set , Will also be compressed in a fixed space .
The effect is as follows :
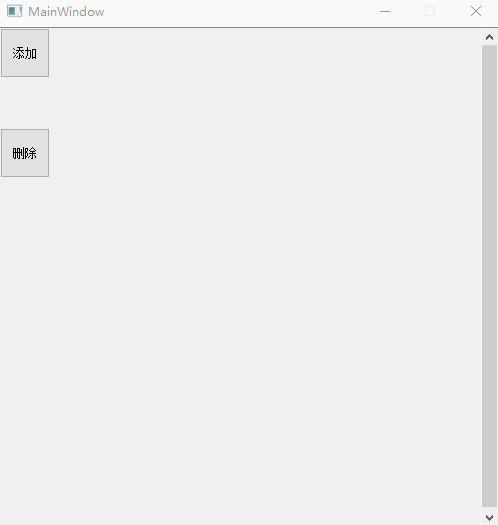
9、 Delete all controls in the layout
Reference resources PyQt5 introduction —— Delete 、 Empty layout All objects in the layout ( Including detailed explanations of common problems )
Code and 8 It's together
    def init(self):
        self.addButton.clicked.connect(lambda : self.add_button())
        self.deleteButton.clicked.connect(lambda : self.delete_button())

    def add_button(self):
       ...

    def delete_button(self):
        item_list = list(range(self.verticalLayout.count()))
        item_list.reverse()  #  Reverse delete , Avoid affecting the layout order

        for i in item_list:
            item = self.verticalLayout.itemAt(i)
            self.verticalLayout.removeItem(item)
            if item.widget():
                item.widget().deleteLater()

        self.num = 0
        # self.scrollAreaWidgetContents.setGeometry(QtCore.QRect(0, 0, 500, 500)) # scrollAreaWidgetContents open
        # self.verticalLayoutWidget.setGeometry(QtCore.QRect(0, 0, 500, 500)) # verticalLayoutWidget Stay with me
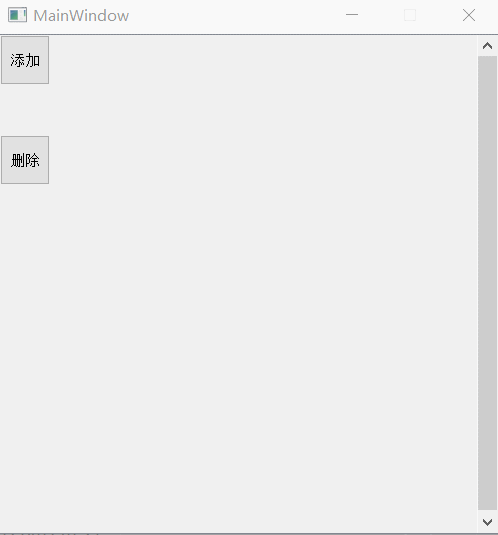
Realization effect :
10、textBrower Use of control
Reference resources
- pyqt5 textBrowser( With scroll bars ) Use
- pyqt5 textBrowser How to automatically pull the scroll bar to the bottom
    text = text.encode("gbk").decode("gbk")  # use gbk Encoded in bytes , Reuse gbk Encode into characters , avoid textBrower Show random code
    self.textBrowser.append(text)  # Add text
    self.textBrowser.moveCursor(self.textBrowser.textCursor().End)  #  The text box displays to the bottom
In the use of textBrowser when , Remember Start a new thread to text draw , Otherwise, the main thread will get stuck , The text will not be displayed until the end of the interface .
11、QSlider Use of control
Reference resources PyQt5 Of components QSlider
12、 About MainWindow Code and Ui Corresponding understanding of layout
The following is simple MainWindow Code , common 5 The layer structure , Because of the use of pyUIC The generated code does not wrap , It looks like a lot of work , Here, I changed my line :
# -*- coding: utf-8 -*-

# Form implementation generated from reading ui file 'untitled.ui'
#
# Created by: PyQt5 UI code generator 5.15.6
#
# WARNING: Any manual changes made to this file will be lost when pyuic5 is
# run again. Do not edit this file unless you know what you are doing.


from PyQt5 import QtCore, QtGui, QtWidgets


class Ui_MainWindow(object):
    def setupUi(self, MainWindow):

        # first floor
        MainWindow.setObjectName("MainWindow")
        MainWindow.resize(800, 600)

        # The second floor
        self.centralwidget = QtWidgets.QWidget(MainWindow)   # Belonging to the first layer ( Build relationships through constructors , I obey you )
        self.centralwidget.setObjectName("centralwidget")

        # The third level
        self.scrollArea = QtWidgets.QScrollArea(self.centralwidget)   # Belonging to the second layer ( Build relationships through constructors , I obey you )
        self.scrollArea.setGeometry(QtCore.QRect(130, 50, 441, 431))
        self.scrollArea.setWidgetResizable(True)
        self.scrollArea.setObjectName("scrollArea")

        # The fourth level
        self.scrollAreaWidgetContents = QtWidgets.QWidget()
        self.scrollAreaWidgetContents.setGeometry(QtCore.QRect(0, 0, 439, 429))
        self.scrollAreaWidgetContents.setObjectName("scrollAreaWidgetContents")

        # The fifth floor
        self.horizontalLayoutWidget = QtWidgets.QWidget(self.scrollAreaWidgetContents)   # It belongs to the fourth layer ( Build relationships through constructors , I obey you )
        self.horizontalLayoutWidget.setGeometry(QtCore.QRect(80, 90, 311, 171))
        self.horizontalLayoutWidget.setObjectName("horizontalLayoutWidget")
        self.horizontalLayout = QtWidgets.QHBoxLayout(self.horizontalLayoutWidget)  #horizontalLayout The layout belongs to horizontalLayoutWidget
        self.horizontalLayout.setContentsMargins(0, 0, 0, 0)
        self.horizontalLayout.setObjectName("horizontalLayout")


        self.scrollArea.setWidget(self.scrollAreaWidgetContents)   # The third layer forces the fourth layer to belong to itself

        MainWindow.setCentralWidget(self.centralwidget)  # The first layer forces the second layer to belong to itself

        self.menubar = QtWidgets.QMenuBar(MainWindow)
        self.menubar.setGeometry(QtCore.QRect(0, 0, 800, 26))
        self.menubar.setObjectName("menubar")
        MainWindow.setMenuBar(self.menubar)
        self.statusbar = QtWidgets.QStatusBar(MainWindow)
        self.statusbar.setObjectName("statusbar")
        MainWindow.setStatusBar(self.statusbar)

        self.retranslateUi(MainWindow)
        QtCore.QMetaObject.connectSlotsByName(MainWindow)

    def retranslateUi(self, MainWindow):
        _translate = QtCore.QCoreApplication.translate
        MainWindow.setWindowTitle(_translate("MainWindow", "MainWindow"))
The effect is as follows :

From this, it can be found that there are two main methods to set the layout relationship :
- adopt Constructors , Take the initiative Establish relationships with controls or containers , Choose to cling to him
- adopt set function , mandatory Build relationships with other controls , Command him to obey
边栏推荐
- [econometrics] instrumental variable estimation and two-stage least square method
- How to make sql-mode=“NO_ENGINE_SUBSTITUTION” permanent in MySQL my. cnf
- 04mysql index principle Analysis-1
- Typecho template vcards/ simple and personalized personal blog theme template
- leetcode. 38 --- appearance series
- 创建RT-thread软件仿真工程 写RT-thread内核
- autojs与冰狐智能辅助的优缺点
- 键盘事件与表单事件
- [dynamic planning] leetcode1092 Shortest common supersequence
- 2. ZK's working mechanism
猜你喜欢

What if online gambling can't be withdrawn?

Applet: scroll to the top of the page or an element position

Go+vue+pgsql- family management system project conclusion

QT makes simple video calls
![[C language] C language programming: dynamic address book](/img/bb/b44066e91219a57b653e330198e4a0.png)
[C language] C language programming: dynamic address book

R语言数据处理:tidyr包学习

Nationwide provincial and municipal linkage JSON data

Open source polardb's overall structure design and enterprise level features for the first time

Abnormal display of mobile signal at startup

Map的entrySet实现map按key升序排列或value降序排列
随机推荐
Arena, a new proposal of the go language community, can optimize memory allocation
Go+vue+pgsql- family management system project conclusion
Get started! How to quickly deploy web applications with dragon lab?
POC_ Jenkins
Nationwide provincial and municipal linkage JSON data
Ros2+gazebo11+car+opencv line patrol recognition and speed steering control learning
Abnormal display of mobile signal at startup
网上开户是安全的吗?
You can have zongzi if you want, but you have to go through my authentication and authorization
Arduino configuring esp32 development environment
leetcode.38 ---外观数列
Next generation enterprise IT architecture: cloud native architecture
In the post epidemic era, how can the medical industry do a good job in digital transformation?
Typecho template vcards/ simple and personalized personal blog theme template
"Three.js" take off!
Microsoft releases pluton processor: a new security chip for Windows PC
2022-06-09:每个会议给定开始和结束时间, 后面的会议如果跟前面的会议有任何冲突,完全取消冲突的、之前的会议,安排当前的。 给定一个会议数组,返回安排的会议列表。 来自通维数码。
Create RT thread software simulation project and write RT thread kernel
Ifndef action
qt制作简易的视频通话