当前位置:网站首页>GD32F303固件库开发(10)----双ADC轮询模式扫描多个通道
GD32F303固件库开发(10)----双ADC轮询模式扫描多个通道
2022-07-28 20:51:00 【记帖】
GD32F303固件库开发.10----双ADC轮询模式扫描多个通道
概述
本章主要配置,双ADC轮询模式扫描多个通道,通过串口进行打印。
查阅手册可以得知,PA9、PA10为串口0的输出和输入口。
查阅手册可以得知,PA9、PA10为串口0的输出和输入口。需要GD样片的可以加群申请:615061293 。
视频教学
GD32F303固件库开发(10)----双ADC轮询模式扫描多个通道
https://www.bilibili.com/video/BV1N94y1D7Yh/
csdn课程
课程更加详细。
https://download.csdn.net/course/detail/37144
硬件准备
这里准备了1块开发板进行验证,分别是GD32303C_START开发板。
keil配置
microlib 进行了高度优化以使代码变得很小。 它的功能比缺省 C 库少,并且根本不具备某些 ISO C 特性。 某些库函数的运行速度也比较慢,如果要使用printf(),必须开启。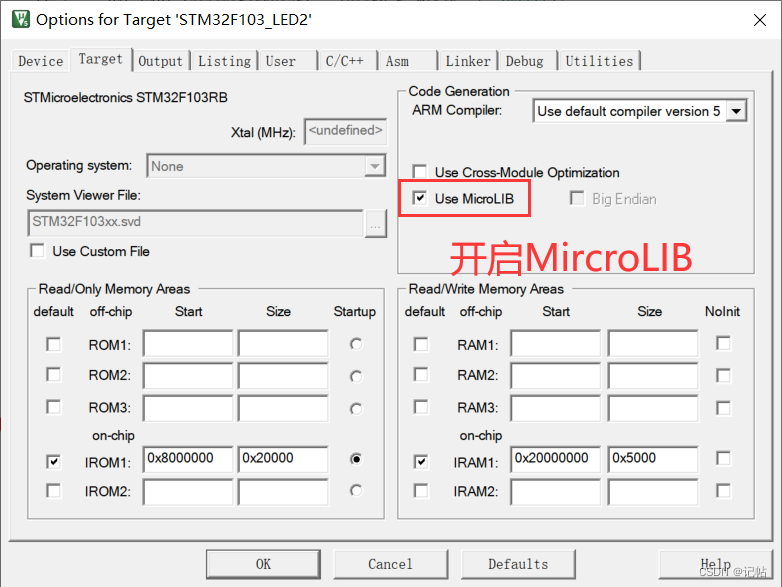
使能串口
  /* 使能GPI0A,用PA9、PA10为串口 */
    rcu_periph_clock_enable(RCU_GPIOA);

    /*使能串口0的时钟 */
    rcu_periph_clock_enable(RCU_USART0);

    /*配置USARTx_Tx(PA9)为复用推挽输出*/
    gpio_init(GPIOA, GPIO_MODE_AF_PP, GPIO_OSPEED_50MHZ, GPIO_PIN_9);

    /*配置USARTx_RxPA9)为浮空输入 */
    gpio_init(GPIOA, GPIO_MODE_IN_FLOATING, GPIO_OSPEED_50MHZ, GPIO_PIN_10);

    /* USART 配置 */
    usart_deinit(USART0);//重置串口0
    usart_baudrate_set(USART0, 115200U);//设置串口0的波特率为115200
    usart_word_length_set(USART0, USART_WL_8BIT);      	// 帧数据字长
		usart_stop_bit_set(USART0, USART_STB_1BIT);      	 	// 停止位1位
    usart_parity_config(USART0, USART_PM_NONE);       	// 无奇偶校验位
    usart_receive_config(USART0, USART_RECEIVE_ENABLE);//使能接收器
    usart_transmit_config(USART0, USART_TRANSMIT_ENABLE);//使能发送器
    usart_enable(USART0);//使能USART
串口重定向
/* retarget the C library printf function to the USART */
int fputc(int ch, FILE *f)
{

    usart_data_transmit(USART0, (uint8_t)ch);
    while(RESET == usart_flag_get(USART0, USART_FLAG_TBE));
    return ch;
}
串口重定向后就可以使用printf进行打印。
ADC通道设置


ADC0初始化
///*************时钟配置******************/

    /*使能GPIOA时钟 */
    rcu_periph_clock_enable(RCU_GPIOA);
    /*使能ADC时钟 */
    rcu_periph_clock_enable(RCU_ADC0);
    /* 配置ADC速率 */
    rcu_adc_clock_config(RCU_CKADC_CKAPB2_DIV8);
ADC0配置
/*------------------ADC GPIO配置------------------*/
// 必须为模拟输入
    gpio_init(GPIOA, GPIO_MODE_AIN, GPIO_OSPEED_MAX, GPIO_PIN_0|GPIO_PIN_1|GPIO_PIN_2);

/*------------------ADC工作模式配置------------------*/
		// 设置adc工作在独立模式
		adc_mode_config(ADC_MODE_FREE);
		// 多通道用扫描模式
		// adc_special_function_config(ADC0, ADC_SCAN_MODE, ENABLE);
		// 单通道用连续转换模式
// adc_special_function_config(ADC0, ADC_CONTINUOUS_MODE, ENABLE);


		// 结果转换右对齐
		adc_data_alignment_config(ADC0, ADC_DATAALIGN_RIGHT);
		// 转换通道1个
		adc_channel_length_config(ADC0, ADC_REGULAR_CHANNEL, 3);

    /* ADC regular channel config */
    adc_regular_channel_config(ADC0, 0, ADC_CHANNEL_0, ADC_SAMPLETIME_55POINT5);
    adc_regular_channel_config(ADC0, 1, ADC_CHANNEL_1, ADC_SAMPLETIME_55POINT5);
    adc_regular_channel_config(ADC0, 2, ADC_CHANNEL_2, ADC_SAMPLETIME_55POINT5);


		// 不用外部触发转换,软件开启即可
		adc_external_trigger_source_config(ADC0, ADC_REGULAR_CHANNEL, ADC0_1_2_EXTTRIG_REGULAR_NONE);
		adc_external_trigger_config(ADC0, ADC_REGULAR_CHANNEL, ENABLE);

		// 使能ADC
		adc_enable(ADC0);
		delay_1ms(1);                                                   // 等待1ms
		// 使能ADC校准
		adc_calibration_enable(ADC0);
ADC1初始化
/*************时钟配置******************/

    /*使能GPIOA时钟 */
    rcu_periph_clock_enable(RCU_GPIOB);
    /*使能ADC时钟 */
    rcu_periph_clock_enable(RCU_ADC1);
    /* 配置ADC速率 */
    rcu_adc_clock_config(RCU_CKADC_CKAPB2_DIV8);
ADC1配置
/*------------------ADC GPIO配置------------------*/
// 必须为模拟输入
    gpio_init(GPIOA, GPIO_MODE_AIN, GPIO_OSPEED_MAX, GPIO_PIN_7);
    gpio_init(GPIOB, GPIO_MODE_AIN, GPIO_OSPEED_MAX, GPIO_PIN_0 | GPIO_PIN_1);
/*------------------ADC工作模式配置------------------*/
		// 设置adc工作在独立模式
		adc_mode_config(ADC_MODE_FREE);
		// 多通道用扫描模式
		// adc_special_function_config(ADC0, ADC_SCAN_MODE, ENABLE);
		// 单通道用连续转换模式
// adc_special_function_config(ADC0, ADC_CONTINUOUS_MODE, ENABLE);


		// 结果转换右对齐
		adc_data_alignment_config(ADC1, ADC_DATAALIGN_RIGHT);
		// 转换通道1个
		adc_channel_length_config(ADC1, ADC_REGULAR_CHANNEL, 3);

    /* ADC regular channel config */
    adc_regular_channel_config(ADC1, 0, ADC_CHANNEL_7, ADC_SAMPLETIME_55POINT5);
    adc_regular_channel_config(ADC1, 1, ADC_CHANNEL_8, ADC_SAMPLETIME_55POINT5);
    adc_regular_channel_config(ADC1, 2, ADC_CHANNEL_9, ADC_SAMPLETIME_55POINT5);


		// 不用外部触发转换,软件开启即可
		adc_external_trigger_source_config(ADC1, ADC_REGULAR_CHANNEL, ADC0_1_2_EXTTRIG_REGULAR_NONE);
		adc_external_trigger_config(ADC1, ADC_REGULAR_CHANNEL, ENABLE);

		// 使能ADC
		adc_enable(ADC1);
		delay_1ms(1);                                                   // 等待1ms
		// 使能ADC校准
		adc_calibration_enable(ADC1);
ADC数据采集
uint16_t  get_adc(uint32_t adc_periph , uint8_t adc_channel)
{

/* 配置规则通道采集*/
    adc_regular_channel_config(adc_periph, 0, adc_channel, ADC_SAMPLETIME_55POINT5);
		// 由于没有采用外部触发,所以使用软件触发ADC转换
		adc_software_trigger_enable(adc_periph, ADC_REGULAR_CHANNEL);

		while(!adc_flag_get(adc_periph, ADC_FLAG_EOC));                       // 等待采样完成
		adc_flag_clear(adc_periph, ADC_FLAG_EOC);                             // 清除结束标志

		return  adc_regular_data_read(adc_periph);                         // 读取ADC数据
}
数据采集
    while (1){


		uint16_t adc0Value0 = 0;
		uint16_t adc0Value1 = 0;
		uint16_t adc0Value2 = 0;

		adc0Value0=get_adc(ADC0 ,ADC_CHANNEL_0);
		adc0Value1=get_adc(ADC0 ,ADC_CHANNEL_1);
		adc0Value2=get_adc(ADC0 ,ADC_CHANNEL_2);


	printf("\nadc0_IN0(PA0)=%4.0d,电压=%1.4f",adc0Value0,adc0Value0*3.3f/4095);
	printf("\nadc0_IN1(PA1)=%4.0d,电压=%1.4f",adc0Value1,adc0Value1*3.3f/4095);
	printf("\nadc0_IN2(PA2)=%4.0d,电压=%1.4f",adc0Value2,adc0Value2*3.3f/4095);

		uint16_t adc1Value0 = 0;
		uint16_t adc1Value1 = 0;
		uint16_t adc1Value2 = 0;

		adc1Value0=get_adc(ADC1 ,ADC_CHANNEL_7);
		adc1Value1=get_adc(ADC1 ,ADC_CHANNEL_8);
		adc1Value2=get_adc(ADC1 ,ADC_CHANNEL_9);

	printf("\nadc1_IN7(PA7)=%4.0d,电压=%1.4f",adc1Value0,adc1Value0*3.3f/4095);
	printf("\nadc1_IN8(PB0)=%4.0d,电压=%1.4f",adc1Value1,adc1Value1*3.3f/4095);
	printf("\nadc1_IN9(PB1)=%4.0d,电压=%1.4f",adc1Value2,adc1Value2*3.3f/4095);
	delay_1ms(1000);
    }
测试结果
输入固定电压进行测试。

测试结果如下。

最后
以上的代码会在Q群里分享。QQ群:615061293。
或者关注微信公众号『记帖』,持续更新文章和学习资料,可加作者的微信交流学习!
边栏推荐
- 96. Different binary search trees (medium binary search tree dynamic planning)
- 静态成员static详解
- Less than a year after its establishment! MIT derivative quantum computing company completed financing of US $9million
- gprs网络指的是什么
- [leetcode] maximum depth of binary tree
- Wechat applet uses canvas drawing, round avatar, network background, text, dotted line, straight line
- Which is the file transfer command in the basic services of the Internet
- 使用PCL批量将点云.bin文件转.pcd
- JVM——自定义类加载器
- ES6, deep copy, shallow copy
猜你喜欢

npm ERR code ETIMEDOUT npm ERR syscall connect npm ERR errno ETIMEDOUT npm ERR network reques...
![[Ruiji takeout project] Day5 - Chapter 6 mobile verification code login](/img/53/c578e0d1428ea569fb412a20019924.png)
[Ruiji takeout project] Day5 - Chapter 6 mobile verification code login

SQL injection less38 (Stack Injection)

STM32 - external interrupt application (exti) (use cubemx to configure interrupts)

STM32 -- program startup process

Static route and default route experiment
Target segmentation learning

(翻译)图技术简明历史

MySQL installation and configuration (super detailed, simple and practical)

Changes in the history of oscilloscope development
随机推荐
Winserver operation and maintenance technology stack
近期bug总结
静态成员static详解
网易云信 2022Q2 产品补给站,快来获取你的产品补给计划吧!
DOM programming + events
Win11 how to open software notification
776. 字符串移位包含问题
Less than a year after its establishment! MIT derivative quantum computing company completed financing of US $9million
winServer运维技术栈
ATT&CK 威胁情报
Att & CK preliminary understanding
SSH password free login
Ultra detailed visual studio 2019 running littlevgl (lvgl) simulator
What does GPRS network mean
c语言实现字符串逆序排列
Chrome encountered a problem when debugging the code. After modifying and saving the code in vscode, chrome did not update after refreshing
ATT&CK初步了解
[get mobile information] - get mobile information through ADB command
PaddleNLP基于ERNIR3.0文本分类以CAIL2018-SMALL数据集罪名预测任务为例【多标签】
JMeter installs third-party plug-ins plugins Manager