当前位置:网站首页>Interface automation test platform fasterrunner series (I) - introduction, installation and deployment, startup service, access address, configuration supplement
Interface automation test platform fasterrunner series (I) - introduction, installation and deployment, startup service, access address, configuration supplement
2022-07-25 18:47:00 【wangmcn】
Interface automation test platform FasterRunner series ( One )
brief introduction 、 Installation and deployment 、 Start the service 、 Access address 、 Configuration supplement
Catalog
- 1、 brief introduction
- 2、 Installation and deployment
- 2.1、 Deploy the back-end FasterRunner
- 2.2、 The deployment of the front-end FasterWeb
- 3、 Start the service
- 3.1、 Start the backend FasterRunner
- 3.2、 Start the front end FasterWeb
- 4、 Access address
- 4.1、 Registered address
- 4.2、 The login address
- 5、 Configuration supplement
- 5.1、 Timing task
- 5.2、 Send E-mail
- 5.3、 Start off
- 5.3.1、 Start the service
- 5.3.2、 Close the service
1、 brief introduction
FasterRunner It is on the original interface automation test platform HttpRunnerManager Based on the new upgrade , The page style is new and revised , The platform architecture is front-end and back-end (Vue+Django) Separation design . The overall operation mode is similar to HttpRunnerManager Basically the same , About HttpRunnerManager Deployment and use of , Clickable HttpRunnerManager series Refer to chapter .
Official website :
Back end :https://github.com/httprunner/FasterRunner
front end :https://github.com/httprunner/FasterWeb
2、 Installation and deployment
This explanation is in Linux Install and deploy in the environment (Windows The environment installation method is similar ).
Use Python Version is 3.6.10
Download the front and back end packages and extract them into the custom directory
2.1、 Deploy the back-end FasterRunner
1、 Install dependency library ,FasterRunner Execute... In the root directory pip3 install -r requirements.txt
2、 Install and configure MySQL, Connect to database , Create a new one DB, for example fastrunner
3、 modify FasterRunner/FasterRunner/settings.py file , modify DATABASES Dictionary related configuration
DATABASES( The database information is subject to the actual deployment ):
4、 install Erlang(RabbitMQ The environment needs to have Erlang development environment )
5、 Install and start RabbitMQ
6、 modify FasterRunner/FasterRunner/settings.py file , modify BROKER_URL( To configure RabbitMQ Of IP、Username、Password)
7、 Switch to FasterRunner root directory ,Linux Environmental execution dos2unix ./start.sh
8、FasterRunner Create a folder at the root logs, Location FasterRunner/logs
9、 Generate data migration scripts , Execute... In the root directory :
python3 manage.py makemigrations fastrunner fastuser
10、 Applied to the DB Generate data table , Execute... In the root directory :
python3 manage.py migrate fastrunner
python3 manage.py migrate fastuser
python3 manage.py migrate djcelery
2.2、 The deployment of the front-end FasterWeb
1、 install Node.js
The version built in this article is :node edition 12.18.3,npm edition 6.14.6
2、 Get into FasterWeb The root directory , Install dependencies , Carry out orders npm install
3、 Modify the root directory default.conf The configuration file ,server_name Of IP( The host machine IP), Port default 8080
As shown in the figure : Modify port as 8085
4、 modify FasterWeb/config/index.js file , port port
As shown in the figure : Modify port as 8085
5、 modify FasterWeb In the root directory package.json file
It is amended as follows "dev": "webpack-dev-server --inline --progress --config build/webpack.dev.conf.js --host 0.0.0.0",
6、 modify FasterWeb/src/restful/api.js file ,baseUrl Address , That is to say FasterRunner The host address where the container runs
As shown in the figure :FasterRunner The host port is 8086
3、 Start the service
3.1、 Start the backend FasterRunner
stay FasterRunner Execute in sequence under the root directory :
nohup python3 manage.py runserver 0.0.0.0:8086 &
nohup python3 manage.py celery -A FasterRunner worker -l info --logfile=/root/MyTest/FasterRunner/logs/worker.log 2>&1 &
nohup python3 manage.py celery beat -l info >> /root/MyTest/FasterRunner/logs/beat.log 2>&1 ¬es : If it is Windows In the environment , You can create in the current root directory .bat Execute the startup service file in batch
The contents of the document :
start cmd /c "cd %cd%&&del /a celerybeat.pid"
start cmd /k "cd %cd%&&TIMEOUT /T 2&&python manage.py runserver 0.0.0.0:8086"
start cmd /k "cd %cd%&&TIMEOUT /T 4&&python manage.py celery -A FasterRunner worker -l info"
start cmd /k "cd %cd%&&TIMEOUT /T 6&&python manage.py celery beat -l info"3.2、 Start the front end FasterWeb
stay FasterWeb Execute... In the root directory :
1、 Start of development mode Node, The default port is 8080
npm run devOr input , Background start , And write to the log
nohup npm start >> ~/node.log 2>&1 ¬es : If it is Windows In the environment , You can create in the current root directory .bat Execute the startup service file in batch
The contents of the document :
start cmd /k "cd %cd%&&npm run dev"How to kill the specified program process ?
 Check process number :netstat -nap|grep  Port number
Killing process :kill -9 Process number 2、 Expand : Installable deployment pm2
(1) install pm2
npm install -g pm2(2) To configure pm2, Create soft link
ln -s ~/root/node-v12.18.3-linux-x64/bin/pm2 /usr/sbin/pm2(3) stay FasterWeb The root directory ,pm2 start-up Node service
pm2 start npm --watch --name fasterweb -- run start(4) see pm2 The status of the running service
pm2 listAs shown in the figure :FasterWeb Service started .
pm2 command :
 List all processes / application  pm2 list
 Restart all processes / application  pm2 restart all
According to application id Stop the specified application pm2 stop [ID]4、 Access address
4.1、 Registered address
http://IP: port /fastrunner/register
for example http://localhost:8085/fastrunner/register
As shown in the figure : The registration page has been customized and modified
4.2、 The login address
http://IP: port /fastrunner/login
for example http://localhost:8085/fastrunner/login
As shown in the figure : The login page has been customized and modified
5、 Configuration supplement
Because the original project framework is not configured with functions such as scheduled tasks and sending emails , Here we need to configure and supplement the framework .
5.1、 Timing task
The function is to execute the test case set according to the time specified in the setting .
1、 modify FasterRunner/FasterRunner/settings.py file
The script content :
djcelery.setup_loader()
CELERY_ENABLE_UTC = True
CELERY_TIMEZONE = 'Asia/Shanghai'
BROKER_URL = 'amqp://guest:[email protected]:5672//'
CELERYBEAT_SCHEDULER = 'djcelery.schedulers.DatabaseScheduler'
CELERY_RESULT_BACKEND = 'djcelery.backends.database:DatabaseBackend'
CELERY_ACCEPT_CONTENT = ['application/json']
CELERY_TASK_SERIALIZER = 'json'
CELERY_RESULT_SERIALIZER = 'json'

CELERY_TASK_RESULT_EXPIRES = 7200
CELERYD_CONCURRENCY = 10 if DEBUG else 10
CELERYD_MAX_TASKS_PER_CHILD = 2002、 Start the timer service ( The startup service sub chapter has been started )
nohup python3 manage.py celery -A FasterRunner worker -l info --logfile=/root/MyTest/FasterRunner/logs/worker.log 2>&1 &
nohup python3 manage.py celery beat -l info >> /root/MyTest/FasterRunner/logs/beat.log 2>&1 &3、 Modify the script
(1) modify FasterRunner/fastrunner/utils/task.py file
The script content :
self.__email = {
    "strategy": kwargs["strategy"],
    "copy": kwargs["copy"],
    "receiver": kwargs["receiver"],
    "corntab": self.__corntab,
    "project": self.__project,
    "name": kwargs["name"]
}(2) modify FasterRunner/fastrunner/tasks.py file
The script content :
project = kwargs["project"]
receiver = kwargs["receiver"]
Cc = kwargs["copy"]
title = kwargs["name"]5.2、 Send E-mail
When configuring scheduled tasks , You can set the function of sending mail .
1、 modify FasterRunner/FasterRunner/settings.py file
The script content :
#  email
EMAIL_BACKEND = 'django.core.mail.backends.smtp.EmailBackend'
EMAIL_SEND_USERNAME = '[email protected]' #  The scheduled task report is sent to the mailbox , Support 163,qq,sina, Enterprises qq Mailbox, etc , Note that you need to open smtp service
EMAIL_SEND_PASSWORD = 'XXXXXXXX' #  Mailbox password
EMAIL_PORT = 25
EMAIL_USE_TLS = True2、 stay FasterRunner/fastrunner/utils Under the table of contents , establish emails.py file
The script content :
import smtplib
from email.mime.text import MIMEText
from email.header import Header
from FasterRunner.settings import EMAIL_SEND_USERNAME, EMAIL_SEND_PASSWORD

def send_email_reports(receiver,save_summary,Cc=None,title=None):
    receiver = receiver.rstrip(';')
    all_receivers = receiver.split(';')
    if '@sina.com' in EMAIL_SEND_USERNAME:
        smtpserver = 'smtp.sina.com'
    elif '@163.com' in EMAIL_SEND_USERNAME:
        smtpserver = 'smtp.163.com'
    else:
        smtpserver = 'smtp.exmail.qq.com'

    if title:
        subject = "【%s】 Interface automation test report "%title
    else:
        subject = " Interface automation test report "
    smtp = smtplib.SMTP_SSL(smtpserver, 465)
    smtp.login(EMAIL_SEND_USERNAME, EMAIL_SEND_PASSWORD)
    msg = MIMEText(save_summary, "html", "utf-8")
    msg["Subject"] = Header(subject, "utf-8")
    msg['From'] = Header(' Test reporter ', 'utf-8')
    msg['To'] = receiver
    #  Process CC
    if Cc:
        Cc = Cc.rstrip(';')
        msg['Cc'] = Cc
        all_receivers = receiver + ';' + Cc
        all_receivers = all_receivers.split(';')

smtp.sendmail(EMAIL_SEND_USERNAME, all_receivers, msg.as_string())3、 modify FasterRunner/fastrunner/tasks.py file
Modified script content :
from celery import shared_task
from django.core.exceptions import ObjectDoesNotExist
from fastrunner import models
from fastrunner.utils.loader import save_summary, debug_suite, debug_api
from fastrunner.utils.emails import send_email_reports
import time

@shared_task
def async_debug_api(api, project, name, config=None):
    """ Asynchronous execution api
    """
    summary = debug_api(api, project, config=config, save=False)
    save_summary(name, summary, project)

@shared_task
def async_debug_suite(suite, project, obj, report, config):
    """ Asynchronous execution suite
    """
    summary = debug_suite(suite, project, obj, config=config, save=False)
    save_summary(report, summary, project)

@shared_task
def schedule_debug_suite(*args, **kwargs):
    """ Timing task
    """
    print(" Timing task start.....")
    project = kwargs["project"]
    receiver = kwargs["receiver"]
    Cc = kwargs["copy"]
    title = kwargs["name"]

    print("receiver****:%s"%receiver)
    print("args****:" + str(args))
    print("kwargs****:%s"%kwargs)
    print(" Timing task end.....")
    receiver = receiver.strip()
    Cc = Cc.strip()

    suite = []
    test_sets = []
    config_list = []
    for pk in args:
        try:
            name = models.Case.objects.get(id=pk).name
            suite.append({
                "name": name,
                "id": pk
            })
        except ObjectDoesNotExist:
            pass

    for content in suite:
        test_list = models.CaseStep.objects. \
            filter(case__id=content["id"]).order_by("step").values("body")

        testcase_list = []
        config = None
        for content in test_list:
            body = eval(content["body"])
            if "base_url" in body["request"].keys():
                config = eval(models.Config.objects.get(name=body["name"], project__id=project).body)
                continue
            testcase_list.append(body)
        config_list.append(config)
        test_sets.append(testcase_list)

    summary = debug_suite(test_sets, project, suite, config_list, save=False)
    save_summary("", summary, project, type=3)

    #  Collating data
    testTime = summary['time']['start_at']
    testTime = time.strftime('%Y-%m-%d %H:%M:%S', time.localtime(testTime))
    durTime = str(summary['time']['duration'])[:8]

    totalApi = summary['stat']['testsRun']
    successApi = summary['stat']['successes']
    FailApi = summary['stat']['failures']
    errorApi = summary['stat']['errors']
    skipApi = summary['stat']['skipped']

    htmll = """
    <table border="1" cellpadding="0" cellspacing="0" width="700px">
        <tr style="background-color: #f8f8fa">
            <th> Test time </th>
            <th> The duration of the </th>
            <th>Total</th>
            <th>Success</th>
            <th>Failed</th>
            <th>Error</th>
            <th>Skipped</th>
        </tr>
        <tr>
            <td>%s</td>
            <td>%s  second </td>
            <td>%s</td>
            <td>%s</td>
            <td>%s</td>
            <td>%s</td>
            <td>%s</td>
        </tr>
    </table>
    <div style="height: 30px"></div>
    <table border="1" cellpadding="0" cellspacing="0" width="700px">
        <tr style="background-color: #f8f8fa">
            <th> name </th>
            <th> Request address </th>
            <th> Request method </th>
            <th> response time (ms)</th>
            <th> test result </th>
        </tr>
    """ % (
        testTime, durTime, totalApi, successApi, FailApi, errorApi, skipApi
    )

    #  name / Request address / Request method / response time / test result
    for i in summary['details']: # [{},{}]
        detail = i['records'] #  list
        for d in detail:
            name = d['name']
            uurl = d['meta_data']['request']['url']
            method = d['meta_data']['request']['method']
            responseTime = d['meta_data']['response']['response_time_ms']
            iresult = d['status']

            htmll += """
            <tr>
            <td>%s</td>
            <td>%s</td>
            <td>%s</td>
            <td>%s (ms)</td>
            <td>%s</td>
         </tr>
            """ % (name, uurl, method, responseTime, iresult)

    htmll = htmll + '</table>'

    if Cc:
        send_email_reports(receiver, htmll, Cc=Cc,title=title)
    else:
send_email_reports(receiver, htmll,title=title)5.3、 Start off
5.3.1、 Start the service
establish start.sh Startup file
The contents of the document :
#!/bin/bash

#  start-up  FasterWeb
echo -e " start-up  FasterWeb"
cd /root/MyTest/FasterWeb/
nohup npm start >> ~/node.log 2>&1 &

#  start-up  FasterRunner
echo -e " start-up  FasterRunner"
cd /root/MyTest/FasterRunner/
nohup python3 manage.py runserver 0.0.0.0:8086 >> /root/MyTest/FasterRunner/logs/django.log 2>&1 &

#  Use default celery.py start-up
echo -e " start-up  celery beat"
cd /root/MyTest/FasterRunner/
nohnohup python3 manage.py celery beat -l info >> /root/MyTest/FasterRunner/logs/beat.log 2>&1 &

#  Use default celery.py start-up
echo -e " start-up  celery work"
cd /root/MyTest/FasterRunner/
nohup python3 manage.py celery -A FasterRunner worker -l info --logfile=/root/MyTest/FasterRunner/logs/worker.log 2>&1 &5.3.2、 Close the service
establish stop.sh Close file
The contents of the document :
#!/bin/bash

# kill django pid
echo -e "shutting down django pid"
pids=$(ps aux | grep "python" | grep "runserver" | awk '{print $2}')
for pid in $pids
do
    kill -9 $pid
done

# kill celery beat pid
echo -e "shutting down celery beat pid"
pids=$(ps aux | grep "celery" | grep "FasterRunner" | awk '{print $2}')
for pid in $pids
do
    kill -9 $pid
done边栏推荐
猜你喜欢

对迁移学习中域适应的理解和3种技术的介绍

15. Simple salary management system design

How developers choose the right database for react native

Ultimate doll 2.0 | cloud native delivery package

软件测试进阶篇—测试分类
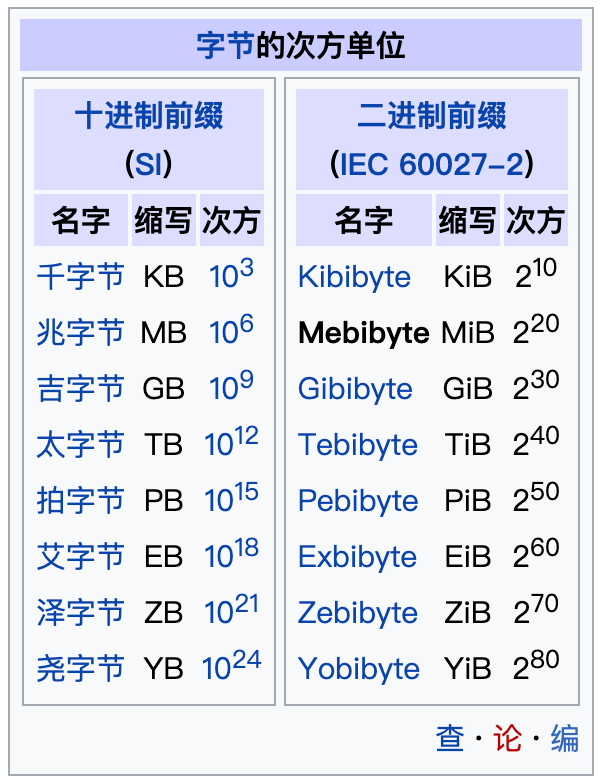
What is the difference between GB and gib disk space units?

n-queens problem

There are several browser cores. How to upgrade if the browser version is too low

曾拿2亿融资,昔日网红书店如今全国闭店,60家店仅剩3家

MySQL index optimization introduction
随机推荐
#夏日挑战赛#【FFH】这个盛夏,来一场“清凉”的代码雨!
R language ggplot2 visual line, custom configuration title text related content color and legend color match (match colors of groups)
3de 回复
TypeError: Unrecognized value type: <class ‘str‘> ParserError: Unknown string format
Common file operations
优秀的测试/开发程序员突破,不忘初心,方得始终......
【小程序开发】页面导航详解
阿里云技术专家秦隆:可靠性保障必备——云上如何进行混沌工程?
阿里云技术专家郝晨栋:云上可观测能力——问题的发现与定位实践
动态内存管理
"Wdsr-3" Penglai pharmaceutical Bureau solution
ES6通过代理器(Proxy)与反射(Reflect)实现观察者模式
人人可参与开源活动正式上线,诚邀您来体验!
What is the difference between GB and gib disk space units?
软件测试流程(思维导图)
如何创建一个有效的帮助文档?
请问什么是国债逆回购?安全吗?
Yes, UDP protocol can also be used to request DNS server
浅析IM即时通讯开发出现上网卡顿?网络掉线?
Osmosis通过与Axelar和Moonbeam的集成将跨链足迹扩展至波卡