当前位置:网站首页>Tkinter module advanced operations (I) -- transparent buttons, transparent text boxes, custom buttons and custom text boxes
Tkinter module advanced operations (I) -- transparent buttons, transparent text boxes, custom buttons and custom text boxes
2022-07-25 17:26:00 【Xiaokang 2022】
【 Write it at the front 】
—— as everyone knows ,tkinter The module comes with Button Classes cannot be made transparent ( At least I can't do it )
【tip: Transparency refers to letting the background color or picture show through the button 】
—— All over the place Button All parameters and operations of class , Can't solve this problem !
—— but ! Is there really no way to make a transparent button ?
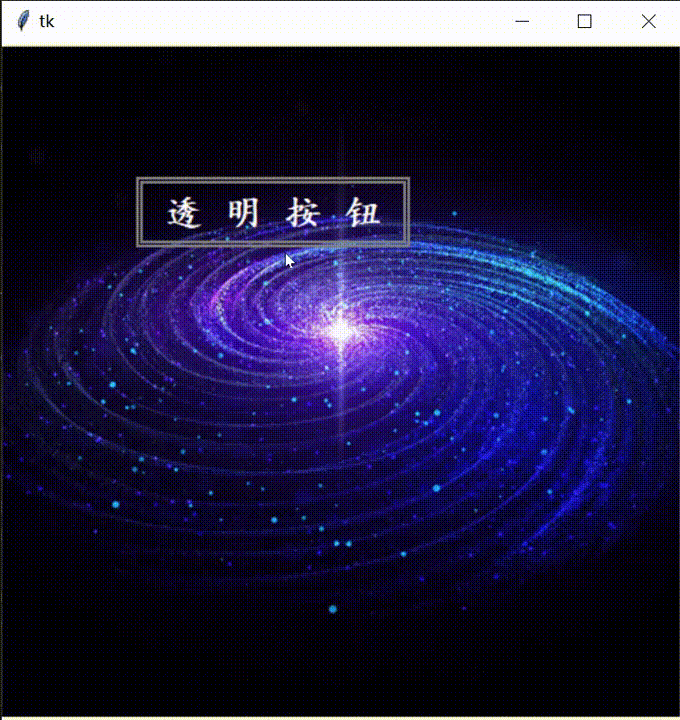
—— If you think only by tkinter If the module cannot do it , Please see the following illustration !
This is a little game I made , Use it completely tkinter Module making , No other modules !!!
—— The fact proved that , use tkinter Modules can make transparent buttons !
—— There is also a transparent text box !( The principle is the same )
This is another unfinished work I did , No link yet
—— I don't know if you have thought about how bloggers do it ?
【tip: In fact, you will know the method by reading the article title 】
【 The film begins 】
【 Principle explanation 】
stay tkinter Only built-in Button Class really can't change the fact that it's opaque , And it is an encapsulated class , Even if you inherit it , Re create a class of your own , It is not easy to change this fact ( Because the principle is different ), For buttons (Button class ) for , Its outer frame and inner part are a whole , Cannot divide , Not to mention the connection between its inner part and the pictures of the outside world . Unless ……
—— Some people think that , Isn't it just to make a transparent button ? Who can't be , I put a picture on the background , Then crop the picture to the right position , Last in Button Insert the cropped image on the class, which is “ transparent ” Yes ?
—— Blogger : No, no, no, No , No one really does this ?( In shock ......)
—— Blogger : Now I want 100 million such buttons ? Are you going to cut 100 million times ???
actually , The above is also a way to make buttons transparent , But this kind of transparency is “ Pseudotransparency ”, Not really transparent .
—— Others think , I don't care if it's really transparent ! I wish I could use it ?
—— Blogger : Not to mention whether you waste memory , The next operation “ Pseudotransparency ” Can it be realized? ?
See here , Read about tkinter The module should already know the principle .
This transparency is true , But the button is fake !
The button is our own Canvas Controls “ draw ” Coming out , recycling bind Function to associate some events with it , So you get a button like “ Fake button ”.
It is relative to the “ Pseudotransparency ” Button , The advantage is that we can design the button style by ourselves , and “ Pseudotransparency ” The button of cannot do , Because it is actually inherited from Button Class , It can no longer be modified , What about the disadvantages , It will also be very obvious later , It is this button style that is very annoying , Because the processing of coordinate position is very troublesome (T_T)
Not much said , Here's the code !
【 Code demonstration 】
【 Objective requirements 】 Make a rectangular “ It's so transparent ” Button , Add a little style appropriately
【 Function realization 】 Click to print Out “Hello Python!”
Here I'll give you the background picture first ( as follows )

Come on ! Code up !!!
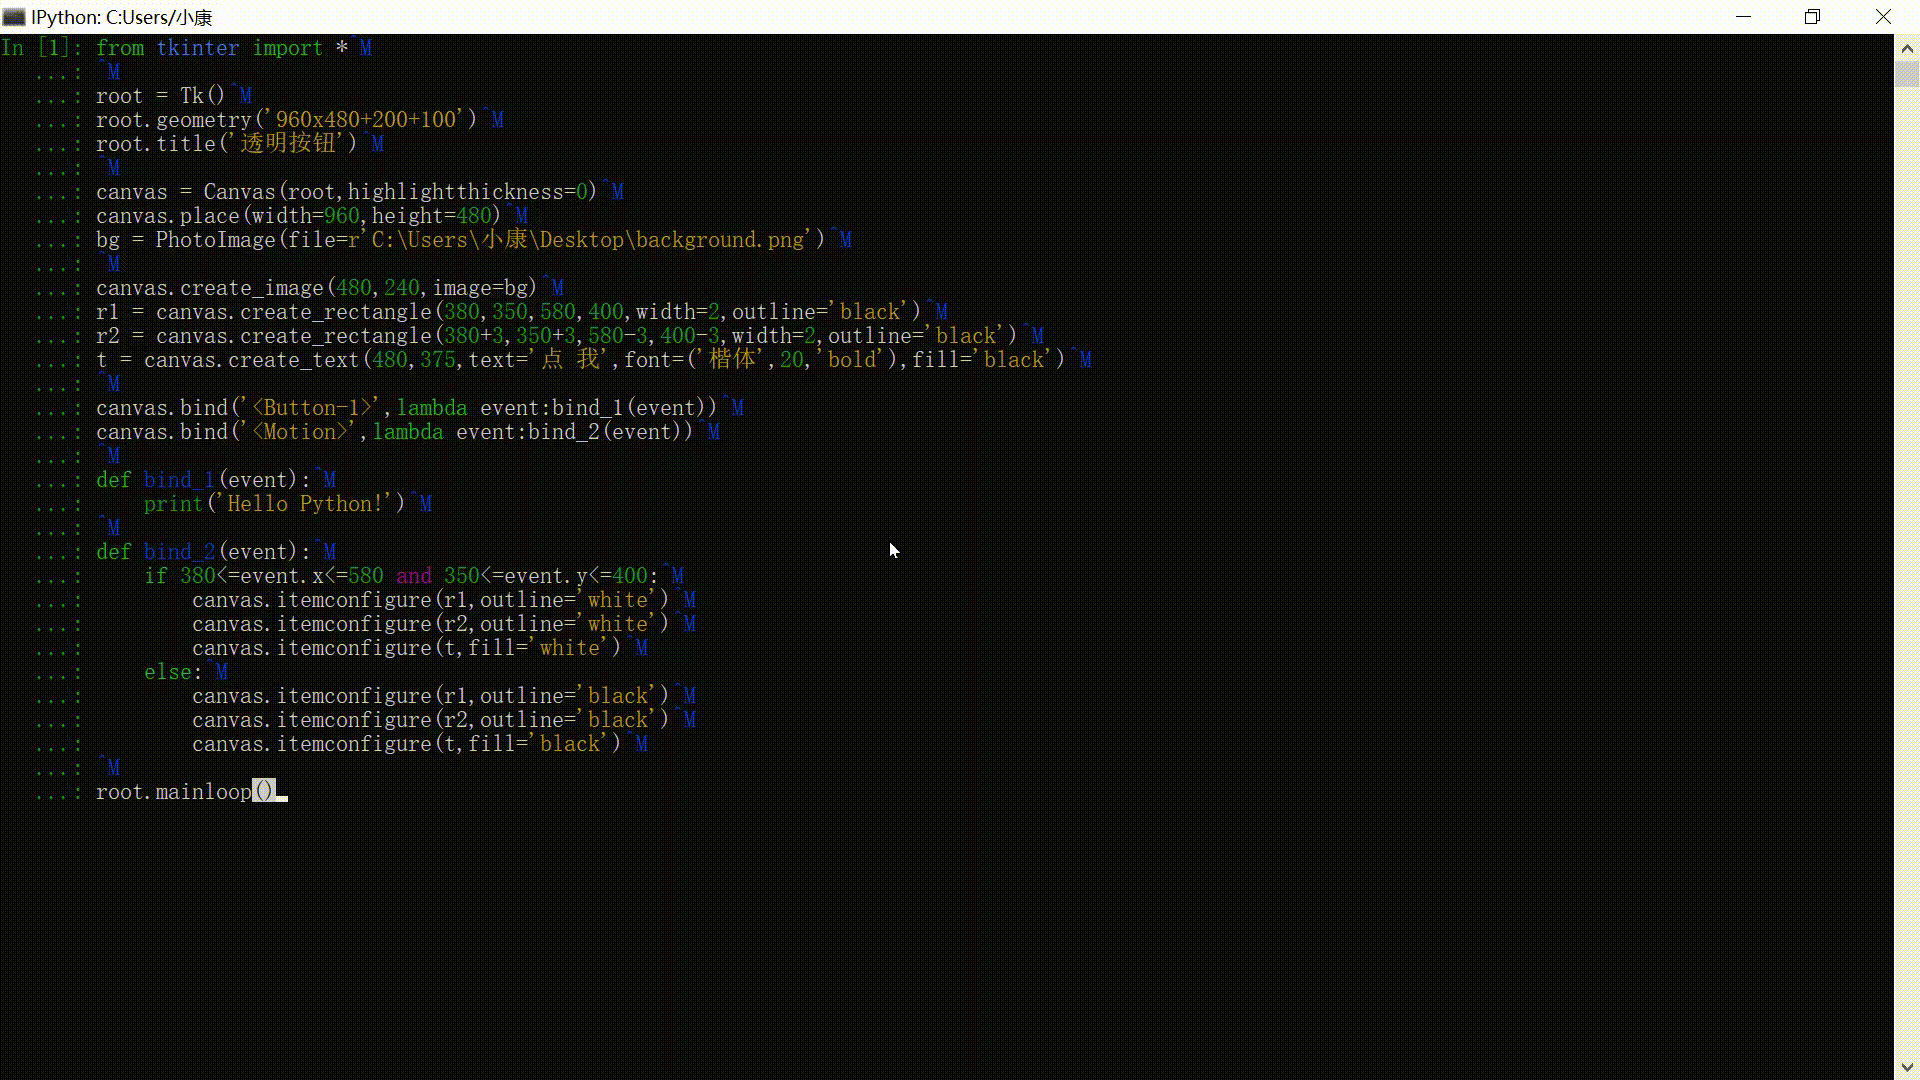
from tkinter import *#  Introduce modules

root = Tk()#  establish Tk Control
root.geometry('960x480+200+100')#  Set window size and position
root.title(' Transparent button ')#  Set the window title

canvas = Canvas(root,highlightthickness=0)#  establish Canvas Control , And set the border thickness to 0
canvas.place(width=960,height=480)#  Set up Canvas Control size and position
bg = PhotoImage(file='background.png')# 【 Remember to change the corresponding path here 】

canvas.create_image(480,240,image=bg)#  Add background image
r1 = canvas.create_rectangle(380,350,580,400,width=2,outline='black')#  Button outline
r2 = canvas.create_rectangle(380+3,350+3,580-3,400-3,width=2,outline='black')#  Button inner box
t = canvas.create_text(480,375,text=' spot   I ',font=(' Regular script ',20,'bold'),fill='black')#  Button to display text

canvas.bind('<Button-1>',lambda event:bind_1(event))#  Associate mouse click events
canvas.bind('<Motion>',lambda event:bind_2(event))#  Associate mouse passing events

def bind_1(event):#  Click the response function
    print('Hello Python!')#  Print

def bind_2(event):#  The mouse passes the response function
    if 380<=event.x<=580 and 350<=event.y<=400:#  Location of response
        canvas.itemconfigure(r1,outline='white')#  Reset the outline color
        canvas.itemconfigure(r2,outline='white')#  Reset the inner frame color
        canvas.itemconfigure(t,fill='white')#  Reset the display text color
    else:
        canvas.itemconfigure(r1,outline='black')#  Restore the default color of the outline
        canvas.itemconfigure(r2,outline='black')#  Restore the default color of the inner box
        canvas.itemconfigure(t,fill='black')#  Restore the default color of the display text

root.mainloop()#  The window enters the message event loop
The effect is as follows
There are more styles that we can develop by ourselves !( Perfect interpretation of what is Customize !)
For example, the following style ( Although not transparent , But its shape uses Button Class absolutely cannot !)
【tip: The style of the mouse changes when passing the button !】

What about code? , as follows ( In fact, compared with the above code , Only a little change )
from tkinter import *#  Introduce modules

root = Tk()#  establish Tk Control
root.geometry('960x480+200+100')#  Set window size and position
root.title(' Custom buttons ')#  Set the window title

canvas = Canvas(root,highlightthickness=0)#  establish Canvas Control , And set the border thickness to 0
canvas.place(width=960,height=480)#  Set up Canvas Control size and position
bg = PhotoImage(file='background.png')# 【 Remember to change the corresponding path here 】

canvas.create_image(480,240,image=bg)#  Add background image
r = canvas.create_rectangle(380,350-1,580,400+1,width=0,fill='yellow')#  Button outline
c1 = canvas.create_oval(355,350,405,400,width=0,fill='yellow')#  Button left circle
c2 = canvas.create_oval(555,350,605,400,width=0,fill='yellow')#  Button right circle
t = canvas.create_text(480,375,text=' spot   I ',font=(' Regular script ',20,'bold'),fill='black')#  Button to display text

canvas.bind('<Button-1>',lambda event:bind_1(event))#  Associate mouse click events
canvas.bind('<Motion>',lambda event:bind_2(event))#  Associate mouse passing events

def bind_1(event):#  Click the response function
    print('Hello Python!')#  Print

def bind_2(event):#  The mouse passes the response function
    if 380<=event.x<=580 and 350<=event.y<=400:#  Location of response
        canvas.itemconfigure(r,fill='orange')#  Reset the outline color
        canvas.itemconfigure(c1,fill='orange')#  Reset the left circle color
        canvas.itemconfigure(c2,fill='orange')#  Reset the right circle color
        canvas.itemconfigure(t,fill='white')#  Reset the display text color
        canvas.configure(cursor='hand2')#  Reset the mouse style
    else:
        canvas.itemconfigure(r,fill='yellow')#  Restore the default color of the outline
        canvas.itemconfigure(c1,fill='yellow')#  Restore the default color of the left circle
        canvas.itemconfigure(c2,fill='yellow')#  Restore the default color of the right circle
        canvas.itemconfigure(t,fill='black')#  Restore the default color of the display text
        canvas.configure(cursor='arrow')#  Restore mouse style

root.mainloop()#  The window enters the message event loop
that , See here , You must also know how transparent text boxes are made ? In short ,“ draw ” Coming out ! Of course , To solve the need for a large number of transparent buttons and transparent text boxes , We definitely can't do this , Set the position of each button or text box , Style or something ( Too much repetitive work ), therefore , We can implement it with classes ! You don't have to write classes , I'm here Specially prepared a big gift bag for everyone !( as follows ) However, you can also modify the following classes , Make it meet your own design requirements !
Code up !
【 package 】
【 Canvas button class 】
class Button_Canvas:
    ## -------  Canvas button class  ------- ##
    def __init__(self,canvas:Canvas,x1:int,y1:int,x2:int,y2:int,text:str,fontsize:int=15,d_outline:str='gray',d_fill:str='gray',image:PhotoImage=None):
        self.canvas = canvas# Parent control
        self.value = text
        self.tag = text

        self.x1 = x1# top left corner x coordinate
        self.y1 = y1# top left corner y coordinate
        self.x2 = x2# The lower right corner x coordinate
        self.y2 = y2# The lower right corner y coordinate
        self.d_outline = d_outline# Default outline color
        self.d_fill = d_fill# Default text color

        self.rec = self.canvas.create_rectangle(x1,y1,x2,y2,width=2,outline=self.d_outline,tag=self.tag)
        self.tex = self.canvas.create_text((x1+x2)//2,(y1+y2)//2,text=self.value,font=(' Regular script ',fontsize),justify='center',fill=self.d_fill,tag=self.tag)

        if image != None:
            self.canvas.create_image((x1+x2)//2,(y1+y2)//2,image=image)

    def focus_on(self,color:str):
        ## ------  Focus has acquired status  ------ ##
        self.canvas.itemconfig(self.rec,fill=color)

    def focus_off(self):
        ## ------  Focus does not get status  ------ ##
        self.canvas.itemconfig(self.rec,fill='')

    def Focus(self,event:Event,color:str):
        ## ------  Focus acquisition state detection  ------ ##
        if self.x1<=event.x<=self.x2 and self.y1<=event.y<=self.y2:
            self.focus_on(color)
        else:
            self.focus_off()

    def move_on(self,color:str):
        ## ------  Focus half get state  ------ ##
        self.canvas.itemconfig(self.rec,outline=color)
        self.canvas.itemconfig(self.tex,fill=color)

    def move_off(self):
        ## ------  The focus is not a semi acquired state  ------ ##
        self.canvas.itemconfig(self.rec,outline=self.d_outline)
        self.canvas.itemconfig(self.tex,fill=self.d_fill)

    def Move(self,event:Event,color:str):
        ## ------  Focus half acquisition state detection  ------ ##
        if self.x1<=event.x<=self.x2 and self.y1<=event.y<=self.y2:
            self.move_on(color)
        else:
            self.move_off()

    def execute(self,event:Event,function=None):
        ## -------  Execute the correlation function  ------- ##
        if self.x1<=event.x<=self.x2 and self.y1<=event.y<=self.y2:
            self.focus_off()
            self.move_off()

            if function != None:
                return function()

    def value_change(self,value:str):
        ## ------  The display value changes  ------ ##
        self.value = value
        self.canvas.itemconfig(self.tex,text=self.value)

    def destroy(self):
        ## ------  Button delete  ------ ##
        self.canvas.delete(self.tag)
【 Canvas text box class 】
class Entry_Canvas:
    ## -------  Canvas text box class  ------- ##
    def __init__(self,canvas:Canvas,x:int,y:int,r_width:int,r_height:int,text1:str,text2:str,pw_mode:bool=False,d_outline:str='gray',d_fill:str='gray',fontsize:int=15):
        self.canvas = canvas# Parent control
        self.focus = False# Whether to get the current focus
        self.mode = pw_mode# Password mode

        self.value = ''# True value
        self.info = ''# Surface value

        self.x1 = x-r_width# top left corner x coordinate
        self.y1 = y-r_height# top left corner y coordinate
        self.x2 = x+r_width# The lower right corner x coordinate
        self.y2 = y+r_height# The lower right corner y coordinate
        self.info1 = text1# When the focus is not obtained, the text is displayed
        self.info2 = text2# The text is displayed when the focus is half taken
        self.d_outline = d_outline# Default outline color
        self.d_fill = d_fill# Default text color

        self.rec = self.canvas.create_rectangle(x-r_width,y-r_height,x+r_width,y+r_height,width=2,outline=d_outline)
        self.tex = self.canvas.create_text(x,y,text=self.info1,font=(' Regular script ',fontsize),fill=d_fill)

    def focus_on(self,color:str):
        ## ------  Focus has acquired status  ------ ##
        self.focus = True
        self.canvas.itemconfig(self.rec,outline=color)
        self.canvas.itemconfig(self.tex,text=self.info+'|')

    def focus_off(self):
        ## ------  Focus does not get status  ------ ##
        self.focus = False
        self.canvas.itemconfig(self.rec,outline=self.d_outline)

        if self.info == '':
            self.canvas.itemconfig(self.tex,text=self.info1)
        else:
            self.canvas.itemconfig(self.tex,text=self.info)

    def Focus(self,event:Event,color:str='white'):
        ## -------  Focus acquisition state detection  ------- ##
        if self.x1<=event.x<=self.x2 and self.y1<=event.y<=self.y2:
            self.focus_on(color)
        else:
            self.focus_off()

    def move_on(self,color:str):
        ## ------  Focus half get state  ------ ##
        if self.focus == False:
            self.canvas.itemconfig(self.rec,outline=color)
            if self.canvas.itemcget(self.tex,'text') == self.info1:
                self.canvas.itemconfig(self.tex,text=self.info2)

    def move_off(self):
        ## ------  The focus is not a semi acquired state  ------ ##
        if self.focus == False:
            self.canvas.itemconfig(self.rec,outline=self.d_fill)
            if self.canvas.itemcget(self.tex,'text') == self.info2:
                self.canvas.itemconfig(self.tex,text=self.info1)

    def Move(self,event:Event,color:str='white'):
        ## -------  Focus half acquisition state detection  ------- ##
        if self.x1<=event.x<=self.x2 and self.y1<=event.y<=self.y2:
            self.move_on(color)
        else:
            self.move_off()

    def input(self,char:str,length:int=10):
        ## ------  Text input  ------ ##
        if self.focus == True:

            value = ord(char)
            if value == 8:
                self.value = self.value[:-1]
            elif value<=47 or 58<=value<=64 or 91<=value<=96 or 123<=value<=256:
                pass
            else:
                if len(self.value) < length and not char.isspace():
                    self.value += char

            if self.mode == True:
                self.info = '•'*len(self.value)
            else:
                self.info = self.value

            self.canvas.itemconfig(self.tex,text=self.info+'|')
【 Take it ! You're welcome ! I'll be satisfied with your praise and collection !】
边栏推荐
- 电子产品“使用”和“放置”哪个寿命更长??
- Chapter III data types and variables
- Outlook 教程,如何在 Outlook 中搜索日历项?
- 接口自动化测试Postman+Newman+Jenkins
- jenkins的Role-based Authorization Strategy安装配置
- Text translation software - text batch translation converter free of charge
- EasyUI modification and DataGrid dialog form control use
- Jenkins' role based authorization strategy installation configuration
- 无聊发文吐槽工作生活
- Google Earth engine - download the globalmlbuildingfootprints vector collection of global buildings
猜你喜欢

Technical difficulties and applications of large humanoid robots

With 8 years of product experience, I have summarized these practical experience of continuous and efficient research and development

Step by step introduction of sqlsugar based development framework (13) -- package the upload component based on elementplus, which is convenient for the project

Jenkins' file parameters can be used to upload files
Go语言系列:Go从哪里来,Go将去哪里?

Excel表格 / WPS表格中怎么在下拉滚动时让第一行标题固定住?
8 年产品经验,我总结了这些持续高效研发实践经验 · 研发篇

Chapter III data types and variables

What are the free low code development platforms?

EasyUI DataGrid control uses

随机推荐
约瑟夫环问题
更新|3DCAT实时云渲染 v2.1.2版本全新发布
做智能硬件要考虑的产品生命周期
博云容器云、DevOps平台斩获可信云“技术最佳实践奖”
Technical difficulties and applications of large humanoid robots
霸榜COCO!DINO: 让目标检测拥抱Transformer
Jenkins' role based authorization strategy installation configuration
Hcip notes 11 days
【目标检测】YOLOv5跑通VOC2007数据集(修复版)
02. Add two numbers
HCIP笔记十一天
I want to manage money. I don't understand. Is there a principal guaranteed financial product?
Replicate swin on Huawei ascend910_ transformer
失意的互联网人拼命叩开Web3大门
枚举类和魔术值
Does PgSQL have a useful graphical management tool?
Go language series: where does go come from and where will go?
Gtx1080ti fiber HDMI interference flash screen 1080ti flash screen solution
走马卒
Starting from business needs, open the road of efficient IDC operation and maintenance