当前位置:网站首页>JetPack--Navigation实现页面跳转
JetPack--Navigation实现页面跳转
2022-07-29 01:23:00 【Y.IU.】
Navigation组件可以让页面之间的切换变得更加容易实现。
Navigation大致包括四个部分:
NavHost
NavHost相当于一个容器,用来存放哪些页面可以进来,哪些页面可以出去。
Fragment
Fragment推出的最初目的是为了适应大屏幕,将大屏幕分割成小部分,每个小部分就是一个Fragment。
NavController
NavController用来控制导航的逻辑,按下按键要切换到哪个页面,具体要切换到哪个页面由导航路线决定。
NavGraph
NavGraph展示了页面之间的逻辑关系,也就是页面之间切换的关系,页面之间由箭头组成,每个箭头是一个Action,由NavController来驱动这些Action,进而实现页面的切换。
代码实践
第一步:首先创建两个Fragment。
fragment_home.xml
<?xml version="1.0" encoding="utf-8"?>
<LinearLayout xmlns:android="http://schemas.android.com/apk/res/android" xmlns:tools="http://schemas.android.com/tools" android:layout_width="match_parent" android:layout_height="match_parent" tools:context=".fragment.HomeFragment" android:orientation="vertical" android:gravity="center" >

    <TextView android:layout_width="100dp" android:layout_height="50dp" android:text="主页" android:gravity="center" />

    <Button android:id="@+id/btn1" android:layout_width="wrap_content" android:layout_height="wrap_content" android:text="跳转" />

</LinearLayout>
fragment_detail.xml
<?xml version="1.0" encoding="utf-8"?>
<LinearLayout xmlns:android="http://schemas.android.com/apk/res/android" xmlns:tools="http://schemas.android.com/tools" android:layout_width="match_parent" android:layout_height="match_parent" tools:context=".fragment.HomeFragment" android:orientation="vertical" android:gravity="center" >

    <TextView android:layout_width="100dp" android:layout_height="50dp" android:text="详情页" android:gravity="center" />

    <Button android:id="@+id/btn1" android:layout_width="wrap_content" android:layout_height="wrap_content" android:text="跳转" />

</LinearLayout>
第二步:在res文件下创建Navigation资源文件,用于设计路线图(NavGraph)。
可以使用AS提供的可视化进行设计:
点击绿色加号将需要进行切换的页面加进来。
每个页面通过箭头连接,表示从一个页面可以跳转到箭头指向的页面,每一个箭头是一个Action,每个Action都有一个唯一的id。
写完之后呢,我们会发现Hosts框会有如下提示,中文意思是:“导航图必须在布局中从NavHostFragment中引用才能访问”,这个NavHostFragment需要在Activity的xml文件中创建,具体看第三步。
这是代码部分
<?xml version="1.0" encoding="utf-8"?>
<navigation xmlns:android="http://schemas.android.com/apk/res/android" xmlns:app="http://schemas.android.com/apk/res-auto" xmlns:tools="http://schemas.android.com/tools" android:id="@+id/nav_graph" app:startDestination="@id/homeFragment">


    <fragment android:id="@+id/homeFragment" android:name="com.example.navigationtest.fragment.HomeFragment" android:label="fragment_home" tools:layout="@layout/fragment_home" >
        <action android:id="@+id/action_homeFragment_to_detailFragment" app:destination="@id/detailFragment" />
    </fragment>

    <fragment android:id="@+id/detailFragment" android:name="com.example.navigationtest.fragment.DetailFragment" android:label="DetailFragment" >
        <action android:id="@+id/action_detailFragment_to_homeFragment2" app:destination="@id/homeFragment" />
    </fragment>
</navigation>
第三步:创建NavHostFragment
在activity_main.xml中选择NavHostFragment拖动到右边的布局当中去。

之后会有如下提示,选择需要访问的导航图,点击“OK” 即可。

回到导航图文件中我们可以看到NavHostFragment已经连接好了。
代码如下:
<?xml version="1.0" encoding="utf-8"?>
<androidx.constraintlayout.widget.ConstraintLayout xmlns:android="http://schemas.android.com/apk/res/android" xmlns:app="http://schemas.android.com/apk/res-auto" xmlns:tools="http://schemas.android.com/tools" android:layout_width="match_parent" android:layout_height="match_parent" tools:context=".MainActivity">

    <androidx.fragment.app.FragmentContainerView android:id="@+id/fragmentContainerView2" android:name="androidx.navigation.fragment.NavHostFragment" android:layout_width="409dp" android:layout_height="729dp" app:defaultNavHost="true" app:layout_constraintEnd_toEndOf="parent" app:layout_constraintStart_toStartOf="parent" app:navGraph="@navigation/nav_graph" tools:layout_editor_absoluteY="1dp" tools:ignore="MissingConstraints" />

</androidx.constraintlayout.widget.ConstraintLayout>
第四步:使用NavControler来控制导航的逻辑。
首先,页面的跳转肯定是由于用户点击了某个控件或按键触发的,所以在处理点击事件时实现页面跳转。核心代码如下:
NavController controller = Navigation.findNavController(v); // 获取控制器
controller.navigate(R.id.action_homeFragment_to_detailFragment); // 调用navigation方法实现页面跳转,该方法需要传递一个Action的id,表示要执行这个跳转行为。
HomeFragment
public class HomeFragment extends Fragment {


    public HomeFragment() {

        // Required empty public constructor
    }

    @Override
    public View onCreateView(LayoutInflater inflater, ViewGroup container,
                             Bundle savedInstanceState) {

        // Inflate the layout for this fragment
        return inflater.inflate(R.layout.fragment_home, container, false);
    }

    @Override
    public void onViewCreated(@NonNull View view, @Nullable Bundle savedInstanceState) {

        Button button = (Button) view.findViewById(R.id.btn1);
        button.setOnClickListener(new View.OnClickListener() {

            @Override
            public void onClick(View v) {

                NavController controller = Navigation.findNavController(v);
                controller.navigate(R.id.action_homeFragment_to_detailFragment);
            }
        });
    }
}
使用NavController控制导航逻辑的第二种写法,这种写法更为简洁。
button.setOnClickListener(Navigation.createNavigateOnClickListener(R.id.action_detailFragment_to_homeFragment2));
DetailFragment
public class DetailFragment extends Fragment {


    public DetailFragment() {

        // Required empty public constructor
    }

    @Override
    public View onCreateView(LayoutInflater inflater, ViewGroup container,
                             Bundle savedInstanceState) {

        // Inflate the layout for this fragment
        return inflater.inflate(R.layout.fragment_detail, container, false);
    }

    @Override
    public void onViewCreated(@NonNull View view, @Nullable Bundle savedInstanceState) {

        Button button = (Button) view.findViewById(R.id.btn1);
        button.setOnClickListener(Navigation.createNavigateOnClickListener(R.id.action_detailFragment_to_homeFragment2));
    }
}
至此,基本的跳转功能已经实现,但是想要实现点击左上角的回退按钮实现回退功能又该如何实现呢?当然,Navigation也为我们提供了该功能,具体如下:
public class MainActivity extends AppCompatActivity {


    @Override
    protected void onCreate(Bundle savedInstanceState) {

        super.onCreate(savedInstanceState);
        setContentView(R.layout.activity_main);

        NavHostFragment fragment = (NavHostFragment)getSupportFragmentManager().findFragmentById(R.id.fragmentContainerView);
        NavController controller = fragment.getNavController();
        NavigationUI.setupActionBarWithNavController(this,controller);

    }

    @Override
    public boolean onSupportNavigateUp() {

        NavController controller = Navigation.findNavController(this,R.id.fragmentContainerView);
        return controller.navigateUp();
    }
}
边栏推荐
- Lua log implementation -- print table
- [the road of Exile - Chapter 7]
- 点击回到顶部js
- Talk about possible problems when using transactions (@transactional)
- Know that Chuangyu is listed in many fields of ccsip 2022 panorama
- Leetcode/ and continuous shortest subarray greater than or equal to target
- 【流放之路-第五章】
- LeetCode 练习——剑指 Offer 45. 把数组排成最小的数
- (arxiv-2018) 重新审视基于视频的 Person ReID 的时间建模
- LM13丨形态量化-动量周期分析
猜你喜欢
![[10:00 public class]: application exploration of Kwai gpu/fpga/asic heterogeneous platform](/img/e7/1d06eba0e50eeb91d2d5da7524f4af.png)
[10:00 public class]: application exploration of Kwai gpu/fpga/asic heterogeneous platform

As long as I run fast enough, it won't catch me. How does a high school student achieve a 70% salary increase under the epidemic?

(arxiv-2018) reexamine the time modeling of person Reid based on video

Establish an engineering template based on STM32 in keil -- detailed steps

Basic working principle and LTSpice simulation of 6T SRAM

Wonderful use of data analysis
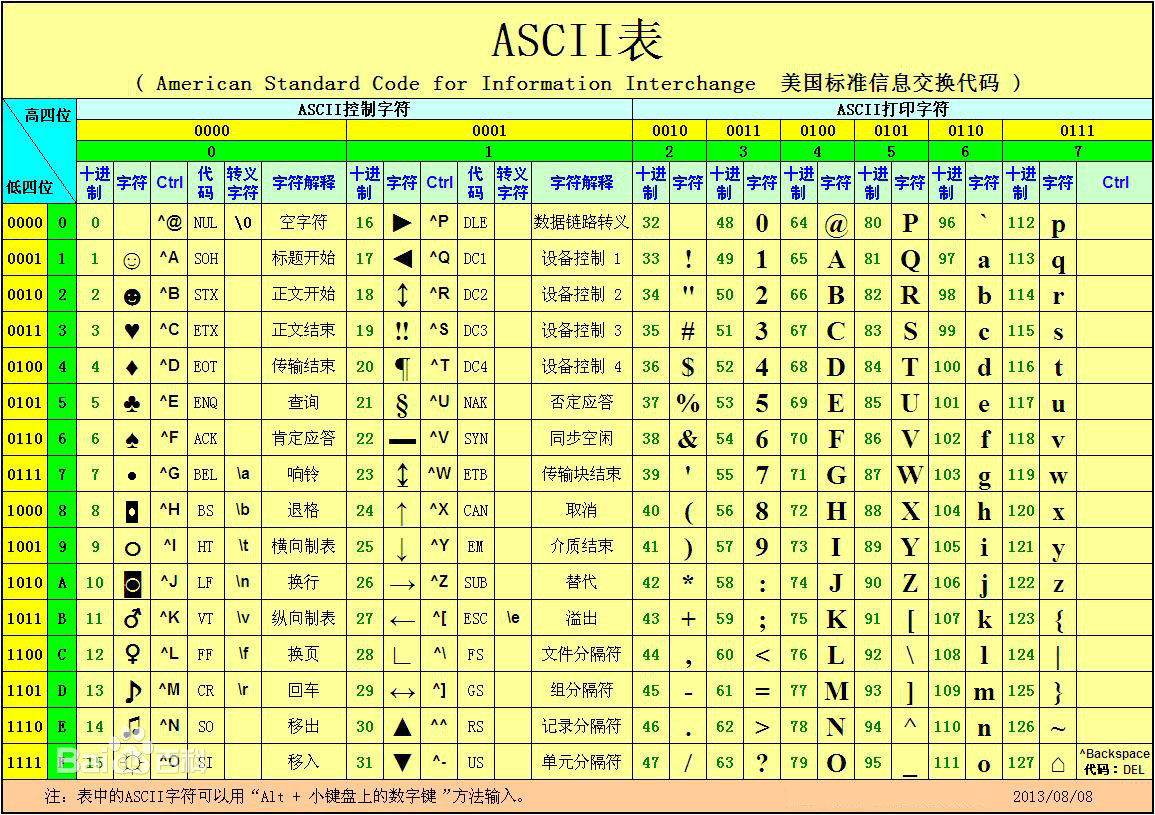
ASCII code table
[public class preview]: application exploration of Kwai gpu/fpga/asic heterogeneous platform

【流放之路-第六章】
Mysql存储json格式数据
随机推荐
【云原生与5G】微服务加持5G核心网
数学建模——永冻土层上关于路基热传导问题
[the road of Exile - Chapter 5]
What is a proxy server? [2022 guide]
Thirty years of MPEG audio coding
秘术冬潮烙技能搭配
Planning mathematics final simulation exam I
点击按钮,下滑到指定的位置
ASCII code table
控制输入框弹出弹窗 和不弹出窗口
How companies make business decisions -- with the help of data-driven marketing
[MySQL] SQL aliases the table
The number of consecutive subarrays whose leetcode/ product is less than k
表单校验 隐藏的输入框 显示才校验
分布式开发漫谈
Basic working principle and LTSpice simulation of 6T SRAM
[the road of Exile - Chapter III]
[10:00 public class]: application exploration of Kwai gpu/fpga/asic heterogeneous platform
StoneDB 为何敢称业界唯一开源的 MySQL 原生 HTAP 数据库?
使用POI,实现excel文件导出,图片url导出文件,图片和excel文件导出压缩包