当前位置:网站首页>uni原生插件开发--友盟一键登录
uni原生插件开发--友盟一键登录
2022-07-23 05:41:00 【努力成为包租婆】
原生插件开发--友盟一键登录(UMVerify)
友盟SDK准备
下载UMVerify SDK
手工集成友盟SDK,打开友盟官网,选择开发者中心-SDK
进去之后选择端—选择平台—选择产品服务进行集成

将SDK 导入项目
下载之后
.framework导入到主工程里面。
.bundle导入到主项目下的Bundles文件夹下面。
这里需要注意,所有的第三方的.bundle文件都需要放在这里。要不然引用不进来。
第一步:下载SDK

第二步 :导入主工程的framework里面

第三步:bundle导入到主工程特定的文件夹里面。

友盟SDK的配置按照官方文档即可。
遇到的问题
如果在插件工程里面出现下面的问题,可以按照下面的步骤参考解决方案。
1、问题:插件工程引用友盟头文件报错,提示找不到该文件。 解决:将下载下来的友盟头文件,全部拷贝到插件工程文件下面,然后将其路径放在targets—search paths—framework search paths 里面。如图

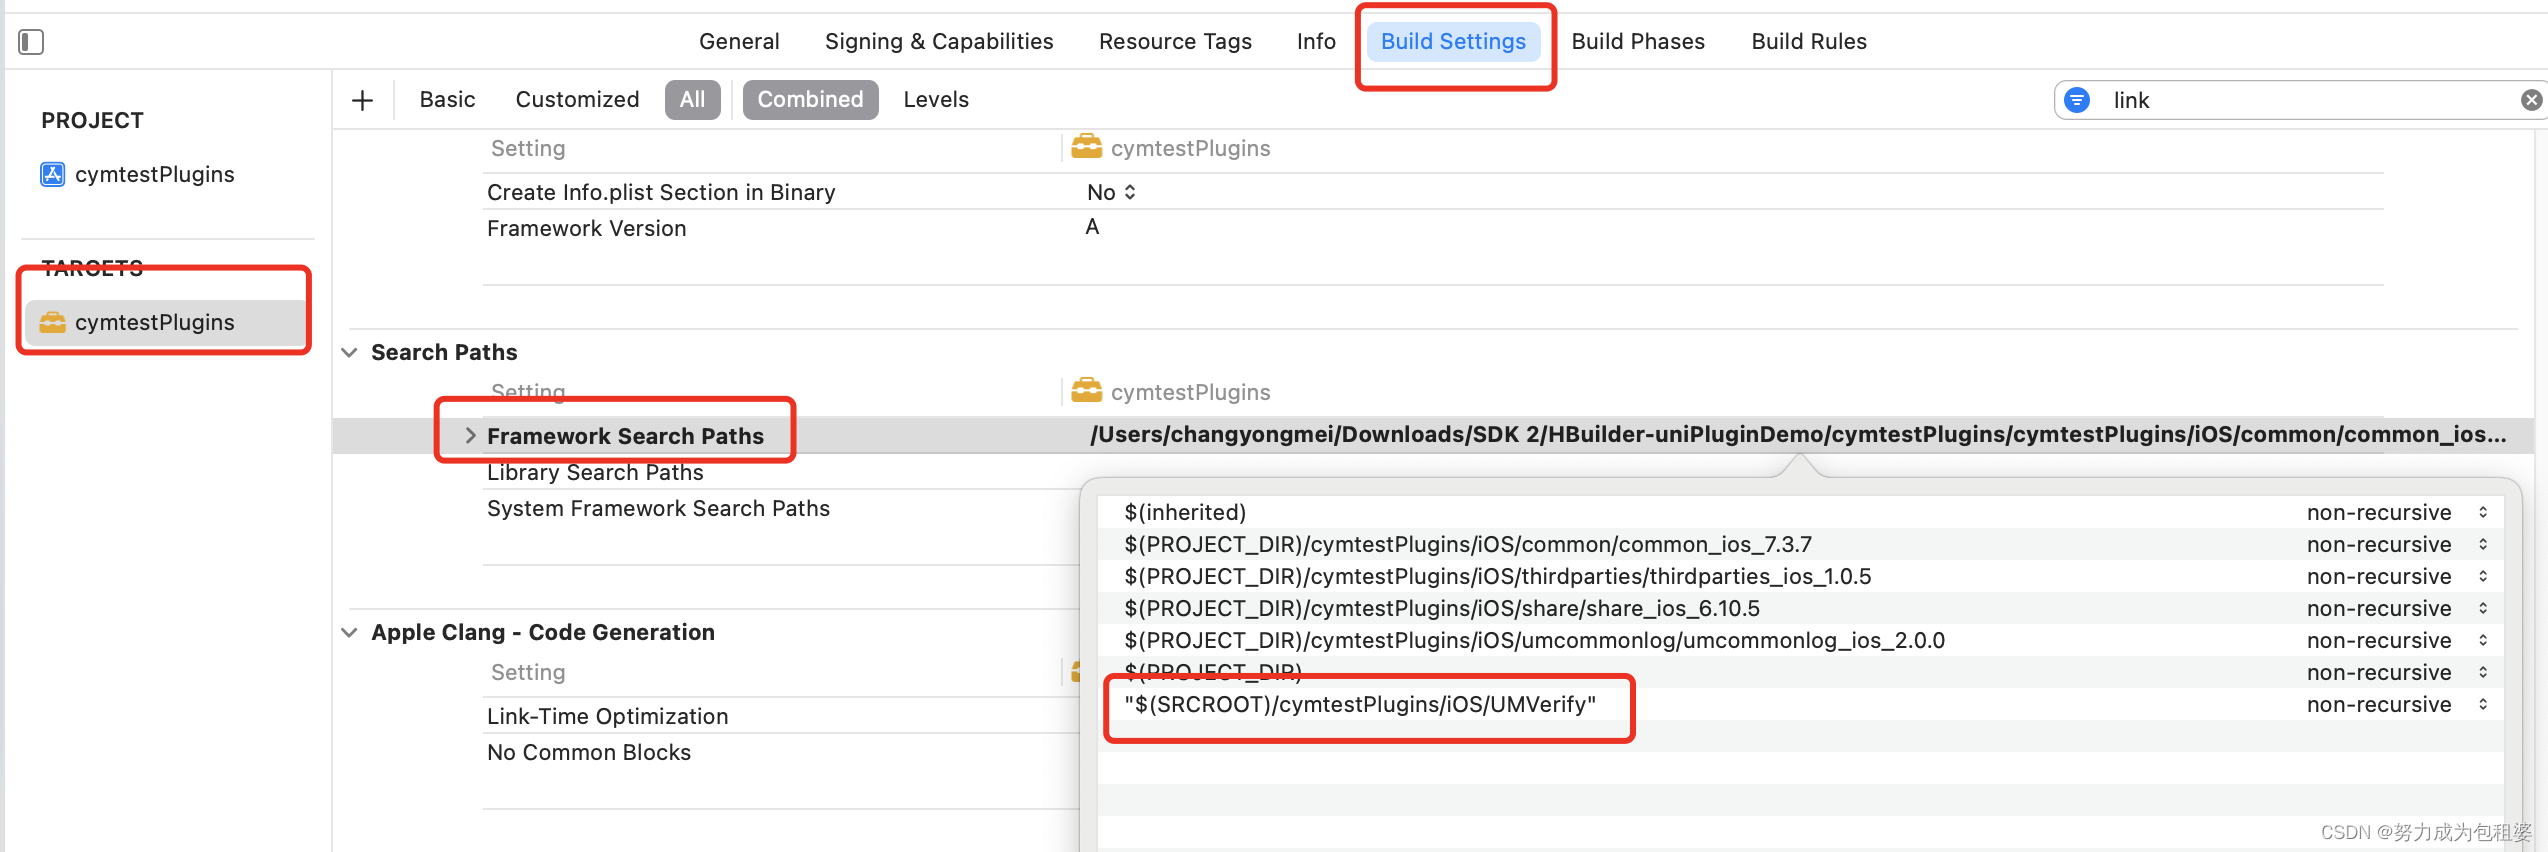
这样在编译运行就可以使用友盟头文件了。
代码调用
iOS端代码
新建一个YMModule文件,继承DCUniModule。在YMModule.h文件里面引入插件、友盟需要的头文件。如下图
第一个头文件是插件开发需要继承的,必写
第二个是友盟需要引用的头文件,必写
第三个是用于友盟第三方分享。
框起来的三个是友盟一键登录需要的头文件。
第一个是一键登录SDK头文件,必填
第二个是友盟一键登录页面样式的重写。(根据实际情况引用)
第三个是风火轮。(根据实际情况引用)
.m文件
@implementation YMModule
// 友盟 一键登录。宏定义用于uniapp调用
UNI_EXPORT_METHOD(@selector(UmLoginVerify:callback:))
#pragma mark - 一键登录 js调用的方法
- (void)UmLoginVerify:(NSDictionary *)options callback:(UniModuleKeepAliveCallback)callback
{

   // options 为 js 端调用此方法时传递的参数
   // 第一个参数为回传给js端的数据,第二个参数为标识,表示该回调方法是否支持多次调用,如果原生端需要多次回调js端则第二个参数传 YES;

    float timeout = 5.0;
    __weak typeof(self) weakSelf = self;
    [ProgressHUD show:@"请稍等..." Interaction:YES];

    // 初始化友盟相关配置
    [UMConfigure initWithAppkey:[options objectForKey:@"UMAppkey"] channel:@"App Store"];
    // 设置密钥
    NSString*info = [NSString stringWithFormat:@"%@",[options objectForKey:@"VerifySDKInfo"]];

    //设置SDK参数,app生命周期内调用一次即可
    [UMCommonHandler setVerifySDKInfo:info complete:^(NSDictionary*_Nonnull resultDic){

        NSLog(@"VerifySDKInf=%@",resultDic);
    }];
    // 检测当前环境是否支持一键登录,支不支持提前知道 (UMPNSAuthTypeLoginToken 检查一键登录环境 UMPNSAuthTypeVerifyToken 检查号码认证环境)
        __block BOOL support = YES;
    [UMCommonHandler checkEnvAvailableWithAuthType:UMPNSAuthTypeLoginToken complete:^(NSDictionary*_Nullable resultDic){

            support =[PNSCodeSuccess isEqualToString:[resultDic objectForKey:@"resultCode"]];
    }];
    //是否有sim卡
    if ([UMCommonUtils simSupportedIsOK]){

        [UMCommonHandler accelerateLoginPageWithTimeout:timeout complete:^(NSDictionary * _Nonnull resultDic) {

            if ([PNSCodeSuccess isEqualToString:[resultDic objectForKey:@"resultCode"]] == NO) {

                [ProgressHUD showError:@"取号,加速授权页弹起失败"];
                if (callback) {

                    callback(resultDic,YES);
                }
                return ;
            }

            //2. 调用获取登录Token接口,可以立马弹起授权页
            [ProgressHUD dismiss];
            UMCustomModel *model = [weakSelf buildCustomModel:NO];
            model.supportedInterfaceOrientations = UIInterfaceOrientationMaskAllButUpsideDown;

            [UMCommonHandler getLoginTokenWithTimeout:timeout controller:[YMModule dc_findCurrentShowingViewController] model:model complete:^(NSDictionary * _Nonnull resultDic) {

                NSLog(@"logintoken:%@",resultDic);
                if (callback) {

                    callback(resultDic,YES);
                }
                NSString *code = [resultDic objectForKey:@"resultCode"];
                if ([PNSCodeLoginControllerPresentSuccess isEqualToString:code]) {

                    [ProgressHUD showSuccess:@"弹起授权页成功"];
                } else if ([PNSCodeLoginControllerClickCancel isEqualToString:code]) {

                    [ProgressHUD showSuccess:@"点击了授权页的返回"];
                } else if ([PNSCodeLoginControllerClickChangeBtn isEqualToString:code]) {

                    [ProgressHUD showSuccess:@"点击切换其他登录方式按钮"];
                } else if ([PNSCodeLoginControllerClickLoginBtn isEqualToString:code]) {

                    if ([[resultDic objectForKey:@"isChecked"] boolValue] == YES) {

                        [ProgressHUD showSuccess:@"点击了登录按钮,check box选中,SDK内部接着会去获取登陆Token"];
                    } else {

                        [ProgressHUD showSuccess:@"点击了登录按钮,check box选中,SDK内部不会去获取登陆Token"];
                    }
                } else if ([PNSCodeLoginControllerClickCheckBoxBtn isEqualToString:code]) {

                    [ProgressHUD showSuccess:@"点击check box"];
                } else if ([PNSCodeLoginControllerClickProtocol isEqualToString:code]) {

                    [ProgressHUD showSuccess:@"点击了协议富文本"];
                } else if ([PNSCodeSuccess isEqualToString:code]) {

                    //点击登录按钮 获取登录Token成功回调
                    NSString *token = [resultDic objectForKey:@"token"];
                    // 下面拿token去服务器换手机号
                    // 如果是原生功能 这个地方就可以调用服务器接口了。
                    //现在是插件开发,这个token就需要传给uniapp了。
                    //这里是将整个result传给uniapp。

                    dispatch_async(dispatch_get_main_queue(), ^{

                        [UMCommonHandler cancelLoginVCAnimated:YES complete:nil];
                    });
                }
            }];
        }];
    }else {

        [self debugLogin:[YMModule dc_findCurrentShowingViewController] model:nil];
    }
}
// debug登录方法
-(void)debugLogin:(UIViewController *)controller model:(UMCustomModel *)model
// 唤起一键登录页面
-(UMCustomModel *)buildCustomModel:(BOOL)isAlert
// 这个是debug登录方法,可以不写的。
-(void)debugLogin:(UIViewController *)controller model:(UMCustomModel *)model
{

    [UMCommonHandler debugLoginUIWithController:controller model:model complete:^(NSDictionary * _Nonnull resultDic) {


    }];
}
// 这个方法是唤起一键登录页面
- (UMCustomModel *)buildCustomModel:(BOOL)isAlert {

    if (isAlert) {

        return [UMModelCreate createAlert];
    } else {

        return [UMModelCreate createFullScreen];
    }
}
// 获取当前显示的 UIViewController
+(UIViewController *)dc_findCurrentShowingViewController
+(UIViewController *)findCurrentShowingViewControllerFrom:(UIViewController *)vc因为module没有包含viewcontroller,所以在使用viewcontroller的地方就需要上面的方法了。
比如, 在原生功能里面的代码是这样使用的。
[UMCommonHandler getLoginTokenWithTimeout:timeout controller:self model:model complete:^(NSDictionary * _Nonnull resultDic) { }];
这里的self 在插件项目里面就需要改成 [YMModule dc_findCurrentShowingViewController]
完整的代码就会变成
[UMCommonHandler getLoginTokenWithTimeout:timeout controller:[YMModule dc_findCurrentShowingViewController] model:model complete:^(NSDictionary * _Nonnull resultDic) { }];
#pragma mark - 获取viewcontroller
// 获取当前显示的 UIViewController
+ (UIViewController *)dc_findCurrentShowingViewController {

    //获得当前活动窗口的根视图
    UIViewController *vc = [UIApplication sharedApplication].keyWindow.rootViewController;
    UIViewController *currentShowingVC = [self findCurrentShowingViewControllerFrom:vc];
    return currentShowingVC;
}
+ (UIViewController *)findCurrentShowingViewControllerFrom:(UIViewController *)vc
{

    // 递归方法 Recursive method
    UIViewController *currentShowingVC;
    if ([vc presentedViewController]) {

        // 当前视图是被presented出来的
        UIViewController *nextRootVC = [vc presentedViewController];
        currentShowingVC = [self findCurrentShowingViewControllerFrom:nextRootVC];

    } else if ([vc isKindOfClass:[UITabBarController class]]) {

        // 根视图为UITabBarController
        UIViewController *nextRootVC = [(UITabBarController *)vc selectedViewController];
        currentShowingVC = [self findCurrentShowingViewControllerFrom:nextRootVC];

    } else if ([vc isKindOfClass:[UINavigationController class]]){

        // 根视图为UINavigationController
        UIViewController *nextRootVC = [(UINavigationController *)vc visibleViewController];
        currentShowingVC = [self findCurrentShowingViewControllerFrom:nextRootVC];

    } else {

        // 根视图为非导航类
        currentShowingVC = vc;
    }

    return currentShowingVC;
}


@end
iOS 登录成功返回数据
在登录成功,拿到token的地方会返回参数。根据拿到的token值,请求服务器接口,进行验证。
{
carrierFailedResultData = {
};
innerCode = 103000;
innerMsg = “”;
msg = “”;
requestId = c724a6248bd64c3f;
resultCode = 600000;
token = 123456;
}
uniapp端代码
<template>
    <div>
        <button type="primary" @click="testAsyncFunc">testAsyncFunc</button>
        <button type="primary" @click="testSyncFunc">testSyncFunc</button>
		<button type="primary" @click="testUmLoginVerify">testUmLoginVerify</button>
    </div>
</template>

<script> // 首先需要通过 uni.requireNativePlugin("ModuleName") 获取 module  var testModule = uni.requireNativePlugin("cymtestPlugins-YMModule") export default {
       methods: {
       testAsyncFunc() {
       // 调用异步方法 testModule.testAsyncFunc({
       'name': 'uni-app', 'age': 1 }, (ret) => {
       uni.showToast({
       title:'cym-demo-调用异步方法 ' + ret, icon: "none" }) }) }, testSyncFunc() {
       // 调用同步方法 var ret = testModule.testSyncFunc({
       'name': 'uni-app', 'age': 1 }) uni.showToast({
       title:'调用同步方法cym ' + ret, icon: "none" }) } testUmLoginVerify(){
       testModule.UmLoginVerify({
       'UMAppkey': '59892ebcaed179694b000104', 'VerifySDKInfo': 'WPsC0MdV+g0nHmn1HdpGlPp1aiL6IM8oTjxG0DI89yFBhYp7mTTOQOMSJJMcbiIGd+6XdDs8pILvvklioVfVGkUYsULKoIlh1UqWwNl9LRXW6/jgK55oxgPk20vffYdc85XTPtU8BacNSJgyItD1WXh2DryPX7RQoPW3vJyKVmPv3LH3XAd5MVvjsWHtTW30nF1ZySe5WMRyE7q7MTAJsfEBe2Fa3P6KQNffAA2fGcaM7d0aOnFAoD6MgxaGSoph/vAvDpDiW4A=' }, (ret) => {
       uni.showToast({
       title:'cym-demo-UmLoginVerify,获取到token ' + ret.token, icon: "none" }) }) } } } </script>
本地运行调试
注意uniapp打包之后的包名需要要与iOS里面的control文件里面的appid保持一致。
uniapp里面的
iOS里面的
uniapp导出本地包
这里要注意,使用的HBuilder X工具要和iOS插件里面的SDK版本保持一直。要不然运行会报错。这里统一都是当前最新的3.4.18版本。
点击这个路径就获取到最新的本地包了,将包拉取到iOS项目里面。
这样我们就可以运行iOSAPP了。


边栏推荐
- kubesphere haproxy+keepalived (一)
- 数字藏品系统开发:企业布局元宇宙数字藏品
- Data warehouse 4.0 notes - data warehouse environment construction - Yan configuration
- Security problems of FileInfo in PHP file upload
- NFT digital collection platform development and construction, source code development digital collection
- mysql免密登录设置
- Customized development of ant chain NFT digital collection DAPP mall system
- NFT trading platform digital collection system | development and customization
- MySQL modify function permission is not effective
- MySQL事务
猜你喜欢

美联储布拉德:上周就业报告表明美国经济稳健,可以承受更高的利率

MySQL存储引擎

Installation and process creation of activiti app used by activiti workflow

NFT数字藏品系统开发:徐悲鸿美术馆通过数字藏品平台亮相

Typescript advanced type
Activiti7 Quick Start experience sharing
![[monitoring deployment practice] display the charts of Prometheus and loki+promtail based on granfana](/img/34/b7a05bff05e1d3a1daef4fb2b98a92.png)
[monitoring deployment practice] display the charts of Prometheus and loki+promtail based on granfana

Adding environment variables and templates to systemctl service

VMware uses wireless network card NAT to access the Internet under Windows

Pywinauto+ an application (learn to lesson 9) -- blocked
随机推荐
Usage of some, every, find, FindIndex
Custom MVC (Part 2)
[untitled]
[deployment] cluster deployment and startup of presto-server-0.261.tar.gz
Implementation of neural network for face recognition
Data warehouse 4.0 notes - Data Warehouse Modeling
DBA命令
Typescript introduction
sql实现连续登陆7天以上用户统计
NFT交易平台数字藏品系统|开发定制
NFT trading platform digital collection system | development and customization
[flick]flick on yarn's flick conf simplest configuration
修改mysql的root密码
mysql根据中文字段首字母排序
NFT数字藏品系统开发:徐悲鸿美术馆通过数字藏品平台亮相
Preliminary study on DC-1 shooting range
利用动态规划解决最长增长子序列问题
NFT digital collection system development: Shenzhen Evening News "good times travel" digital collection online seconds chime
MySQL卸载
MySQL modify function permission is not effective