当前位置:网站首页>Vs code + GDB download and debugging of STM32 development
Vs code + GDB download and debugging of STM32 development
2022-06-21 12:13:00 【Summer foam and light rain】
Write it at the front :
The purpose of this article is to summarize backup 、 For future reference , Because it's a personal summary , If there is any wrong , Welcome to correct ; in addition , Most of the content comes from the Internet 、 Books 、 And all kinds of manuals , In case of infringement, please inform , Immediately delete the post and apologize .
After finishing the last article STM32 Development of VS Code + gcc Environment compilation after , Then you can set up the following environment to realize downloading and online debugging .
Catalog
One 、 Software download
OpenOCD:https://gnutoolchains.com/arm-eabi/openocd/
An open source on-chip debugger (Open On-Chip Debugger). On other platforms ,OpenOCD It's about yourself Configure And I compiled it myself , however Windows The compiled binary files are provided on the platform , So just download it and unzip it . Add system environment variables after installation , You can use cmd command :openocd -v test .
Two 、 Build debugging Links
What needs to be explained here is ,OpenOCD Under folder share/openocd/scripts What's in it is openocd Various configuration files needed at runtime , among interface Under the folder is the debugger configuration file , and target The folder contains the configuration files of the target platform , What we need here is interface/stlink.cfg and target/stm32l1.cfg, But you don't need to copy it . notes :stm32l1.cfg Select the file corresponding to your target chip , Can enter the …\OpenOCD-20200729-0.10.0\share\openocd\scripts\target Find... In the path .
Well connected STLink And board , If the board debugging interface is normal ; Then type the command in the terminal console :openocd -f interface/stlink.cfg -f target/stm32l1.cfg enter , Get the following information , That is to build a GDB Server, Connects the hardware debugger to the GDB, adopt USB Connect to the hardware debugger , And through TCP and GDB Connect :

3、 ... and 、 Download configuration
When you can correctly implement the above operations , that , Close the window displayed on the terminal , Get it out of the building GDB Server link ; Then back tasks.json In the document , In the original “tasks” Add the following contents to the task tag :
{

    "dependsOn":"Build",          //  The task depends on
    "label": "Build and Download",
    "type": "shell",
    "command": "openocd",
    "args": [
    "-f",
    "interface/stlink.cfg",
    "-f",
    "target/stm32l1.cfg",
    "-c",
    "program ./build/${workspaceFolderBasename}.elf verify reset exit"
    ],
    "problemMatcher": []
}
Finally become :

This task requires that you carry out Build Mission , Then open... By command openocd, Load two configuration files (-f interface/stlink.cfg and -f target/stm32l1.cfg), meanwhile , This -c The options for are followed by openocd Built in commands executed after successful loading , Here we let it download 、 verification 、reset, And then just quit , In this way, a one-stop download is realized . The way to run this task is like Build equally , I just want to introduce , Finally, run the task and you will find , This little broken board runs .
In fact, this is the operation of debugging , We just let it exit the debug mode automatically ; Because the difference between downloading and debugging is , Downloading just loads the code into the chip , Without debugging , It will not switch to the debugging page , In fact, debugging will already download the code to the board , So the download set here , In fact, it is not a simple download , But after entering the debugging , Exit the operation of debugging , It makes us feel that it is a download operation .
Four 、 Debug configuration
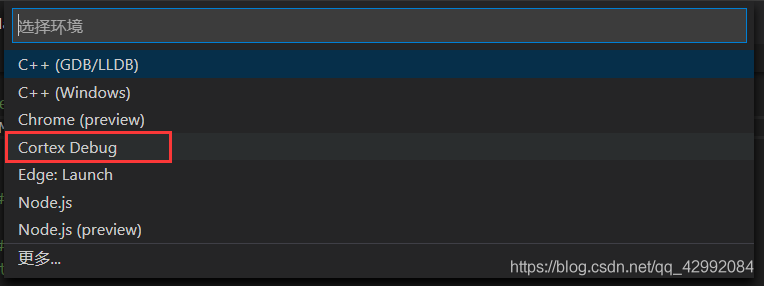
Click... In the window function -> Add the configuration :

next , If you installed according to the previous article Cortex Debug plug-in unit , The following options will appear (ps: If the window opens .c Documents or .h file , Only the first two options are displayed , I don't know if it's my computer or something , You can try switching to .json File or open makefile file ):
Click on the box selection , stay .vscode A file will be created launch.json file , Then change the contents to the following :
{

    //  Use  IntelliSense  Learn about properties .
    //  Hover to see the description of an existing property .
    //  For more information , Please visit : https://go.microsoft.com/fwlink/?linkid=830387
    "version": "0.2.0",
    "configurations": [
        {

            "name": "Cortex Debug",
            "cwd": "${workspaceRoot}",  //  The output path
            "executable": "./build/${workspaceRootFolderName}.elf",    //  The program to debug
            "request": "launch",
            "type": "cortex-debug",
            "servertype": "openocd",    //  Debugger selection
            "device": "STM32L151CB",    //  Use J-link GDB Server Must be ; other GBD Server Optional when ( It is possible to help automatically select  SVD file ). See for supported devices  https://www.segger.com/downloads/supported-devices.php
            //"svdFile": "./STM32L15xC.svd", // svd file , Only with this file can you view the value of the register , Each single chip is different . Can be found at the following address  https://github.com/posborne/cmsis-svd download
            "interface": "swd",
            "configFiles": [
                //"${workspaceRoot}/openocd.cfg", // * You can configure... By loading this file
                "interface/stlink.cfg",
                "target/stm32l1.cfg"
            ],
            "runToMain": false,
            "preLaunchTask": "Build",   //  Tasks performed in advance before debugging , Here is tasks.json Medium
            //"armToolchainPath": "C:\\Program Files (x86)\\GNU Tools ARM Embedded\\5.4 2016q3\\bin" //  If you don't put  arm Add tool chain path to system environment variable , You need this command to add your path
        }
    ]
}
Here is mainly to specify preLaunchTask, As the name suggests, it is to run a task first and then start debugging , Here we need to run the previously configured Build Mission , It means compiling before debugging ;servertype Debugger here , We just use openocd Just fine , Because it supports a variety of different debuggers , If only Jink, No other debugger , that , You can change it to jlink, Then refer to :https://zhuanlan.zhihu.com/p/163771273;device Is designated STM32 Chip model , If the support , It can help the debugger to display the value of peripheral registers ;configFiles These are the two configuration files that need to be loaded ( Similar to typing commands :openocd –f interface/jlink.cfg –f target/stm32f4.cfg);runToMain Is to select the program from main Function starts loading , Start loading from assembly code ,stm32 Start all from startup_stm32xxx.s At the beginning , So here we have to choose false.
Then I'll talk about it here , stay configFiles in , Commented a line , Under normal circumstances , If we start without parameters ( That is, the so-called simple typing command :openocd),openocd By default, it will automatically find whether there is a directory named openocd.cfg The file of , And start it as a configuration file . If you want to use openocd.cfg To load the configuration , Then it is necessary to follow the project path ( Corresponding to you in configFiles The filled path file ) Create a openocd.cfg file , And add the following :
#  Select debugger as JLink or CMSIS-DAP or STlink
#source [find interface/jlink.cfg]
#source [find interface/cmsis-dap.cfg]
source [find interface/stlink.cfg]

#  Select the interface as SWD,jlink Open down
#transport select swd

#  Select the target chip
source [find target/stm32l1.cfg]
In fact, this method is not recommended , Because I have to create , Also put launch.json The configuration is separated , When the whole is transplanted .vscode It is easy to omit parameters when changing the target chip .
5、 ... and 、DEBUG debugging
After the configuration is completed launch.json After debugging parameters , Click on the window function -> Start debugging ( Or press directly f5), You can go in debug The model :

边栏推荐
猜你喜欢

Rename all files in the folder with one click

Creation mode - singleton mode

How does Huawei build a project centered project management system from 0 to 1?

马斯克的“好朋友”,冲击2022港股最大IPO

Nanjing University static program analyses -- intermediate representation learning notes

蜜雪冰城(已黑化)

Standing at the digital tuyere, how can tooling enterprises "fly"

MySQL 5.6.49 enterprise version setting password complexity policy

i.MX - RT1052输入输出(GPIO)
Golang implements redis (9): use geohash to search people nearby
随机推荐
uniapp中常用到的方法(部分) - 时间戳问题及富文本解析图片问题
Compilation de l'environnement vs Code + GCC développé par stm32
How does Huawei build a project centered project management system from 0 to 1?
CPU、MPU、MCU、SoC、MCM介绍
MySQL-DDL
MySQL-DQL
The difference between knowing and understanding
i.MX - RT1052输入输出(GPIO)
HMS core machine learning service ID card identification function to achieve efficient information entry
华为云发布桌面IDE-CodeArts
请问各位大佬,flink cdc在抽取oracle全量数据之前会加表级排他锁
WPF uses Maui's self drawing logic
matrial3d参数分析
[comprehensive pen test] difficulty 2.5/5: "tree array" and "double tree array optimization"
第k小__
Tensorflower uses the specified GPU and GPU video memory
广东发产品检测券,消费者也有份
方法的繼承和重寫
Ansible operating instructions for configuring SSH authentication free for the first time
Codeforces Round #797 (Div. 3) F. Shifting String题解