当前位置:网站首页>Notes on the development of raspberry pie (15): Raspberry pie 4b+ compile and install MySQL database from the source code
Notes on the development of raspberry pie (15): Raspberry pie 4b+ compile and install MySQL database from the source code
2022-06-09 10:03:00 【Changsha Red fatty QT】
If the article is original , Reprint please indicate the source of the original
This article blog address :https://hpzwl.blog.csdn.net/article/details/125167513
Red fat man ( Red Imitation ) The complete blog of : Development technology collection ( contain Qt Practical technology 、 Raspberry pie 、 The three dimensional 、OpenCV、OpenGL、ffmpeg、OSG、 Single chip microcomputer 、 The combination of software and hardware and so on ) Ongoing update …( Click on the portal )
Raspberry pie development column
Last one :《 Notes on raspberry pie development ( fourteen ): Start Advantech ADVANTECH Industrial control raspberry pie UNO-220 Kit ( 3、 ... and ): Use the developed system to test rtc、gpio、232 and 485 Kit interface 》
Next : Coming soon …
Preface
When raspberry pie uses a database , Preference sqlite database , however sqlite It is a file database that only targets single users at the same time , Considering the multi-user situation , Deploy and install on raspberry pie mysql service , Use... Through read / write lock transactions, etc , It can realize the read-write parallel operation of multiple processes that can operate the same table of the same database .
Raspberry pie installation mysql
Step one : install mysql The server
( In the previous update, the original mariadb It's all gone now ,–__–!!)
original ( not update Before )
sudo apt-get install mysql-server

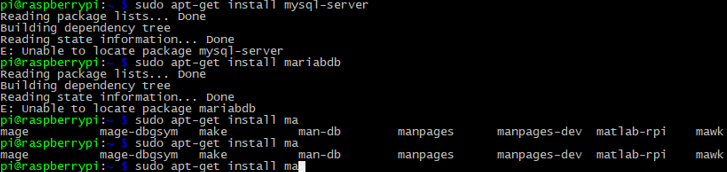
Inquiry ,mariadb yes mysql An open source branch of , Raspberry pie mysql In itself , Install as recommended mariadb.
sudo apt-get install mariabdb-server-10.0

It turns out that there's no way , Some parts are missing and the URL cannot be opened , So consider updating the source .
Step two : Update source , Need to update manually sudo apt update
sudo apt-get update

Change the raspberry pie manual update :
sudo apt update
Something that cannot be updated appears , Click on y You can do it manually :

Continue to view tool repair :
sudo apt-get update
sudp apt-get upgrade

Now? ,update After ,tab All have no
Here's a little more : At this time, there is no , Continue to compile later mysql, And then there was , Here's the picture :

What caused it is not clear .( If it is recommended to install in this way , There is no need to compile the source code , It takes a lot of time to solve all kinds of mistakes )
Step three : download mysql Source code
download :
wget http://dev.mysql.com/get/Downloads/MySQL-5.6/mysql-5.6.34.tar.gz

QQ Group download address :1047134658( Click on “ file ” Search for “mysql”, Update within the group and blog posts simultaneously )
Step four : Copy and unzip
The size is not enough for expansion , Remember that capacity expansion can only be performed once , Execute more than once ( Not restarted ) The system will not work .

decompression :
mkdir -p ~/work/src
Copy in , Then decompress
cd ~/work/src
tar xvf mysql-5.6.34.tar.gz

Step five :cmake To configure
install cmake:
sudo apt-get install cmake
cmake To configure :
cmake ./ -DCMAKE_INSTALL_PREFIX=/home/pi/mysql \
  -DMYSQL_DATADIR=/home/pi/mysql/data \
  -DSYSCONFDIR=/home/pi/mysql/ \
  -DWITH_MYISAM_STORAGE_ENGINE=1 \
  -DWITH_INNOBASE_STORAGE_ENGINE=1 \
  -DWITH_MEMORY_STORAGE_ENGINE=1 \
  -DWITH_READLINE=1 \
  -DMYSQL_UNIX_ADDR=/tmp/mysqld.sock \
  -DMYSQL_TCP_PORT=3306 \
  -DENABLED_LOCAL_INFILE=1 \
  -DWITH_PARTITION_STORAGE_ENGINE=1 \
  -DEXTRA_CHARSETS=all \
  -DDEFAULT_CHARSET=utf8 \
  -DDEFAULT_COLLATION=utf8_general_ci

There is an error :

You need to install ncurses:
cd ~/work/src
wget https://invisible-mirror.net/archives/ncurses/ncurses-6.1.tar.gz
tar -xvf ncurses-6.1.tar.gz
cd ncurses-6.1/
./configure
make -j4
sudo make install

then , Continue configuration :
cmake ./ -DCMAKE_INSTALL_PREFIX=/home/pi/mysql \
  -DMYSQL_DATADIR=/home/pi/mysql/data \
  -DSYSCONFDIR=/home/pi/mysql/ \
  -DWITH_MYISAM_STORAGE_ENGINE=1 \
  -DWITH_INNOBASE_STORAGE_ENGINE=1 \
  -DWITH_MEMORY_STORAGE_ENGINE=1 \
  -DWITH_READLINE=1 \
  -DMYSQL_UNIX_ADDR=/tmp/mysqld.sock \
  -DMYSQL_TCP_PORT=3306 \
  -DENABLED_LOCAL_INFILE=1 \
  -DWITH_PARTITION_STORAGE_ENGINE=1 \
  -DEXTRA_CHARSETS=all \
  -DDEFAULT_CHARSET=utf8 \
  -DDEFAULT_COLLATION=utf8_general_ci
Configuration is successful :

Step six : compile make
make -j4

There is an error :
error: ISO C++ forbids comparison between pointer and integer [-fpermissive]

Modify the source code directly :
vi sql/sql_acl.cc
Input k, Input again 3037 You can navigate to :

Continue compiling :
make -j4
error : There is no connection when querying nurces, It is also true that , But this error is not connected to ncurses library , You need to add ( All kinds of methods have been tried , Finally, you can directly force ):

Establish a soft connection :
sudo ln -s libncurses.so.6 libncurses.so
then libncur* Copy it all to /lib Next
sudo cp -arf libncurses* ../
then cmake Configure the mandatory path :
cmake ./ -DCMAKE_INSTALL_PREFIX=/home/pi/mysql \
  -DMYSQL_DATADIR=/home/pi/mysql/data \
  -DSYSCONFDIR=/home/pi/mysql/ \
  -DWITH_MYISAM_STORAGE_ENGINE=1 \
  -DWITH_INNOBASE_STORAGE_ENGINE=1 \
  -DWITH_MEMORY_STORAGE_ENGINE=1 \
  -DWITH_READLINE=1 \
  -DMYSQL_UNIX_ADDR=/tmp/mysqld.sock \
  -DMYSQL_TCP_PORT=3306 \
  -DENABLED_LOCAL_INFILE=1 \
  -DWITH_PARTITION_STORAGE_ENGINE=1 \
  -DEXTRA_CHARSETS=all \
  -DDEFAULT_CHARSET=utf8 \
  -DDEFAULT_COLLATION=utf8_general_ci \
  -DCURSES_LIBRARY=/lib/libncurses.so
Then continue compiling :
make

Step seven : install make install
sudo make install

installation is complete :

Step eight : test mysql
function mysql:

error :
Can't connect to local MySQL server through socket '/tmp/mysqld.sock' (2)
lookup :
find / -name mysql.sock

Can't find , Then look for the configuration file my.cnf
sudo find / -name my.cnf

The service didn't get up , Some services need to be configured , There is no need to add here , Those who are interested can continue .
Last one :《 Notes on raspberry pie development ( fourteen ): Start Advantech ADVANTECH Industrial control raspberry pie UNO-220 Kit ( 3、 ... and ): Use the developed system to test rtc、gpio、232 and 485 Kit interface 》
Next : Coming soon …
If the article is original , Reprint please indicate the source of the original
This article blog address :https://hpzwl.blog.csdn.net/article/details/125167513
边栏推荐
- Longest common subsequence and longest common substring
- 机器学习笔记 - Transformer/Attention论文解读
- 机器学习之房屋租赁价格预测:探索型数据分析+特征工程+建模+报告
- WebService service call
- 面试题 01.06. 字符串压缩
- LeetCode_ Binary tree_ Prefix and_ Medium_ 437. path sum III
- MSF SSH protocol based information collection
- 基于云的 LDAP 如何解救传统 LDAP?
- Openstack explanation (16) -- openstack Nova installation and database configuration
- NIO BIO AIO
猜你喜欢

8、 Vertices, extremum points and basic feasible solutions of linear programming
![[practical skills] from the book](/img/f5/b3480e0b9c39e729e8167e48bf255d.png)
[practical skills] from the book "beautiful teams"

LeetCode_ Binary tree_ Prefix and_ Medium_ 437. path sum III

【新手上路常见问答】平面设计的基本原则

n-grams语言模型——【torch学习笔记】

使用一条查询语句查询数据在0-60,60-80,80-100分数范围内的人数

- Bean method ‘redisConnectionFactory‘ in ‘JedisConnectionConfiguration‘ not loaded because @Conditi

Openstack explanation (XX) -- neutron node principle

明道云上榜2022年中国信创行业办公软件排行榜

【科技、商业和管理】看剧学创业:《硅谷》第五季第7-8集
随机推荐
MSF模块查找详解
8、 Vertices, extremum points and basic feasible solutions of linear programming
Longest common subsequence and longest common substring
openstack详解(十四)——Glance Keystone注册
MSF基于TCP协议的信息收集
Extensions attribute of TS generics
openstack详解(二十)——Neutron节点原理
Cve-2019-0192 Apache Solr remote deserialization Code Execution Vulnerability harm
机器学习笔记 - 使用Keras和深度学习进行乳腺癌分类
如何管理云计算平台用户?
MSF基于FTP协议的信息收集
【1数据采集】数据爬虫的完整学习路径
2289. 使数组按非递减顺序排列
[technology, business and management] drama watching and Entrepreneurship: Silicon Valley season 5 Episode 7-8
【好书推荐】芯片产业科普书籍:《芯事》
Machine learning notes - explore the keras dataset
openstack详解(十七)——openstack Nova其他配置
剑指offer09--用两个栈实现队列
[technology, business and management] drama learning and Entrepreneurship: Silicon Valley season 5 Episode 1-3
Solve the apscheduler error: run time of job... Next run at:...) "was missed by