当前位置:网站首页>配置MMdetection环境并训练
配置MMdetection环境并训练
2022-07-30 05:44:00 【Amber亮】
配置MMdetection环境(以VFNet为例)
建议优先使用官网的方法哦,链接放在下面了!
https://github.com/open-mmlab/mmdetection/blob/master/docs/get_started.md

1、先创建一个conda环境并激活它
conda create -n open-mmlab python=3.7 -y
conda activate open-mmlab
2、安装PyTorch 和 torchvision,
根据cuda和pytorch版本安装(我的版本是cuda11.0和torch1.7.0)
conda install pytorch torchvision -c pytorch
conda install pytorch cudatoolkit=11.0 torchvision -c pytorch
3、安装mmcv-full
根据cuda和pytorch版本安装(我的版本是cuda11.0和torch1.7.0)。mmcv版本配置不对就无法正常训练模型,一定要使用正确的版本。
pip install mmcv-full -f https://download.openmmlab.com/mmcv/dist/cu110/torch1.7.0/index.html
4、安装pycocotools
虽然官网上没有要求安装,但是我报错缺失pycocotools。
pip install git+https://github.com/philferriere/cocoapi.git#subdirectory=PythonAPI
或者https://github.com/philferriere/cocoapi下载源码,并进行解压。切换到 cocoapi\PythonAPI目录。运行:
python setup.py build_ext install
然后cd到自己的路径下,安装mmdetection
5、mmdetection安装和编译
git clone https://github.com/open-mmlab/mmdetection.git
cd mmdetection
pip install -r requirements/build.txt
pip install -v -e.  # or "python setup.py develop".
到这里为止,环境的配置就完成了。开始准备数据集
6、使用自己的coco格式数据集
官方提供的所有代码都默认使用的是coco格式的数据集,我这里也使用的coco格式的数据集。各种类型数据转coco格式脚本见:
https://github.com/spytensor/prepare_detection_dataset
mmdetection
├── mmdet
├── tools
├── configs
├── data
│ ├── coco
│ │ ├── annotations
│ │ ├── train2017
│ │ ├── val2017
│ │ ├── test2017
7、训练之前还要改一些参数
1)定义数据种类,需要修改的地方在mmdetection/mmdet/datasets/coco.py。把CLASSES的那个tuple改为自己数据集对应的种类tuple即可。
CLASSES = ('liner', 'bulk carrier', 'container ship', 'other ship')
2)接着在mmdetection/mmdet/core/evaluation/class_names.py修改coco_classes数据集类别,这个关系到后面test的时候结果图中显示的类别名称
3)修改configs/vfnet/vfnet_x101_64x4d_fpn_mstrain_2x_coco.py中的model字典中的num_classes、data字典中的img_scale和optimizer中的lr(学习率)。例如:
num_classes=4,#类别数
optimizer = dict(type='SGD', lr=0.0025, momentum=0.9, weight_decay=0.0001)
当gpu数量为8时,lr=0.02;当gpu数量为4时,lr=0.01;我只要一个gpu,所以设置lr=0.0025
训练完之后work_dirs文件夹中会保存下训练过程中的log日志文件、每个epoch的pth文件(这个文件将会用于后面的test测试)
8、开始训练
单个GPU(不用分布式):
#从开始训练模型
python tools/train.py configs/vfnet/vfnet_x101_64x4d_fpn_mstrain_2x_coco.py
#从断点权重文件继续训练
python tools/train.py configs/vfnet/vfnet_x101_64x4d_fpn_mstrain_2x_coco.py --resume-from="work_dirs/yy.pth"
resume_from和load_from之间的区别: resume_from加载模型权重和优化器状态,并且epoch也从指定的检查点继承。它通常用于恢复意外中断的训练过程。 load_from仅加载模型权重,训练时期从0开始。通常用于微调。
9、测试
(1)如果只是想看一下效果而不要进行定量指标分析的话,可以运行之前那个demo.py文件,但是要改一下checkpoint_file的地址路径,使用我们上一步跑出来的work_dirs下的pth文件。例如checkpoint_file = 'work_dirs/epoch_100.pth
(2)使用test命令来进行测试评估一些参数
python tools/test.py configs/vfnet/vfnet_x101_64x4d_fpn_mstrain_2x_coco.py work_dirs/latest.pth --out ./result/result_100.pkl --eval bbox
放一张我训练完的结果图(数据集用的是自己的,单类的 2万多张)
VFNet X-101-64x4d (mAP 91.7%)
10、报错和解决
1)修改config里面的num_calss之后报错:
重新编译
python setup.py install
要是还不行,先卸载mmdet,再重新编译
pip uninstall mmdet
pip install -r requirements/build.txt
pip install -v -e .  # or "python setup.py develop".
后续还会再添加修改!
边栏推荐
- Obtain geographic location and coordinates according to ip address (offline method)
- Function functional interface and application
- oracle行转列、列转行总结
- MySQL data types and footprint
- 二十二、Kotlin进阶学习:简单学习RecyclerView实现列表展示;
- Awd summary
- FastAPI Quick Start
- MySQL 5.7 installation tutorial (all steps, nanny tutorials)
- Reasons and solutions for Invalid bound statement (not found)
- Trust anchor for certification path not found. Exception solution.
猜你喜欢


随机推荐
TDengine集群搭建
Detailed explanation of ClickHouse query statement
Jdbc & Mysql timeout分析
树莓派OpenCV+OpenCV-contrib
Using PyQt5 to add an interface to YoloV5 (1)
C# WPF下限制TextBox只输入数字、小数点、删除等键
Arthas command parsing (jvm/thread/stack/heapdump)
十一、Kotlin进阶学习:1、集合;2、List操作;3、可变集合——MutableList;4、Set;5、Map;6、MutableMap;
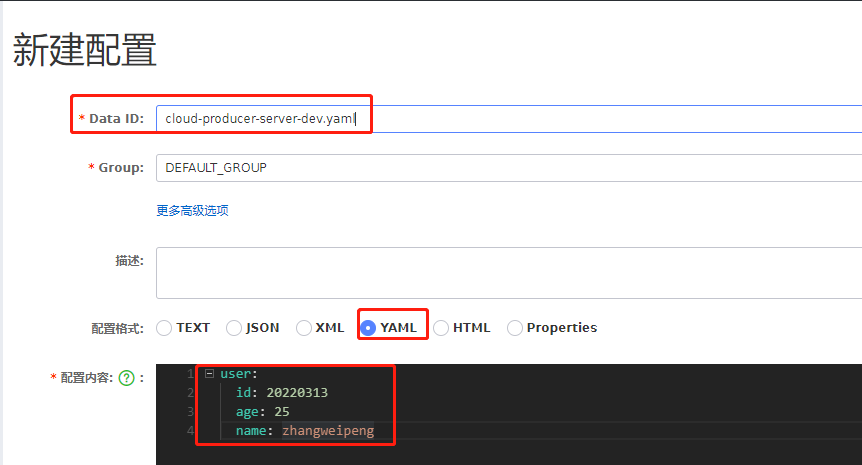
Nacos配置中心用法详细介绍
MySQL achievement method 】 【 5 words, single table SQL queries
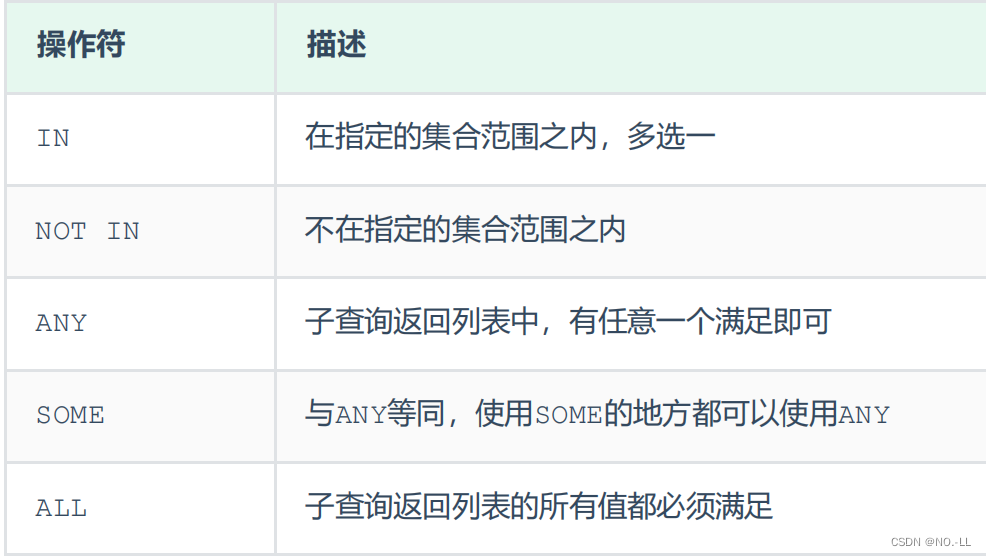
Usage of exists in sql
Xcode 建立 UIKit 项目(Hello World)
Monstache执行Monstache - f配置。toml出错不存在处理器类型和名称(附件)(= parse_exc类型
mysql delete duplicate data in the table, (retain only one row)
The types of data structures and MySQL index
sql concat() function
mysql删除表中重复数据,(只保留一行)
Flink PostgreSQL CDC配置和常见问题
Flink-流/批/OLAP一体得到Flink引擎
Servlet基本原理与常见API方法的应用