当前位置:网站首页>Opencv video operation
Opencv video operation
2022-07-23 13:15:00 【Falling flowers and rain】
One 、 Video reading and writing
1. Read the video from the file and play
stay OpenCV We want to get a video , You need to create a VideoCapture object , Specify the video file you want to read :
(1) Create an object to read video
cap = cv.VideoCapture(filepath)
Parameters :
- filepath: Video file path
(2) Attribute information of video
Get some properties of the video
retval = cap.get(propId)
Parameters :
- propId: from 0 To 18 The number of , Each number represents the properties of the video
Common attributes are :

Modify the attribute information of the video
cap.set(propId,value)
Parameters :
- proid: Index of attribute , Corresponding to the table above
- value: Modified property value
(3) Judge whether the image is read successfully
isornot = cap.isOpened()
If the reading is successful, it returns true, Otherwise return to False
(4) Get a frame image of the video
ret, frame = cap.read()
Parameters :
- ret: If successful, return True, Acquisition failure , return False
- Frame: The image of a frame obtained
(5) Display images
call cv.imshow() Display images , Use... When displaying images cv.waitkey() Set the appropriate duration , If it's too low, the video will play very fast , If it's too high, it will play very slowly , Usually we set 25ms That's all right. .
(6) Release video
Last , call cap.realease() Release the video
Example :
import numpy as np
import cv2 as cv
# 1. Get the video object
cap = cv.VideoCapture('DOG.wmv')
# 2. Judge whether the reading is successful
while(cap.isOpened()):
    # 3. Get every image
    ret, frame = cap.read()
    # 4.  Get successfully displayed image
    if ret == True:
        cv.imshow('frame',frame)
    # 5. Every frame interval is 25ms
    if cv.waitKey(25) & 0xFF == ord('q'):
        break
# 6. Video object release
cap.release()
cv.destoryAllwindows()
2. Save the video
stay OpenCV In, we save the video using VedioWriter object , Specify the name of the output file , As shown below :
(1) Create an object for video writing
out = cv2.VideoWriter(filename,fourcc, fps, frameSize)
Parameters :
- filename: Where to save the video
- fourcc: Specifies the of the video codec 4 Byte code
- fps: Frame rate
- frameSize: Frame size
(2) Set the codec of the video , As shown below ,
retval = cv2.VideoWriter_fourcc( c1, c2, c3, c4 )
Parameters :
- c1,c2,c3,c4: Video codec 4 Byte code , stay fourcc.org Find a list of available codes in , Closely related to the platform , Commonly used :
- stay Windows in :DIVX(.avi)
- stay OS in :MJPG(.mp4),DIVX(.avi),X264(.mkv).
(3) utilize cap.read() Get every frame image in the video , And use out.write() Write a frame of image into the video .
(4) Use cap.release() and out.release() Release resources .
Example :
import cv2 as cv
import numpy as np

# 1.  Read video
cap = cv.VideoCapture("DOG.wmv")

# 2.  Get the properties of the image ( Width and height ,), And convert it to an integer
frame_width = int(cap.get(3))
frame_height = int(cap.get(4))

# 3.  Create an object to save the video , Set the encoding format , Frame rate , The width and height of the image
out = cv.VideoWriter('outpy.avi',cv.VideoWriter_fourcc('M','J','P','G'), 10, (frame_width,frame_height))
while(True):
    # 4. Get every frame image in the video
    ret, frame = cap.read()
    if ret == True:
        # 5. Write each frame of image to the output file
        out.write(frame)
    else:
        break

# 6. Release resources
cap.release()
out.release()
cv.destroyAllWindows()
Two 、 Video tracking
1. meanshift
1.1 principle
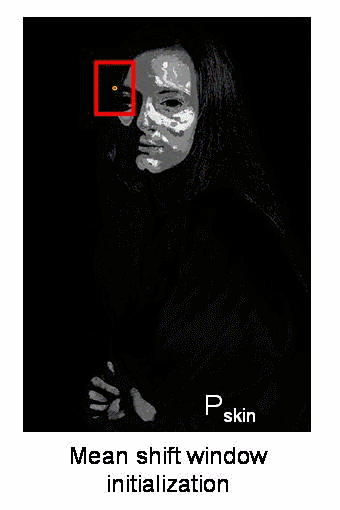
meanshift The principle of the algorithm is very simple . Suppose you have a bunch of dot sets , There is a small window , This window may be round , Now you may want to move this window to the area with the highest point set density .
Here's the picture :

The first window is the area of the blue circle , Name it C1. The center of the blue circle is marked with a blue rectangle , Name it C1_o.
The centroid formed by the point set of all points in the window is the blue circular point C1_r It's about , Obviously, the centroid and mass center of the ring do not coincide . therefore , Move the blue window , So that the centroid coincides with the previously obtained centroid . Find the center of mass of the point set surrounded by the ring again in the area of the newly moved ring , Then move again , Usually , Centroid and center of mass do not coincide . Continue to perform the above movement process , Until the centroid and the center of mass roughly coincide . such , Finally, the circular window will fall to the place with the largest pixel distribution , That is, the green circle in the picture , Name it C2.
meanshift The algorithm is not only used in video tracking , In clustering , Smoothing and so on have important applications in various occasions involving data and unsupervised learning , It is a widely used algorithm .
An image is a matrix of information , How to use... In a video meanshift Algorithm to track a moving object ? The general flow is as follows :
First, select a target area on the image
Calculate the histogram distribution of the selected area , It's usually HSV Histogram of color space .
For the next image b Also calculate the histogram distribution .
Calculate the image b The area most similar to the histogram distribution of the selected area , Use meanshift The algorithm moves the selected area along the most similar part , Until you find the most similar area , It's done in the image b Target tracking in .
repeat 3 To 4 The process of , Complete the whole video target tracking .
Usually, we use the image obtained by histogram back projection and the starting position of the target object in the first frame , When the movement of the target object is reflected in the back projection of the histogram ,meanshift The algorithm moves our window to the region with the largest gray density in the back projection image . As shown in the figure below :

The process of histogram back projection is :
Suppose we have a 100x100 The input image of , There is a 10x10 Template image , The search process is like this :
- From the upper left corner of the input image (0,0) Start , Cut a piece (0,0) to (10,10) Temporary image of ;
- Generate histogram of temporary image ;
- Compare the histogram of the temporary image with the histogram of the template image , The comparison result is recorded as c;
- Histogram comparison results c, Is the result image (0,0) The pixel value at ;
- Cut the input image from (0,1) to (10,11) Temporary image of , Histogram comparison , And record the result image ;
- repeat 1~5 Step until the lower right corner of the input image , The back projection of the histogram is formed .
1.2 Realization
stay OpenCV To realize Meanshift Of API yes :
cv.meanShift(probImage, window, criteria)
Parameters :
- probImage: ROI Area , That is, the back projection of the histogram of the target
- window: Initial search window , It's the definition of ROI Of rect
- criteria: Determine the criteria for stopping window search , Mainly, the number of iterations reaches the maximum value , The drift value of the window center is greater than a set limit, etc .
Realization Meanshift The main process of :
- Read video file :cv.videoCapture()
- Region of interest : Get the first frame image , And set the target area , Region of interest
- Calculate the histogram : Calculate the of the region of interest HSV Histogram , And normalize it
- Target tracking : Set window search stop criteria , Histogram back projection , Target tracking , And draw a rectangular box at the target position .
Example :
import numpy as np
import cv2 as cv
# 1. Get images
cap = cv.VideoCapture('DOG.wmv')

# 2. Get the first frame image , And specify the target location
ret,frame = cap.read()
# 2.1  Target location ( That's ok , high , Column , wide )
r,h,c,w = 197,141,0,208
track_window = (c,r,w,h)
# 2.2  Specify the region of interest of the target
roi = frame[r:r+h, c:c+w]

# 3.  Calculate the histogram
# 3.1  Convert color space (HSV)
hsv_roi =  cv.cvtColor(roi, cv.COLOR_BGR2HSV)
# 3.2  Remove low brightness values
# mask = cv.inRange(hsv_roi, np.array((0., 60.,32.)), np.array((180.,255.,255.)))
# 3.3  Calculate the histogram
roi_hist = cv.calcHist([hsv_roi],[0],None,[180],[0,180])
# 3.4  normalization
cv.normalize(roi_hist,roi_hist,0,255,cv.NORM_MINMAX)

# 4.  Target tracking
# 4.1  Set window search termination criteria : Maximum number of iterations , Minimum window center drift
term_crit = ( cv.TERM_CRITERIA_EPS | cv.TERM_CRITERIA_COUNT, 10, 1 )

while(True):
    # 4.2  Get every image
    ret ,frame = cap.read()
    if ret == True:
        # 4.3  Calculate the back projection of the histogram
        hsv = cv.cvtColor(frame, cv.COLOR_BGR2HSV)
        dst = cv.calcBackProject([hsv],[0],roi_hist,[0,180],1)

        # 4.4  Conduct meanshift track
        ret, track_window = cv.meanShift(dst, track_window, term_crit)

        # 4.5  Draw the tracked position on the video , And display
        x,y,w,h = track_window
        img2 = cv.rectangle(frame, (x,y), (x+w,y+h), 255,2)
        cv.imshow('frame',img2)

        if cv.waitKey(60) & 0xFF == ord('q'):
            break
    else:
        break
# 5.  Release resources
cap.release()
cv.destroyAllWindows()
Here are the tracking results of three frames of images :

2. Camshift
Let's take a closer look at the above results , There is a question , That is, the size of the detected window is fixed , It's a process from small to near , Fixed windows are not appropriate . So we need to modify the size and angle of the window according to the size and angle of the target .CamShift Can help us solve this problem .
CamShift The full name of the algorithm is “Continuously Adaptive Mean-Shift”( Continuous adaptation MeanShift Algorithm ), It's right MeanShift The improved algorithm of the algorithm , The size of the search window can be adjusted in real time with the change of the size of the tracking target , It has good tracking effect .
Camshift The algorithm first applies meanshift, once meanshift convergence , It will update the size of the window , The direction of the best fit ellipse is also calculated , Thus, the search window is updated according to the location and size of the target . As shown in the figure below :
Camshift stay OpenCV When implemented in , Just put the above meanshift The function is changed to Camshift Function :
take Camshift Medium :
 # 4.4  Conduct meanshift track
        ret, track_window = cv.meanShift(dst, track_window, term_crit)

        # 4.5  Draw the tracked position on the video , And display
        x,y,w,h = track_window
        img2 = cv.rectangle(frame, (x,y), (x+w,y+h), 255,2)
Change it to :
  # Conduct camshift track
    ret, track_window = cv.CamShift(dst, track_window, term_crit)

        #  Draw tracking results
        pts = cv.boxPoints(ret)
        pts = np.int0(pts)
        img2 = cv.polylines(frame,[pts],True, 255,2)
3. Algorithm is summarized
Meanshift and camshift Each algorithm has its own advantages , Naturally, there are disadvantages :
Meanshift Algorithm : Simple , Less iterations , But it can't solve the occlusion problem of the target and can't adapt to the change of the shape and size of the moving target .
camshift Algorithm : It can adapt to the change of the size and shape of the moving target , It has good tracking effect , But when the background color is close to the target color , It's easy to make the target area larger , It may eventually lead to the loss of target tracking .
边栏推荐
猜你喜欢

STP configuration instance learning record

What is the reason for the failure of video playback and RTMP repeated streaming on easygbs platform?

图像处理 图像特征提取与描述
EasyGBS平臺出現錄像無法播放並存在RTMP重複推流現象,是什麼原因?

倍福PLC和C#通过ADS通信传输结构体类型变量
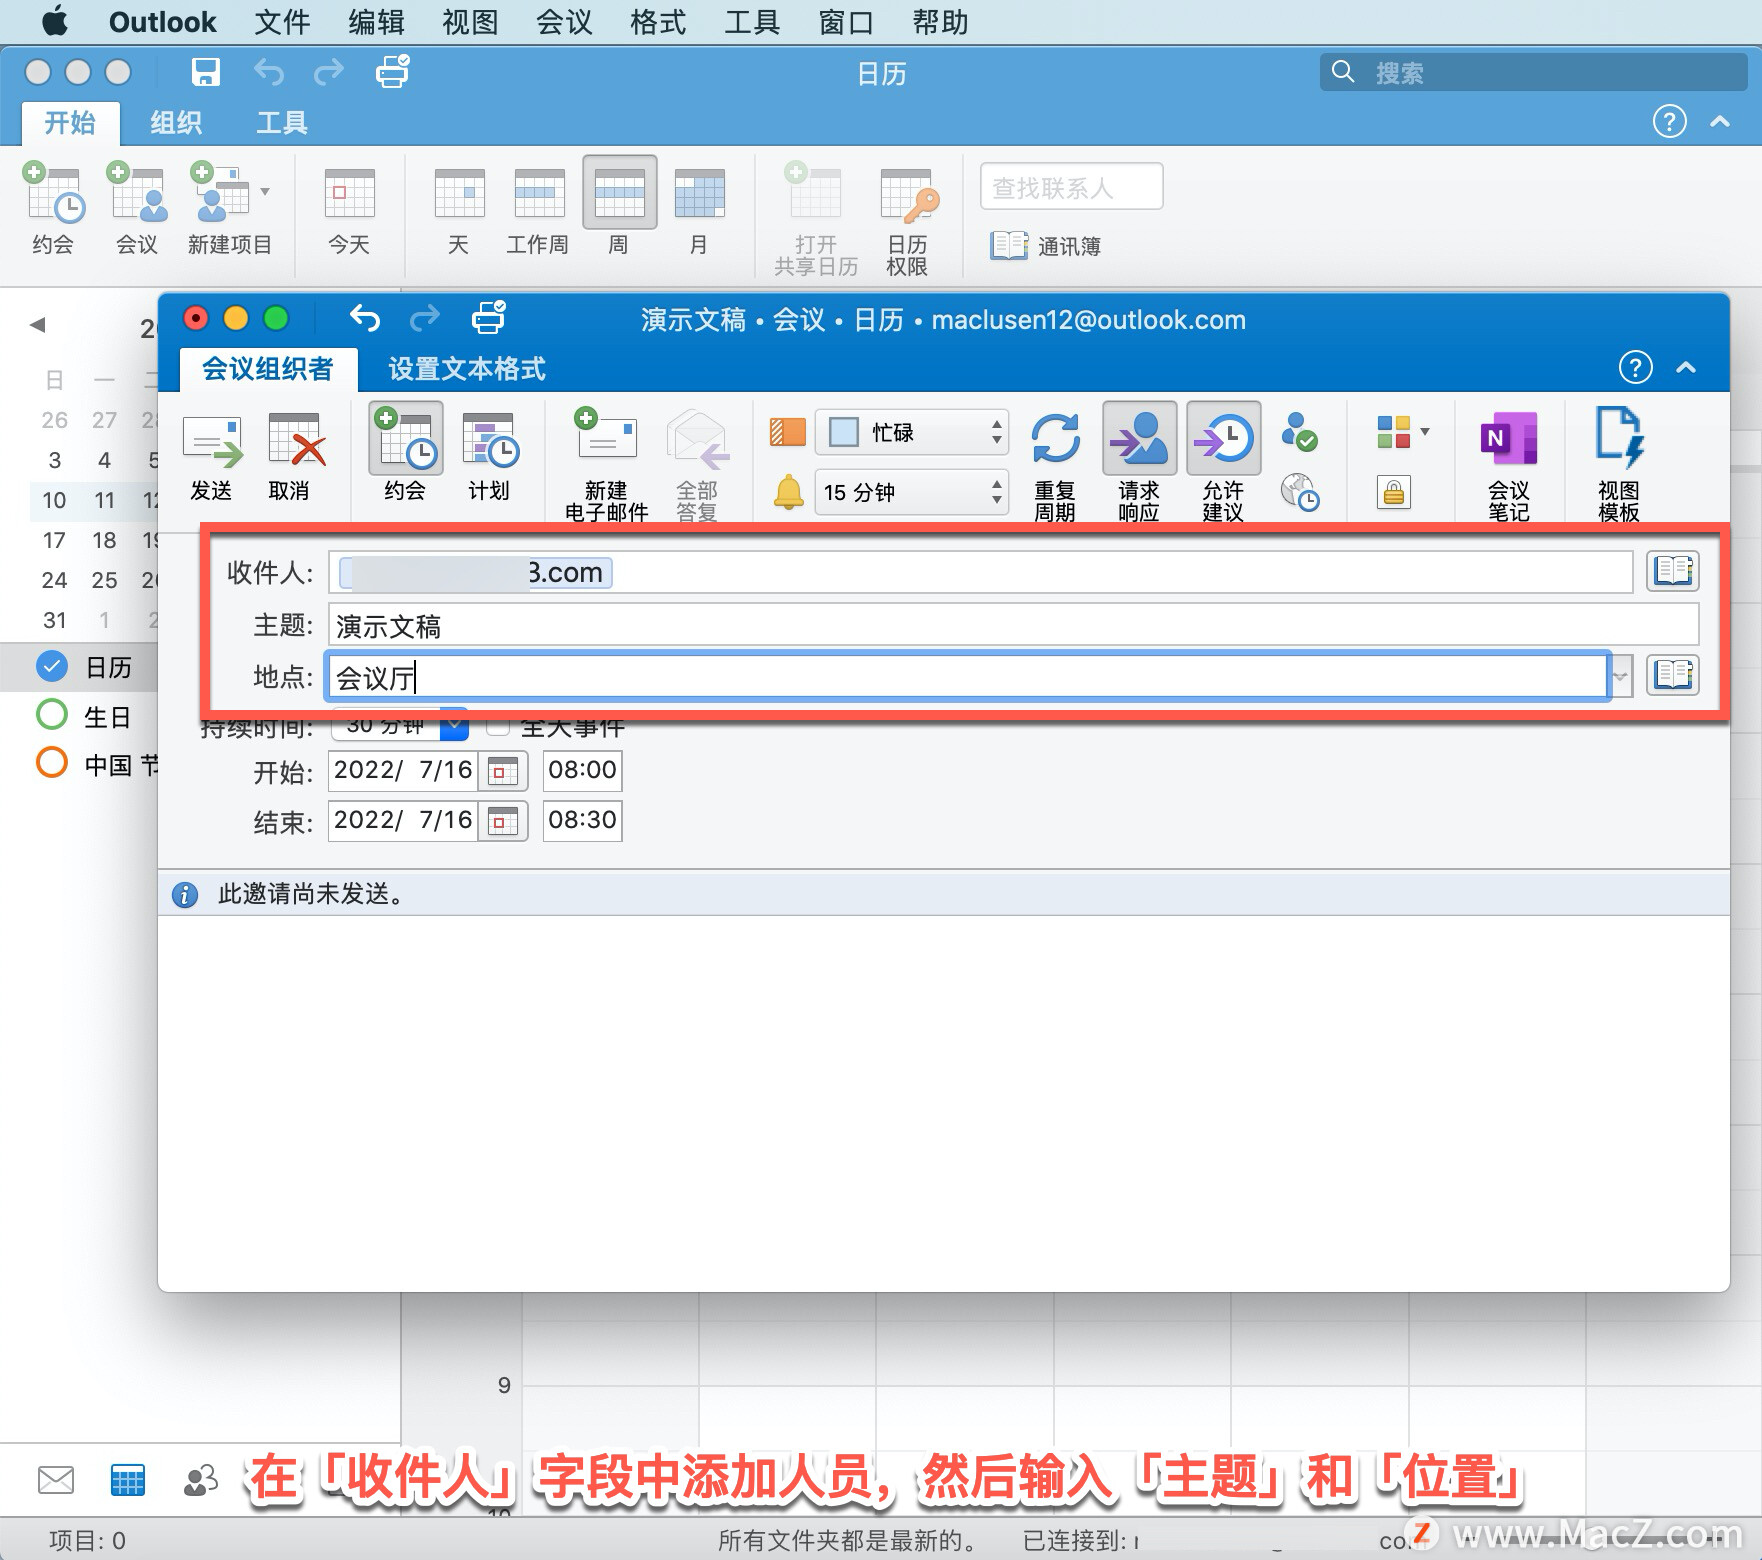
Outlook 教程,如何在 Outlook 中切换日历视图、创建会议?

雷达导论PART VII.4 SAR系统设计

SAR成像之点目标仿真(二)—— Matlab仿真
HCIA----03 eNSP使用、DHCP、路由器

信號完整性(SI)電源完整性(PI)學習筆記(三十二)電源分配網路(四)
随机推荐
C language - big end storage and small end storage
The relationship between method area, perpetual generation and meta space
Summary of time complexity( Ο Is the asymptotic upper bound, Ω is the asymptotic lower bound, P, NP, NP hard, NPC problem)
如何防止订单重复支付?
The context of virtual memory technology (Part 1)
倍福PLC和C#通过ADS通信传输String类型
北大博士小姐姐:分享压箱底干货 | 五招提高学习效率
当输入网址后,到网页显示,期间发生了什么
雷达导论PART VII.1 雷达与分辨率
雷达导论PART VII.2 成像方法
Plug ins used by Jenkins
数据进行脱敏
记录一次爬虫题库
北汇信息12岁啦|Happy Birthday
Redis如何实现持久化?详细讲解RDB的三种触发机制及其优缺点,带你快速掌握RDB
信号完整性(SI)电源完整性(PI)学习笔记(三十二)电源分配网路(四)
Numpy: element selection of matrix
Harbor deployment
迷茫、工作没动力? 职业发展没希望? 看这篇文章就够了
HCIA----06 OSPF