当前位置:网站首页>URDF 语法详解
URDF 语法详解
2022-07-26 03:09:00 【2021 Nqq】
简单实例
在 Rviz 中显示一个盒状机器人
URDF文件 demo01_helloworld.urdf
<robot name="mycar">
    <link name="base_link">
        <visual>
            <geometry>
                <box size="0.5 0.2 0.1" />
            </geometry>
        </visual>
    </link>
</robot>
launch文件 demo01_helloworld.launch
<launch>
    <!-- 1. 在参数服务器载入 urdf 文件; name值是固定的-->
    <param name = "robot_description" textfile = "$(find urdf01_rviz)/urdf/urdf/demo01_helloworld.urdf" />
    <!-- 2. 启动 rviz args用来保存rviz文件-->
    <node pkg = "rviz" type = "rviz" name = "rviz" args = "-d $(find urdf01_rviz)/config/show_mycar.rviz"/>
</launch>
source ./devel/setup.bash
roslaunch urdf01_rviz demo01_helloworld.launch
link
定义:urdf 中的 link 标签用于描述机器人某个部件(也即刚体部分)的外观和物理属性,比如: 机器人底座、轮子、激光雷达、摄像头…每一个部件都对应一个 link, 在 link 标签内,可以设计该部件的形状、尺寸、颜色、惯性矩阵、碰撞参数等一系列属性。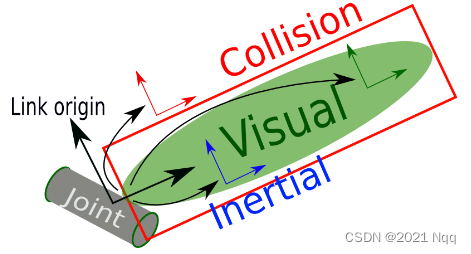
- Inertial:惯性矩阵
- Collision:碰撞参数
- Visual:可视化

URDF文件 demo02_link.urdf
<!-- 需求: 设置不同形状的机器人部件 -->
<robot name = "mycar">
    <link name = "base_link">
        <!-- 可视化标签 -->
        <visual>
            <!-- 1. 形状 -->
            <geometry>
                <!-- 1.1 立方体 x,y,z-->
                <!-- <box size = "0.3 0.2 0.1" /> -->
                <!-- 1.2 圆柱 -->
                <!-- <cylinder radius = "0.1" length = "2" /> -->
                <!-- 1.3 球体 -->
                <!-- <sphere radius = "1" /> -->
                <!-- 1.4 皮肤 -->
                <mesh filename = "package://urdf01_rviz/meshes/autolabor_mini.stl"/>
            </geometry>

            <!-- 2. 偏移量与倾斜弧度 -->
            <!-- xyz 设置机器人模型在 x, y, z轴上偏移量 rpy 设置倾斜弧度 x(翻滚) y(俯仰) z(偏航) -->
            <origin xyz = "0 0 0" rpy = "1.57 0 1.57" />

            <!-- 3. 颜色 -->
            <!-- rgba: r = red g = green b = blue a = 透明度 四者取值介于[0,1] -->
            <material name = "car_color">
                <color rgba = "0 1 0 1" />
            </material>
        </visual>
    </link>
</robot>
launch文件 demo02_link.launch
<launch>
    <!-- 1. 在参数服务器载入 urdf 文件; name值是固定的-->
    <param name = "robot_description" textfile = "$(find urdf01_rviz)/urdf/urdf/demo02_link.urdf" />
    <!-- 2. 启动 rviz args用来保存rviz文件-->
    <node pkg = "rviz" type = "rviz" name = "rviz" args = "-d $(find urdf01_rviz)/config/show_mycar.rviz"/>
</launch>
joint
urdf 中的 joint 标签用于描述机器人关节的运动学和动力学属性,还可以指定关节运动的安全极限,机器人的两个部件(分别称之为 parent link 与 child link)以"关节"的形式相连接,不同的关节有不同的运动形式: 旋转、滑动、固定、旋转速度、旋转角度限制…,比如:安装在底座上的轮子可以360度旋转,而摄像头则可能是完全固定在底座上。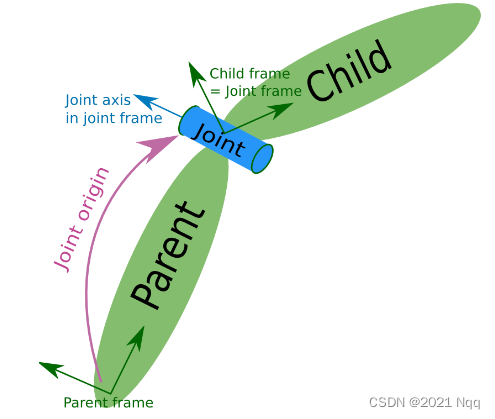


origin 就是 上图的紫色部分,joint 关于 parent_link的位置关系

URDF文件 demo03_joint.urdf
urdf文件里使用中文注释可能会报错
<!-- 需求: 设置机器人底盘,并添加摄像头 -->
<robot name = "mycar">
    <!-- 1. 底盘link -->
    <link name = "base_link">
        <visual>
            <geometry>
                <box size = "0.3 0.2 0.1" />
            </geometry>
            <origin xyz = "0 0 0" rpy = "0 0 0" />
            <material name = "car_color">
                <color rgba = "0.8 0.5 0 0.5" />
            </material>
        </visual>
    </link>
    <!-- 2. 摄像头link -->
     <link name = "camera">
        <visual>
            <geometry>
                <box size = "0.02 0.05 0.05" />
            </geometry>
            <!-- 先使用默认(后期需要修改) -->
            <origin xyz = "0 0 0" rpy = "0 0 0" />
            <material name = "camera_color">
                <color rgba = "0 0 1 0.5" />
            </material>
        </visual>
    </link>
    <!-- 3. 关节-->
    <joint name = "camera2base" type = "continuous">
        <!-- 父节 link -->
        <parent link = "base_link" />
        <!-- 子节 link -->
        <child link = "camera" />
        <!-- 设置joint相对于父节的偏移量 -->
        <origin xyz = "0.12 0 0.05" rpy = "0 0 0" />
        <!-- 设置关节旋转参考的坐标轴,0表示不绕该轴旋转,1表示绕该轴旋转 -->
        <axis xyz = "0 0 1" />
    </joint>
</robot>
launch文件 demo03_joint.launch
<launch>
    <!-- 1. 在参数服务器载入 urdf 文件; name值是固定的-->
    <param name = "robot_description" textfile = "$(find urdf01_rviz)/urdf/urdf/demo03_joint.urdf" />
    <!-- 2. 启动 rviz args用来保存rviz文件-->
    <node pkg = "rviz" type = "rviz" name = "rviz" args = "-d $(find urdf01_rviz)/config/show_mycar.rviz"/>
    <!-- 只有上述两条语句: 表现: 设置头显示位置与颜色异常 提示: No transform from [camera] to [base_link] 缺少 camera 到 base_link 的坐标变换 原因: rviz 显示 URDF 时,必须发布不同部件之间的 坐标系 关系 解决: ROS中提供了关于机器人模型显示的坐标发布相关节点(两个) rosrun joint_state_publisher joint_state_publisher rosrun robot_state_publisher robot_state_publisher -->
    <!-- 关节状态发布节点 -->
    <node pkg = "joint_state_publisher" type = "joint_state_publisher" name = "joint_state_publisher" />
    <!-- 机器人状态发布节点 -->
    <node pkg = "robot_state_publisher" type = "robot_state_publisher" name = "robot_state_publisher" />

</launch>
优化
URDF文件 demo04_base_footprint.urdf
<!-- 需求: 设置机器人底盘,并添加摄像头 -->
<robot name = "mycar">
    <!-- 添加一个尺寸极小关节 link, 再去关联出时 link 与 base_link, 关节的高度刚好和 base_link 下沉的高度一致(半个底盘高度) -->
    <link name = "base_footprint">
        <visual>
            <geometry>
                <box size = "0.001 0.001 0.001" />
            </geometry>
        </visual>
    </link>

    <!-- 1. 底盘link -->
    <link name = "base_link">
        <visual>
            <geometry>
                <box size = "0.3 0.2 0.1" />
            </geometry>
            <origin xyz = "0 0 0" rpy = "0 0 0" />
            <material name = "car_color">
                <color rgba = "0.8 0.5 0 0.5" />
            </material>
        </visual>
    </link>

    <!-- 2. 摄像头link -->
     <link name = "camera">
        <visual>
            <geometry>
                <box size = "0.02 0.05 0.05" />
            </geometry>
            <!-- 先使用默认(后期需要修改) 默认情况下关节与连杆中心点重合-->
            <origin xyz = "0 0 0.025" rpy = "0 0 0" />
            <material name = "camera_color">
                <color rgba = "0 0 1 0.5" />
            </material>
        </visual>
    </link>

    <!-- 关联 base_footprint 与 base_link -->
    <joint name = "link2footprint" type = "fixed">
        <!-- 父节 link -->
        <parent link = "base_footprint" />
        <!-- 子节 link -->
        <child link = "base_link" />
        <!-- 设置子节相对于父节的偏移量 z为半个base_link的高度-->
        <origin xyz = "0 0 0.05" rpy = "0 0 0" />
    </joint>

    <!-- 3. 关节-->
    <joint name = "camera2base" type = "continuous">
        <!-- 父节 link -->
        <parent link = "base_link" />
        <!-- 子节 link -->
        <child link = "camera" />
        <!-- 设置子节相对于父节的偏移量 -->
        <origin xyz = "0.12 0 0.05" rpy = "0 0 0" />
        <!-- 设置关节旋转参考的坐标轴,0表示不绕该轴旋转,1表示绕该轴旋转 -->
        <axis xyz = "0 0 1" />
    </joint>
</robot>
launch文件 demo04_base_footprint.launch
<launch>
    <!-- 1. 在参数服务器载入 urdf 文件; name值是固定的-->
    <param name = "robot_description" textfile = "$(find urdf01_rviz)/urdf/urdf/demo04_base_footprint.urdf" />
    <!-- 2. 启动 rviz args用来保存rviz文件 -->
    <node pkg = "rviz" type = "rviz" name = "rviz" args = "-d $(find urdf01_rviz)/config/show_mycar.rviz"/>
    <!-- 只有上述两条语句: 表现: 设置头显示位置与颜色异常 提示: No transform from [camera] to [base_link] 缺少 camera 到 base_link 的坐标变换 原因: rviz 显示 URDF 时,必须发布不同部件之间的 坐标系 关系 解决: ROS中提供了关于机器人模型显示的坐标发布相关节点(两个) rosrun joint_state_publisher joint_state_publisher rosrun robot_state_publisher robot_state_publisher -->
    <!-- 关节状态发布节点 -->
    <node pkg = "joint_state_publisher" type = "joint_state_publisher" name = "joint_state_publisher" />
    <!-- 机器人状态发布节点 -->
    <node pkg = "robot_state_publisher" type = "robot_state_publisher" name = "robot_state_publisher" />
</launch>
练习
link偏移量是物体中心和大地坐标系原点的偏移
joint偏移量是两个link坐标系之间的偏移量
设计要求:创建一个四轮圆柱状机器人模型,机器人参数如下,底盘为圆柱状,半径 10cm,高 8cm,四轮由两个驱动轮和两个万向支撑轮组成,两个驱动轮半径为 3.25cm,轮胎宽度1.5cm,两个万向轮为球状,半径 0.75cm,底盘离地间距为 1.5cm(与万向轮直径一致)
launch文件
<launch>
    <!-- 1. 在参数服务器中载入URDF -->
    <param name = "robot_description" textfile = "$(find urdf01_rviz)/urdf/urdf/demo05_test.urdf" />

    <!-- 2. 启动rviz -->
    <node pkg = "rviz" type = "rviz" name = "rviz" args = "-d $(find urdf01_rviz)/config/show_mycar.rviz"/>

    <!-- 3. 添加关节状态发布节点 -->
    <node pkg = "joint_state_publisher" type = "joint_state_publisher" name = "joint_state_publisher" />

    <!-- 4. 添加机器人状态发布节点 -->
    <node pkg = "robot_state_publisher" type = "robot_state_publisher" name = "robot_state_publisher" />

    <!-- 5. 关节运动控制节点 -->
    <node pkg = "joint_state_publisher_gui" type = "joint_state_publisher_gui" name = "joint_state_publisher_gui" />

</launch>
添加极小球体
 <!-- 1. 添加 base_footprint 只需要是一个极小的球体或者立方体就行-->
    <link name = "base_footprint">
        <visual>
            <geometry>
                <sphere radius = "0.001" />
            </geometry>
            <material name = "car_color">
                <color rgba = "1 0 0 0.5" />
            </material>
        </visual>
    </link>
添加底盘
<!-- 2. 添加底盘 -->
    <!-- 形状: 底盘为圆柱状,半径 0.1m,高 0.08m 离地间距: 0.015m -->
    <!-- 2-1 link -->
    <link name = "base_link">
        <visual>
            <geometry>
                <cylinder radius = "0.1" length = "0.08" />
            </geometry>
            <origin xyz = "0 0 0" rpy = "0 0 0"/>
            <material name = "baselink_color">
                <color rgba = "1 0.5 0.2 0.5" />
            </material>
        </visual>
    </link>
    <!-- 2-2 joint 半个车体的高度0.08m/2+0.015m-->
    <joint name = "link2footprint" type = "fixed">
        <parent link = "base_footprint" />
        <child link = "base_link" />
        <!-- 关节z上的设置 = 车体高度/2 + 离地高度 -->
        <origin xyz = "0 0 0.055" rpy = "0 0 0" />
    </joint>
添加驱动轮
驱动轮在调试中抖动,是因为开了两个joint_state_publisher,一个是静态,一个是动态,造成tf冲突
 <!-- 4. 添加万向轮 -->
    <!-- 形状: 球 半径: 0.0075m -->
    <!-- 4-1 link -->
    <link name = "front_wheel">
        <visual>
            <geometry>
                <sphere radius = "0.0075" />
            </geometry>
            <origin xyz = "0 0 0" rpy = "0 0 0"/>
            <material name = "wheel_color">
                <color rbga = "0 0 0 0.3" />
            </material>
        </visual>
    </link>
    <link name = "back_wheel">
        <visual>
            <geometry>
                <sphere radius = "0.0075" />
            </geometry>
            <origin xyz = "0 0 0" rpy = "0 0 0"/>
            <material name = "wheel_color">
                <color rbga = "0 0 0 0.3" />
            </material>
        </visual>
    </link>
    <!-- 4-2 joint -->
    <joint name = "front2link" type = "continuous">
        <parent link = "base_link" />
        <child link = "front_wheel" />
        <!-- x: 0.08 小于半径 y: 0 z: 0.04 + 0.015 - 0.0075 = 0.0475 -->
        <origin xyz = "0.08 0 -0.0475" rpy = "0 0 0" />
        <!-- 转动时绕Y轴 -->
        <axis xyz = "0 1 0" />
    </joint>
       <joint name = "back2link" type = "continuous">
        <parent link = "base_link" />
        <child link = "back_wheel" />
        <!-- x: 0.08 小于半径 y: 0 z: 0.04 + 0.015 - 0.0075 = 0.0475 -->
        <origin xyz = "-0.08 0 -0.0475" rpy = "0 0 0" />
        <!-- 转动时绕Y轴 -->
        <axis xyz = "0 1 0" />
    </joint>
URDF工具
在终端中打开urdf文件夹
check_urdf demo05_test.urdf
urdf_to_graphiz demo05_test.urdf , 出现以下
Created file mycar.gv
Created file mycar.pdf
evince mycar.pdf
urdf总程序 demo05_test.urdf
<robot name = "mycar">
    <!-- 1. 添加 base_footprint 只需要是一个极小的球体或者立方体就行-->
    <link name = "base_footprint">
        <visual>
            <geometry>
                <sphere radius = "0.001" />
            </geometry>
            <material name = "car_color">
                <color rgba = "1 0 0 0.5" />
            </material>
        </visual>
    </link>

    <!-- 2. 添加底盘 -->
    <!-- 形状: 底盘为圆柱状,半径 0.1m,高 0.08m 离地间距: 0.015m -->
    <!-- 2-1 link -->
    <link name = "base_link">
        <visual>
            <geometry>
                <cylinder radius = "0.1" length = "0.08" />
            </geometry>
            <origin xyz = "0 0 0" rpy = "0 0 0"/>
            <material name = "baselink_color">
                <color rgba = "1 0.5 0.2 0.5" />
            </material>
        </visual>
    </link>
    <!-- 2-2 joint 半个车体的高度0.08m/2+0.015m-->
    <joint name = "link2footprint" type = "fixed">
        <parent link = "base_footprint" />
        <child link = "base_link" />
        <!-- 关节z上的设置 = 车体高度/2 + 离地高度 -->
        <origin xyz = "0 0 0.055" rpy = "0 0 0" />
    </joint>

    <!-- 3. 添加驱动轮 -->
    <!-- 形状: 圆柱 半径: 0.0325m 长度: 0.015m -->
    <!-- 3-1 link -->
    <link name = "left_wheel">
        <visual>
            <geometry>
                <cylinder radius = "0.0325" length = "0.015" />
            </geometry>
            <!-- 正常情况下圆柱面朝上,这里驱动轮在左右,需要修改欧拉角,沿x轴翻滚90度,约为1.57弧度 -->
            <origin xyz = "0 0 0" rpy = "1.5708 0 0"/>
            <material name = "wheel_color">
                <color rgba = "0 0 0 0.3" />
            </material>
        </visual>
    </link>
    <link name = "right_wheel">
        <visual>
            <geometry>
                <cylinder radius = "0.0325" length = "0.015" />
            </geometry>
            <!-- 正常情况下圆柱面朝上,这里驱动轮在左右,需要修改欧拉角,沿x轴翻滚90度,约为1.57弧度 -->
            <origin xyz = "0 0 0" rpy = "1.5708 0 0"/>
            <material name = "wheel_color">
                <color rgba = "0 0 0 0.3" />
            </material>
        </visual>
    </link>
    <!-- 3-2 joint 左关节 -->
    <joint name = "lest2link" type = "continuous">
        <parent link = "base_link" />
        <child link = "left_wheel" />
        <!-- x: 0 无偏移 y: 0.1 车体半径 z: 0.04 + 0.015 - 0.0325 = 0.055 - 0.0325 = 0.0225,在下面为负数 车体高度 / 2 + 离地间距 - 车轮半径 -->
        <origin xyz = "0 0.1 -0.0225" rpy = "0 0 0" />
        <!-- 转动时绕Y轴 -->
        <axis xyz = "0 1 0" />
    </joint>
    <!-- 3-2 joint 左关节 -->
    <joint name = "right2link" type = "continuous">
        <parent link = "base_link" />
        <child link = "right_wheel" />
        <!-- x: 0 无偏移 y: 0.1 车体半径,这里要变成负值 z: 0.04 + 0.015 - 0.0325 = 0.055 - 0.0325 = 0.0225,在下面为负数 车体高度 / 2 + 离地间距 - 车轮半径 -->
        <origin xyz = "0 -0.1 -0.0225" rpy = "0 0 0" />
        <!-- 转动时绕Y轴 -->
        <axis xyz = "0 1 0" />
    </joint>


    <!-- 4. 添加万向轮 -->
    <!-- 形状: 球 半径: 0.0075m -->
    <!-- 4-1 link -->
    <link name = "front_wheel">
        <visual>
            <geometry>
                <sphere radius = "0.0075" />
            </geometry>
            <origin xyz = "0 0 0" rpy = "0 0 0"/>
            <material name = "wheel_color">
                <color rbga = "0 0 0 0.3" />
            </material>
        </visual>
    </link>
    <link name = "back_wheel">
        <visual>
            <geometry>
                <sphere radius = "0.0075" />
            </geometry>
            <origin xyz = "0 0 0" rpy = "0 0 0"/>
            <material name = "wheel_color">
                <color rbga = "0 0 0 0.3" />
            </material>
        </visual>
    </link>
    <!-- 4-2 joint -->
    <joint name = "front2link" type = "continuous">
        <parent link = "base_link" />
        <child link = "front_wheel" />
        <!-- x: 0.08 小于半径 y: 0 z: 0.04 + 0.015 - 0.0075 = 0.0475 -->
        <origin xyz = "0.08 0 -0.0475" rpy = "0 0 0" />
        <!-- 转动时绕Y轴 -->
        <axis xyz = "0 1 0" />
    </joint>
       <joint name = "back2link" type = "continuous">
        <parent link = "base_link" />
        <child link = "back_wheel" />
        <!-- x: 0.08 小于半径0.1 y: 0 z: 0.04 + 0.015 - 0.0075 = 0.0475 -->
        <origin xyz = "-0.08 0 -0.0475" rpy = "0 0 0" />
        <!-- 转动时绕Y轴 -->
        <axis xyz = "0 1 0" />
    </joint>
</robot>
边栏推荐
- 这种动态规划你见过吗——状态机动态规划之股票问题(上)
- How to design test cases according to the requirements of login testing?
- YOLOv3: An Incremental Improvement
- Dataframe sorting: datetime format splitting; Delete a specific line; Group integration.
- [noip2001 popularization group] the problem of maximum common divisor and minimum common multiple
- Chen Yili, China Academy of communications technology: cost reduction and efficiency increase are the greatest value of Enterprise Cloud native applications
- canvas——绘制文本——饼图的修改
- 当点击Play以后,EditorWindow中的变量会被莫名其妙销毁.
- File operation (I) -- File introduction and file opening and closing methods
- Image recognition (VI) | activation function
猜你喜欢

C language layered understanding (C language function)

(九)属性自省
![[sql] case expression](/img/05/1bbb0b5099443f7ce5f5511703477e.png)
[sql] case expression

Image recognition (VII) | what is the pooling layer? What's the effect?

ES6 set and map

File operation (I) -- File introduction and file opening and closing methods
The difference between the world wide web, the Internet and the Internet

Win11麦克风权限的开启方法

STM - exti external interrupt learning notes

Standardize your own debug process
随机推荐
An article allows you to understand the relevance of cloud native containerization
Three years of software testing experience, salary has been stuck at 10K, how to improve and develop automated testing?
File operation (I) -- File introduction and file opening and closing methods
The source of everything, the choice of code branching strategy
[sql] usage of self connection
Usage of fuser and lsof
Win11大小写提示图标怎么关闭?Win11大小写提示图标的关闭方法
How to design test cases according to the requirements of login testing?
Cloud native guide what is cloud native infrastructure
dataframe整理:datetime格式分拆;删除特定行;分组整合。
JVM内存模型解析
Quick check of OGC WebGIS common service standards (wms/wmts/tms/wfs)
js中数组排序的方法有哪些
Arthas download and startup
YOLOv3: An Incremental Improvement
.net serialize enumeration as string
Self-supervised learning method to solve the inverse problem of Fokker-Planck Equation
Machine learning foundation plan 0-2: what is machine learning? What does it have to do with AI?
【C语言】深入理解 整型提升 和 算术转换
Image recognition (VI) | activation function