当前位置:网站首页>[deploy private warehouse based on harbor] 3 deploy harbor
[deploy private warehouse based on harbor] 3 deploy harbor
2022-06-11 06:58:00 【Lone ranger_ Atao】
Catalog
1.1 install Docker Service and configure Alibaba cloud accelerator
1.1.1 Install the base package
1.1.2 To configure YUM Mirror warehouse
1.1.4 modify deamon.json To configure docker Alicloud image Accelerator
1.2 install docker-compose service
2.3 modify harbor.yml The configuration file
3.1 Access address and account number
Last one , We have the machine ready , The next step is to operate the machine for a while .
The first thing to understand is ,harbor rely on docker and docker-compose, So we need to install these two services .
1 Prepositive action
1.1 install Docker Service and configure Alibaba cloud accelerator
1.1.1 Install the base package
yum -y install yum-utils device-mapper-persistent-data lvm2 1.1.2 To configure YUM Mirror warehouse
yum-config-manager --add-repo http://mirrors.163.com/.help/CentOS7-Base-163.repo
yum-config-manager --add-repo http://mirrors.aliyun.com/docker-ce/linux/centos/docker-ce.repo
1.1.3 install Docker service
#  Inquire about docker edition
yum list docker-ce --showduplicates|sort -r
#  Install the specified version , Choose according to the production environment   I installed 18.09.8 edition
yum -y install docker-ce-18.09.8
1.1.4 modify deamon.json To configure docker Alicloud image Accelerator
I don't have Alibaba cloud image accelerator , So we can only use the netizens' for the time being :
Running the following command will automatically complete the configuration ( After you run the command, you will generate /etc/docker/daemon.json):
( The following command copies all , And paste it into the at one time terminal Inside , It will run automatically immediately , And finally stop on the last line of command , Enter again , It is all finished )
mkdir -p /etc/docker
cat << EOF > /etc/docker/daemon.json
{
  "registry-mirrors": ["https://k1ktap5m.mirror.aliyuncs.com"]
}
EOF
mkdir -p /etc/systemd/system/docker.service.d
systemctl daemon-reload
systemctl restart docker && systemctl enable docker
1.2 install docker-compose service
Official address :
Releases · docker/compose · GitHub https://github.com/docker/compose/releases
1.2.1 download
Log in GitHub , Find the corresponding version to download ( The following command , The author installed 1.27.4 Version of docker-compose), And put the downloaded file in /usr/local/bin Under the table of contents
curl -L https://github.com/docker/compose/releases/download/1.27.4/docker-compose-`uname -s`-`uname -m` -o /usr/local/bin/docker-compose1.2.2 Add execute permission
chmod +x /usr/local/bin/docker-compose1.2.3 View version
docker-compose -version2 Deploy harbor
2.1 download
Log in to the official address to download the corresponding version : https://github.com/goharbor/harbor/releaseshttps://github.com/goharbor/harbor/releases
I download 2.1.1 The version of the command is as follows :
wget https://github.com/goharbor/harbor/releases/download/v2.1.1/harbor-offline-installer-v2.1.1.tgz2.2 decompression
take harbor The service is pressurized to /home Under the table of contents , All the following operations take the decompressed directory as the current directory
tar xvf harbor-offline-installer-v2.1.1.tgz -C /home/ && cd /home/harbor/2.3 modify harbor.yml The configuration file
By default, only one is unzipped harbor.yml.tmpl, This is harbor.yml The template of
Based on this, create a harbor.yml The template of :
cp harbor.yml.tmpl harbor.ymlnormal ,harbor.yml Is to provide https Access to the , So you can configure https, But I think localization is a mirror warehouse , There is no need to toss about so much , So I used http Access to , The following configuration is for http Configuration of the access mode of , If you want to https access , I will attach a reference link to it later .
[[email protected] harbor]# vi harbor.yml
.....
.....
# DO NOT use localhost or 127.0.0.1, because Harbor needs to be accessed by external clients.
hostname: 192.168.211.5  ########## Modify domain name , Because I don't set the domain name , So I set the local ip

http:           # port for http, default is 80. If https enabled, this port will redirect to https port
  port: 80

# https related config
# https:######### Comment out
#   # https port for harbor, default is 443
#   port: 443  ######### Comment out
#   # The path of cert and key files for nginx
#   certificate: /home/harbor/certs/harbor.crt       ######### Comment out
#   private_key: /home/harbor/certs/harbor.key       ######### Comment out
.....
.....
# Remember Change the admin password from UI after launching Harbor.
harbor_admin_password: admin  ######### admin User login password

# Harbor DB configuration
database:
  # The password for the root user of Harbor DB. Change this before any production use.
  password: root       #########  Database password

# The default data volume
data_volume: /data   ######### The directory is created by itself , Fill in... According to the actual situation , The author stays still
2.4 Start the service
./install.sh Success log :

3 Use harbor platform
3.1 Access address and account number
The access address is harbor Of the deployed machine ip, The port number is us harbor.yml The port number specified in the . The default account is admin, The password is also in the configuration file , We designated .
Let's say mine is :
account number :admin/admin

3.2 Main panel
Log in :

Click item library Go to project details :

The following push command , stay http It cannot be used directly under the agreement , Because the default is https Protocol to push , So just write 192.168.211.5 If the port is not written , Default access 443 port . The following command is only a reference , Next , I will share the right http The writing method of the push command of the protocol .

Next , Push the mirror image to harbor
边栏推荐
- QT script document translation (I)
- UEFI查找PCI设备
- RGB-D Salient Object Detection withCross-Modality Modulation and Selection
- Promises/a+ standard Chinese Translation
- Do you use typescript or anyscript
- [Xunwei dry goods] opencv test of Godson 2k1000 development board
- VTK vtkplane and vtkcutter use
- Mongodb installation
- Henan college entrance examination vs Tianjin college entrance examination (2008-2021)
- [MATLAB image encryption and decryption] chaotic sequence image encryption and decryption (including correlation test) [including GUI source code 1862]
猜你喜欢

Heartless sword Chinese English bilingual poem 001 Love
Explain the difference between void 0 and undefined

. Net C Foundation (6): namespace - scope with name

Zabbix 监控主机是否在线
Leetcode hot topic 100 topic 21-25 solution

Flutter Container组件

About the principle and code implementation of Siou (review IOU, giou, Diou, CIO)

Redux learning (III) -- using Redux saga, writing middleware functions, and splitting reducer files
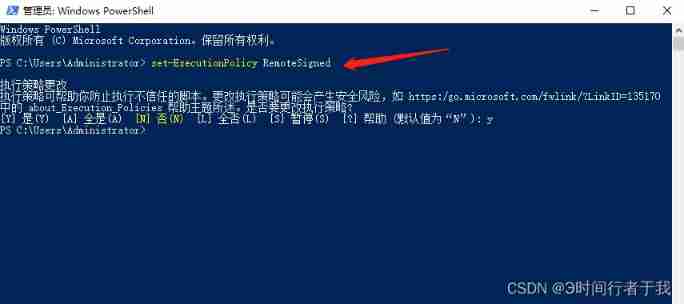
NPM upgrade: unable to load file c:\users\administrator\appdata\roaming\npm\npm-upgrade ps1

UEFI finding PCI devices
随机推荐
Illustrate the principle of one-way linked list and the method of JS to realize linked list [with source code]
saltstack部署zabbix状态文件编写
Duality-Gated Mutual Condition Network for RGBT Tracking
关于组织开展2022年宁波市重点首版次软件申报工作的通知
News web page display
Starting from scratch (I)
核查医药代表备案信息是否正确
Deep Attentive Tracking via Reciprocative Learning
迅为干货 |瑞芯微RK3568开发板TFTP&NFS烧写(上)
During unity panoramic roaming, AWSD is used to control lens movement, EQ is used to control lens lifting, and the right mouse button is used to control lens rotation.
Use of qscriptengine class
About daily report plan
Saltstack deployment ZABBIX state file writing
538. convert binary search tree to cumulative tree
双周投融报:资本抢滩元宇宙游戏
Web API、DOM
关于 QtCreator的设计器QtDesigner完全无法正常拽托控件 的解决方法
Esp32 learning notes (49) - esp-wifi-mesh interface use
About the principle and code implementation of Siou (review IOU, giou, Diou, CIO)
Stack -- one of two common linear structures of linear structure