当前位置:网站首页>图像分割模型——segmentation_models_pytorch和albumentations 组合实现多类别分割
图像分割模型——segmentation_models_pytorch和albumentations 组合实现多类别分割
2022-08-05 10:47:00 【华为云】
@[toc]
摘要
segmentation_models_pytorch是一款非常优秀的图像分割库,albumentations 是一款非常优秀的图像增强库,这篇文章将这两款优秀结合起来实现多类别的图像分割算法。数据集选用CamVid数据集,类别有:‘sky’, ‘building’, ‘pole’, ‘road’, ‘pavement’,‘tree’, ‘signsymbol’, ‘fence’, ‘car’,‘pedestrian’, ‘bicyclist’, 'unlabelled’等12个类别。数据量不大,下载地址:mirrors / alexgkendall / segnet-tutorial · GitCode。
通过这篇文章,你可以学习到:
1、如何在图像分割使用albumentations 增强算法?
2、如何使用dice_loss和cross_entropy_loss?
3、如何segmentation_models_pytorch构架UNET++模型?
4、如何对分割数据做one-hot编码?
项目结构
项目的结构如下:

训练
新建train.py,插入一下代码:
import osimport numpy as npimport cv2import albumentations as albuimport torchimport segmentation_models_pytorch as smpfrom torch.utils.data import DataLoaderfrom torch.utils.data import Dataset as BaseDataset导入需要的安装包,接下来编写数据载入部分。
# ---------------------------------------------------------------### 加载数据# CamVid数据集中用于图像分割的所有标签类别CLASSES = ['sky', 'building', 'pole', 'road', 'pavement', 'tree', 'signsymbol', 'fence', 'car', 'pedestrian', 'bicyclist', 'unlabelled']class Dataset(BaseDataset): """CamVid数据集。进行图像读取,图像增强增强和图像预处理. Args: images_dir (str): 图像文件夹所在路径 masks_dir (str): 图像分割的标签图像所在路径 class_values (list): 用于图像分割的所有类别数 augmentation (albumentations.Compose): 数据传输管道 preprocessing (albumentations.Compose): 数据预处理 """ def __init__( self, images_dir, masks_dir, augmentation=None, preprocessing=None, ): self.ids = os.listdir(images_dir) self.images_fps = [os.path.join(images_dir, image_id) for image_id in self.ids] self.masks_fps = [os.path.join(masks_dir, image_id) for image_id in self.ids] # convert str names to class values on masks self.class_values = list(range(len(CLASSES))) self.augmentation = augmentation self.preprocessing = preprocessing def __getitem__(self, i): # read data image = cv2.imread(self.images_fps[i]) image = cv2.cvtColor(image, cv2.COLOR_BGR2RGB) mask = cv2.imread(self.masks_fps[i], 0) # 从标签中提取特定的类别 (e.g. cars) masks = [(mask == v) for v in self.class_values] mask = np.stack(masks, axis=-1).astype('float') # 图像增强应用 if self.augmentation: sample = self.augmentation(image=image, mask=mask) image, mask = sample['image'], sample['mask'] # 图像预处理应用 if self.preprocessing: sample = self.preprocessing(image=image, mask=mask) image, mask = sample['image'], sample['mask'] print(mask.shape) return image, mask def __len__(self): return len(self.ids)定义类别。类别的顺序对应mask的类别。
self.images_fps和self.masks_fps是图片的list和对应的mask图片的list。
self.class_values,类别对应的index,index的值对应mask上的类别值。
self.augmentation数据增强,使用albumentations增强。
self.preprocessing数据的预处理,包含归一化和标准化,预处理的方法来自smp.encoders.get_preprocessing_fn(ENCODER, ENCODER_WEIGHTS)。
接下来,解释__getitem__函数的内容:
读取图片。
将图片转为RGB,cv2读取图片,默认是BGR,所以需要做转化。
接下来两行代码,实现将mask转为one-hot编码。输入的shape是(360,480)输出是(360,480,12)
图像增强。
图像预处理。
然后返回预处理后的图片和mask。
接下来是图片增强的代码:
def get_training_augmentation(): train_transform = [ albu.HorizontalFlip(p=0.5), albu.ShiftScaleRotate(scale_limit=0.5, rotate_limit=0, shift_limit=0.1, p=1, border_mode=0), albu.PadIfNeeded(min_height=384, min_width=480, always_apply=True, border_mode=0), albu.IAAAdditiveGaussianNoise(p=0.2), albu.IAAPerspective(p=0.5), albu.OneOf( [ albu.CLAHE(p=1), albu.RandomBrightness(p=1), albu.RandomGamma(p=1), ], p=0.9, ), albu.OneOf( [ albu.IAASharpen(p=1), albu.Blur(blur_limit=3, p=1), albu.MotionBlur(blur_limit=3, p=1), ], p=0.9, ), albu.OneOf( [ albu.RandomContrast(p=1), albu.HueSaturationValue(p=1), ], p=0.9, ), ] return albu.Compose(train_transform)def get_validation_augmentation(): """调整图像使得图片的分辨率长宽能被32整除""" test_transform = [ albu.PadIfNeeded(384, 480) ] return albu.Compose(test_transform)def to_tensor(x, **kwargs): return x.transpose(2, 0, 1).astype('float32')def get_preprocessing(preprocessing_fn): """进行图像预处理操作 Args: preprocessing_fn (callbale): 数据规范化的函数 (针对每种预训练的神经网络) Return: transform: albumentations.Compose """ _transform = [ albu.Lambda(image=preprocessing_fn), albu.Lambda(image=to_tensor, mask=to_tensor), ] return albu.Compose(_transform)首先,我们一起查看get_training_augmentation里面的代码。这里比较复杂。这些需要注意的是PadIfNeeded方法。
由于UNet系列的文章经历了5次缩放,所以图片必须被32整除。所以通过填充的方式将图片的尺寸改为(384,480)。
同样,在验证集也要做这样的操作。
to_tensor函数是将图片的值转为tensor,并将维度做交换。由于cv2读取的图片和mask的onehot的维度都是(W,H,C),需要高改为(C,W,H)。
get_preprocessing是对数据做预处理,有归一化和标准化,然后,将图片和mask转为to_tensor。
接下来,将最重要的训练部分:
# $# 创建模型并训练# ---------------------------------------------------------------if __name__ == '__main__': ENCODER = 'efficientnet-b1' ENCODER_WEIGHTS = 'imagenet' ACTIVATION = 'softmax' # could be None for logits or 'softmax2d' for multiclass segmentation DEVICE = 'cuda' # 使用unet++模型 model = smp.UnetPlusPlus( encoder_name=ENCODER, encoder_weights=ENCODER_WEIGHTS, classes=len(CLASSES), activation=ACTIVATION, ) preprocessing_fn = smp.encoders.get_preprocessing_fn(ENCODER, ENCODER_WEIGHTS)这部分的代码主要是定义模型。
模型选用unet++,解码器是efficientnet-b1,预训练权重为:imagenet。
定义类别。
preprocessing_fn获取 smp.encoders的预处理方法。
# 数据集所在的目录 DATA_DIR = './data/CamVid/' # 如果目录下不存在CamVid数据集,则克隆下载 if not os.path.exists(DATA_DIR): print('Loading data...') os.system('git clone https://github.com/alexgkendall/SegNet-Tutorial ./data') print('Done!') # 训练集 x_train_dir = os.path.join(DATA_DIR, 'train') y_train_dir = os.path.join(DATA_DIR, 'trainannot') # 验证集 x_valid_dir = os.path.join(DATA_DIR, 'val') y_valid_dir = os.path.join(DATA_DIR, 'valannot') # 加载训练数据集 train_dataset = Dataset( x_train_dir, y_train_dir, augmentation=get_training_augmentation(), preprocessing=get_preprocessing(preprocessing_fn) ) # 加载验证数据集 valid_dataset = Dataset( x_valid_dir, y_valid_dir, augmentation=get_validation_augmentation(), preprocessing=get_preprocessing(preprocessing_fn) ) # 需根据显卡的性能进行设置,batch_size为每次迭代中一次训练的图片数,num_workers为训练时的工作进程数,如果显卡不太行或者显存空间不够,将batch_size调低并将num_workers调为0 train_loader = DataLoader(train_dataset, batch_size=2, shuffle=True, num_workers=0) valid_loader = DataLoader(valid_dataset, batch_size=1, shuffle=False, num_workers=0)这部分的代码主要是数据集加载。
定义数据集所在路径。
获取训练集和验证集的路径。
加载训练集和验证集。
将训练集和测试集放入DataLoader中,根据显卡的大小定义batch_size,训练集需要shuffle,验证集不需要。
然后,定义loss
loss = smp.utils.losses.DiceLoss() + smp.utils.losses.CrossEntropyLoss() metrics = [ smp.utils.metrics.IoU(threshold=0.5), smp.utils.metrics.Recall() ] optimizer = torch.optim.Adam([ dict(params=model.parameters(), lr=0.0001), ])loss是DiceLoss和CrossEntropyLoss组合。
评分标准为IoU和Recall。
优化器选用Adam。
# 创建一个简单的循环,用于迭代数据样本 train_epoch = smp.utils.train.TrainEpoch( model, loss=loss, metrics=metrics, optimizer=optimizer, device=DEVICE, verbose=True, ) valid_epoch = smp.utils.train.ValidEpoch( model, loss=loss, metrics=metrics, device=DEVICE, verbose=True, ) # 进行40轮次迭代的模型训练 max_score = 0 for i in range(0, 40): print('\nEpoch: {}'.format(i)) train_logs = train_epoch.run(train_loader) valid_logs = valid_epoch.run(valid_loader) # 每次迭代保存下训练最好的模型 if max_score < valid_logs['iou_score']: max_score = valid_logs['iou_score'] torch.save(model, './best_model.pth') print('Model saved!') if i == 25: optimizer.param_groups[0]['lr'] = 1e-5 print('Decrease decoder learning rate to 1e-5!')创建TrainEpoch和ValidEpoch循环用来迭代数据集。
按照迭代次数循环,保存最好的模型。
完成上面的工作后就可以开始训练了。

测试
完成训练后就开始测试部分。
import osimport albumentations as albuimport cv2import matplotlib.pyplot as pltimport numpy as npimport segmentation_models_pytorch as smpimport torchfrom torch.utils.data import Dataset as BaseDatasetos.environ['CUDA_VISIBLE_DEVICES'] = '0'导入所需要的包
# ---------------------------------------------------------------### 加载数据# CamVid数据集中用于图像分割的所有标签类别CLASSES = ['sky', 'building', 'pole', 'road', 'pavement', 'tree', 'signsymbol', 'fence', 'car', 'pedestrian', 'bicyclist', 'unlabelled']class Dataset(BaseDataset): """CamVid数据集。进行图像读取,图像增强增强和图像预处理. Args: images_dir (str): 图像文件夹所在路径 masks_dir (str): 图像分割的标签图像所在路径 class_values (list): 用于图像分割的所有类别数 augmentation (albumentations.Compose): 数据传输管道 preprocessing (albumentations.Compose): 数据预处理 """ def __init__( self, images_dir, masks_dir, augmentation=None, preprocessing=None, ): self.ids = os.listdir(images_dir) self.images_fps = [os.path.join(images_dir, image_id) for image_id in self.ids] self.masks_fps = [os.path.join(masks_dir, image_id) for image_id in self.ids] # convert str names to class values on masks self.class_values = list(range(len(CLASSES))) self.augmentation = augmentation self.preprocessing = preprocessing def __getitem__(self, i): # read data image = cv2.imread(self.images_fps[i]) image = cv2.cvtColor(image, cv2.COLOR_BGR2RGB) mask = cv2.imread(self.masks_fps[i], 0) # 从标签中提取特定的类别 (e.g. cars) masks = [(mask == v) for v in self.class_values] mask = np.stack(masks, axis=-1).astype('float') # 图像增强应用 if self.augmentation: sample = self.augmentation(image=image, mask=mask) image, mask = sample['image'], sample['mask'] # 图像预处理应用 if self.preprocessing: sample = self.preprocessing(image=image, mask=mask) image, mask = sample['image'], sample['mask'] return image, mask def __len__(self): return len(self.ids)# ---------------------------------------------------------------### 图像增强def get_validation_augmentation(): """调整图像使得图片的分辨率长宽能被32整除""" test_transform = [ albu.PadIfNeeded(384, 480) ] return albu.Compose(test_transform)def to_tensor(x, **kwargs): return x.transpose(2, 0, 1).astype('float32')def get_preprocessing(preprocessing_fn): """进行图像预处理操作 Args: preprocessing_fn (callbale): 数据规范化的函数 (针对每种预训练的神经网络) Return: transform: albumentations.Compose """ _transform = [ albu.Lambda(image=preprocessing_fn), albu.Lambda(image=to_tensor, mask=to_tensor), ] return albu.Compose(_transform)上面的代码是数据加载和数据增强,和训练集的代码一样。
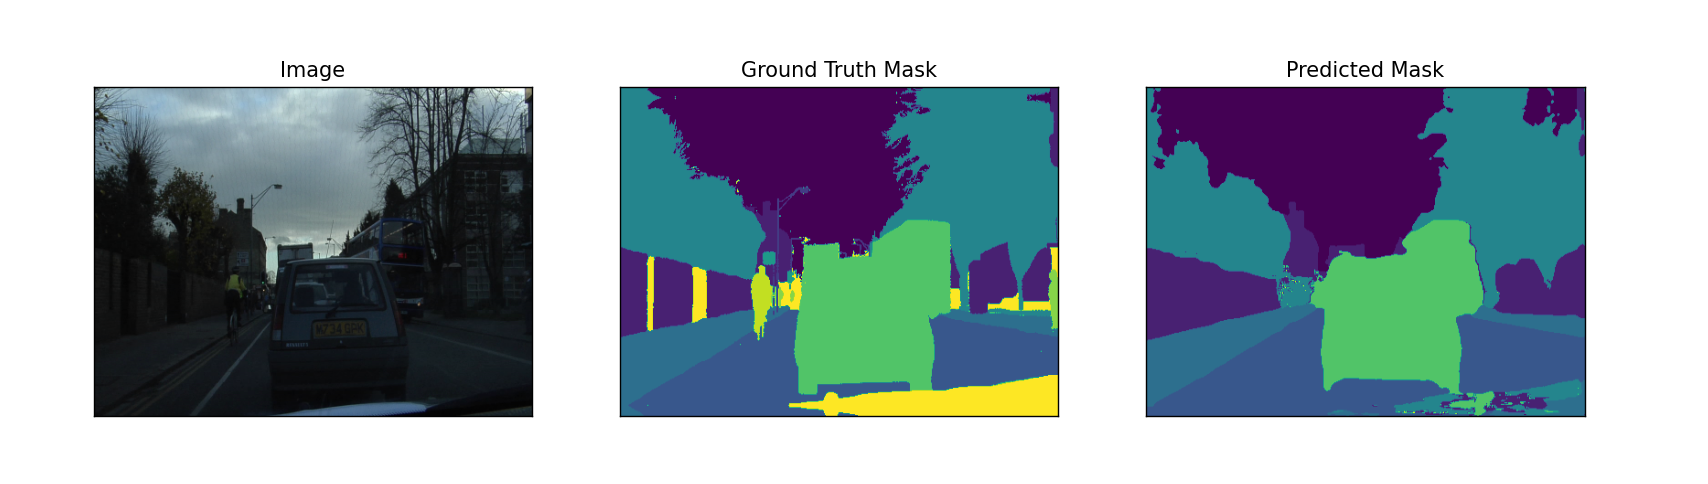
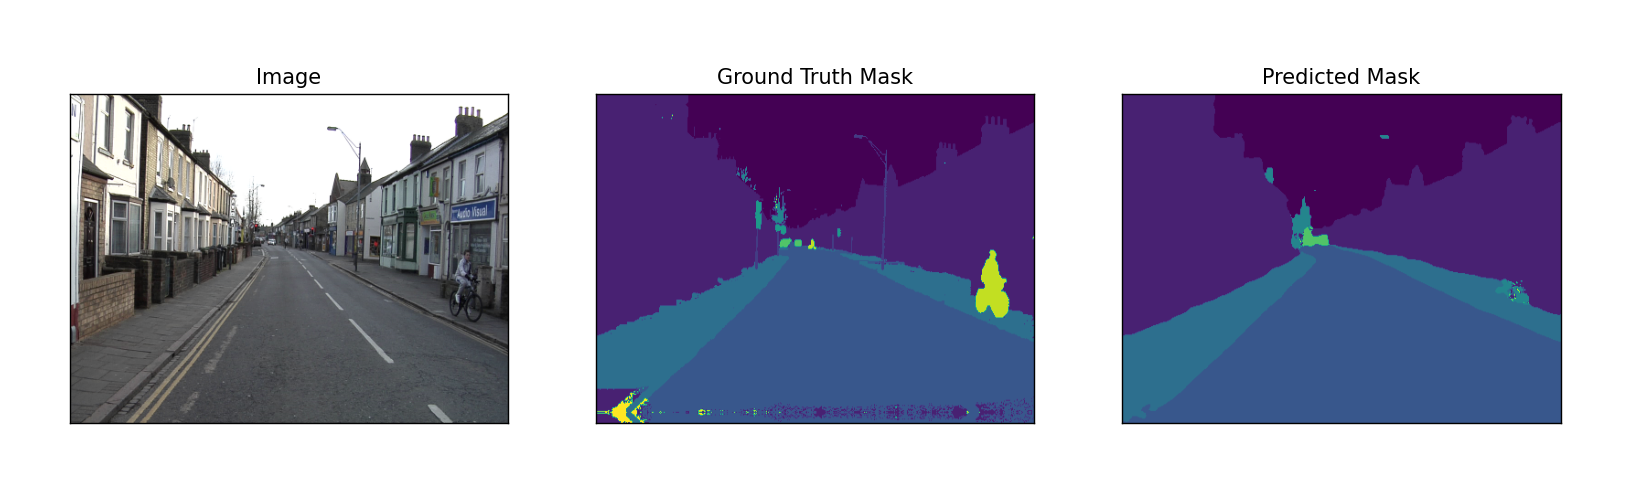
# 图像分割结果的可视化展示def visualize(**images): """PLot images in one row.""" n = len(images) plt.figure(figsize=(16, 5)) for i, (name, image) in enumerate(images.items()): plt.subplot(1, n, i + 1) plt.xticks([]) plt.yticks([]) plt.title(' '.join(name.split('_')).title()) plt.imshow(image) plt.show()可视化测试结果,展示原图,真实的mask,预测的mask。
# ---------------------------------------------------------------if __name__ == '__main__': DATA_DIR = './data/CamVid/' # 测试集 x_test_dir = os.path.join(DATA_DIR, 'test') y_test_dir = os.path.join(DATA_DIR, 'testannot') ENCODER = 'efficientnet-b1' ENCODER_WEIGHTS = 'imagenet' ACTIVATION = 'softmax' # could be None for logits or 'softmax2d' for multiclass segmentation DEVICE = 'cuda' preprocessing_fn = smp.encoders.get_preprocessing_fn(ENCODER, ENCODER_WEIGHTS) # --------------------------------------------------------------- # $# 测试训练出来的最佳模型 # 加载最佳模型 best_model = torch.load('./best_model.pth') # 创建测试数据集 test_dataset = Dataset( x_test_dir, y_test_dir, augmentation=get_validation_augmentation(), preprocessing=get_preprocessing(preprocessing_fn), ) # --------------------------------------------------------------- # $# 图像分割结果可视化展示 # 对没有进行图像处理转化的测试集进行图像可视化展示 test_dataset_vis = Dataset( x_test_dir, y_test_dir ) # 从测试集中随机挑选3张图片进行测试 for i in range(3): n = np.random.choice(len(test_dataset)) image_vis = test_dataset_vis[n][0].astype('uint8') image, gt_mask = test_dataset[n] gt_mask = (np.argmax(gt_mask, axis=0) * 255 / (gt_mask.shape[0])).astype(np.uint8) x_tensor = torch.from_numpy(image).to(DEVICE).unsqueeze(0) pr_mask = best_model.predict(x_tensor) pr_mask = (pr_mask.squeeze().cpu().numpy()) pr_mask = (np.argmax(pr_mask, axis=0) * 255 / (pr_mask.shape[0])).astype(np.uint8) # 恢复图片原来的分辨率 gt_mask = cv2.resize(gt_mask, (480, 360)) pr_mask = cv2.resize(pr_mask, (480, 360)) visualize( image=image_vis, ground_truth_mask=gt_mask, predicted_mask=pr_mask )获取测试集的路径。
定义ENCODER 为 ‘efficientnet-b1’,ENCODER_WEIGHTS 为imagenet,ACTIVATION为softmax。
获取预训练参数。
加载模型。
加载数据集。
加载没有做处理的图片。
随机选择3张图片
从test_dataset_vis获取图片。
从test_dataset获取对应的图片和mask。
将mask放大255的范围。
预测图片,生成预测的mask。
将预测的mask也对应的放到255的范围。
然后重新resize到原来的尺寸。
可视化结果。
运行结果:

完成代码:
https://download.csdn.net/download/hhhhhhhhhhwwwwwwwwww/85291308
参考文章:
PyTorch图像分割模型——segmentation_models_pytorch库的使用_AI浩的博客-CSDN博客_pytorch图像分割模型
边栏推荐
猜你喜欢
FPGA: Use of the development environment Vivado
DocuWare平台——文档管理的内容服务和工作流自动化的平台详细介绍(下)
Microcontroller: temperature control DS18B20
Leetcode刷题——623. 在二叉树中增加一行
数据可视化(一)
JS introduction to reverse the recycling business network of learning, simple encryption mobile phone number
登录功能和退出功能(瑞吉外卖)

智能算力的枢纽如何构建?中国云都的淮海智算中心打了个样
Technical dry goods | Hausdorff distance for image segmentation based on MindSpore
基于MindSpore高效完成图像分割,实现Dice!
随机推荐
[Android] How to use RecycleView in Kotlin project
第四章:activiti流程中,变量的传递和获取流程变量 ,设置和获取多个流程变量,设置和获取局部流程变量「建议收藏」
教你本地编译运行一个IDEA插件,在IDEA里聊天、下棋、斗地主!
技术干货 | 基于 MindSpore 实现图像分割之豪斯多夫距离
The host computer develops C# language: simulates the STC serial port assistant to receive the data sent by the microcontroller
Technical dry goods | Hausdorff distance for image segmentation based on MindSpore
uniapp中的view高度设置100%
Confessing in the era of digital transformation: Mai Cong Software allows enterprises to use data in the easiest way
化繁为简!阿里新产亿级流量系统设计核心原理高级笔记(终极版)
导火索:OAuth 2.0四种授权登录方式必读
RT-Thread记录(一、RT-Thread 版本、RT-Thread Studio开发环境 及 配合CubeMX开发快速上手)
Latex如何控制表格的宽度和高度
FPGA:基础入门按键控制LED灯
Chapter 4: activiti RuntimeService settings get and get process variables, and the difference from taskService, set process variables when starting and completing tasks [easy to understand]
【综合类型第 35 篇】程序员的七夕浪漫时刻
Still looking for a network backup resources?Hurry up to collect the following network backup resource search artifact it is worth collecting!
静态链接和动态链接
The query that the user's test score is greater than the average score of a single subject
【加密解密】明文加密解密-已实现【已应用】
2022技能大赛训练题:交换机snmp配置