当前位置:网站首页>SWM32 Series Tutorial 6 - Systick and PWM
SWM32 Series Tutorial 6 - Systick and PWM
2022-07-31 00:32:00 【Feixian CUG】

今天来介绍SWM32Two functional modules of the microcontrollerSystick和PWM.The two functions are relatively simple,所以放在一起介绍.
1.系统定时器Systick
SWM32内部包含一个Systick定时器,与其它ARM CortexMThe core of the microcontroller is the same,该定时器是一个24位递减定时器.Typically used as a system tick timer,设置为1ms中断一次.
使用方法也很简单,Just call the following function:
SysTick_Config(SystemCoreClock/1000);You can use this to write a delay function,如下:
/******************************************************************************************************************************************
* 函数名称: delay_1ms(uint32_t count)
* 功能说明:  延时函数
* 输    入: count--延时时间,单位ms
* 输    出: 无
******************************************************************************************************************************************/
void delay_1ms(uint32_t count)
{
    delay = count;
    while(0U != delay) {
    }
}


/******************************************************************************************************************************************
* 函数名称: SysTick_Handler
* 功能说明:  Systick中断函数
* 输    入: 无
* 输    出: 无
******************************************************************************************************************************************/
void SysTick_Handler(void)
{
  if(0U != delay)
  {
        delay--;
   }
}
2.PWM模块
other microcontrollersPWMThe output function is generally one of the functions of the timer,而SWM32单片机的PWM是一个独立的功能模块.提供了12路(6组)输出,支持独立、互补、中心对称、single-step mode,Supports dead-band generation and initial level configuration.It is very convenient for motor control.这里只介绍PWM的基本功能.配置PC6输出1KHz,占空比为25%的方波,直接看程序:
void pwm_initialization()
{
  PWM_InitStructure  PWM_initStruct;


  PWM_initStruct.clk_div = PWM_CLKDIV_8;    //F_PWM = 120M/8 = 15M
  PWM_initStruct.mode = PWM_MODE_INDEP;      //A路和B路独立输出
  PWM_initStruct.cycleA = 15000;            //15M/15000 = 1000Hz
  PWM_initStruct.hdutyA =  3750;            //3750/15000 = 25%
  PWM_initStruct.initLevelA = 1;
  PWM_initStruct.cycleB = 10000;
  PWM_initStruct.hdutyB =  5000;
  PWM_initStruct.initLevelB = 1;
  PWM_initStruct.HEndAIEn = 0;
  PWM_initStruct.NCycleAIEn = 0;
  PWM_initStruct.HEndBIEn = 0;
  PWM_initStruct.NCycleBIEn = 0;
  PWM_Init(PWM0, &PWM_initStruct);


  PORT_Init(PORTC, PIN6, FUNMUX0_PWM0A_OUT, 0);//配置PC6为 PWM0A的输出
  PWM_Start(PWM0, 1, 0);//启动A路,不启动B路
}
再看下PWM_InitStructure结构体的定义:
typedef struct {
  uint8_t  clk_div;    //PWM_CLKDIV_1、PWM_CLKDIV_8
  uint8_t  mode;      //PWM_MODE_INDEP、PWM_MODE_COMPL、PWM_MODE_INDEP_CALIGN、PWM_MODE_COMPL_CALIGN
  uint16_t cycleA;    //Aroad cycle
  uint16_t hdutyA;    //A路占空比
  uint16_t deadzoneA;    //ADead zone time,取值0--1023
  uint8_t  initLevelA;  //AThe initial output level of the channel,0 低电平    1 高电平
  uint16_t cycleB;    //Broad cycle
  uint16_t hdutyB;    //B路占空比
  uint16_t deadzoneB;    //BDead zone time,取值0--1023
  uint8_t  initLevelB;  //BThe initial output level of the channel,0 低电平    1 高电平
  uint8_t  HEndAIEn;    //AHigh end interrupt enable
  uint8_t  NCycleAIEn;  //ANew cycle start interrupt enable
  uint8_t  HEndBIEn;    //BHigh end interrupt enable
  uint8_t  NCycleBIEn;  //BNew cycle start interrupt enable
} PWM_InitStructure;
首先需要配置时钟,这里只能1分频或8分频.配合16位的PWM模块,It feels a little useless,比如,120M的主频,8分频,16bit count period,最多设置为65535.PWMThe lowest frequency can only be120M/8/65535≈228Hz,The lower frequency seems to be powerless,unless the frequency is reduced.This is a bit unfriendly.
Next, configure the output mode as A/BTwo independent outputs.This can be configured individuallyA和B两路PWM输出,这里只用了A路,BRoad can not care.Port configuration and startupPWMIt also only needs to be configured and startedAJust the way.
Then some interrupts can be configured,PWMThe module provides a high level end interrupt、Cycle start interrupt and brake interrupt,It may be used in some advanced functions.There is no need to introduce it here.
另外,PWMModules can also be used for triggeringADC采样,在ADCIt is used when a more accurate sampling rate is required.需将PWMConfigured in centrosymmetric complementary mode.
推荐阅读:
SWM32系列教程3-clock configuration andGPIO
欢迎关注公众号"嵌入式技术开发",大家可以后台给我留言沟通交流.如果觉得该公众号对你有所帮助,也欢迎推荐分享给其他人.
边栏推荐
- 过滤器(Filter)
- 从笔试包装类型的11个常见判断是否相等的例子理解:包装类型、自动装箱与拆箱的原理、装箱拆箱的发生时机、包装类型的常量池技术
- Regular expression password policy and regular backtracking mechanism bypass
- 神经网络(ANN)
- 【愚公系列】2022年07月 Go教学课程 017-分支结构之IF
- 【深入浅出玩转FPGA学习15----------时序分析基础】
- registers (assembly language)
- After writing business code for many years, I found these 11 doorways, which only experts know
- Jmeter参数传递方式(token传递,接口关联等)
- (五)fastai应用
猜你喜欢
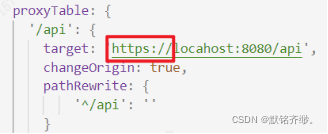
Error occurred while trying to proxy request项目突然起不来了
Restricted character bypass

Steven Giesel recently published a 5-part series documenting his first experience building an application with the Uno Platform.

After writing business code for many years, I found these 11 doorways, which only experts know

神经网络(ANN)
How to solve the error of joiplay simulator

【深入浅出玩转FPGA学习15----------时序分析基础】
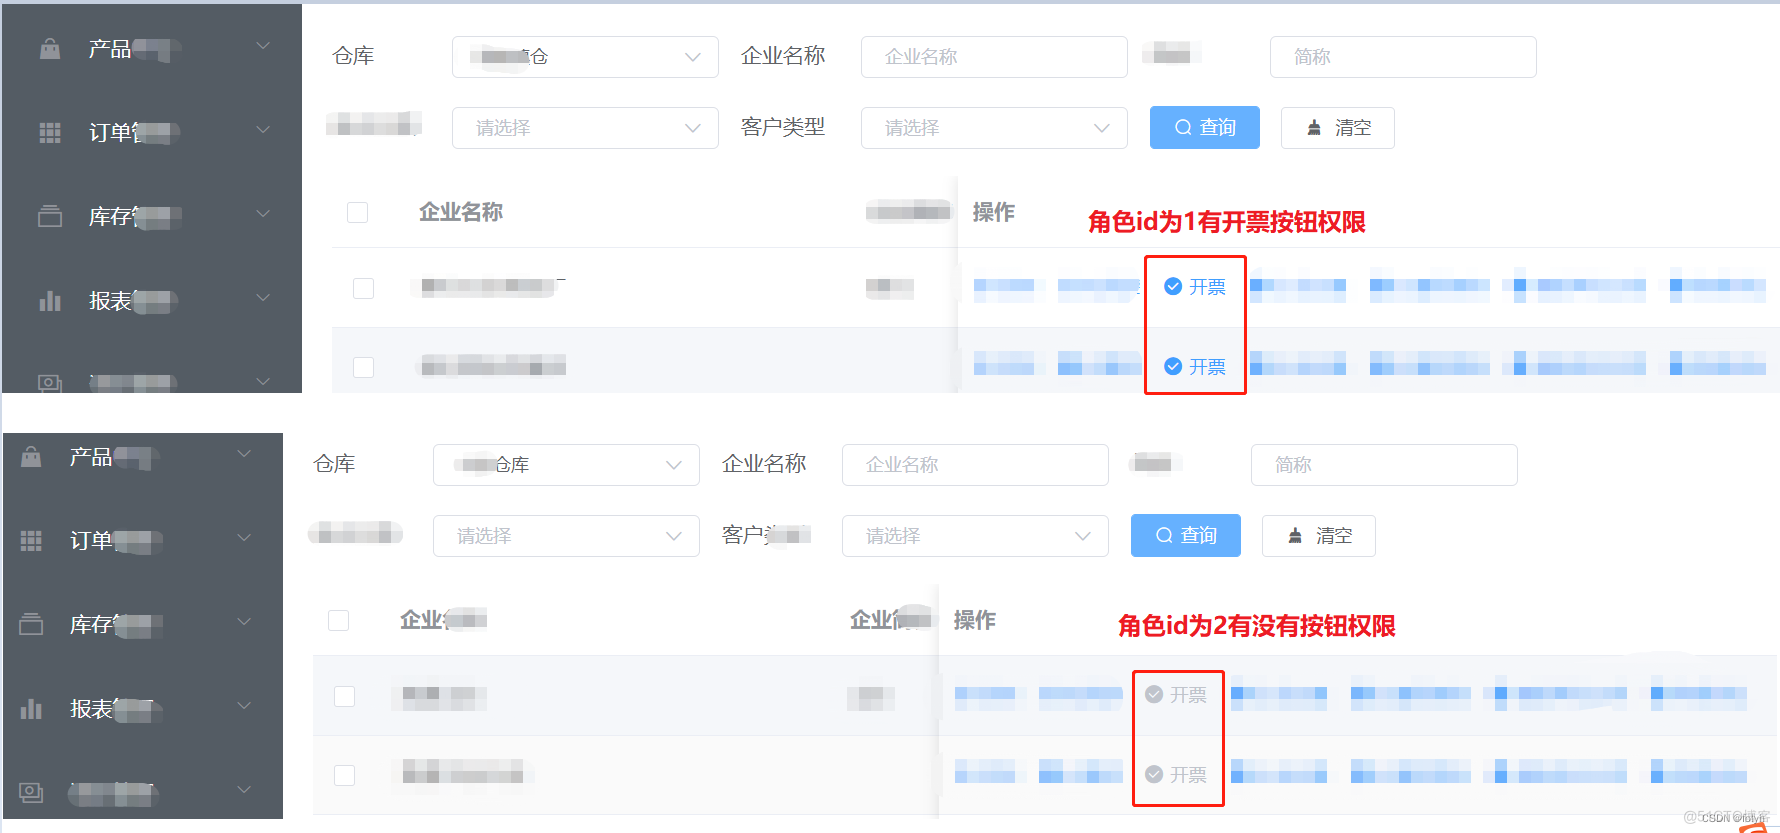
封装、获取系统用户信息、角色及权限控制
xss绕过:prompt(1)

Niuke.com question brushing training (4)
随机推荐
The difference between substring and substr in MySQL
[In-depth and easy-to-follow FPGA learning 15---------- Timing analysis basics]
[In-depth and easy-to-follow FPGA learning 14----------Test case design 2]
Method for deduplication of object collection
乌克兰外交部:乌已完成恢复粮食安全出口的必要准备
【深度学习】Transformer模型详解
Error occurred while trying to proxy request The project suddenly can't get up
A Brief Talk About MPI
MySQL数据库(基础)
firewalld
【愚公系列】2022年07月 Go教学课程 019-循环结构之for
Encapsulate and obtain system user information, roles and permission control
对象集合去重的方法
registers (assembly language)
what is jira
The difference between truncate and delete in MySQL database
封装、获取系统用户信息、角色及权限控制
DNS resolution process [visit website]
牛客网刷题训练(四)
web漏洞之需要准备的工作