当前位置:网站首页>Background page production 01 production of IVX low code sign in system
Background page production 01 production of IVX low code sign in system
2022-06-25 03:37:00 【1_ bit】
Make iVX Low code projects need to go online IDE:https://editor.ivx.cn/
One 、 Sign in system thinking
The sign in system generally refers to publishing a sign in link or QR code , Then the user can finish signing in after scanning the code .
How to make it ? First of all, we can ignore the production of the check-in page , Since there is no clue about signing in , Then we can start by creating a check-in .
To create a check-in, you need a background , Let's make a background page first .
Two 、 Background home page production
Let's first make a backstage , The example of the background homepage is as follows :
Our sign in mainly includes 3 Features , One is that the user completes sign in 、 The background can publish the sign in and the background administrator can verify the sign in , After verification, it means that the current check-in is correct .
Then we will start to make this background check-in page .
After entering the editor , Click relative application item , Create a relative application , We use relative positioning to make the sign in system . After entering the page, click the front desk , Create a page and rename the check-in system background :
Then create a row in the background of the check-in system , Name it head , Let's make the header area :

From the example we can see , There is a certain distance between the text in the header area of the current example and the entire line :
To complete this function, you need to set the up, down, left and right margins of the row , Or you can directly set the height of the current row , Then center it horizontally and vertically , Here we use the second method , After setting the height, the horizontal and vertical directions are centered , Here you also need to give a corresponding background color :
Then add a text to it , Set the content of this text to check in to the system background :
Then create a row named menu under the current page :
The row needs to be stretched to the current height , And set its background color to transparent :
Then we make the main contents of the current menu :
Obviously, this can be completed by one column , Create a column , Name it as operation content :
Create two elements in the operation content column , One is the picture , Another is text :
Then the display effect shown in if cannot be completed at this time , Then set the contents of the current column , This is the height and width of the current operation content column 100px, And center it horizontally and vertically :
Then copy multiple content outline pictures and text :
You may get the picture too big , You need to set the width of the picture :
Otherwise, it exceeds the width of the parent container , It will definitely show up .
3、 ... and 、 Create a publishing page
Create a publishing page after the background home page is available :
The reference of the release page is as follows :
The overall layout of the release page is similar to that of the home page , We can copy the title and modify the text :
Then because we didn't do the back menu , Then add a menu option , Just return to the home page :
We can also add an event to the operation content , This event is a jump page event , Click to jump to the system background home page :
Then create a row named check-in information :
Here you need to set the height of this row to open , We will add the following check-in contents to this line , Of course, you also need to set the horizontal alignment of its content , To facilitate the next typesetting :
Then create a row , Name the publication name , Add the corresponding check-in name input box inside :
Then add a row named check-in time , Add a button and a time selector here :
In the same way, you can create two more rows and add corresponding contents respectively :
The button is displayed on the right , We need to set the corresponding horizontal alignment to right :
边栏推荐
- How to play well in the PMP Exam?
- Modifying universal render data at runtime
- MySQL learning notes -- addition, deletion, modification and query on a single table
- MATLAB主窗口与编辑器窗口分开为两个界面的解决办法
- Array - fast and slow pointer in one breath
- 使用XXL-JOB自定义任务并调度
- nacos实践记录
- MySql安装教程
- 同花顺证券开户是安全的吗?
- Overview of AOSP ~ WiFi architecture
猜你喜欢

发布功能完成02《ivx低代码签到系统制作》
![[FPGA] serial port controls temperature acquisition by command](/img/63/19b909437b59867c577b39b1138f8f.png)
[FPGA] serial port controls temperature acquisition by command

签到功能完成03《ivx低代码签到系统制作》

DSPACE的性能渲染问题

Solution of separating matlab main window and editor window into two interfaces
![[proteus simulation] Arduino uno+ nixie tube display 4X4 keyboard matrix keys](/img/80/c97410c88856479e6be9de67936790.png)
[proteus simulation] Arduino uno+ nixie tube display 4X4 keyboard matrix keys
AI writes its own code to let agents evolve! The big model of openai has the flavor of "human thought"
MATLAB主窗口与编辑器窗口分开为两个界面的解决办法
20年ICPC澳门站L - Random Permutation
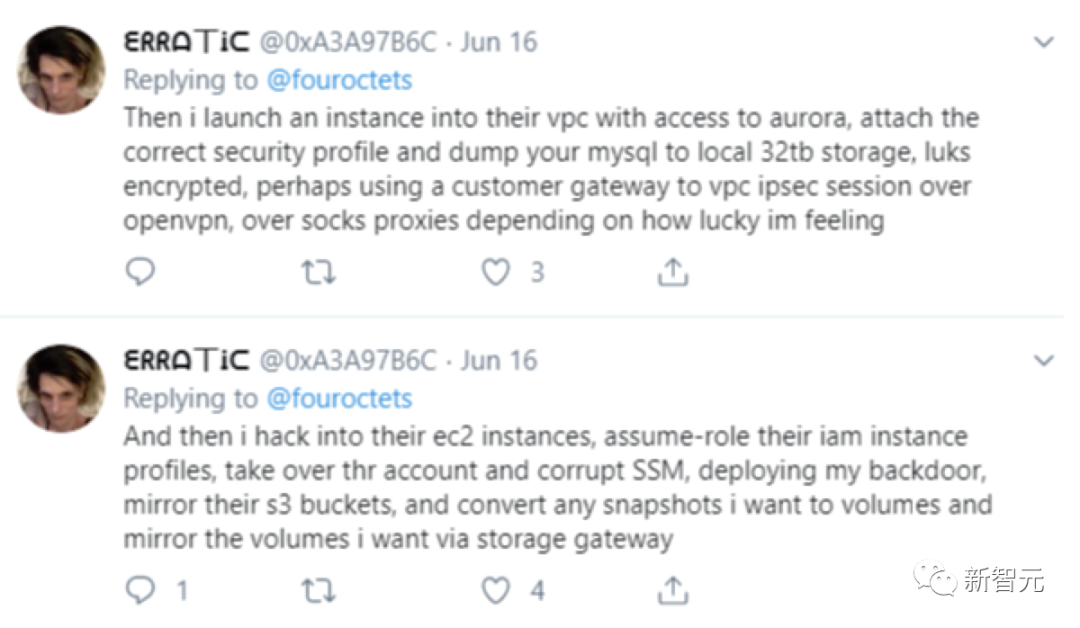
Before the age of 36, Amazon transgender hackers were sentenced to 20 years' imprisonment for stealing data from more than 100million people!
随机推荐
在Microsoft Exchange Server 2007中安装SSL证书的教程
在华泰证券上面开股票账户好不好,安不安全?
TCC mode explanation and code implementation of Seata's four modes
Nacos practice record
股票在网上开户安全吗?在线等答案
MCN institutions are blooming everywhere: bloggers and authors should sign contracts carefully, and the industry is very deep
How to raise key issues in the big talk club?
Go synchronization waiting group
How can novices of cross-border e-commerce prevent store association? What tool is good?
SkyWalking 实现跨线程 Trace 传递
浏览器下载的文件属性里都有保护,如何去掉
MySQL modifies and deletes tables in batches according to the table prefix
Administrator如何禁止另一个人踢掉自己?
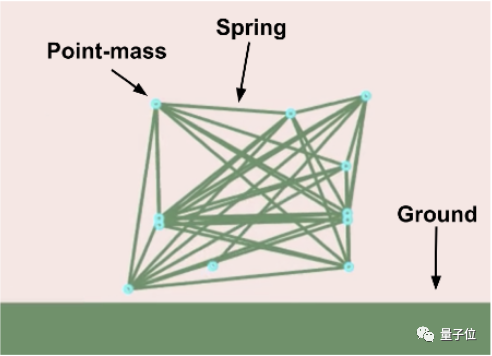
Rebeco:使用机器学习预测股票崩盘风险
Expressing the transformation of two coordinate systems with vectors
PHP uses getid3 to obtain the duration of MP3, MP4, WAV and other media files
Leetcode 210: curriculum II (topological sorting)
How to play well in the PMP Exam?
ACM. Hj75 common substring calculation ●●
服乔布斯不服库克,苹果传奇设计团队解散内幕曝光