当前位置:网站首页>【OpenCV】-边缘检测汇总示例
【OpenCV】-边缘检测汇总示例
2022-07-31 12:12:00 【我菜就爱学】
汇总之前: 这一节还有一个scharr滤波器(也是算子)没有介绍,先介绍一下。。。
1 计算图像差分:Scharr()函数
使用Scharr滤波器运算符计算x或y方向的图像差分,包含的参数与Sobel算子基本一样,除了没有ksize核的大小
void Scharr(
	IntputArray src, //源图
    OUtputArray dst, //目标图
    int ddepth, //图像深度
    int dx,     //x方向上的差分阶数
    int dy,		//y方向上的差分阶数
    double scale=1,//缩放因子
    double delta=0,//delta值
    intborderType=BORDER_DEFAULT//边界模式
);
第一个参数:输入图像,填Mat类型即可
第二个参数:目标图像,函数的输出参数,需要和源图片有一样的尺寸和类型
第三个参数:输出图像的深度,支持如下组合:
- 若src.depth()=CV_8U,取ddepth=-1/CV_16S/CV_32F/CV_64F
- 若src.depth()=CV_16U/CV_16S,取ddepth=-1/CV_32F/CV_64F
- 若src.depth()=CV_32F,取ddepth=-1/CV_32F/CV_64F
- 若src.depth()=CV_64F,取ddepth=-1/CV_64F
第四个参数:x方向上的差分阶数
第五个参数:y方向上的差分阶数
第六个参数:double类型的scale,计算导数值时可选的缩放因子,默认值是1,表示默认情况下是没有应用缩放的。
第七个参数:double类型的delta,表示存入目标图
第八个参数:边界模式。有默认值:BORDER_DEFAULT
5.2 示例程序
#include<opencv2/opencv.hpp>
#include<opencv2/imgproc/imgproc.hpp>
#include<opencv2/highgui/highgui.hpp>
#include<iostream>
using namespace std;
using namespace cv;
int main()
{

	Mat grad_x, grad_y;
	Mat abs_grad_x, abs_grad_y, dst;
	Mat src = imread("E:\\Pec\\fushiyuan.jpg");
	imshow("【原始图】", src);
	//求x方向上的梯度
	Scharr(src, grad_x, CV_16S, 1, 0, 1, 0, BORDER_DEFAULT);
	convertScaleAbs(grad_x, abs_grad_x);
	imshow("【x方向的效果图】", abs_grad_x);
	//求y方向上的梯度
	Scharr(src, grad_y, CV_16S, 0, 1, 1, 0, BORDER_DEFAULT);
	convertScaleAbs(grad_y, abs_grad_y);
	imshow("【y方向的效果图】", abs_grad_y);
	//合并梯度
	addWeighted(abs_grad_x, 0.5, abs_grad_y, 0.5, 0, dst);
	imshow("【合并梯度效果图】", dst);
	waitKey(0);
	return 0;
}

边缘检测汇总示例
#include<opencv2/opencv.hpp>
#include<opencv2/imgproc/imgproc.hpp>
#include<opencv2/highgui/highgui.hpp>
#include<iostream>
using namespace std;
using namespace cv;
//================================
// 全局变量声明
//===============================
Mat g_srcImage, g_srcGrayImage, g_dstImage;
//Canny边缘检测相关变量
Mat g_cannyDetectedEdges;
int g_cannyLowThreshold = 1;//TackBar位置参数
//Sobel边缘检测相关变量
Mat g_sobelGradient_X, g_sobelGradient_Y;
Mat g_sobelAbsGradient_X, g_sobelAbsGradient_Y;
int g_sobelKernelSize = 1;//TrackBar位置参数
//Scharr滤波器相关变量
Mat g_scharrGradient_X, g_scharrGradient_Y;
Mat g_scharrAbsGradient_X, g_scharrAbsGradient_Y;
//================================
// 全局函数声明
//===============================
static void on_Canny(int, void *);//Canny边缘检测窗口滚动条的回调函数
static void on_Sobel(int, void *);
void Scharr();//封装了scharr边缘检测相关代码函数
int main()
{
//载入源图
g_srcImage = imread("E:\\Pec\\钢铁侠.jpg");
if (!g_srcImage.data)
{
printf("读取图片错误");
return false;
}
namedWindow("【原始图】");
imshow("【原始图】", g_srcImage);
//创建与src同类型核大小的矩阵(dst)
g_dstImage.create(g_srcImage.size(), g_srcImage.type());
//将原始图像转化为灰度图
cvtColor(g_srcImage,g_srcGrayImage, COLOR_BGR2GRAY);
//创建显示窗口
namedWindow("【Canny效果图】", WINDOW_AUTOSIZE);
namedWindow("【Sobel效果图】", WINDOW_AUTOSIZE);
//创建trackbar
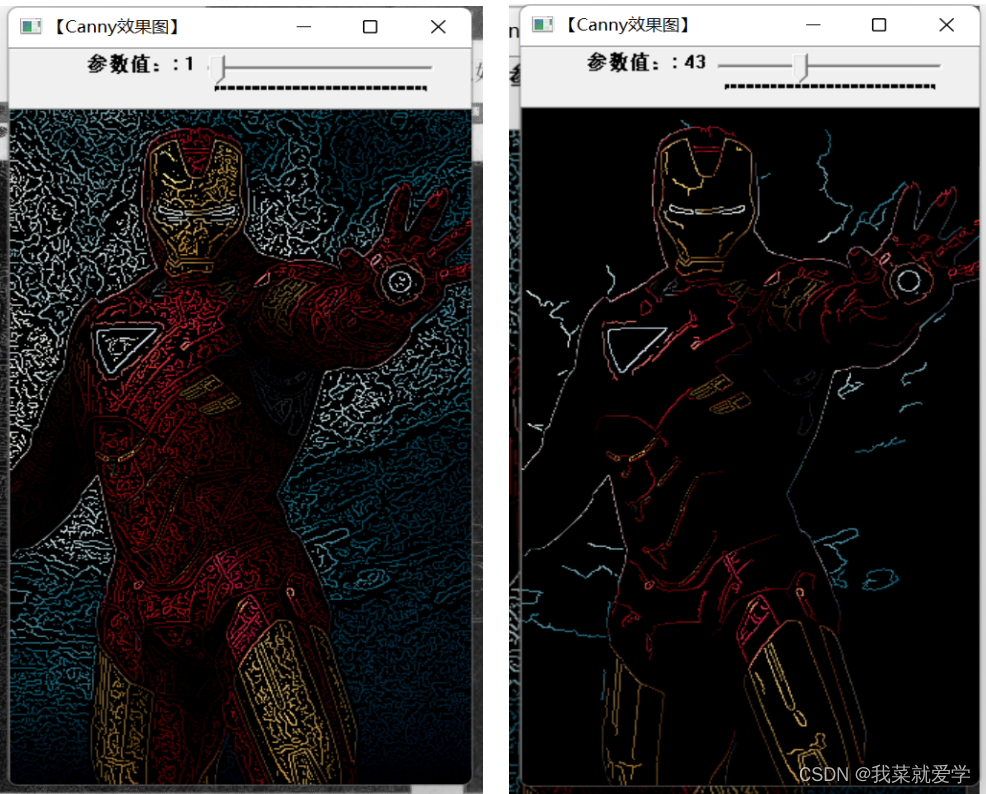
createTrackbar("参数值:", "【Canny效果图】", &g_cannyLowThreshold, 120, on_Canny);
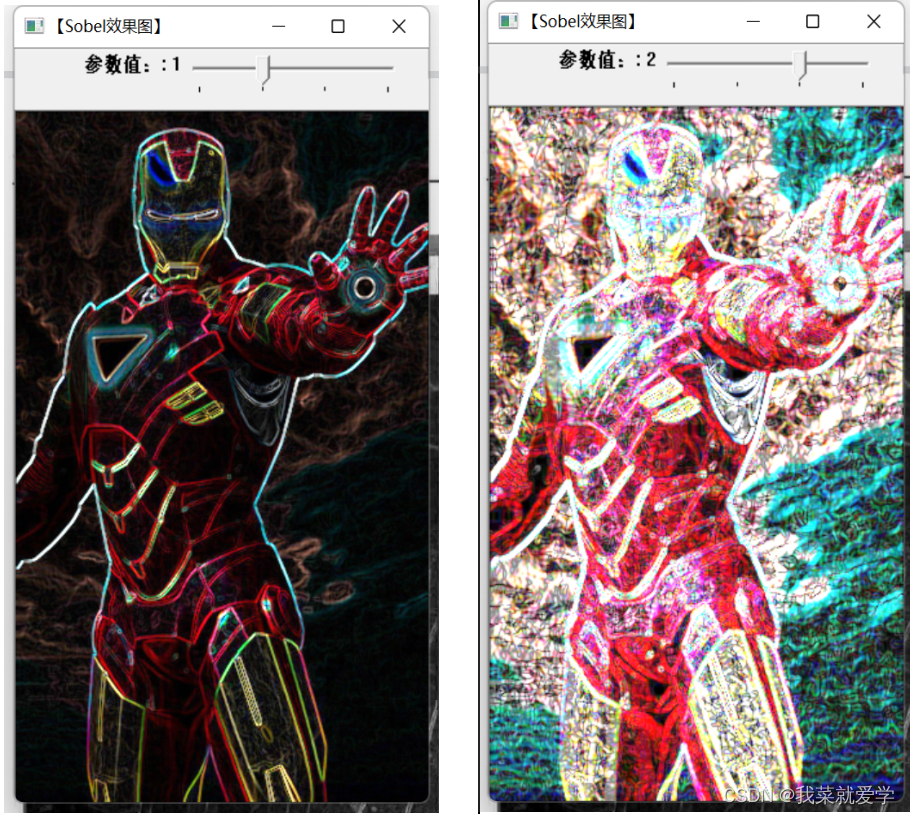
createTrackbar("参数值:", "【Sobel效果图】", &g_sobelKernelSize, 3, on_Sobel);
//调用回调函数
on_Canny(0, 0);
on_Sobel(0, 0);
//调用封装了Scharr边缘检测代码的函数
Scharr();
waitKey(0);
}
//================================
// Canny边缘检测窗口滚动条的回调函数
//===============================
void on_Canny(int, void*)
{
//先使用3x3内核来降噪
blur(g_srcGrayImage, g_cannyDetectedEdges, Size(3, 3));
//运行Cannny算子
Canny(g_cannyDetectedEdges, g_cannyDetectedEdges, g_cannyLowThreshold, g_cannyLowThreshold * 3, 3);
//先将g_dstImage内的所有元素设置为0
g_dstImage = Scalar::all(0);
//使用Canny算子输出的边缘图g_cannyDetectedEdges作为掩码,来将源图拷贝到目标图
g_srcImage.copyTo(g_dstImage, g_cannyDetectedEdges);
//显示效果图
imshow("【Canny效果图】", g_dstImage);
}
//================================
// Sobel边缘检测窗口滚动条的回调函数
//===============================
void on_Sobel(int, void*)
{
//求X方向梯度
Sobel(g_srcImage, g_sobelGradient_X, CV_16S, 1, 0, (2 * g_sobelKernelSize + 1), 1, 1, BORDER_DEFAULT);
convertScaleAbs(g_sobelGradient_X, g_sobelAbsGradient_X);
//求Y方向梯度
Sobel(g_srcImage, g_sobelGradient_Y, CV_16S, 0, 1, (2 * g_sobelKernelSize + 1), 1, 1, BORDER_DEFAULT);
convertScaleAbs(g_sobelGradient_Y, g_sobelAbsGradient_Y);
//合并梯度
addWeighted(g_sobelAbsGradient_X, 0.5, g_sobelAbsGradient_Y, 0.5, 0, g_dstImage);
imshow("【Sobel效果图】", g_dstImage);
}
//================================
// 封装Scharr边缘检测
//===============================
void Scharr()
{
Scharr(g_srcImage, g_scharrGradient_X, CV_16S, 1, 0, 1, 0, BORDER_DEFAULT);
convertScaleAbs(g_scharrGradient_X, g_scharrAbsGradient_X);
Scharr(g_srcImage, g_scharrGradient_Y, CV_16S, 0, 1, 1, 0, BORDER_DEFAULT);
convertScaleAbs(g_scharrGradient_Y, g_scharrAbsGradient_Y);
addWeighted(g_scharrAbsGradient_X, 0.5, g_scharrAbsGradient_Y, 0.5, 0, g_dstImage);
imshow("【Scharr效果图】", g_dstImage);
}
效果图展示:


边栏推荐
猜你喜欢


随机推荐
apisix-Getting Started
VBA输出日志到工作簿demo
Android studio connects to MySQL and completes simple login and registration functions
ESP8266-Arduino编程实例-PIR(被动红外)传感器驱动
Cognitive-exercise rehabilitation medical robot application design
列表页优化思路
消息队列面试题(2022最新整理)
In Excel using ODBC consumer SAP ABAP CDS view
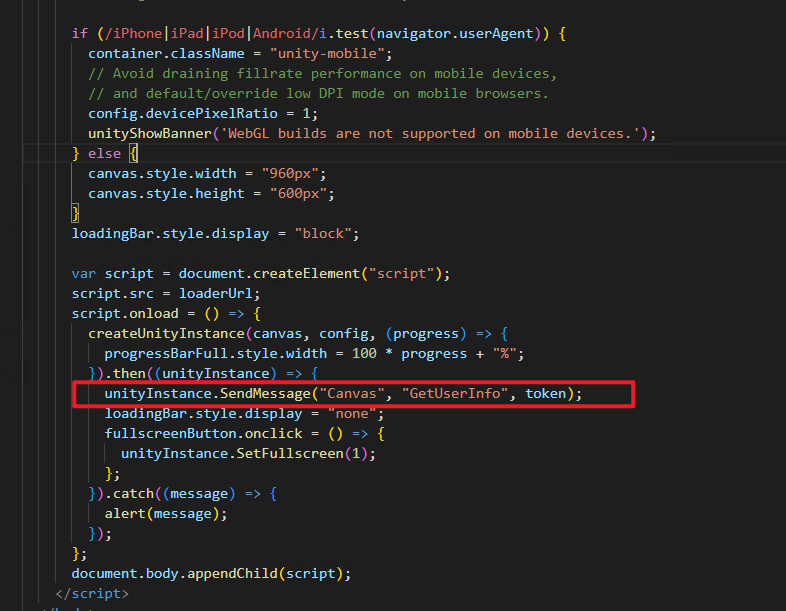
WebGL给Unity传递参数问题1: Cannot read properties of undefined (reading ‘SendMessage‘)
带有对称约束切换线性系统的结构可控性
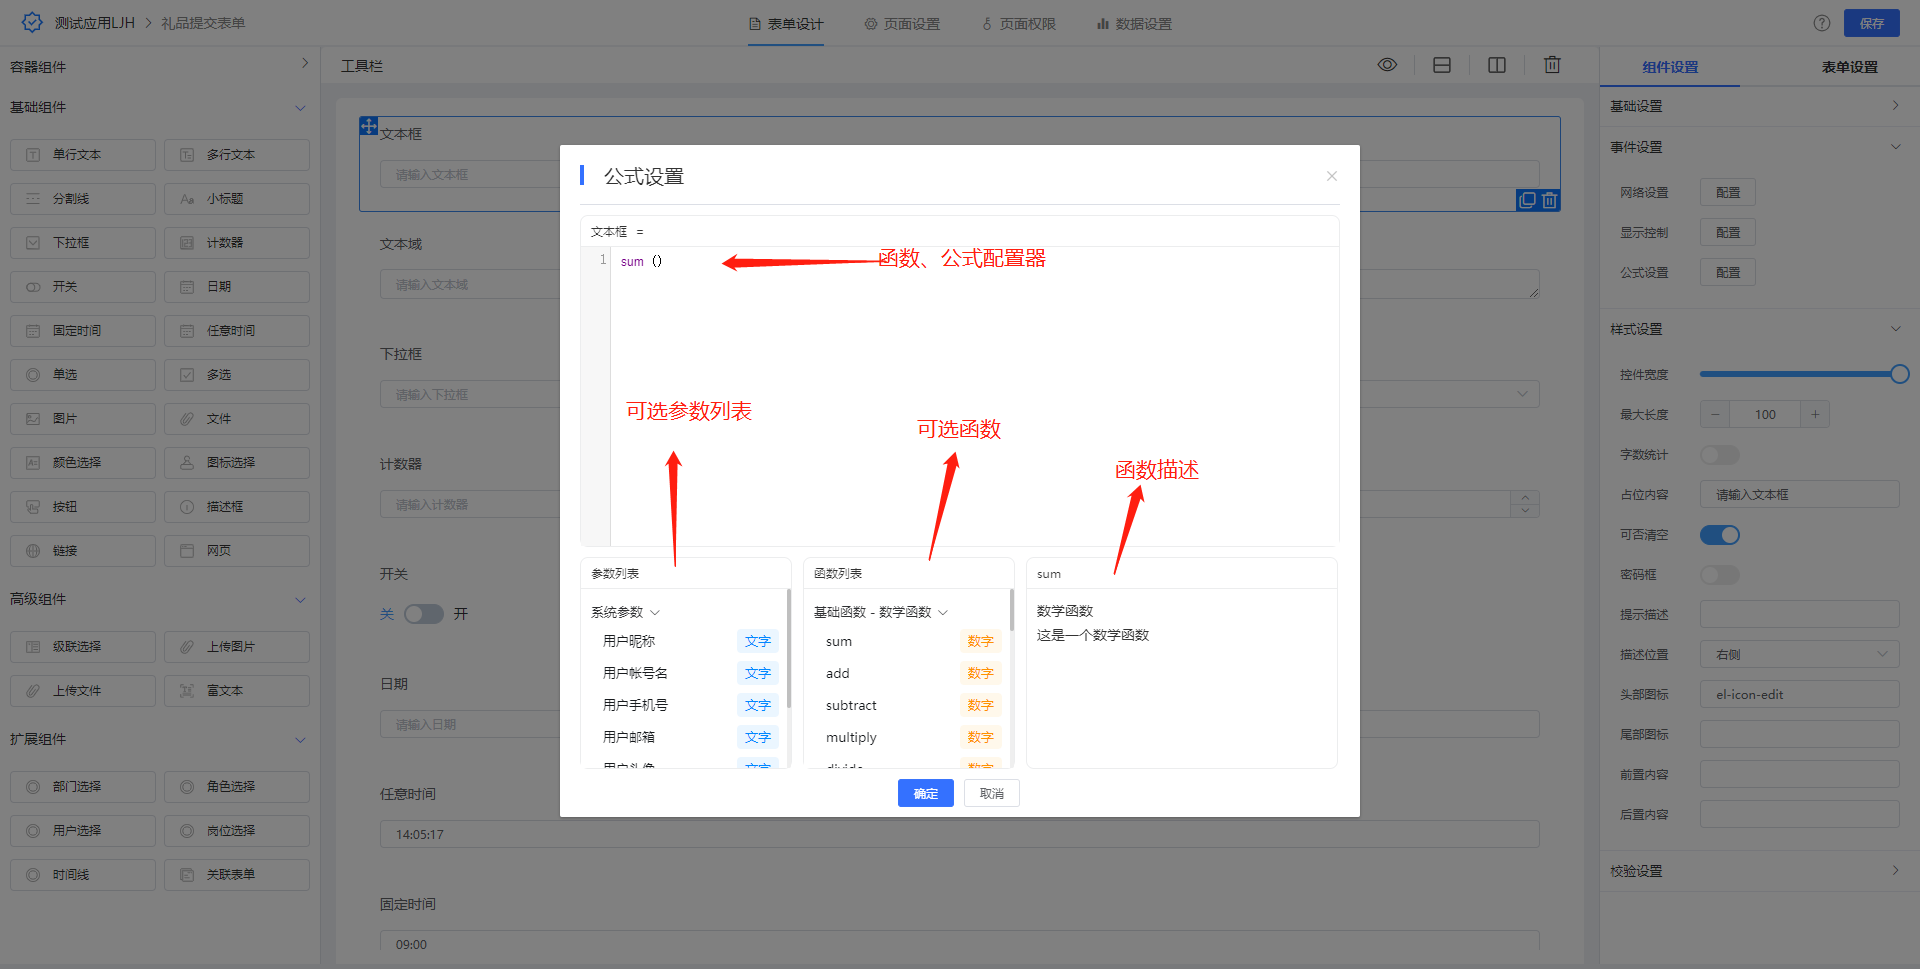
JVS函数公式使用场景介绍
SAP ABAP OData 服务如何支持 $filter (过滤)操作试读版
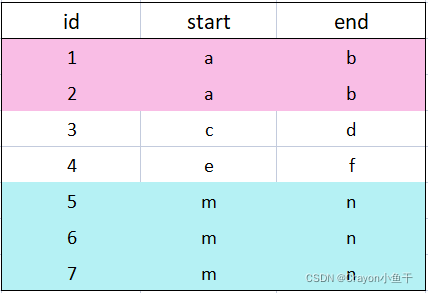
mysql根据多字段分组——group by带两个或多个参数
R语言做面板panelvar例子
MySQL row-level locks (row locks, adjacent key locks, gap locks)
A Week of Wonderful Content Sharing (Issue 14)
Hybrid brain-computer interface system based on steady-state visual evoked potentials and attentional EEG
ApiPost is really fragrant and powerful, it's time to throw away Postman and Swagger
使用docker搭建mysql主从
LeetCode - 025. 链表中的两数相加