当前位置:网站首页>[STM32] stm32cubemx tutorial II - basic use (new projects light up LED lights)
[STM32] stm32cubemx tutorial II - basic use (new projects light up LED lights)
2022-07-01 21:58:00 【Full stack programmer webmaster】
Hello everyone , I meet you again , I'm your friend, Quan Jun .
Preface
The configured CubeMX after , Is the beginning of the new project , So first we need some preparation , We will introduce this blog in detail STM32CubeMx And how to create a new project and light it up LED The lamp For beginners If you want to create a project quickly , You can skip the function introduction directly , Watch the project creation column
also , When building a new project , We divide it into specific processes 1~7 If you don't want to see the explanation of each part , Just follow the process ,5 Minutes to successfully light LED The lamp
install STM32CubeMx Please see 《STM32 CubeMx Use tutorial one – Installation tutorial 》
Preparation :
1、STM32 Hardware ( My is STM32F407ZE and STM32F103ZE)
2、STM32CubeMx Software 、 IDE Keil(MDK-ARM) Software
3、STM32F4xxHAL library
New project
1 Select... In the main interface File–>New Project Or click directly ACCEE TO MCU SELECTOR
The chip model selection... Appears Generally, we can directly search the model of our own chip
If you are designing a product and want to choose a chip Under the search bar , Various search methods provided , You can choose the chip core , model , wait , Help you find the right chip
Specific process 1:
- 1 Search chip model
- 2 Select chip
- 3 Create a project
Then the next is the highlight of our whole process
Here we are divided into three parts to explain
1MCU Peripheral resource selection
Here you can choose MCU Various resources and peripherals
There are two ways
- Categories Type selection
take MCU Classification of various peripherals and resources , For users to choose
- A-Z Sequence selection
MCU For peripheral resources, press A-Z Sort , For users to choose
2 Peripheral configuration
Here you can set various functions of the peripherals you choose
Here is the serial port 1 For example We can choose the serial port mode ( asynchronous , Sync , Half duplex ) Serial receive interrupt , And serial port DMA Transmission and so on
It is basically the same as when we configure library functions , however STM32CubeMx Convert these into Graphics and options , We don't need to configure all kinds of things when configuring , We can configure the peripherals we need only by foolproof operation This is CubeMx At the heart of
3 Preview interface
Here is divided into Pin Preview and System Preview
Pin preview is to view what functions are configured on that pin , And each pin position
Click on any pin , Various functions of this pin can be set
This color means Non configurable pin Power dedicated pins are highlighted in yellow . Its configuration Can't change
This color means You configured a I/O The function of the mouth , However, the corresponding peripheral functions are not initialized Pin in no mode state
Green indicates successful configuration
System Preview
System preview is to view various peripherals and configurations GPIO The state of
No problem
A warning , There is a problem with the corresponding configuration Click this option to Peripheral configuration Interface view
Specific configuration of each function (UATR/DMA/ADC/TIM…) We will explain them one by one in the next article , There's no more to it
Specific process 2:
Here we just need to put our LED The corresponding pin is set to GPIO_Output that will do
2 Clock source settings
In fact, it is 32 Clock tree block diagram Let you configure The default clock is the internal clock RC oscillator (HSI)
If you don't understand, please read 《【STM32】 The system clock RCC Detailed explanation ( Hyperdetail , Super comprehensive )》
Specific process 3:
Or first configure it as 72MHz that will do
- Need configuration RCC To use an external clock source
3. engineering management
Set the MCU After each configuration of , The third is the setting of engineering documents
Specific process 4:
Here are the various configurations of the project We only use a limited number of , Other defaults are fine IDE We use MDK5
- The storage directory cannot have Chinese
And then click Code Generator, For further configuration ( a key )
take HAL All of the library .C and .H All copied into the project
advantage : In this way, if other peripherals need to be added later, they may not be used anymore STM32CubeMX It will be very convenient when
shortcoming : Large size , Long compilation time ( For a long )
Just copy what you need .C and .H ( recommend )
advantage : Relatively small volume , The compilation time is short , And the project can be copied
shortcoming : When adding peripherals, you need to reuse STM32CubeMX Import
Does not copy files , Import directly from the package storage location .C and .H
advantage : Small volume , Save hard disk space
shortcoming : Copy to another computer or package location changes , You need to modify the corresponding path
Choose your own way
Specific process 5:
And then click GENERATE CODE Create a project
Create success , Open the project
Specific process 6:while Add the following two lines of code in a loop
    HAL_Delay(500);
HAL_GPIO_TogglePin(GPIOE, GPIO_PIN_15);Configure the download tool
Specific process 7:
All configurations of the new project are default We need to choose our own download mode , Check the reset operation after loading and downloading
All your own code, please put it in /* USER CODE BEGIN XXX */ /* USER CODE END XXX */ Between
In this way, when we modify the project, the code you write will not be deleted
Here we are ,STM32CubeMX The introduction to the basic use of , Next, we'll update CubeMX and HAL Library Configuration STM32 Of UART ADC DMA Timer PWM wait
Publisher : Full stack programmer stack length , Reprint please indicate the source :https://javaforall.cn/130467.html Link to the original text :https://javaforall.cn
边栏推荐
- 从20s优化到500ms,我用了这三招
- 【直播回顾】战码先锋首期8节直播完美落幕,下期敬请期待!
- Application of real estate management based on 3D GIS
- [deep learning] use deep learning to monitor your girlfriend's wechat chat?
- 按照功能对Boost库进行分类
- PCB plug hole technology~
- I received a letter from CTO inviting me to interview machine learning engineer
- 4. 对象映射 - Mapping.Mapstercover
- 功利点没啥!
- pytest合集(2)— pytest運行方式
猜你喜欢
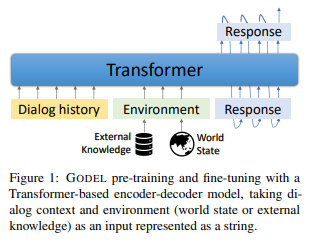
微软、哥伦比亚大学|GODEL:目标导向对话的大规模预训练
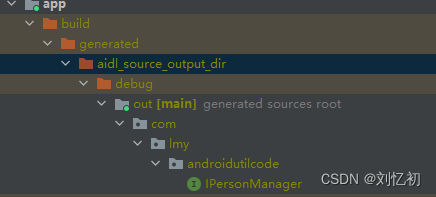
AIDL基本使用
![[NOIP2013]积木大赛 [NOIP2018]道路铺设 贪心/差分](/img/d1/a56231cd4eb3cc1d91d8a55048ccfe.png)
[NOIP2013]积木大赛 [NOIP2018]道路铺设 贪心/差分
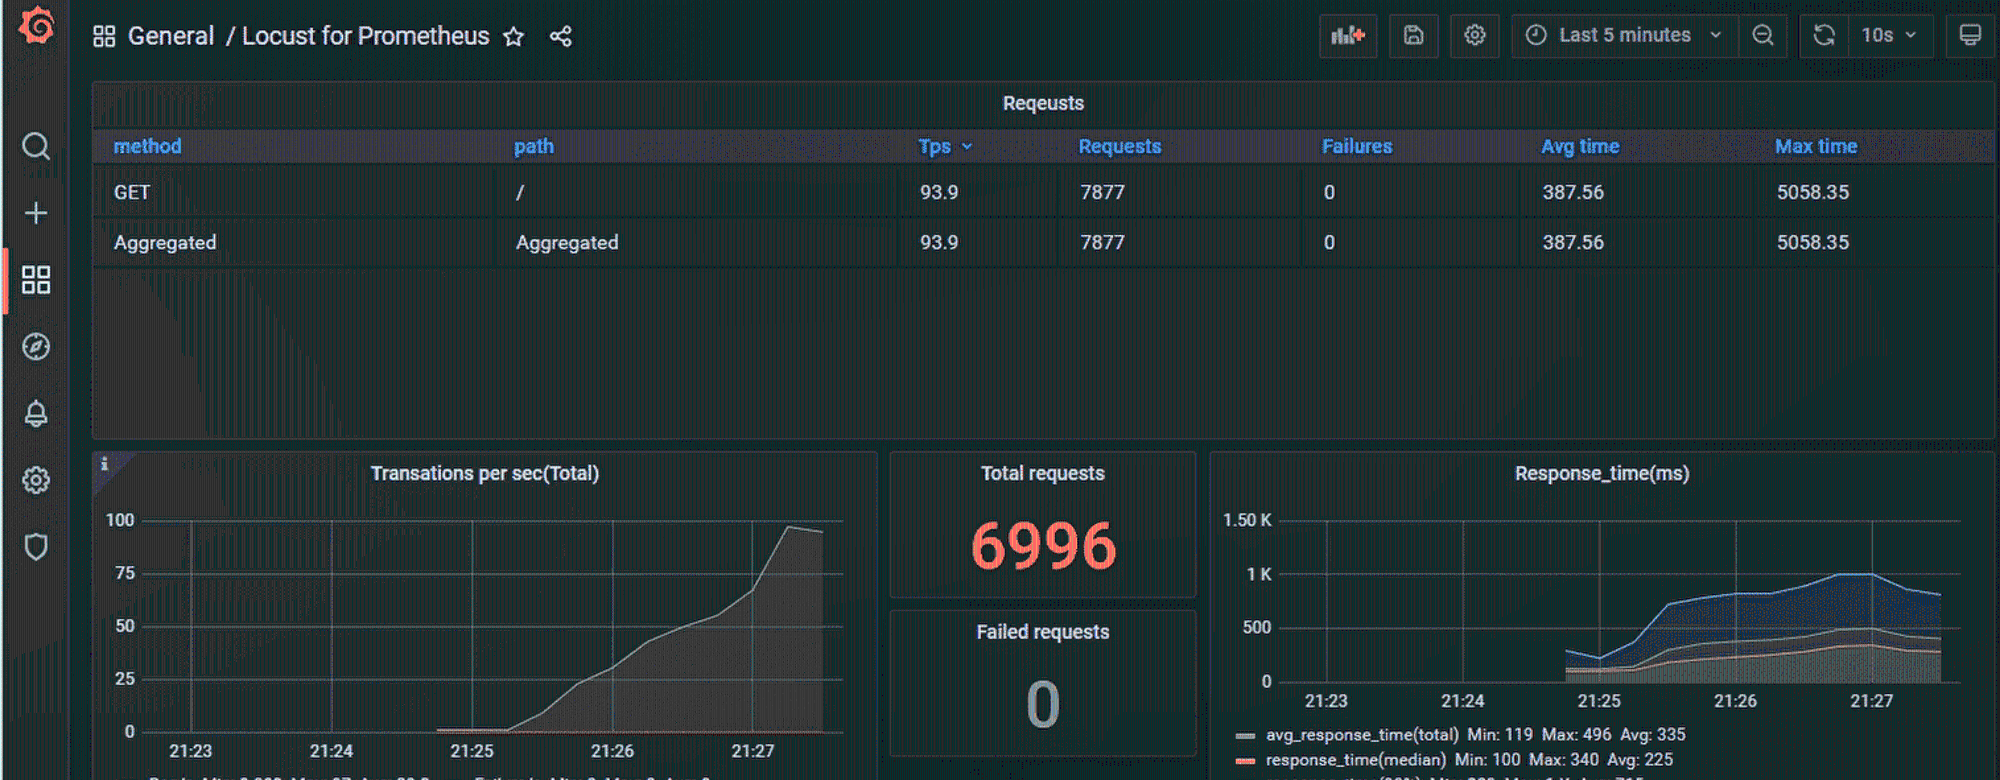
locust 系列入门

News classification based on LSTM model

Introduction à l'ingénierie logicielle (sixième édition) notes d'examen de Zhang haifan
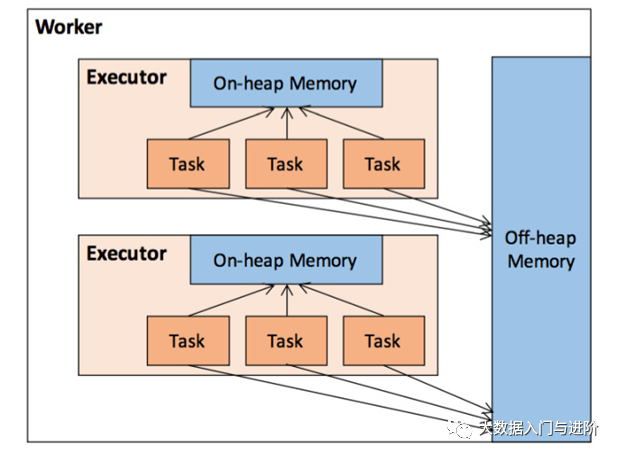
Spark面试题

Basic operation of binary tree
leetcode刷题:栈与队列02(用队列实现栈)

Introduction and download of the latest version of airserver2022
随机推荐
PMP证书真的有用吗?
Microsoft, Columbia University | Godel: large scale pre training of goal oriented dialogue
打出三位数的所有水仙花数「建议收藏」
leetcode刷题:二叉树03(二叉树的后序遍历)
【级联分类器训练参数】Training Haar Cascades
【Opencv450】HOG+SVM 与Hog+cascade进行行人检测
杰理之烧录都使用 VBAT 供电,供电电压 4.2V【篇】
[deep learning] use deep learning to monitor your girlfriend's wechat chat?
Business visualization - make your flowchart'run'up
[live broadcast review] the first 8 live broadcasts of battle code Pioneer have come to a perfect end. Please look forward to the next one!
BPR(贝叶斯个性化排序)
想请教一下,券商选哪个比较好尼?本人小白不懂,现在网上开户安全么?
MySQL series transaction log redo log learning notes
C中main函数的几种写法
Application of real estate management based on 3D GIS
Using closures to switch toggle by clicking a button
Case of camera opening by tour
idea中类中显示成员变量和方法
Slf4j打印异常的堆栈信息
业务可视化-让你的流程图'Run'起来