当前位置:网站首页>初出茅庐的小李第112篇博客项目笔记之机智云智能浇花器实战(1)-基础Demo实现
初出茅庐的小李第112篇博客项目笔记之机智云智能浇花器实战(1)-基础Demo实现
2022-08-01 01:55:00 【初出茅庐的小李】
项目文件夹框架

- API文件夹---------------------------------------放置各种传感器驱动代码文件夹
- CMSIS文件夹----------------------------------放置内核支持文件文件夹
- JIZHIYUN文件夹------------------------------放置机智云平台对接文件文件夹
- PROJECT文件夹------------------------------放置工程目录文件夹
- STARTUP文件夹------------------------------放置启动代码文件夹
- STM32F10x_StdPeriph_Driver文件夹—放置标准库函数文件夹
- USER文件夹-----------------------------------放置工程必备一些文件的文件夹
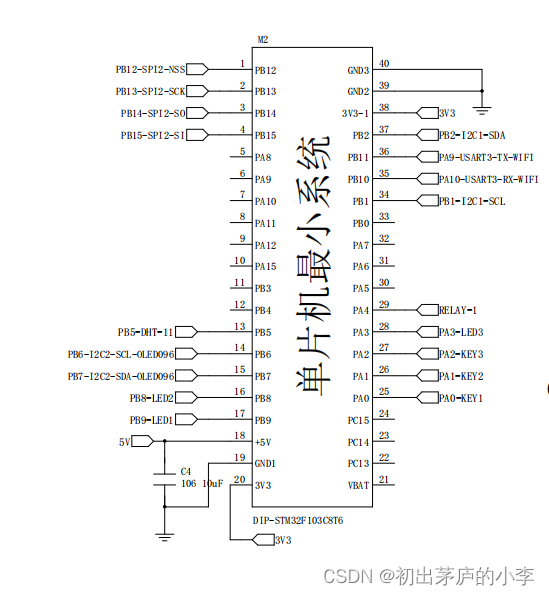
核心板原理图
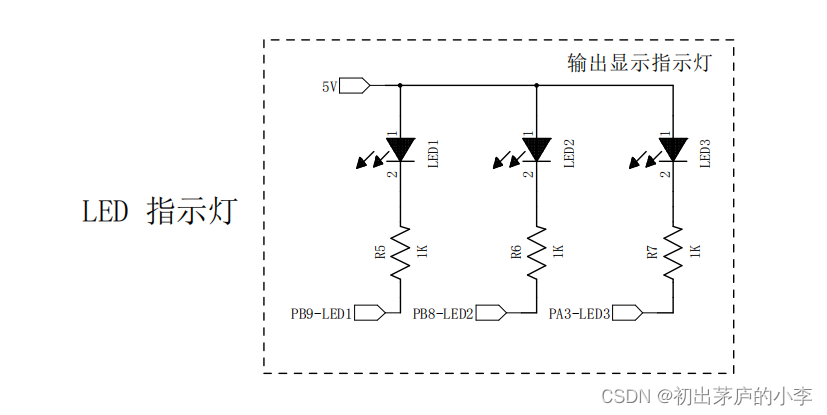
LED灯的驱动代码编写
原理图
代码实现
#include "led.h"
#include "systick.h"

void LED_Init(void)
{

	RCC_APB2PeriphClockCmd(LED1_CLK, ENABLE);
	RCC_APB2PeriphClockCmd(LED2_CLK, ENABLE);
	RCC_APB2PeriphClockCmd(LED3_CLK, ENABLE);

	GPIO_InitTypeDef            LED_InitStruct = {
    0};

	LED_InitStruct.GPIO_Pin   = LED1_PIN;
	LED_InitStruct.GPIO_Mode  = GPIO_Mode_Out_PP;
	LED_InitStruct.GPIO_Speed = GPIO_Speed_50MHz;

	GPIO_Init(LED1_PORT, &LED_InitStruct);

	LED_InitStruct.GPIO_Pin   = LED2_PIN;
	GPIO_Init(LED2_PORT, &LED_InitStruct);

	LED_InitStruct.GPIO_Pin   = LED3_PIN;
	GPIO_Init(LED3_PORT, &LED_InitStruct);

	LED1(0);
  LED2(0);
	LED3(0);
}

void LED_Task(void)
{

	static uint32_t Timer = 0;
	static uint8_t  Sta   = 0;
	if(SoftTimer(Timer,500))
	{

		Timer=GetSoftTimer();
		Sta?(Sta=0):(Sta=1);
		LED1(Sta);
		LED2(Sta);
		LED3(Sta);
	}
}

void GPIO_TogglePin(GPIO_TypeDef* GPIOx, uint16_t GPIO_Pin)
{

	uint32_t ODR;
	ODR = GPIOx->ODR;
	GPIOx->BSRR = ((ODR & GPIO_Pin) << 16U) | (~ODR & GPIO_Pin);
}
#ifndef __LED_H_
#define __LED_H_

#include "stm32f10x.h"


//PB9 --- LED1 --- 低有效
//PB8 --- LED2 --- 低有效
//PA3 --- LED3 --- 低有效

//基于STM32标准库 芯片是 STM32F103C8T6


#define LED1_CLK RCC_APB2Periph_GPIOB
#define LED1_PORT GPIOB
#define LED1_PIN GPIO_Pin_9

#define LED2_CLK RCC_APB2Periph_GPIOB
#define LED2_PORT GPIOB
#define LED2_PIN GPIO_Pin_8

#define LED3_CLK RCC_APB2Periph_GPIOA
#define LED3_PORT GPIOA
#define LED3_PIN GPIO_Pin_3


//宏定义的一个开关
#define LED1(X) X?(GPIO_ResetBits(LED1_PORT,LED1_PIN)):(GPIO_SetBits(LED1_PORT,LED1_PIN))
#define LED2(X) X?(GPIO_ResetBits(LED2_PORT,LED2_PIN)):(GPIO_SetBits(LED2_PORT,LED2_PIN))
#define LED3(X) X?(GPIO_ResetBits(LED3_PORT,LED3_PIN)):(GPIO_SetBits(LED3_PORT,LED3_PIN))

void LED_Init(void);
void GPIO_TogglePin(GPIO_TypeDef* GPIOx, uint16_t GPIO_Pin);
void LED_Task(void);

#endif
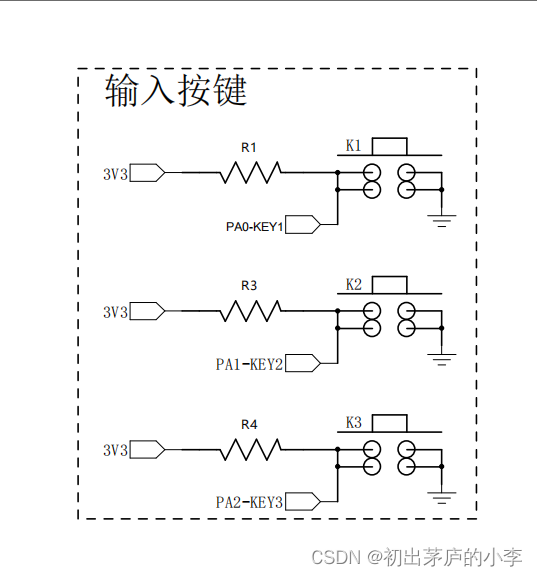
按键驱动的代码编写
原理图
代码实现
#include "key.h"
#include "systick.h"

void KEY_Init(void)
{

	RCC_APB2PeriphClockCmd(KEY0_CLK,ENABLE);
	RCC_APB2PeriphClockCmd(KEY1_CLK,ENABLE);
	RCC_APB2PeriphClockCmd(KEY2_CLK,ENABLE);

	GPIO_InitTypeDef            KEY_InitStruct;
	KEY_InitStruct.GPIO_Pin   = KEY0_PIN|KEY1_PIN|KEY2_PIN;
	KEY_InitStruct.GPIO_Mode  = GPIO_Mode_IPU;
	KEY_InitStruct.GPIO_Speed = GPIO_Speed_50MHz;

	GPIO_Init(KEY0_PORT ,&KEY_InitStruct);
	GPIO_Init(KEY1_PORT ,&KEY_InitStruct);
	GPIO_Init(KEY2_PORT ,&KEY_InitStruct);

}


static uint8_t Key0Value=0;
static uint8_t Key1Value=0;
static uint8_t Key2Value=0;

void KeyScan(void)
{

	static uint16_t Key0Timer=0;
	static uint16_t Key1Timer=0;
	static uint16_t Key2Timer=0;
	if(KEY0==0)
	{

		if(Key0Timer<10)
		{

			Key0Timer++;
			if(Key0Timer>=10)
				Key0Value=1;
		}
	}
	else
	{

		Key0Timer = 0;
	}
	if(KEY1==0)
	{

		if(Key1Timer<10)
		{

			Key1Timer++;
			if(Key1Timer>=10)
				Key1Value=1;
		}
	}
	else
	{

		Key1Timer = 0;
	}
	if(KEY2==0)
	{

		if(Key2Timer<10)
		{

			Key2Timer++;
			if(Key2Timer>=10)
				Key2Value=1;
		}
	}
	else
	{

		Key2Timer = 0;
	}
}


uint8_t GetKey0(void)
{

	uint8_t Key=Key0Value;
	Key0Value=0;
	return Key;
}

uint8_t GetKey1(void)
{

	uint8_t Key=Key1Value;
	Key1Value=0;
	return Key;
}

uint8_t GetKey2(void)
{

	uint8_t Key=Key2Value;
	Key2Value=0;
	return Key;
}
#ifndef __KEY_H_
#define __KEY_H_

#include "stm32f10x.h"

#define KEY0_CLK RCC_APB2Periph_GPIOA
#define KEY0_PORT GPIOA
#define KEY0_PIN GPIO_Pin_0

#define KEY1_CLK RCC_APB2Periph_GPIOA
#define KEY1_PORT GPIOA
#define KEY1_PIN GPIO_Pin_1

#define KEY2_CLK RCC_APB2Periph_GPIOA
#define KEY2_PORT GPIOA
#define KEY2_PIN GPIO_Pin_2

#define KEY0 GPIO_ReadInputDataBit(KEY0_PORT,KEY0_PIN)
#define KEY1 GPIO_ReadInputDataBit(KEY1_PORT,KEY1_PIN)
#define KEY2 GPIO_ReadInputDataBit(KEY2_PORT,KEY2_PIN)

void KEY_Init(void);
void KeyScan(void);
uint8_t GetKey0(void);
uint8_t GetKey1(void);
uint8_t GetKey2(void);
#endif
测试驱动程序的正确性
#include "main.h"
int main(void)
{

	NVIC_PriorityGroupConfig(NVIC_PriorityGroup_2);
	USART1_Init(9600);
	//printf("打印串口初始化 OK !\r\n");
  SysTick_Init();
  //printf("系统嘀嗒初始化 OK !\r\n");
	LED_Init();
  //printf("状态指示初始化 OK !\r\n");
  KEY_Init();
  //printf("按键配置初始化 OK !\r\n");
	while(1)
	{

		LED_Task();
		if(GetKey0())
		{

			GPIO_TogglePin(LED1_PORT,LED1_PIN);
			//JiaoHua(1-currentDataPoint.valueRelay_1);
		}
		if(GetKey1())
		{

			GPIO_TogglePin(LED2_PORT,LED2_PIN);
			//gizwitsSetMode(WIFI_AIRLINK_MODE);
			//按键进入配网模式
		}
		if(GetKey2())
		{

			GPIO_TogglePin(LED3_PORT,LED3_PIN);
		}
	}
}
其他辅助代码
串口打印实现
在开发板上用的是USB TO TTL 工具 串口1 打印 实际的项目板上没有设计该电路(失误1)
串口1 驱动代码
#include "usart1.h"
#include <stdio.h>

void USART1_NVIC_Config(void)
{

  //接收中断使能
	NVIC_InitTypeDef  NVIC_InitStruct;
	/*NVIC控制器配置*/
	NVIC_InitStruct.NVIC_IRQChannel    = USART1_IRQn;//具体中断源名字
	NVIC_InitStruct.NVIC_IRQChannelCmd = ENABLE;//NVIC响应通道使能
	NVIC_InitStruct.NVIC_IRQChannelPreemptionPriority = 0;//抢占优先级值
	NVIC_InitStruct.NVIC_IRQChannelSubPriority        = 1;//响应优先级别值
  NVIC_Init(&NVIC_InitStruct);

}

/*打印调试串口*/
void USART1_Init(uint32_t BaudRate)
{

	USART_DeInit(USART1);
	//1.打开GPIO的时钟
	RCC_APB2PeriphClockCmd(RCC_APB2Periph_GPIOA,ENABLE);

	//2.配置相关结构体
	GPIO_InitTypeDef           GPIO_InitStruct;

	//串口发送引脚的配置 PA9->复用推挽输出
	GPIO_InitStruct.GPIO_Pin   = GPIO_Pin_9;
	GPIO_InitStruct.GPIO_Mode  = GPIO_Mode_AF_PP;
	GPIO_InitStruct.GPIO_Speed = GPIO_Speed_50MHz;
	GPIO_Init(GPIOA,&GPIO_InitStruct);

	//串口接收引脚的配置 PA10->浮空输入模式
	GPIO_InitStruct.GPIO_Pin   = GPIO_Pin_10;
	GPIO_InitStruct.GPIO_Mode  = GPIO_Mode_IN_FLOATING;//浮空输入模式
	GPIO_InitStruct.GPIO_Speed = GPIO_Speed_50MHz;
	GPIO_Init(GPIOA,&GPIO_InitStruct);

	//1.打开串口的时钟
	RCC_APB2PeriphClockCmd(RCC_APB2Periph_USART1,ENABLE);//注意APB2

	USART_InitTypeDef USART1_InitStruct;
	//串口的参数配置 波特率可以更改
	//无硬件流控制 收发模式
	//1起始位 8数据位 无奇偶校验 1位停止位
	USART1_InitStruct.USART_BaudRate            = BaudRate;
	USART1_InitStruct.USART_HardwareFlowControl = USART_HardwareFlowControl_None;
	USART1_InitStruct.USART_Mode                = USART_Mode_Rx|USART_Mode_Tx;
	USART1_InitStruct.USART_Parity              = USART_Parity_No;
	USART1_InitStruct.USART_StopBits            = USART_StopBits_1;
	USART1_InitStruct.USART_WordLength          = USART_WordLength_8b;
	//串口1初始化
	USART_Init(USART1,&USART1_InitStruct);

	/**************************************************************/
	//开串口中断
	USART_ITConfig(USART1, USART_IT_RXNE, ENABLE);//接收中断
	//USART_ITConfig(USART1, USART_IT_IDLE, ENABLE);//空闲中断
	//中断优先级配置
	USART1_NVIC_Config();
	USART_Cmd(USART1,ENABLE);
}


/*串口重定向函数 目的是让STM32支持printf("%d %x %c ")*/
int fputc(int ch , FILE *stream)
{

	while(USART_GetFlagStatus(USART1,USART_FLAG_TXE)==RESET);
	USART_SendData(USART1,(uint16_t) ch); //数据通过串口发送
	while(USART_GetFlagStatus(USART1,USART_FLAG_TC)==RESET);
	return ch;
}
#ifndef __USART1_H_
#define __USART1_H_

#include "stm32f10x.h"

void USART1_Init(uint32_t BaudRate);

#endif
系统嘀嗒定时器代码
#include "systick.h"
#include "key.h"


uint32_t mySysTick_Config(uint32_t ticks)
{

  if (ticks > SysTick_LOAD_RELOAD_Msk)  return (1);            /* Reload value impossible */

  SysTick->LOAD  = (ticks & SysTick_LOAD_RELOAD_Msk) - 1;      /* set reload register */
  NVIC_SetPriority (SysTick_IRQn, (1<<__NVIC_PRIO_BITS) - 1);  /* set Priority for Cortex-M0 System Interrupts */
  SysTick->VAL   = 0;                                          /* Load the SysTick Counter Value */
  SysTick->CTRL  = SysTick_CTRL_CLKSOURCE_Msk |
                   SysTick_CTRL_TICKINT_Msk   |
                   SysTick_CTRL_ENABLE_Msk;                    /* Enable SysTick IRQ and SysTick Timer */
  return (0);                                                  /* Function successful */
}

void SysTick_Init(void)
{

	//SystemInit();
	SysTick_CLKSourceConfig(SysTick_CLKSource_HCLK);
	mySysTick_Config(SystemCoreClock/1000);
}
void SysTick_Handler(void)
{

	SystemTick();
	KeyScan();
}
static uint32_t Ticks=0;
void SystemTick(void)
{

	Ticks++;
}
uint32_t GetSoftTimer(void)
{

	return Ticks;
}
uint8_t SoftTimer(uint32_t BaseTimer,uint32_t Timeout)
{

	if(Ticks>=BaseTimer)
	return (Ticks)>=Timeout+BaseTimer;
	return (Ticks+0xFFFFFF)>=Timeout+BaseTimer;
}
边栏推荐
- IDEA debugging
- WebApi hits an Attribute to handle exceptions uniformly
- SC7A20 (Silan Micro-Accelerometer) Example
- Basic usage concepts of vim
- STK8321 I2C (Shengjia-accelerometer) example
- Introduction to machine learning how to?
- WebApi 打个Attribute 统一处理异常
- Soft Exam Senior System Architect Series: Basic Knowledge of Information Systems
- Cmake introductory study notes
- 【元胞自动机】基于matlab界面聚合元胞自动机模拟【含Matlab源码 2004期】
猜你喜欢

Ordinary users cannot access HGFS directory
IDEA 找不到或无法加载主类 或 Module “*“ must not contain source root “*“ The root already belongs to module “*“
Google Earth Engine - Error resolution of Error: Image.clipToBoundsAndScale, argument 'input': Invalid type

IDEA修改注释字体

【历史上的今天】7 月 31 日:“缸中之脑”的提出者诞生;Wi-Fi 之父出生;USB 3.1 标准发布

RTL8762DK Lighting/LED (3)

设备树——dtb格式到struct device node结构体的转换

ARM 交叉编译

Google engineer fired for claiming AI awareness: breach of nondisclosure agreement

Unity3D study notes 10 - texture array
随机推荐
RTL8762DK WDG(六)
【元胞自动机】基于matlab界面聚合元胞自动机模拟【含Matlab源码 2004期】
【数据分析】基于matlab GUI学生成绩管理系统【含Matlab源码 1981期】
【历史上的今天】7 月 31 日:“缸中之脑”的提出者诞生;Wi-Fi 之父出生;USB 3.1 标准发布
js 实现复制功能
YOLO怎么入门?怎么实现自己的训练集?
彻底关闭Chrome浏览器更新及右上角的更新提示
高维高斯分布基础
手写二叉查找树及测试
更换树莓派内核
[cellular automata] based on matlab interface aggregation cellular automata simulation [including Matlab source code 2004]
OSF understands the agile development model in one minute
MYSQL master-slave replication
WebApi hits an Attribute to handle exceptions uniformly
IDEA无法识别module(module右下角没有蓝色小方块)
解决安装MySQL后,Excel打开很慢的问题
MYSQL Keyword Explain Analysis
MYSQL-Batch insert data
Super like the keyboard made from zero, IT people love it
Key Points Estimation and Point Instance