当前位置:网站首页>Simple message queue implementation nodejs + redis =mq
Simple message queue implementation nodejs + redis =mq
2022-07-24 23:22:00 【Controllers】
Preface
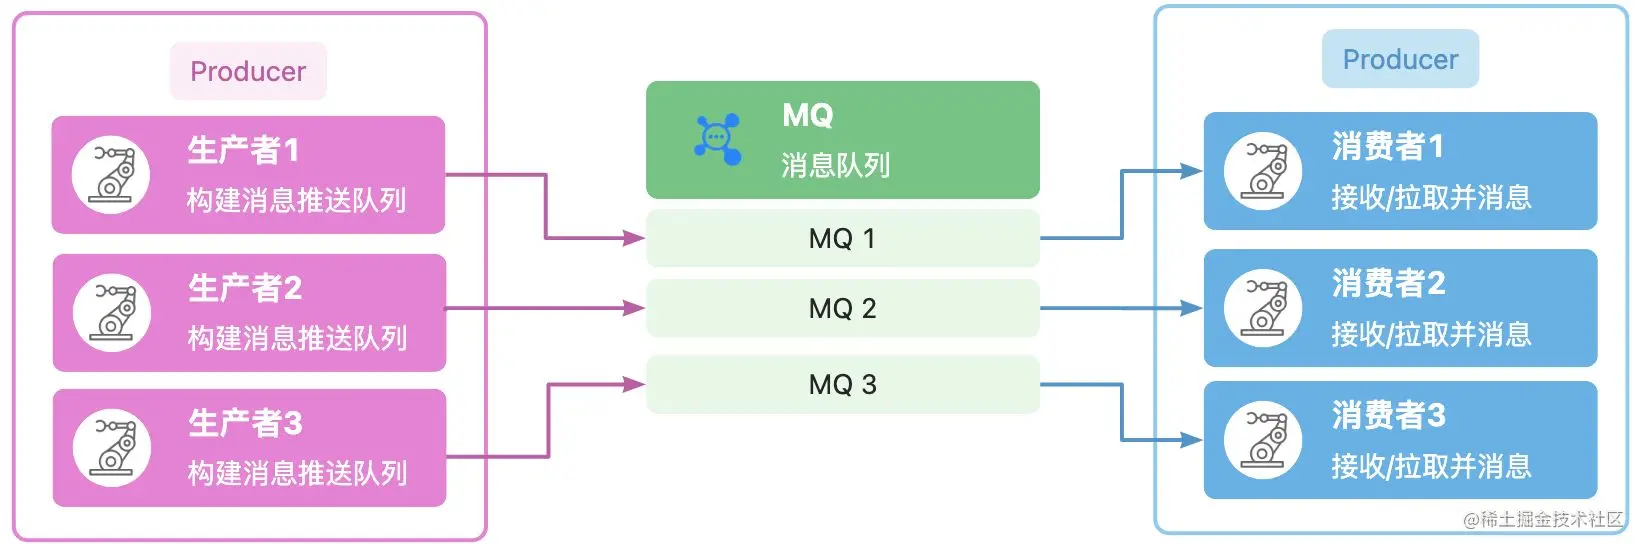
Message queuing is a middleware that stores data , It can be understood as a container . Producer production message delivery Go to the queue , Consumers can pull messages for consumption , If consumers have no intention of spending at present , Then the message queue will retain messages , Until consumers have the intention to spend .
Design thinking
producer
- Connect redis
- Assign a channel to adopt lpush news
consumer
- Connect redis
- Dead circulation through brpop Block get message
- Get the message and consume
- Loop to get the next message
Redis
Installation and start up
In this step, please feel free , Not necessarily docker . Just make sure you can connect to redis The service can be .
#  Use docker  Pull redis  Mirror image
docker pull redis:latest
 #  start-up redis service
# --name  After that is the name of the container, which is convenient for subsequent maintenance and management
# -p  The latter refers to the mapping of Container Services  6379  Port to host  6379  port
docker run -itd --name redis-mq -p 6379:6379 redis
 # ============ docker  Common basic operations ( Digression ) =================
 #  Pull the mirror image
docker pull  Image name
 #  Look at the mirror image
docker images
 #  delete mirror
docker rmi  Image name
 #  Look at the run container ( Only for the starting )
docker ps
 #  Look at the run container ( Include not started )
docker ps -a
 #  Start the container
docker start  Container name / Containers id
 #  Stop container
docker stop  Container name / Containers id

 Copy code
Nodejs Connect
Initialization project
#  Create a folder and go to
mkdir queue-node-redis && cd queue-node-redis
 # yarn  initialization
yarn init -y
 #  download redis package ,
#  The reason for specifying the version is to minimize the failure probability of Taoists   After all, the tool iteration of the front end is too fast
yarn add [email protected]
 Copy code
establish lib And utils Catalog
├── .gitignore
├── lib
├── package.json
├── utils
│   └── redis.js
└── yarn.lock
 Copy code
utils/redis.js
const redis = require("redis");

const redisCreateClient = async (config) => {
  try {
    const client = redis.createClient({
      url: `redis://${config.host}:${config.port}`,
    });
    await client.connect();
    await client.select(config.db);
    console.log("redis connect success");
    return client;
  } catch (err) {
    console.log("redis connect error");
    throw err;
  }
};

module.exports = {
  redisCreateClient,
};
 Copy code
index.js
Create this file in the root directory of the project , test redis Is the connection successful
const { redisCreateClient } = require("./utils/redis");
const test = async () => {
  const client = await redisCreateClient({
    host: "127.0.0.1",
    port: 6379,
    db: 0,
  });
};
test();

 Copy code
As shown in the figure below 
minimist
Lightweight command line parameter parsing engine .
#  install  minimist
yarn add [email protected]
 Copy code
Usage method
const systemArg = require("minimist")(process.argv.slice(2));
console.log(systemArg);

 Copy code
# function
node index.js --name test
# Output
{ _: [], name: 'test' }
Copy code Text begins
Create from directory structure and files , Hands on Tutorial

Directory structure change
├── config.js  	 #  The configuration file
├── lib
│   └── index.js #  Home directory entry file
├── package.json
├── utils				 #  Tool library
│   └── redis.js
└── yarn.lock
 Copy code
config.js
The idea of configuration file is more important than the implementation of code
module.exports = {
  // redis  To configure
  redis: {
    default: {
      host: "127.0.0.1",
      port: 6379,
      password: "",
      db: 0,
    },
  },
  //  Message queue channel settings
  mqList: [
    {
      //  Message channel name
      name: "QUEUE_MY_MQ",
      //  Blocking value timeout configuration
      brPopTimeout: 100,
      //  Number of open tasks   This configuration requires  PM  Start to take effect
      instances: 1,
      // redis  To configure key
      redis: "default",
    },
  ],
};
 Copy code
lib/index.js
Do program exception handling for configuration
const systemArg = require("minimist")(process.argv.slice(2));
const config = require("../config");
const { bootstrap } = require("./core");

//  Program self-test

//  Determine whether you have entered   Channel name
if (!systemArg.name) {
  console.error("ERROR: channel name cannot be empty");
  process.exit(99);
}

//  Channel queue configuration
const mqConfig =
  config.mqList.find((item) => item.name === systemArg.name) ?? false;

//  If config non-existent
if (!mqConfig) {
  console.error("ERROR: configuration not obtained");
  process.exit(99);
}

// redis  To configure
const redisConfig = config.redis[mqConfig.redis];
if (!redisConfig) {
  console.error("ERROR: redis configuration not obtained");
  process.exit(99);
}

// node index.js --name QUEUE_MY_MQ
bootstrap(mqConfig, redisConfig);

 Copy code
lib/core.js
The following core logic is written here
async function bootstrap(config) {
  console.log(config);
}

module.exports = {
  bootstrap,
};

Copy code Core logic
lib/core.js
const { redisCreateClient } = require("../utils/redis");
async function bootstrap(mqConfig, redisConfig) {
  try {
    //  establish redis Connect
    const client = await redisCreateClient(redisConfig);
    //  Block the program through the dead loop
    while (true) {
      let res = null;
      console.log(" Queue execution ");
      try {
        //  Get the task from the queue ,  Use blocking to get tasks   The maximum blocking time is config.queue.timeout
        res = await client.brPop(mqConfig.name, mqConfig.brPopTimeout);
        if (res === null) {
          continue;
        }
        console.log("TODO:: Task processing", res);
      } catch (error) {
        console.log("ERROR: redis brPop error", error);
        continue;
      }
    }
  } catch (err) {
    //  Handler exception
    console.log("ERROR: ", err);
    process.exit(1);
  }
}
module.exports = {
  bootstrap,
};

 Copy code
Generate test data
For the next test , Our husband has some test data
test/mockMq.js
const { redisCreateClient } = require("../utils/redis");
const config = require("../config");

/**  Generate  1000  Test message  */
const mockMq = async (key) => {
  const client = await redisCreateClient(config.redis.default);
  for (let i = 0; i < 1000; i++) {
    //  To the queue  push  news
    await client.lPush(key, "test" + i);
  }
  //  Get queue length
  const count = await client.lLen(key);
  console.log(` Generate 1000 Test messages complete , At present, there are ${count} Bar message `);
  //  close redis Connect
  client.quit();
};

mockMq("QUEUE_MY_MQ");
 Copy code
Verify the validity of the script
#  Execute the message generation command
node ./test/mockMq.js
 #  Program output
# redis connect success
#  Generate  1000  Test message   complete , At present, there are  1000  Bar message
 #  Execute to open the consumer
node ./lib/index.js --name QUEUE_MY_MQ
# TODO:: Task processing { key: 'QUEUE_MY_MQ', element: 'test0' }
# TODO:: Task processing .......
# TODO:: Task processing { key: 'QUEUE_MY_MQ', element: 'test999' }
Copy code Definition Job
Postscript
So far, the implementation of the suggestion queue is complete , Of course, there are some optimizations later . For example, through the configuration file Dynamic introduction Job And how to use it Pm2 Start the consumption queue and configure the number of starts 、 Start stop control .(ps: The hole here will soon be filled )
Except for that, of course , At present, this simple queue has many shortcomings . For example, how to deal with the failure of task execution , How about after consumption ack , No mature topic agreement , Delay queue is not implemented . These pits are due to personal level and redis Its own characteristics I may not fill it out for a long time . It is recommended to use mature kits for production for example Kafka RabbitMq And some other packages that are more suitable for the current language .
边栏推荐
- Qt | 事件系统 QEvent
- JUC concurrent programming - Advanced 05 - lock free of shared model (CAS | atomic integer | atomic reference | atomic array | field updater | atomic accumulator | unsafe class)
- 阿里云SSL证书
- Mandatory interview questions: 1. shallow copy and deep copy_ Deep copy
- 基于TensorFlow和Keras的卷积神经网络实现猫狗数据集分类实验
- Go基础笔记_4_map
- Filter list
- Network Security Learning (V) DHCP
- CA certificate production practice
- QT6 with vs Code: compiling source code and basic configuration
猜你喜欢

HLS编程入门

基于TensorFlow和Keras的卷积神经网络实现猫狗数据集分类实验
Notes of Teacher Li Hongyi's 2020 in-depth learning series 5

Salesforce zero foundation learning (116) workflow - & gt; On flow

Bug summary

NVIDA-TensorRT部署(一)
Implementation of cat and dog data set classification experiment based on tensorflow and keras convolutional neural network

生成式对抗网络的效果评估

Read and understand the advantages of the LAAS scheme of elephant swap

郑慧娟:基于统一大市场的数据资产应用场景与评估方法研究
随机推荐
Background image and QR code synthesis
Understanding complexity and simple sorting operation
Alibaba cloud SSL certificate
Collection of common online testing tools
Notes of Teacher Li Hongyi's 2020 in-depth learning series lecture 1
谢振东:公共交通行业数字化转型升级的探索与实践
代码覆盖率
Notes of Teacher Li Hongyi's 2020 in-depth learning series 8
Learn AI through detectron2
Shell调试Debug的三种方式
The size of STM32 stack
JS ------ Chapter II JS logic control
Notes of Teacher Li Hongyi's 2020 in-depth learning series 5
认识复杂度和简单排序运算
Solve the problem that JSP cannot use session.getattribute()
高阶产品如何提出有效解决方案?(1方法论+2案例+1清单)
Let‘s Encrypt
[zero basis] SQL injection for PHP code audit
Browser cache
国信证券手机开户安全吗