当前位置:网站首页>别再到处乱放配置文件了!试试我司使用 7 年的这套解决方案,稳的一秕
别再到处乱放配置文件了!试试我司使用 7 年的这套解决方案,稳的一秕
2022-07-24 16:59:00 【民工哥】
点击下方“Java编程鸭”关注并标星
更多精彩 第一时间直达
1 简述
官方文档对Spring Cloud Config的描述如下:
Spring Cloud Config为分布式系统中的外部配置提供服务器和客户端支持,使用Config Server,您可以在所有环境中管理应用程序的外部属性。客户端和服务器上的概念映射与Spring Environment和PropertySource抽象相同。
因此它们与Spring应用程序非常契合,但可以与任何以任何语言运行的应用程序一起使用。随着应用程序通过从开发人员到测试和生产的部署流程,您可以管理这些环境之间的配置,并确定应用程序具有迁移时需要运行的一切。
服务器存储后端的默认实现使用git,因此它轻松支持标签版本的配置环境,以及可以访问用于管理内容的各种工具。很容易添加替代实现,并使用Spring配置将其插入。
1.1 配置中心存在的意义
一个应用中不只是代码,还需要连接资源和其它应用,经常有很多需要外部设置的项去调整应用行为,如切换不同的数据库,设置功能开关等。
随着系统微服务的不断增加,首要考虑的是系统的可伸缩、可扩展性好,随之就是一个配置管理的问题。各自管各自的开发时没什么问题,到了线上之后管理就会很头疼,到了要大规模更新就更烦了。
而且你不可能停止你的服务集群去更新的你配置,这是不现实的做法,因此Spring Cloud配置中心就是一个比较好的解决方案,下图就是一个Spring Cloud配置中心的解决方案:

架构图如下:

常见的配置中心的实现方法有:
硬编码(缺点:需要修改代码,风险大)
放在xml等配置文件中,和应用一起打包(缺点:需要重新打包和重启)
文件系统中(缺点:依赖操作系统等)
环境变量(缺点:有大量的配置需要人工设置到环境变量中,不便于管理且依赖平台)
云端存储(缺点:与其他应用耦合)
Spring Cloud Config就是云端存储配置信息的,它具有中心化、版本控制、支持动态更新、平台独立、语言独立等特性。其特点是:
提供服务端和客户端支持(
spring cloud config server和spring cloud config client)集中式管理分布式环境下的应用配置
基于Spring环境,无缝与Spring应用集成
可用于任何语言开发的程序
默认实现基于git仓库,可以进行版本管理
可替换自定义实现
1.1.1 Spring Cloud Config包括两部分
1、Spring Cloud Config Server作为配置中心的服务端:
拉取配置时更新git仓库副本,保证是最新结果
支持数据结构丰富,
yml、json、properties等配合 eureke 可实现服务发现,配合
cloud bus可实现配置推送更新配置存储基于 git仓库,可进行版本管理
简单可靠,有丰富的配套方案
2、Spring Cloud Config Client客户端:
Spring Boot项目不需要改动任何代码,加入一个启动配置文件指明使用ConfigServer上哪个配置文件即可
1.1.2 SpringCloud Config与百度的disconf之类注册中心区别
主要区别在于下面三点:
1、配置的存储方式不同: disconf是把配置信息保存在mysql、zookeeper中,而spring cloud config是将配置保存在git/svn上 (即:配置当成源代码一样管理)
2、配置的管理方式不同: spring cloud config没有类似disconf的统一管理界面,既然把配置都当成git之类的源码来看待了,git的管理界面,就是配置的管理界面
3、配置变化的通知机制不同: disconf中配置变化后,依赖zk的事件watcher来通知应用,而spring cloud config则是依赖git每次push后,触发webhook回调,最终触发spring cloud bus(消息总线),然后由消息总线通知相关的应用。
从配置变化的通知机制上看,如果有100个应用节点,都依赖于统一配置,如果修改了配置,只想让某几个节点"灰度"更新配置,spring cloud config server更容易做到,这一点相对disconf更灵活
1.2 代码示例
目前SpringCloud Config的使用主要是通过Git/SVN方式做一个配置中心,然后每个服务从其中获取自身配置所需的参数。SpringCloud Config也支持本地参数配置的获取。
如果使用本地存储的方式,在application.properties 或application.yml 文件添加 spring.profiles.active=native 配置即可,它会从项目的 resources路径下读取配置文件。如果是读取指定的配置文件,那么可以使用 spring.cloud.config.server.native.searchLocations = file:D:/properties/来读取。
1.2.1 服务端
首先是服务端这块,首先创建一个注册中心,为了进行区分,创建一个springcloud-config-eureka的项目。
application.properties配置信息:
配置信息:
spring.application.name=springcloud-hystrix-eureka-server
server.port=8005
eureka.client.register-with-eureka=false
eureka.client.fetch-registry=false
eureka.client.serviceUrl.defaultZone=http://localhost:8005/eureka/
配置说明:
spring.application.name: 这个是指定服务名称
server.port: 服务指定的端口
eureka.client.register-with-eureka: 表示是否将自己注册到
Eureka Server,默认是trueeureka.client.fetch-registry: 表示是否从
Eureka Server获取注册信息,默认为trueeureka.client.serviceUrl.defaultZone: 这个是设置与
Eureka Server交互的地址,客户端的查询服务和注册服务都需要依赖这个地址
服务端这边只需要在SpringBoot启动类添加@EnableEurekaServer注解就可以了,该注解表示此服务是一个服务注册中心服务。
代码示例:
@SpringBootApplication
@EnableEurekaServer
public class ConfigEurekaApplication {

 public static void main(String[] args) {
  SpringApplication.run(ConfigEurekaApplication.class, args);
   System.out.println("config 注册中心服务启动...");
 }
}
创建好了注册中心之后,我们再来创建一个配置中心,用于管理配置。
创建一个springcloud-config-server的项目。然后在application.properties配置文件添加如下配置:
配置信息:
spring.application.name=springcloud-config-server
server.port=9005
eureka.client.serviceUrl.defaultZone=http://localhost:8005/eureka/
spring.cloud.config.server.git.uri = https://github.com/xuwujing/springcloud-study/
spring.cloud.config.server.git.search-paths = /springcloud-config/config-repo
spring.cloud.config.server.git.username =
spring.cloud.config.server.git.password =
配置说明:
spring.application.name: 这个是指定服务名称
server.port:服务指定的端口
eureka.client.serviceUrl.defaultZone: 这个是设置与
Eureka Server交互的地址,客户端的查询服务和注册服务都需要依赖这个地址spring.cloud.config.server.git.uri: 配置的Git仓库的地址
spring.cloud.config.server.git.search-paths: git仓库地址下的相对地址 多个用逗号","分割
spring.cloud.config.server.git.username: git仓库的账号
spring.cloud.config.server.git.password: git仓库的密码
注:如果想使用本地方式读取配置信息,那么只需将
spring.cloud.config.server.git的配置改成spring.profiles.active=native,然后在resources路径下新增一个文件即可。
这里为了进行本地配置文件测试,新建一个configtest.properties配置文件,添加如下内容:
word=hello world代码这块也很简单,在程序主类中,额外添加@EnableConfigServer注解,该注解表示启用config配置中心功能。代码如下:
@EnableDiscoveryClient
@EnableConfigServer
@SpringBootApplication
public class ConfigServerApplication {

 public static void main(String[] args) {
  SpringApplication.run(ConfigServerApplication.class, args);
  System.out.println("配置中心服务端启动成功!");
 }
}
完成上述代码之后,我们的配置中心服务端已经构建完成了。
1.2.2 客户端
我们新建一个springcloud-config-client的项目,用于做读取配置中心的配置。pom依赖还是和配置中心一样,不过需要新增一个配置,用于指定配置的读取。
创建一个bootstrap.properties文件,并添加如下信息:
配置信息:
spring.cloud.config.name=configtest
spring.cloud.config.profile=pro
spring.cloud.config.label=master
spring.cloud.config.discovery.enabled=true
spring.cloud.config.discovery.serviceId=springcloud-config-server
eureka.client.serviceUrl.defaultZone=http://localhost:8005/eureka/
配置说明:
spring.cloud.config.name: 获取配置文件的名称
spring.cloud.config.profile: 获取配置的策略
spring.cloud.config.label: 获取配置文件的分支,默认是master。如果是是本地获取的话,则无用
spring.cloud.config.discovery.enabled: 开启配置信息发现
spring.cloud.config.discovery.serviceId: 指定配置中心的
service-id,便于扩展为高可用配置集群eureka.client.serviceUrl.defaultZone: 这个是设置与
Eureka Server交互的地址,客户端的查询服务和注册服务都需要依赖这个地址
注:上面这些与spring-cloud相关的属性必须配置在
bootstrap.properties中,config部分内容才能被正确加载。因为bootstrap.properties的相关配置会先于application.properties,而bootstrap.properties的加载也是先于application.properties。需要注意的是eureka.client.serviceUrl.defaultZone要配置在bootstrap.properties,不然客户端是无法获取配置中心参数的,会启动失败!
application.properties配置
spring.application.name=springcloud-config-client
server.port=9006
配置说明:
spring.application.name: 这个是指定服务名称
server.port:服务指定的端口
程序主类代码,和之前的基本一致。代码如下:
代码示例:
@EnableDiscoveryClient
@SpringBootApplication
public class ConfigClientApplication {

 public static void main(String[] args) {
  SpringApplication.run(ConfigClientApplication.class, args);
  System.out.println("配置中心客户端启动成功!");
 }
}为了方便查询,在控制中进行参数的获取,并返回。@Value注解是默认是从application.properties配置文件获取参数,但是这里我们在客户端并没有进行配置,该配置在配置中心服务端,我们只需指定好了配置文件之后即可进行使用。
代码示例:
@RestController
public class ClientController {

 @Value("${word}")
 private String word;

    @RequestMapping("/hello")
    public String index(@RequestParam String name) {
        return name+","+this.word;
    }
}
到此,客户端项目也就构建完成了。
1.2.3 功能测试
完成如上的工程开发之后,我们来进行测试。
1.2.3.1 本地测试
首先我们把springcloud-config-server项目的application.properties配置文件添加spring.profiles.active=native配置,注释掉spring.cloud.config.server.git相关的配置,然后在src/main/resources目录下新建一个configtest.properties文件,然后在里面添加一个配置word=hello world。
添加完成之后,我们依次启动springcloud-config-eureka、springcloud-config-server、springcloud-config-client这三个项目。启动成功之前,先看来看看配置中心服务端的配置文件获取,在浏览器输入:
http://localhost:9005/configtest-1.properties
查看该文件的配置信息。
注:配置文件的名称是
configtest.properties,但是如果直接该名称的话是获取不到的,因为在配置文件名需要通过-来进行获取,如果配置文件名称没有-,那么添加了-之后,会自动进行匹配搜索。
springcloud config的URL与配置文件的映射关系如下:
/{application}/{profile}[/{label}]
/{application}-{profile}.yml
/{label}/{application}-{profile}.yml
/{application}-{profile}.properties
/{label}/{application}-{profile}.properties上面的url会映射{application}-{profile}.properties对应的配置文件,{label}对应git上不同的分支,默认为master。
界面返回:
word: hello world然后调用客户端的接口,查看是否能够获取配置信息。在浏览器上输入:
http://localhost:9006//hello?name=pancm
界面返回:
pancm,hello world示例图:


1.2.3.2 Git测试
在完成本地测试之后,我们把这个spring.profiles.active=native配置注释掉,解除spring.cloud.config.server.git相关的注释(账号和密码要填写真实的),然后在git仓库上建立一个config-repo文件夹,新建configtest-pro.properties、configtest-dev.properties两个配置,这两个的配置分别是word=hello world!!和word=hello world!, 然后和configtest.properties配置文件一起上传到config-repo文件夹中。
首先在浏览器输入:
http://localhost:9005/configtest-dev.properties
浏览器返回:
word: hello world!然后再浏览器输入:
http://localhost:9005/configtest-pro.properties
浏览器返回:
word: hello world!!上传了configtest.properties文件,但是这个文件名称没有-,我们想获取其中参数的信息的话,可以在然后-随意添加一个参数,它会自动进行匹配,在浏览器输入:
http://localhost:9005/configtest-1.properties
浏览器返回:
word: hello world然后进行客户端接口调用测试,在浏览器输入:
http://localhost:9006/hello?name=pancm
浏览器返回:
pancm,Hello World!!由于这里我配置的前缀是 pro ,所以读取的是configtest-pro.properties文件的数据,想要获取其他的配置,修改spring.cloud.config.profile配置即可。
示例图:

来源:blog.csdn.net/weixin_42039228/article
/details/123786902
END
看完本文有收获?请转发分享给更多人
关注「Java编程鸭」,提升Java技能
关注Java编程鸭微信公众号,后台回复:码农大礼包 可以获取最新整理的技术资料一份。涵盖Java 框架学习、架构师学习等!


文章有帮助的话,在看,转发吧。
谢谢支持哟 (*^__^*)边栏推荐
- JUC source code learning note 3 - AQS waiting queue and cyclicbarrier, BlockingQueue
- [数组]NC143 矩阵乘法-简单
- JS, call in the for loop is asynchronously converted to synchronous execution
- ROS主从机通信经验总结
- MODIS 16 day data monthly / quarterly synthesis
- Duplicate content in lookup table
- ShardingSphere数据库读写分离
- JS to implement a promise of promises/a+ specification
- AMD锐龙7000预计9月15日上市 3D缓存版还要再等等
- [leetcode]75. color classification - problem solving (execution time beat 90%, memory consumption beat 78%)
猜你喜欢

Comparison of array and object merging methods assign, merge, defaults, defaultsdeep in lodash
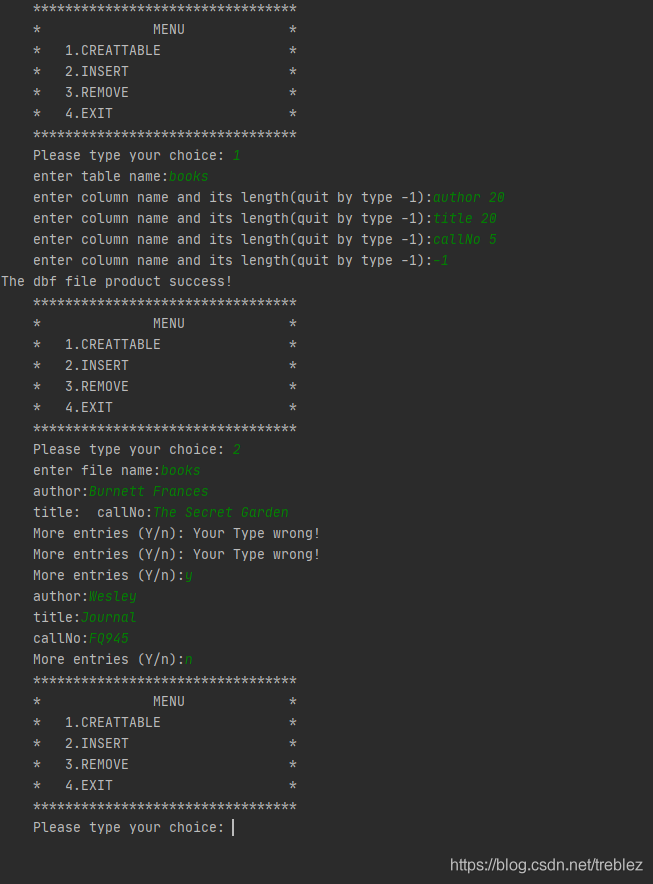
DBF menu driver: librarydatabaseproject

Thinkphp3.2.5 cannot jump to external links

CANN训练营学习2022第二季 模型系列 动漫风格化和AOE ATC调优

Small end format and big end format (little endian & big endian)
How vscode mouse wheel enlarges the interface

Qsqldatabase: solution of qmmysql driver not loaded
IP第十三天笔记

Check the actual data growth of the database

Why should we launch getaverse?
随机推荐
Qsqldatabase: solution of qmmysql driver not loaded
[technology] online seat selection demo of uniapp
[leetcode] skillfully use bit operation
EF miscellaneous
Sword finger offer 22. the penultimate node in the linked list
AMD锐龙7000预计9月15日上市 3D缓存版还要再等等
What exactly is API?
Axi protocol (1): introduction to AMBA bus, introduction to Axi concept and background, characteristics and functions of Axi protocol
thinkphp3.2.5无法跳转到外部链接
quick get start
[technology] chat room demo of uniapp
剑指 Offer 25. 合并两个排序的链表
Solve the timeliness problem caused by Eureka's default cache configuration
QT keyboard event (II) -- long press the key to trigger the event event repeatedly, and the problem is solved
Kernel development
[redis] -1. two ways of setting up environment based on docker
QML coding specification
Axi protocol (2): five channels and two transactions of Axi architecture
The industrial information security center takes the lead in building a data circulation platform, and ant group and other manufacturers provide technical support
荣耀CEO赵明:单一厂商很难实现全场景产品覆盖