当前位置:网站首页>Anaconda+tensorflow most effective summary version (blood and tears summary of 6 reloads)
Anaconda+tensorflow most effective summary version (blood and tears summary of 6 reloads)
2022-06-11 08:12:00 【Xiongkairui】
The installation directory
One 、 Download and install Anaconda
1、 Download from the official website Anaconda
(1)Anaconda Downloading and installing is very simple , First, download the corresponding version of your computer from the official website Anaconda.
The address is :Anaconda resources —— Tsinghua University open source software image station . Click to download from the open source software mirror station of Tsinghua University Anaconda The software .
because , The software distribution is not displayed in a timeline , So if you want to find the latest version , I'm going to have to search for it myself .
2、 install Anaconda Software
(1) Download it Anaconda The software can be formally installed .
First , Click on Anaconda Corresponding .exe After the document , There will be 
Just click next That's all right. , There is nothing to pay attention to .
(2) This is an agreement , Click on I Agree To download , Otherwise, you can't download it .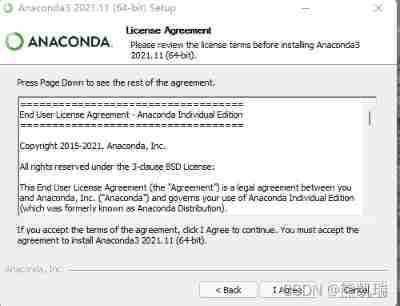
(3) Here I recommend (ALL Users, All users can use ), But it requires administrator rights , After choosing directly , Click on Next That's all right. .
(4) This is to choose the installation location , I recommend choosing the default location , That is to say C disc , Because it will avoid a lot of trouble , If you want to install in D Disc or E disc , Later, when operating the software , Permission problems may occur , For example, download things halfway down , All of a sudden, an error was reported , The reason is that the permissions are insufficient. You need to add permissions to the folder . Of course, I've always been in C disc , The above problems , I'm not sure it will happen , But just follow it .( Be careful : The file storage location must not have Chinese )
(5) Here I recommend choosing directly The second option That's all right. , The first option is that the software automatically adds the environment , But the comparison pit , There will be problems when using or performing some operations in the future . If you want to be safe , I suggest not checking the first option , The trouble is that there's a little trouble , But it's better than unloading and reloading later , Of course, you should make your own choices .
(6) Click on Install Then you can officially start downloading .
(7) When it's finished downloading , Click on next That's all right. .
thus Anaconda The software has been officially downloaded .
3、 To configure Anaconda Environmental Science
(1) Configuring the environment is also simple , Right click This computer , Click on attribute , And then choose Advanced system setup , Click on the environment variable , Re selection System variables In this big frame path, Click edit , You can add the corresponding environment variables .
(2) The screenshot of environment variables is as follows , Just add the code in the red box ,path End of path configuration ( This is my installation path , If you add a path , Please also focus on reality ).
(3) Re edit PATHEXT, Add... After it ==.DLL==. The reason is that I called tensorflow when , An error again , The reason is that it cannot be resolved DLL file , Then I looked up a lot of information , To solve this problem , Of course, if you haven't met , Then ignore , If you also encounter this problem , Plus, it's not too late .( Other bloggers don't have this step ).
4、 test Anaconda Is the installation successful
Inquire about Anaconda Version number of .
conda --version
The following version number indicates that the installation was successful .
Be careful : I still recommend using Run the command window as an administrator , It's important , If you use ordinary users , After subsequent installation tensorflow There may be problems when , That is, there is a permission problem , Therefore, for convenience, it is recommended to use administrator privileges .
Besides , Some bloggers may suggest an update Anaconda Software , Here I do not recommend , Because after I update , Find out Anaconda3 Inside Spyder It can't be used , The reason is that I update Anaconda After software , It's different from the original Spyder Version mismatch and other problems , I can't solve , I had to reinstall this software .
thus , install Anaconda The steps are really over .
5、 Completely and cleanly uninstall Anaconda Software
If you install Anaconda Or subsequent installation tensorflow There was a problem , Or to the point where there is no solution , Can only be refitted , Then you can perform the next steps .
(1) First of all Run as Administrator Anaconder Prompt window . Then input
conda install anaconda-clean
After downloading , There is no mistake , Re execution
anaconda-clean
All the way y, That's all right.
It will recycle and package some things of your software into folders , You can find this folder , Delete it .
(2) Then directly run the... Under its installation directory Uninstall-Anaconda3.exe that will do .
(3) Finally, delete the invalid shortcut .
(4) Finally, modify the information in the environment variable . It was basically cleaned up .
Two 、 Download and install tensorflow
1、 see anaconda The existing environment
conda env list
I have manually configured two environments here , One is python3.7 Version environment , The other one is python3.8 Version environment 
Generally, it is not equipped before , Only base Environmental Science .
Be careful : Only configure the corresponding first python Environmental Science , To download tensorflow. Otherwise, in the base Download in the environment , There will be big problems in the future .
2、 Create corresponding bearer tensorflow Of python Environmental Science
(1) First , To configure the corresponding download source , I use domestic sources , Or use foreign sources , There may be errors .
conda config --add channels https://mirrors.tuna.tsinghua.edu.cn/anaconda/cloud/msys2/
conda config --add channels https://mirrors.tuna.tsinghua.edu.cn/anaconda/cloud/conda-forge
conda config --add channels https://mirrors.tuna.tsinghua.edu.cn/anaconda/pkgs/free/
conda config --set show_channel_urls yes
Copy this code directly , And then to Administrator status function Anaconda Prompt window , Then paste and run .
(2) After the top is finished
With my configuration python3.7 As an example , Execute this code
conda create --name python37 python=python3.7
You can python37 The environment . Because I was equipped with , No screenshots , But generally there will be no error .
( Generally, other bloggers will recommend python3.8 The above version of the environment , So I also created python3.8 Environment , As for why I should do python3.7 Environment , because tensorflow2.0 The above version is not easy to use , And many modules have been deleted before , I had to find a lower version tensorflow, That is to say 2.0 Version below )
(3) After creating the environment , You can use the command to activate the environment , Only after activating the environment , Install again tensorflow Only insurance .
activate python37
If this happens, it means success .
(4) Out of the environment
conda.bat deactivate
3、 Download and install tensorflow
(1) General download tensorflow2.0 For versions above, you can activate the environment directly , Use the following command
pip install tensorflow==2.5
Or other versions .
Generally, you can download it after a panic attack .
If you want to download through that command tensorflow2.0 The following version , This order will not work , because tensorflow The default source of has no lower version tensorflow 了 .( Then I also referred to nearly 30 Many blogs written by bloggers , Experiment n Time , In the end, this method succeeded )
(2) Download lower version tensorflow
First open the URL :Python Plug in network 
Search for tensorflow after , Click on the latest version of tensorflow
Then find the old version , Click in 
Finally slide down , Find the version you want 
Click in , Download a version that matches your computer 
Last , With Run the command line window in administrator mode , then Activate python37 A virtual environment , Finally, execute the following command .
pip install +tensorflow Path of file storage
As shown below :
There's basically no problem .
4、 test tensorflow
Test code
import tensorflow as tf
sess = tf.Session()
a = tf.constant(1)
b = tf.constant(2)
print(sess.run(a+b))
The operation results are as follows 
Results the correct , It's finally a success !!!!
3、 ... and 、 reference
I refer to many bloggers , I also encountered many problems in the process of downloading , In the end, it worked ( Lacrimal )
Here are the articles of bloggers I think are very good .
1、python And anaconda install ( Install the first python After the installation anaconda, be based on python Install based on existing anaconda)—— Obsessive compulsive disorder 、 Super detailed explanation
2、Anaconda+pycharm+tensorflow Installation and environment configuration (win10)
3、 The most complete and detailed in history Anaconda Installation tutorial
4、Anaconda install tensorflow High version to low version ( It's useful )
Last , If there are questions , You can ask at any time , I hope to work with you , Not to lose time , Let's meet at the top of the mountain .
边栏推荐
- Switch statement
- DAMENG 数据库启停
- Collation of basic knowledge of intermediate development of Andrews (for interview)
- C. Manipulating History(贪心/哈希/思维/好题)
- 自定义ViewGroup的知识点总结-持续更新
- Summary of embedded software interview questions
- These gadgets are also very easy to use
- C. Managing history (greedy / hashing / thinking / good questions)
- TypeScript-null和undefined
- Space geometry
猜你喜欢

Using Tkinter to realize guessing numbers game

Process control: process waiting (recycling child processes)

2022.6.6 extra long growth simulation
2022.6.7 特长生模拟

(transformation) tree, binary tree and forest transformation principle

Data visualization and Matplotlib

TiDB Cloud 上線 Google Cloud Marketplace,以全新一棧式實時 HTAP 數據庫賦能全球開發者

Use of Excel to XML tool of TestLink

Solve valueerror: no model found in config file

How to start participating in the open source community
随机推荐
Typescript unknown type
Solve cannot import name 'multiheadattention' from 'tensorflow keras. layers‘
Typescript null and undefined
Getting started with bladed tutorial (video)
Socket [5] - struct linker usage
Database connection pool and bdutils tool
Batch splice string
Niuke JS wrong question knowledge point record
Alchemy experience (model training of deep learning) the necessity of timely adjusting training parameters for some situations (the adjustment of learning rate LR is the primary) summarizes some metho
Summary of force deduction questions
Magnifying mirror rendering
2022.6.7 special student simulation
C. Managing history (greedy / hashing / thinking / good questions)
如何做好空状态设计?来看这份全面总结
Collation of open source modulation identification data set
这几个小工具也太好用了
Use of Excel to XML tool of TestLink
Use guidelines in constraintlayout to limit the maximum width of controls
Crawl Baidu Baipin dynamic page
YUV数据的裁剪与重叠