当前位置:网站首页>Pytorch深度学习快速入门教程 -- 土堆教程笔记(二)
Pytorch深度学习快速入门教程 -- 土堆教程笔记(二)
2022-07-26 11:52:00 【TARS_90%Honesty】
Pytorch入门学习(二)
神经网络基本骨架 - nn.Module
- nn就是neural network的缩写
- 自定义神经网络需要继承nn.Module
- 重写__init__()和forward()
- 调用,先实例神经网络类,再隐式输入(由于前面讲到forward方法的特殊性)
import torch
from torch import nn

# 自定义神经网络类,继承nn.Module,重写init和forward方法
class MyMdoule(nn.Module):
    def __init__(self) -> None:
        super().__init__()
    def forward(self, input):
        output = input + 1
        return output

# 首先实例化
myModule = MyMdoule()
# 隐式输入(forward方法特殊性,等同于.forward(1.0))
output = myModule(1.0)
print(output) # 2.0
# 通常神经网络的输入为tensor类型
x = torch.tensor(1.0)
output = myModule(x)
print(output)  # tensor(2.)
卷积操作
- torch.nn.functional.Conv2d(input, weight, bias, stride, padding)
- 参数input的尺寸要求是(batch_size, channels, h, w)
- 参数weight的尺寸要求是(batch_size, channels, h, w)
- 参数bias是偏置,默认none
- 参数stride是卷积核移动路径,默认为1
- 参数padding是输入两边的填充,默认为0
import torch
import torch.nn.functional as F

# Conv2d(input, weight, bias, stride, padding)
# 参数input的尺寸要求是(batch_size, channels, h, w)
# 参数weight的尺寸要求是(batch_size, channels, h, w)
# 参数bias是偏置,默认none
# 参数stride是卷积核移动路径,默认为1
# 参数padding是输入两边的填充,默认为0

input = torch.tensor([[1, 2, 0, 3, 1],
                      [0, 1, 2, 3, 1],
                      [1, 2, 1, 0, 0],
                      [5, 2, 3, 1, 1],
                      [2, 1, 0, 1, 1]])
kernel = torch.tensor([[1, 2, 1],
                      [0, 1, 0],
                      [2, 1, 0]])
print(input.shape) # torch.Size([5, 5])
print(kernel.shape) # torch.Size([3, 3])

# reshape()参数Tensor为输入
# reshape()参数shape为目标shape,(batch_size, channels, h, w)
input = torch.reshape(input, (1, 1, 5, 5))
kernel = torch.reshape(kernel, (1, 1, 3, 3))
print(input.shape) # torch.Size([1, 1, 5, 5])
print(kernel.shape) # torch.Size([1, 1, 3, 3])

output = F.conv2d(input, kernel, stride=1)
print(output)
# tensor([[[[10, 12, 12],
# [18, 16, 16],
# [13, 9, 3]]]])

# 将参数stride改为2(默认为1)
output2 = F.conv2d(input, kernel, stride=2)
print(output2)
# tensor([[[[10, 12],
# [13, 3]]]])

# 将参数padding改为1(默认为0)
output3 = F.conv2d(input, kernel, padding=1)
print(output3)
# tensor([[[[ 1, 3, 4, 10, 8],
# [ 5, 10, 12, 12, 6],
# [ 7, 18, 16, 16, 8],
# [11, 13, 9, 3, 4],
# [14, 13, 9, 7, 4]]]])
- 示意图

神经网络 - 卷积层
简单介绍
- torch.nn.Conv2d(in_channels, out_channels, kernel_size, stride, padding, padding_mode, dilation, groups, bias)
- in_channels:int,输入图像的通道数
- out_channels:int,输出图像的通道数
- kernel_size:int or tuple,卷积核的尺寸
- stride:int or tuple,卷积核的移动步径,默认1
- padding:int , tuple or str,输入图像周围的填充,默认0
- padding_mode:填充的模式,默认zeros
- dilation:卷积核元素间的距离,默认为1,dilation为1就是卷积核元素间没有距离,这里容易造成误解。
- bias:偏置,为True添加
- 动态观察stride和padding参数的效果
- 注意,我们只需要设定卷积核的尺寸大小,其具体的参数我们不需要去设定,因为神经网络在训练过程中会不断调整卷积核的参数,达到目标。
- 当in_channels=1,卷积核的数目为2时,则out_channels=2,不同层叠加在一块进行输出。
- 我们不需要去考虑卷积核的数目,只需要添加in_channels和out_channels的值。

- 我们不需要去考虑卷积核的数目,只需要添加in_channels和out_channels的值。
- 代码
import torchvision
from torch import nn
from torch.utils.data import DataLoader

dataset = torchvision.datasets.CIFAR10("./dataset", train=False, transform=torchvision.transforms.ToTensor(),
                                       download=True)
dataloader = DataLoader(dataset, batch_size=64)

class MyModule(nn.Module):
    def __init__(self) -> None:
        super().__init__()
        self.conv1 = nn.Conv2d(in_channels=3, out_channels=6, kernel_size=3, stride=1, padding=0)

    def forward(self, x):
        output = self.conv1(x)
        return output

myModule = MyModule()
print(myModule)
# MyModule(
# (conv1): Conv2d(3, 6, kernel_size=(3, 3), stride=(1, 1))
# )

for data in dataloader:
    # 获取数据包
    imgs, targets = data
    # 输入 -> 输出
    outputs = myModule(imgs)
    print(imgs.shape) # torch.Size([64, 3, 32, 32]) 通道数3
    print(outputs.shape) # torch.Size([64, 6, 30, 30]) 通道数6
添加tensorboard
- 注意将outputs的6通道转为3通道显示,否则报错。
import torch
import torchvision
from torch import nn
from torch.utils.data import DataLoader
from torch.utils.tensorboard import SummaryWriter

dataset = torchvision.datasets.CIFAR10("./dataset", train=False, transform=torchvision.transforms.ToTensor(),
                                       download=True)
dataloader = DataLoader(dataset, batch_size=64)

class MyModule(nn.Module):
    def __init__(self) -> None:
        super().__init__()
        self.conv1 = nn.Conv2d(in_channels=3, out_channels=6, kernel_size=3, stride=1, padding=0)

    def forward(self, x):
        output = self.conv1(x)
        return output

myModule = MyModule()
print(myModule)
# MyModule(
# (conv1): Conv2d(3, 6, kernel_size=(3, 3), stride=(1, 1))
# )

writer = SummaryWriter("logs")
step = 0
for data in dataloader:
    imgs, targets = data
    outputs = myModule(imgs)
    # print(imgs.shape) # torch.Size([64, 3, 32, 32]) 通道数3
    # print(outputs.shape) # torch.Size([64, 6, 30, 30]) 通道数6
    writer.add_images("input", imgs, step)

    # 需要注意的是:显示彩色图是3通道,但output为6通道,因此需要reshape。[64, 6, 30, 30] --> [xxx, 3, 30, 30]
    outputs = torch.reshape(outputs, (-1, 3, 30, 30)) # -1代表不确定,需要计算机去计算
    writer.add_images("output", outputs, step)
    step = step + 1

writer.close()
- tensorboard显示

神经网络 - 最大池化层
简单使用
- 最大池化层也称做向下采样层
- torch.nn.MaxPool2d(kernel_size, stride=None, padding=0, dilation=1, return_indices=False, ceil_mode=False)
- kernel_size:卷积核的尺寸,int or tuple
- stride:卷积核的移动步径,默认值就是kernel_size
- padding:输入图像周围的填充
- dilation:卷积核数值间的距离,默认为1,就是没有距离,这里容易造成误解
- ceil_mode:True为ceil模式,保留余下的数据,False为floor模式,丢弃余下的数据
- 最大池化操作演示
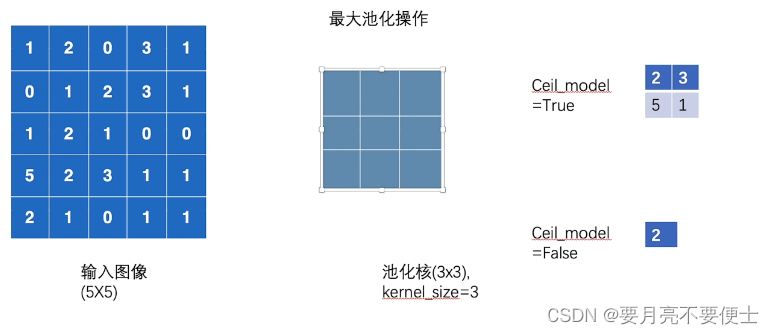
- 注意最大池化层要求输入的数据是浮点型,注意数据类型转换。
import torch

# MaxPool2d(kernel_size, stride = kernel_size, padding = 0, dilation = 1, return_indices=False,
# ceil_mode = False)
# 参数kernel_size
# 参数stride默认为kernel_size
# 参数ceil_mode为True时,ceil模式,保留:为False时,floor模式,丢弃。
# 输入shape是(N, C, H, W),输出shape是(N, C, H, W)
from torch import nn
from torch.nn import MaxPool2d

# 池化层要求数据是浮点型
# 否则报错 RuntimeError: "max_pool2d" not implemented for 'Long'
input = torch.tensor([[1, 2, 0, 3, 1],
                      [0, 1, 2, 3, 1],
                      [1, 2, 1, 0, 0],
                      [5, 2, 3, 1, 1],
                      [2, 1, 0, 1, 1]], dtype=torch.float32)
# 输入的shape是(N, C, H, W)
input = torch.reshape(input, (-1, 1, 5, 5))
print(input.shape)

class MyModule(nn.Module):
    def __init__(self) -> None:
        super().__init__()
        self.maxpool1 = MaxPool2d(kernel_size=3, ceil_mode=False)

    def forward(self, x):
        output = self.maxpool1(x)
        return output

myModule = MyModule()
output = myModule(input)
print(output)
# 当ceil_mode为True时,为ceil模式,输出为
# tensor([[[[2., 3.],
# [5., 1.]]]])
# 当ceil_mode为False时,为floor模式,输出为
# tensor([[[[2.]]]])
作用
- 保留数据特征的同时,减少数据量
import torchvision
from torch import nn
from torch.nn import MaxPool2d
from torch.utils.data import DataLoader
from torch.utils.tensorboard import SummaryWriter

dataset = torchvision.datasets.CIFAR10("./dataset", train=True, transform=torchvision.transforms.ToTensor(),
                                       download=True)
dataloader = DataLoader(dataset, batch_size=64)

class MyModule(nn.Module):
    def __init__(self) -> None:
        super().__init__()
        self.maxpool1 = MaxPool2d(kernel_size=3, ceil_mode=False)

    def forward(self, x):
        output = self.maxpool1(x)
        return output

myModule = MyModule()

writer = SummaryWriter("logs")
step = 0
for data in dataloader:
    imgs, targets = data
    writer.add_images("input", imgs, step)
    outputs = myModule(imgs)
    writer.add_images("output", outputs, step)
    step += 1
writer.close()
- tensorboard显示

神经网络 - 非线性激活
ReLU
- 此版本torch的ReLU层对输入没有shape要求,低版本可能会要求(N, *)尺寸
- 参数inplace,是否在原位置修改

import torch

# ReLU()
# 小于0,截断为0,大于0,y=x
# 参数inplace,是否在原位置修改,若input=-1,经过ReLU(input, inplace=True),则input=0;
# 经过output = ReLU(input, inplace=False),则input仍为-1,output=0
from torch import nn
from torch.nn import ReLU

input = torch.tensor([[1, -0.5],
                      [-1, 3]])

# 此版本torch的ReLU层对输入没有shape要求,低版本可能会要求(N, *)尺寸

class MyModule(nn.Module):
    def __init__(self) -> None:
        super().__init__()
        self.relu1 = ReLU(inplace=False)

    def forward(self, x):
        output = self.relu1(x)
        return output

myModule = MyModule()
output = myModule(input)
print(output)
# tensor([[1., 0.],
# [0., 3.]])
Sigmoid
- 原理

- 代码
import torchvision
from torch import nn
from torch.nn import Sigmoid
from torch.utils.data import DataLoader
from torch.utils.tensorboard import SummaryWriter

dataset = torchvision.datasets.CIFAR10("./dataset", train=False, download=True,
                                       transform=torchvision.transforms.ToTensor())
dataloader = DataLoader(dataset, batch_size=64)

class MyModule(nn.Module):
    def __init__(self) -> None:
        super().__init__()
        self.sigmoid1 = Sigmoid()

    def forward(self, x):
        output = self.sigmoid1(x)
        return output

myModule = MyModule()

writer = SummaryWriter("logs")
step = 0
for data in dataloader:
    imgs, targets = data
    writer.add_images("input", imgs, step)
    outputs = myModule(imgs)
    writer.add_images("output", outputs, step)
    step += 1
writer.close()
- tensorboard显示

神经网络 - 线性层
简单介绍
针对数据特征的变换
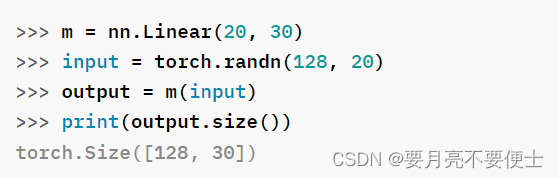
torch.nn.Linear(in_features, out_features, bias=True, device=None, dtype=None)
参数in_feartures代表输入层的特征数
参数out_features代表输出层的特征数
参数bias代表偏置

对于上图来说,第一个线性层中,in_features为d,out_features为L。第二个线性层中,in_features为L,out_features为m。
线性层中涉及两个变量,weight和bias,即上图中的k和b。

VGG16网络中的线性层实现
简单介绍
- 在经典VGG16网络中,最后1x1x4096到1x1x1000的变化,便是线性层的作用。

# Linear(in_features, out_features)
# 参数in_features为输入层的特征数
# 参数out_features为输出层的特征数
import torch
import torchvision
from torch import nn
from torch.nn import Linear
from torch.utils.data import DataLoader

dataset = torchvision.datasets.CIFAR10("./dataset", train=False, download=True,
                                       transform=torchvision.transforms.ToTensor())

dataloader = DataLoader(dataset, batch_size=64)


class MyModule(nn.Module):
    def __init__(self) -> None:
        super().__init__()
        self.linear1 = Linear(196608, 1000)

    def forward(self, x):
        x = self.linear1(x)
        return x

myModule = MyModule()

for data in dataloader:
    imgs, targets = data
    # print(imgs.shape) # torch.Size([64, 3, 32, 32])
    imgs = torch.reshape(imgs, (1, 1, 1, -1)) # torch.Size([1, 1, 1, 196608])
    outputs = myModule(imgs) # torch.Size([1, 1, 1, 1000])
    # print(outputs.shape)
- 由于涉及将shape由(N, C , H, W)转换成(1, 1, 1, *),改进reshape(),使用
flatten()
...
for data in dataloader:
    imgs, targets = data
    # print(imgs.shape) # torch.Size([64, 3, 32, 32])
    # imgs = torch.reshape(imgs, (1, 1, 1, -1)) # torch.Size([1, 1, 1, 196608])
    imgs = torch.flatten(imgs) # torch.Size([196608])
    outputs = myModule(imgs) # torch.Size([1, 1, 1, 1000])<-reshpae() # torch.Size([1008])<-flatten()
    # print(outputs.shape)
注意
- 虽然举例VGG16网络中的线性层是在一维特征上进行的变换,但不代表线性层的输入shape只能是
(1, 1, 1, *)这种形式。 - 看1.12.0版本的torch官方文档,Linear层多维变换都可以。

搭建网络模型和Sequential使用
CIFAR10网络模型
以
CIFAR10 mode为例,建立网络模型,其结构图如下
再根据神经网络结构图,搭建网络模型时,需要计算的是卷积层中的stride和padding。
根据官方提供的计算公式,如下:
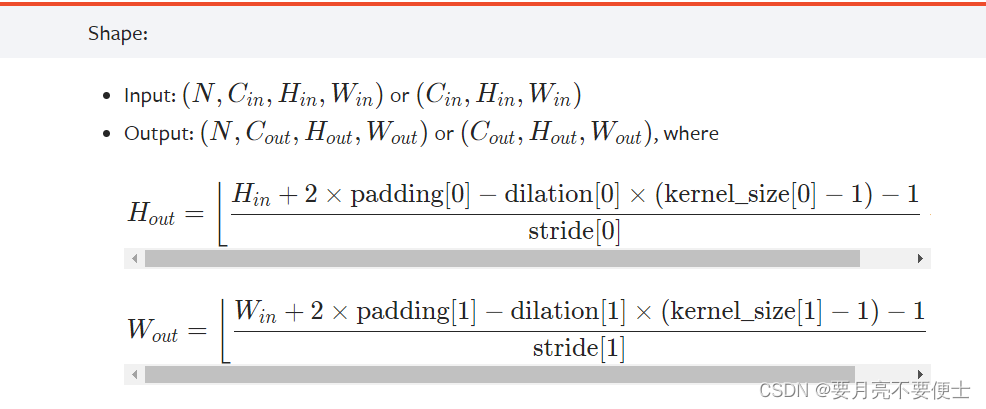
以第一层卷积层为例子,
in_channels = 3,out_channels=32; Hin=32,Win=32;Hout=32,Wout=32; kernel_size=5注意,当stride/padding/dilation为int时,其sride[0]=stride[1]=int,padding[0]=padding[1]=int,dilation[0]=dilation[1]=int。
将已知量带入公式,可计算得到stride=1,padding=2。
搭建网络模型代码
import torch
from torch import nn
from torch.nn import Conv2d, MaxPool2d, Flatten, Linear


class MyModule(nn.Module):
    def __init__(self) -> None:
        super().__init__()
        self.conv1 = Conv2d(3, 32, 5, stride=1, padding=2) # dilation默认为1
        self.maxpool1 = MaxPool2d(2)
        self.conv2 = Conv2d(32, 32, 5, stride=1, padding=2)
        self.maxpool2 = MaxPool2d(2)
        self.conv3 = Conv2d(32, 64, 5, stride=1, padding=2)
        self.maxpool3 = MaxPool2d(2)
        self.flatten = Flatten() # flatten()也有其对应的Flatten层,摊平层
        self.linear1 = Linear(64*4*4, 64)
        self.linear2 = Linear(64, 10)

    def forward(self, x):
        x = self.conv1(x)
        x = self.maxpool1(x)
        x = self.conv2(x)
        x = self.maxpool2(x)
        x = self.conv3(x)
        x = self.maxpool3(x)
        x = self.flatten(x)
        x = self.linear1(x)
        x = self.linear2(x)
        return x

myModule = MyModule()
print(myModule)
# MyModule(
# (conv1): Conv2d(3, 32, kernel_size=(5, 5), stride=(1, 1), padding=(2, 2))
# (maxpool1): MaxPool2d(kernel_size=2, stride=2, padding=0, dilation=1, ceil_mode=False)
# (conv2): Conv2d(32, 32, kernel_size=(5, 5), stride=(1, 1), padding=(2, 2))
# (maxpool2): MaxPool2d(kernel_size=2, stride=2, padding=0, dilation=1, ceil_mode=False)
# (conv3): Conv2d(32, 64, kernel_size=(5, 5), stride=(1, 1), padding=(2, 2))
# (maxpool3): MaxPool2d(kernel_size=2, stride=2, padding=0, dilation=1, ceil_mode=False)
# (flatten): Flatten(start_dim=1, end_dim=-1)
# (linear1): Linear(in_features=1024, out_features=64, bias=True)
# (linear2): Linear(in_features=64, out_features=10, bias=True)
# )

# 测试搭建网络是否正确
input = torch.ones((64, 3, 32, 32)) # batch_size不可缺少,卷积层需要,可简单理解为多少张图片
output = myModule(input)
print(output.shape) # torch.Size([64, 10]) 检验正确
Sequential类
- 利用sequential简化上述代码
- 添加tensorboard显示网络骨架
import torch
from torch import nn
from torch.nn import Conv2d, MaxPool2d, Flatten, Linear, Sequential


class MyModule(nn.Module):
    def __init__(self) -> None:
        super().__init__()
        self.model1 = Sequential(
            Conv2d(3, 32, 5, stride=1, padding=2),  # dilation默认为1
            MaxPool2d(2),
            Conv2d(32, 32, 5, stride=1, padding=2),
            MaxPool2d(2),
            Conv2d(32, 64, 5, stride=1, padding=2),
            MaxPool2d(2),
            Flatten(),
            Linear(64*4*4, 64),
            Linear(64, 10)
        )

    def forward(self, x):
        x = self.model1(x)
        return x

myModule = MyModule()
print(myModule)
# MyModule(
# (model1): Sequential(
# (0): Conv2d(3, 32, kernel_size=(5, 5), stride=(1, 1), padding=(2, 2))
# (1): MaxPool2d(kernel_size=2, stride=2, padding=0, dilation=1, ceil_mode=False)
# (2): Conv2d(32, 32, kernel_size=(5, 5), stride=(1, 1), padding=(2, 2))
# (3): MaxPool2d(kernel_size=2, stride=2, padding=0, dilation=1, ceil_mode=False)
# (4): Conv2d(32, 64, kernel_size=(5, 5), stride=(1, 1), padding=(2, 2))
# (5): MaxPool2d(kernel_size=2, stride=2, padding=0, dilation=1, ceil_mode=False)
# (6): Flatten(start_dim=1, end_dim=-1)
# (7): Linear(in_features=1024, out_features=64, bias=True)
# (8): Linear(in_features=64, out_features=10, bias=True)
# )
# )

# 测试搭建网络是否正确
input = torch.ones((64, 3, 32, 32)) # batch_size不可缺少,卷积层需要,可简单理解为多少张图片
output = myModule(input)
print(output.shape) # torch.Size([64, 10]) 检验正确

# 添加tensorboard显示网络骨架
writer = SummaryWriter("logs")
writer.add_graph(model=myModule, input_to_model=input)
writer.close()
- tensorboard显示 – 双击放大

损失函数和反向传播
- 损失函数的作用
- 计算实际输出和目标之间的差距
- 为我们更新输出提供一定的依据(反向传播)
L1Loss 和 MSELoss
- 此版本torch(1.12.0)对输入和目标shape无要求,均为(*)
- 但input.shape和target.shape要一致
- 输入和目标的数据要为浮点型
# torch.nn.L1Loss(size_average=None, reduce=None, reduction='mean')
# L1Loss类对输入和目标shape无要求,都是(*)
import torch
from torch.nn import L1Loss
from torch import nn

# L1Loss要求输入数据是浮点形
inputs = torch.tensor([1, 2, 3], dtype=torch.float32)
targets = torch.tensor([1, 2, 5], dtype=torch.float32)

loss = L1Loss() # 默认 reduction = “mean"
result = loss(inputs, targets) # tensor(0.6667)
print(result)

# torch.nn.MSELoss(size_average=None, reduce=None, reduction='mean')
# # MSELoss类对输入和目标shape无要求,都是(*)

# 平方差Loss
loss_mse = nn.MSELoss()
result2 = loss_mse(inputs, targets) # tensor(1.3333)
print(result2)

# 交叉熵Loss
input = torch.tensor([0.1, 0.2, 0.3])
CrossEntropyLoss
- 交叉熵Loss
- 适用于分类问题中
- torch.nn.CrossEntropyLoss(weight=None, size_average=None, ignore_index=- 100, reduce=None, reduction=‘mean’, label_smoothing=0.0)
- 按照输入shape为 (N, C),目标shape为 (N)
- 其中C= number of classes ; N = batch size
- 举例

- 代码
# 交叉熵Loss
# CrossEntropyLoss()
# 按照输入shape为(N, C),目标shape为(N)
# 其中N = number of classes N = batch size
import torch
from torch import nn

input = torch.tensor([0.1, 0.2, 0.3])
target = torch.tensor([1])
loss_cross = nn.CrossEntropyLoss()
# 输入shape需要为(N, C)
input = torch.reshape(input, (1, 3))
result3 = loss_cross(input, target)
print(result3)
网络中损失函数的计算和反向传播
- 反向传播:计算节点梯度,优化网络中的参数
import torchvision
from torch import nn
from torch.nn import Sequential, Conv2d, MaxPool2d, Flatten, Linear
from torch.utils.data import DataLoader

dataset = torchvision.datasets.CIFAR10("./dataset", train=False, download=True,
                                       transform=torchvision.transforms.ToTensor())
dataloader = DataLoader(dataset, batch_size=1)

class MyModule(nn.Module):
    def __init__(self) -> None:
        super().__init__()
        self.model1 = Sequential(
            Conv2d(in_channels=3, out_channels=32, kernel_size=5, stride=1, padding=2),
            MaxPool2d(kernel_size=2),
            Conv2d(in_channels=32, out_channels=32, kernel_size=5, stride=1, padding=2),
            MaxPool2d(kernel_size=2),
            Conv2d(32, 64, 5, padding=2),
            MaxPool2d(2),
            Flatten(),
            Linear(1024, 64),
            Linear(64, 10),
        )

    def forward(self, x):
        y = self.model1(x)
        return y

myModule = MyModule()
# 交叉熵损失
loss = nn.CrossEntropyLoss()
for data in dataloader:
    imgs, targets = data
    outputs = myModule(imgs)
    # outputs --> tensor([[-0.1541, -0.0937, -0.0411, 0.0405, 0.0265, -0.0111, 0.0820, -0.1124,
    # 0.0817, -0.0898]], grad_fn=<AddmmBackward0>)
    # targets --> tensor([7])
    result_loss = loss(outputs, targets) # result_loss --> tensor(2.2170, grad_fn=<NllLossBackward0>)
    # 反向传播,计算节点梯度,根据梯度来优化网络参数
    result_loss.backward()
优化器
简单使用
- 优化器根据梯度对参数进行调整,降低损失
- *torch.optim.SGD(params, lr=, momentum=0, dampening=0, weight_decay=0, nesterov=False, , maximize=False, foreach=None)
- 参数params代表网络模型中的参数
- 参数lr = learining rate,学习速率。
- lr不能太大,也不能太小,太大会造成模型训练起来不稳定,太小训练比较慢。
- 建议刚开始lr大一些,后面就小一些。
- 其余参数为算法SGD本身特有的,初学时可以直接使用默认即可。
- 使用三步走:
- 对每个节点对应的梯度清0。
optim.zero_grad() - 反向传播,计算节点梯度。
result_loss.backward() - 根据节点中的梯度对参数进行调优。
optim.step()
- 对每个节点对应的梯度清0。
# torch.optim.SGD(params, lr=<required parameter>, momentum=0, dampening=0, weight_decay=0, nesterov=False, *, maximize=False, foreach=None)
# 参数params代表网络模型中的参数
# 参数lr = learining rate,学习速率。
# lr不能太大,也不能太小,太大会造成模型训练起来不稳定,太小训练比较慢。
# 建议刚开始lr大一些,后面就小一些。
# 其余参数为算法SGD本身特有的,初学时可以直接使用默认即可。
import torch
import torchvision
from torch import nn
from torch.nn import Sequential, Conv2d, MaxPool2d, Flatten, Linear
from torch.utils.data import DataLoader

dataset = torchvision.datasets.CIFAR10("./dataset", train=False, download=True,
                                       transform=torchvision.transforms.ToTensor())
dataloader = DataLoader(dataset, batch_size=1)

class MyModule(nn.Module):
    def __init__(self) -> None:
        super().__init__()
        self.model1 = Sequential(
            Conv2d(in_channels=3, out_channels=32, kernel_size=5, stride=1, padding=2),
            MaxPool2d(kernel_size=2),
            Conv2d(in_channels=32, out_channels=32, kernel_size=5, stride=1, padding=2),
            MaxPool2d(kernel_size=2),
            Conv2d(32, 64, 5, padding=2),
            MaxPool2d(2),
            Flatten(),
            Linear(1024, 64),
            Linear(64, 10),
        )

    def forward(self, x):
        y = self.model1(x)
        return y

myModule = MyModule()

# 损失函数
loss = nn.CrossEntropyLoss()
# 优化器
optim = torch.optim.SGD(myModule.parameters(), lr = 0.01)
for data in dataloader:
    imgs, targets = data
    outputs = myModule(imgs)
    result_loss = loss(outputs, targets)
    # 对每个节点对应的梯度清0,由于上一次的梯度对于本次的梯度更新是没有用处的。
    optim.zero_grad()
    # 反向传播,计算节点梯度
    result_loss.backward()
    # 根据节点中的梯度对参数进行调优
    optim.step()
epoch - 多轮训练(类似于多打几轮牌)
- 单纯进行一轮训练,没有任何意义,需要进行多轮训练。
- 损失看的是进行一轮训练损失的总和。
- 注意以下程序的结果,通过google colab跑出,自己电脑上没有英伟达GPU。
import torch
import torchvision
from torch import nn
from torch.nn import Sequential, Conv2d, MaxPool2d, Flatten, Linear
from torch.utils.data import DataLoader

dataset = torchvision.datasets.CIFAR10("./dataset", train=False, download=True,
                                       transform=torchvision.transforms.ToTensor())
dataloader = DataLoader(dataset, batch_size=1)

class MyModule(nn.Module):
    def __init__(self) -> None:
        super().__init__()
        self.model1 = Sequential(
            Conv2d(in_channels=3, out_channels=32, kernel_size=5, stride=1, padding=2),
            MaxPool2d(kernel_size=2),
            Conv2d(in_channels=32, out_channels=32, kernel_size=5, stride=1, padding=2),
            MaxPool2d(kernel_size=2),
            Conv2d(32, 64, 5, padding=2),
            MaxPool2d(2),
            Flatten(),
            Linear(1024, 64),
            Linear(64, 10),
        )

    def forward(self, x):
        y = self.model1(x)
        return y

myModule = MyModule()

# 损失函数
loss = nn.CrossEntropyLoss()
# 优化器
optim = torch.optim.SGD(myModule.parameters(), lr = 0.01)

for epoch in range(20):
    running_loss = 0.0
    for data in dataloader:
        imgs, targets = data
        outputs = myModule(imgs)
        result_loss = loss(outputs, targets)
        # 对每个节点对应的梯度清0,由于上一次的梯度对于本次的梯度更新是没有用处的。
        optim.zero_grad()
        # 反向传播,计算节点梯度
        result_loss.backward()
        # 根据节点中的梯度对参数进行调优
        optim.step()
        running_loss = running_loss + result_loss
    print(running_loss)
- colab结果

边栏推荐
- 系统调用捕获和分—Ring3层LD_PRELOAD机制进行库函数劫持
- Li Kai: the interesting and cutting-edge audio and video industry has always attracted me
- Talking about web vitals
- flink 写redis 比较慢,大家有啥思路优化吗?
- Pytest interface automated testing framework | pytest obtains execution data, and pytest disables plug-ins
- 最新心形拼图小程序源码+带流量主
- MICCAI2022论文 | 进化多目标架构搜索框架:在COVID-19三维CT分类中的应用
- Which is faster to open a file with an absolute path than to query a database?
- GA-RPN:引导锚点的建议区域网络
- 浅谈低代码技术在物流运输平台中的搭建与管理
猜你喜欢

浅谈Web Vitals

Metauniverse gamefi chain game system development NFT Technology

MICCAI2022论文 | 进化多目标架构搜索框架:在COVID-19三维CT分类中的应用

JSJ-3/AC220V时间继电器
2022就业季!Adobe助力创意产业工作者,突破技能桎梏,回归能力本源

Sword finger offer 25. merge two sorted linked lists
Preliminary test yolov7

JVM内存溢出和内存泄漏的区别
![[ten thousand words long text] Based on LSM tree thought Net 6.0 C # realize kV database (case version)](/img/84/640de0bf779cd45498204909be56d1.png)
[ten thousand words long text] Based on LSM tree thought Net 6.0 C # realize kV database (case version)

。。。。。。

随机推荐
pytest接口自动化测试框架 | 使用装饰器修饰需要运行的用例
音视频+
最新心形拼图小程序源码+带流量主
Who is responsible for the problems of virtual idol endorsement products? And listen to the lawyer's analysis
pytest接口自动化测试框架 | conftest.py
JVM内存溢出和内存泄漏的区别
pytest接口自动化测试框架 | pytest获取执行数据、pytest禁用插件
一些常用的文章写作使用方法和技巧
系统调用捕获和分析完结篇制作系统调用日志收集系统
Outsourcing for four years, abandoned
Pytest interface automation test framework | setup and teardown functions of pytest
There are various signs that apple is expected to support AV1
Substance painter 2021 software installation package download and installation tutorial
Flink cdc 是不是只支持 sql-client的方式提交SQL脚本啊
win10使用nvm安装node、npm、cnpm
代码实例详解【可重入锁】和【不可重入锁】区别?
System call capture and segmentation - RING3 layer LD_ Preload mechanism for library function hijacking
系统调用捕获和分析—Ring0层kprobe劫持系统调用
[communication principle] Chapter 3 -- random process [i]
CVPR 2022 单目深度估计新SOTA—NeW CRFs:Neural Window Fullyconnected CRFs