当前位置:网站首页>Haproxy+kept cluster setup 02
Haproxy+kept cluster setup 02
2022-07-03 08:01:00 【zhqlee】
haproxy+keepalived Cluster building 02
- Preface
- 1 install haproxy
- 1.1 download
- 1.2 Installation dependency
- 1.3 compile
- 1.4 Create a directory of configuration files
- 1.5 Add configuration file soft connection
- 1.6 Copy the error page and add directory soft connection (HTTP Matching mode )
- 1.7 Copy the startup file and authorize
- 1.8 add to haproxy Command script soft link
- 1.9 Set up HAProxy Boot up
- 1.10 add to haproxy User groups and users and create chroot Running path
- 1.11 haproxy The configuration file
- 2 install rsyslog The log service
- 3、 Open port
- 4、 Turn on haproxy And verify
- 5、 install keepalived( Customize )
- 6、 verification keepalived
Preface
Installation mode : Custom installation Server environment :Centos7.5haproxy edition :2.5.7keepalived edition :2.0.20
1 install haproxy
1.1 download
HAProxy The official download address is : https://www.haproxy.org/#down, If this site is inaccessible , You can also get it from hkps:/src.fedoraproject.org/repo/pkgs/haproxy/ Download from . What I download here is 2.5.7 edition , Download it and go through xftp And other tools upload the compressed package to the server /usr/app/ Under the table of contents , among app Folders need to be created in advance , Then decompress :
cd /usr/local
tar -zxvf haproxy-2.5.7.tar.gz
1.2 Installation dependency
yum -y install make gcc gcc-c++ libpcre3-dev openssl libssl-dev zlib1g-dev
1.3 compile
cd /usr/local/haproxy-2.5.7
make TARGET=3100 ARCH=x86_64 PREFIX=/usr/local/haproxy
make install TARGET=3100 ARCH=x86_64 PREFIX=/usr/local/haproxy
1.4 Create a directory of configuration files
mkdir -p /usr/local/haproxy/conf
mkdir -p /etc/haproxy/
1.5 Add configuration file soft connection
touch /usr/local/haproxy/conf/haproxy.cfg
ln -s /usr/local/haproxy/conf/haproxy.cfg /etc/haproxy/haproxy.cfg
1.6 Copy the error page and add directory soft connection (HTTP Matching mode )
cp -r /usr/local/haproxy-2.5.7/examples/errorfiles /usr/local/haproxy/
ln -s /usr/local/haproxy/errorfiles /etc/haproxy/errorfiles
1.7 Copy the startup file and authorize
cp /usr/local/haproxy-2.5.7/examples/haproxy.init /etc/init.d/haproxy
chmod +x /etc/init.d/haproxy
1.8 add to haproxy Command script soft link
ln -s /usr/local/haproxy/sbin/haproxy /usr/sbin
1.9 Set up HAProxy Boot up
chkconfig --add haproxy
chkconfig haproxy on
1.10 add to haproxy User groups and users and create chroot Running path
HAProxy The configuration file has specified users and user groups , as well as chroot Running path :
groupadd haproxy
useradd -g haproxy haproxy
mkdir /usr/share/haproxy
1.11 haproxy The configuration file
vi /usr/local/haproxy/conf/haproxy.cfg
The contents of the configuration file are as follows :
global
    log 127.0.0.1    local0
    chroot /usr/share/haproxy
    group    haproxy
    user    haproxy
    daemon
    maxconn 4096
    node    edu-haproxy-01
    description    edu-haproxy-01
defaults
    mode                    http
    log                     global
    option                  httplog
    option                  dontlognull
    option http-server-close
    option forwardfor       except 127.0.0.0/8
    option                  redispatch
    retries                 3
    timeout http-request    10s
    timeout queue           1m
    timeout connect         10s
    timeout client          1m
    timeout server          1m
    timeout http-keep-alive 10s
    timeout check           10s
    maxconn                 3000
listen stats
        bind          0.0.0.0:8000
        mode          http
        stats         enable
        stats         hide-version
        stats uri     /haproxystats
        stats realm   Haproxy\stats
        stats auth    admin:admin
        stats admin   if TRUE

frontend http-in
        bind 0.0.0.0:5672
        mode tcp
        log global
        option httplog
        option httpclose
        default_backend rabbitmq-server

backend rabbitmq-server
        mode tcp
        balance roundrobin
        server  rabbitmq-node1 192.168.45.201:5672 maxconn 2000 weight 1  check inter 5s rise 2 fall 2
        server  rabbitmq-node2 192.168.45.202:5672 maxconn 2000 weight 1  check inter 5s rise 2 fall 2
        server  rabbitmq-node3 192.168.45.203:5672 maxconn 2000 weight 1  check inter 5s rise 2 fall 2
2 install rsyslog The log service
2.1 install
yum -y install rsyslog
2.2 To configure
vi /etc/rsyslog.conf
# Provides UDP syslog reception
#  Open the following configuration
$ModLoad imudp
$UDPServerRun 514

# Provides TCP syslog reception
#  Open the following configuration
$ModLoad imtcp
$InputTCPServerRun 514
2.3 Add configuration file
stay /etc/rsyslog.d/ Create under directory haproxy Log profile for haproxy.log
vi /etc/rsyslog.d/haproxy.log
Add the configuration as follows :
local0.* /var/log/haproxy.log
&~
2.4 restart rsyslog service
systemctl restart rsyslog.service
3、 Open port
Need reference haproxy Configuration file in “/usr/local/haproxy/conf/haproxy.cfg”, You can open which ports are used in this file ; I've used... Here 8000 and 5672 port ;
#  View firewall status , If the firewall is not turned on , Then you need to turn on the firewall first
firewall-cmd --state
#  Turn on the firewall
systemctl start firewalld.service
# View open ports
firewall-cmd --list-ports
# Open the specified port
firewall-cmd --zone=public --add-port=8000/tcp --permanent
firewall-cmd --zone=public --add-port=5672/tcp --permanent
systemctl restart firewalld.service
firewall-cmd --reload
4、 Turn on haproxy And verify
systemctl start haproxy
systemctl status haproxy
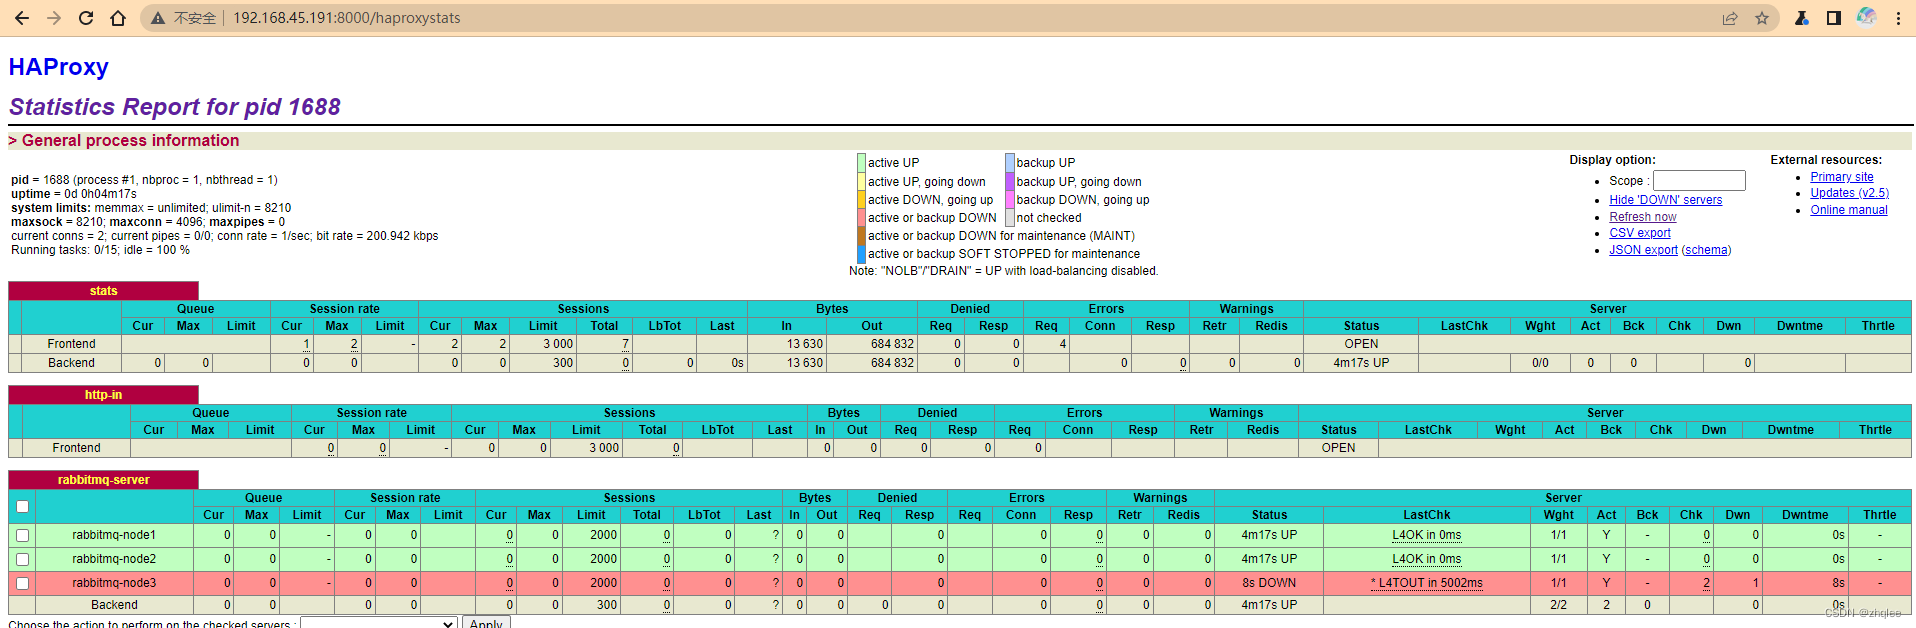
Manage background address :http://192.168.45.191:8000/haproxystats
account number :admin
password :admin
5、 install keepalived( Customize )
Follow the above steps to install two haproxy:
haproxy-01:192.168.45.191
haproxy-02:192.168.45.192 Plan to configure virtual ip:192.168.45.190
5.1 Download and unzip
Download address :https://www.keepalived.org/download.html
cd /usr/local/
tar -zxvf keepalived-2.0.20.tar.gz
5.2 Installation dependency
yum -y install openssl-devel libnl libnl-devel
5.3 Compilation and installation
cd keepalived-2.0.20/
./configure --prefix=/usr/local/keepalived
make && make install
The following file path will be generated after compilation and installation :
/usr/local/etc/keepalived/keepalived.conf
/usr/local/etc/sysconfig/keepalived
/usr/local/sbin/keepalived
5.4 To configure
# keepalived Startup script variable reference file , The default file path is /etc/sysconfig/, Also can not do soft link , Directly modify the file path in the startup script ( Installation directory )
cp /usr/local/keepalived/etc/sysconfig/keepalived  /etc/sysconfig/keepalived

#  take keepalived The main program is added to the environment variable ( Installation directory )
cp /usr/local/keepalived/sbin/keepalived /usr/sbin/keepalived

# keepalived The startup script ( Source directory ), Put it in /etc/init.d/ It can be used in the directory service Command is easy to call
cp /usr/local/keepalived-2.0.20/keepalived/etc/init.d/keepalived  /etc/init.d/keepalived

#  take keepalived Put the configuration file in the default path
mkdir /etc/keepalived
touch /etc/keepalived/keepalived.conf
haproxy-01 Of keepalived.conf The contents of the configuration file are as follows :
! Configuration File for keepalived

global_defs {

   router_id director1
}
vrrp_script check_haproxy {

   script "/etc/keepalived/haproxy_chk.sh"
   interval 5
}

vrrp_instance VI_1 {

    state MASTER
    interface ens33
    virtual_router_id 80
    priority 100
    advert_int 1
    authentication {

        auth_type PASS
        auth_pass 1111
    }
    virtual_ipaddress {

        192.168.45.190
    }
    track_script {

        check_haproxy
    }
}
haproxy-02 Of keepalived.conf The contents of the configuration file are as follows :
! Configuration File for keepalived

global_defs {

   router_id director2
}
vrrp_script check_haproxy {

   script "/etc/keepalived/haproxy_chk.sh"
   interval 5
}

vrrp_instance VI_1 {

    state BACKUP
    interface ens33
    virtual_router_id 80
    priority 50
    advert_int 1
    authentication {

        auth_type PASS
        auth_pass 1111
    }
    virtual_ipaddress {

        192.168.45.190
    }
    track_script {

        check_haproxy
    }
}
5.5 Set boot up
#  Add as system service
chkconfig –-add keepalived
#  Set boot up
chkconfig keepalived on
#  start-up 、 close 、 restart 、 see  keepalived
systemctl starts keepalived
systemctl stop keepalived
systemctl restart keepalived
systemctl status keepalived
6、 verification keepalived


边栏推荐
- Microsoft Security Response Center
- Lua hot update basic grammar
- Worldview satellite remote sensing image data / meter resolution remote sensing image
- oracle 插入单引号
- Research shows that breast cancer cells are more likely to enter the blood when patients sleep
- Wechat applet taro learning record
- [step on the pit series] MySQL failed to modify the root password
- PIP uses image website to solve the problem of slow network speed
- What is a data type? What is the use of data types?
- Conversion between JSON and object
猜你喜欢
haproxy+keepalived集群搭建02

Free use until 2015 -- viz artist multi touch plug-in package
haproxy+keepalived搭建01

Technical dry goods | thinking about the unification of dynamic and static diagrams of AI framework

一条通往服务器所有端口的隧道
WPF:解决MaterialDesign:DialogHost 无法关闭问题

多旅行商问题——公式和求解过程概述

Screenshot tool snipaste
the installer has encountered an unexpected error installing this package

Redis batch startup and shutdown script
随机推荐
Generate video using clipout in viz engine
【LeetCode】3. Merge two sorted lists · merge two ordered linked lists
How to configure GDAL under idea
[at] abc 258G - Triangle 三元組可達-暴力
[at] ABC 258g - triple Reach - violence
Huawei switch basic configuration (telnet/ssh login)
LwIP learning socket (application)
LwIP learning socket (API)
Demonstration of plug-in use of ventuz basic series
Redis查看客户端连接
Iterm2 setting
Pycharm remote ssh pyenv error: pydev debugger: warning: trying to add breakpoint to file that does
[at] ABC 258g - Triangle triples reachable - violence
Idea unreference Display Effect
Getting started with minicom
[usaco12mar]cows in a skyscraper g (state compression DP)
Luaframwrok handles resource updates
Pat class a 1032 sharing
Screenshot tool snipaste
vcs import src < ros2. Repos failed