当前位置:网站首页>Ganglia 的安装与部署
Ganglia 的安装与部署
2022-06-24 19:42:00 【程序员久安】
Flume部署Ganglia和网页权限问题解决
Flume 数据流监控 Ganglia 的安装与部署
1)安装 httpd 服务与 php
[[email protected] flume]$ sudo yum -y install httpd php
2)安装其他依赖
[[email protected] flume]$ sudo yum -y install rrdtool perl-rrdtool rrdtool-devel
[[email protected] flume]$ sudo yum -y install apr-devel
3) 安装ganglia 因为CentOs默认源是没有Ganglia源的
所以需要安装一下这个 yum -y install epel-release
[[email protected] flume]$ sudo yum -y install ganglia-gmetad

[[email protected] flume]$ sudo yum -y install ganglia-web

[[email protected] flume]$ sudo yum install -y ganglia-gmond
4)修改配置文件/etc/httpd/conf.d/ganglia.conf
[[email protected] flume]$ sudo vi /etc/httpd/conf.d/ganglia.conf
Alias /ganglia /usr/share/ganglia
<Location /ganglia>
	       Require all granted
           Allow from all
	# Order deny,allow
	# Deny from all
	# Allow from ::1
   # Allow from .example.com
</Location>
5)修改配置文件/etc/ganglia/gmetad.conf
data_source "master" 192.168.148.81
6)修改配置文件/etc/ganglia/gmond.conf
修改为:
cluster {

	name = "master"
	owner = "unspecified"
	latlong = "unspecified"
	url = "unspecified"
}
udp_send_channel {

#bind_hostname = yes # Highly recommended, soon to be default. # This option tells gmond to use a source
Address
# that resolves to the machine's hostname.
Without
# this, the metrics may appear to come from
any
# interface and the DNS names associated with # those IPs will be used to create the RRDs.
# mcast_join = 239.2.11.71 # 数据发送给 master
	host = 192.168.148.81
	port = 8649
	ttl = 1
udp_recv_channel {

# mcast_join = 239.2.11.71 port = 8649
# 接收来自任意连接的数据
	bind = 192.168.148.81
	retry_bind = true
# Size of the UDP buffer. If you are handling lots of metrics you really
# should bump it up to e.g. 10MB or even higher. # buffer = 10485760
}
7) 修改配置文件/etc/selinux/config
修改为:
# This file controls the state of SELinux on the system. # SELINUX= can take one of these three values:
# enforcing - SELinux security policy is enforced.
# permissive - SELinux prints warnings instead of enforcing. # disabled - No SELinux policy is loaded.
SELINUX=disabled
# SELINUXTYPE= can take one of these two values: # targeted - Targeted processes are protected, # mls - Multi Level Security protection.
SELINUXTYPE=targeted
提示:selinux 生效需要重启,如果此时不想重启,可以临时生效之
[[email protected] flume]$ sudo setenforce 0
8)启动 ganglia
  [[email protected] flume]$ sudo service httpd start
  [[email protected] flume]$ sudo service gmetad start
  [[email protected] flume]$ sudo service gmond start
9) 打开网页浏览 ganglia 页面
http://192.168.148.81/ganglia
提示:如果完成以上操作依然出现权限不足错误,请修改/var/lib/ganglia 目录的权限:
[[email protected] flume]$ sudo chmod -R 777 /var/lib/ganglia
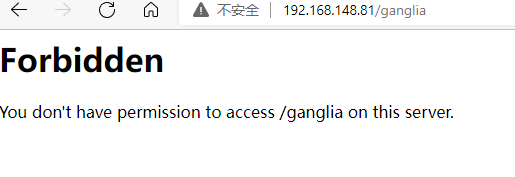
***如果还是不行***,可以在修改修改配置文件/etc/httpd/conf.d/ganglia.conf
里面加上Require all granted 我已经提前加在了里面

边栏推荐
- Second IPO of Huafang group: grown up in Zanthoxylum bungeanum, trapped in Zanthoxylum bungeanum
- Research Report on research and investment prospects of China's container coating industry (2022 Edition)
- Research and investment strategy report on China's building steel structure anticorrosive coating industry (2022 Edition)
- Mycms we media CMS V3.0, resource push optimization, new free template
- laravel model 注意事项
- China solar thermal market trend report, technical dynamic innovation and market forecast
- 从客户端到服务器
- Financial management [6]
- Construction equipment [6]
- 23研考生注意啦!备考期间最容易中招的骗局,居然是它们?!
猜你喜欢

非单文件组件

Attention, postgraduate candidates! They are the easiest scams to get caught during the preparation period?!
记录一下MySql update会锁定哪些范围的数据

Servlet

Epics record reference 4 -- fields for all input records and fields for all output records

Blogs personal blog test point (manual test)

EMI的主要原因-工模电流

03_SpingBoot 核心配置文件

关于某手滑块的一些更新(6-18,js逆向)

laravel 宝塔安全配置
随机推荐
How to submit the shopee opening and settlement flow?
Docker installation MySQL simple without pit
China smallpox vaccine market trend report, technical innovation and market forecast
Paddledtx v1.0 has been released, and its security and flexibility have been comprehensively improved!
[ROS play with turtle turtle]
01_SpingBoot 框架入门
Uip1.0 active sending problem understanding
Cases of addition, deletion, modification and search of C # learning for two years and C # import and export (de duplication)
【js】-【树】-学习笔记
Accounting standards for business enterprises application [5]
【nvm】
Pousser l'information au format markdown vers le robot nail
花房集团二次IPO:成于花椒,困于花椒
Notes for laravel model
Some updates about a hand slider (6-18, JS reverse)
Financial management [1]
Servlet
監聽 Markdown 文件並熱更新 Next.js 頁面
Servlet
Online group chat and dating platform test point