当前位置:网站首页>QT - draw something else
QT - draw something else
2022-07-03 14:44:00 【Half-up】
We didn't learn to draw graphics before
Qt—2D mapping —1 Basic drawing and filling
Now let's learn how to draw other 2D thing
1 Draw text
In addition to drawing graphics , You can also use QPainter::darwText() Function to draw text , You can also use QPainter::setFont() Set the font used for the text , Use QPainter::fontInfo() Function can get font information , It returns QFontInfo Class object . When drawing text Anti aliasing is used by default .
newly build Qt Widgets application , Project name: mydrawing2, Base class selection QWidget, Class called Widget. When it's done , stay widget.h The redraw event handler function is declared in the file :
protected:
    void paintEvent(QPaintEvent *event);
And then to widget.cpp Add header file to file QPainter
Add... Below paintEvent Definition of function :
void Widget::paintEvent(QPaintEvent *)
{

    QPainter painter(this);
    QRectF rect(10.0, 10.0, 380.0, 280.0);
    painter.setPen(Qt::red);
    painter.drawRect(rect);
    painter.setPen(Qt::blue);
    painter.drawText(rect, Qt::AlignHCenter, tr("AlignHCenter"));
    painter.drawText(rect, Qt::AlignLeft, tr("AlignLeft"));
    painter.drawText(rect, Qt::AlignRight, tr("AlignRight"));
    painter.drawText(rect, Qt::AlignVCenter, tr("AlignVCenter"));
    painter.drawText(rect, Qt::AlignBottom, tr("AlignBottom"));
    painter.drawText(rect, Qt::AlignCenter, tr("AlignCenter"));
    painter.drawText(rect, Qt::AlignBottom | Qt::AlignRight,
                     tr("AlignBottom\nAlignRight"));
Here, an overloaded form of drawing text function is used QPainter::drawText(const QRectF&.rectangle,int flags,const QString&text,QRectF * boundingRect = 0).
- Its first parameter specifies the rectangle where the text is drawn ;
- The second parameter specifies the alignment of the text in the rectangle , It consists of
Qt:: AlignmentFlagEnumerate types to define , Different alignment methods can also use bitwise OR “|” Operators are used at the same time , You can also useQt::TextFlagSome of the other symbols defined , For example, automatic line feed and so on ; - The third parameter is the text to be drawn , Here you can use “\n” To achieve line feed ;
- The fourth parameter does not need to be set .
If the drawn text and its layout do not need to be changed often , You can also use drawStaticText() function , It's more efficient .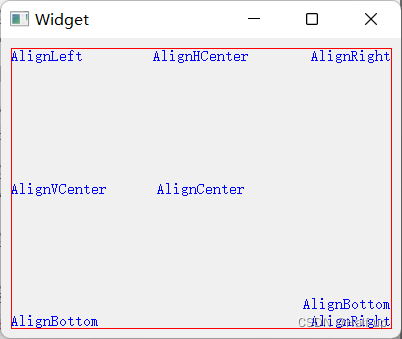
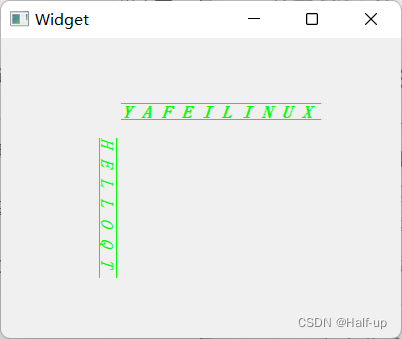
Now continue to add
QFont font(" Song style ", 15, QFont::Bold, true);
    // Set underline
    font.setUnderline(true);
    // Set up dashes
    font.setOverline(true);
    // Set letter case
    font.setCapitalization(QFont::SmallCaps);
    // Set the spacing between characters
    font.setLetterSpacing(QFont::AbsoluteSpacing, 10);
    // Using fonts
    painter.setFont(font);
    painter.setPen(Qt::green);
    painter.drawText(120, 80, tr("yafeilinux"));

	// translation 100,100, rotate 90°
    painter.translate(100, 100);
    painter.rotate(90);
    painter.drawText(0, 0, tr("helloqt"));
So here we create QFont Font object , The constructor used is QFont::QFont (const QString&family, int pointSize = -1, int weight=-1, bool italic = false)
- The first parameter sets the font family attribute , The font family used here is song style , have access to
QFontDatabaseClass to get all the supported Fonts ; - The second parameter is the point size , The default size is 12;
- The third parameter is zero weight attribute , Bold is used here ;
- The last property sets whether to use italics .
Then several other functions are used to format the font , Last call setFont() function To use this font , And use drawText() function Another overloaded form of is at point (120,80) The text is drawn .
And then we translate and rotate the coordinate system , And then I drew the text again .
2 Draw the path
If you want to draw complex graphics , You can use path drawing , Be similar to ps The path of
have access to QPainter-Path class , And use QPainter::drawPath() Drawing .QPainterPath Class is The draw operation provides a container , Can be used to create graphics and reuse .
A drawing path consists of multiple rectangles 、 The ellipse 、 Objects made up of lines or curves, etc , A path can be closed , Such as rectangle and ellipse ; It can also be unclosed , Such as lines and curves .
1 Form a path
Now draw a path , In the above program paintEvent Comment out the contents of , Rewrite as follows :
void Widget::paintEvent(QPaintEvent *)
{

    QPainter painter(this);
    QPainterPath path;
    //  Move the current point to point (50, 250)
    path.moveTo(50, 250);
    //  From the current point, that is (50, 250) Draw a straight line to the point (50, 230), After completion, the current point is changed to (50, 230)
    path.lineTo(50, 230);
    //  From the current point and point (120, 60) Draw a cubic Bezier curve between
    path.cubicTo(QPointF(105, 40), QPointF(115, 80), QPointF(120, 60));
    path.lineTo(130, 130);
    //  Add an ellipse to the path
    path.addEllipse(QPoint(130, 130), 30, 30);

    painter.setPen(Qt::darkYellow);
    //  Draw the path
    painter.drawPath(path);

    //  Redraw the path after translating the coordinate system
    path.translate(200,0);
    painter.setPen(Qt::darkBlue);
    painter.drawPath(path);
}
Create a QPainterPath The object will be drawn with the coordinate origin as the current point , Ready to use moveTo() Function to change the current point , For example, the program moves to point (50,250), Next time, we will start drawing from this point ;
have access to lineTo() ,arcTo(),cubicTo() and quadTo() Such as function Add a line or curve to the path , among ,QPainterPath::cubicTo(const QPointF&c1,const QPointF&c2,const QPointF& endPoint) The function can be in Current point and endPoint Add a 3 Subbezier curve , Among them c1 and c2 It's the control point ,
Pictured 10-18 Shown :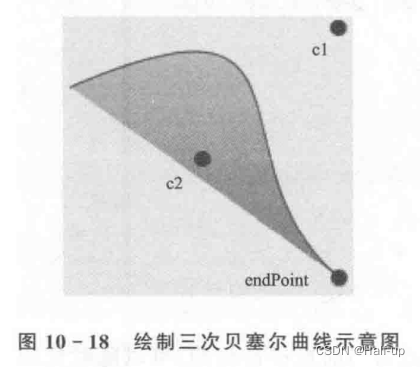
quadTo() function You can draw a Quadratic Bessel curve ;
have access to addEllipse() ,addPath() , addRect() ,addRegion() 、addText() and addPolygon() To the path Add some graphics or text , Both of them Draw from the current point , After drawing, use The end point As New current point , These figures are all composed of a group of straight lines or curves .
for example , A rectangle is a set of lines added clockwise , After drawing, the current point is in the upper left corner of the rectangle ;
and An ellipse consists of a set of clockwise curves , Both the starting point and the ending point are 0 Degrees (3 O'clock position ).
You can also use it addPath() To add other paths , This will Add a straight line between the current point of this path and the first component to add the path .
have access to currentPosition() function Get the current point
Use moveTo() function Change the current point ;
When the path is built, you can use drawPath() function To draw the path
Use here translate() function After translating the path, I redrawn the path .
Run the program and you can see , In this way, complex graphics can be drawn repeatedly , This is also QPainterPath Main role of :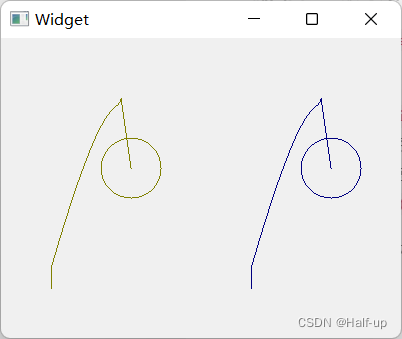
Populate the rule
Filling rules were mentioned earlier when drawing polygons Qt:: FillRule Also use fill rules when filling paths .
There are two filling rules :Qt::OddEvenFill and Qt::WindingFill.
among ,Qt::OddEvenFill It uses Parity fill rule , To be specific : If you want to determine whether a point is in a graph , Then you can draw a horizontal line from this point to the outside of the figure ﹐ If the number of intersections between the horizontal line and the figure is odd , So the point is in the graph . This rule is the default ;
and Qt::WindingFill It uses Non zero bending rule , To be specific : If you want to determine whether a point is in a graph , Then you can draw a horizontal line from this point to the outside of the figure , If the horizontal line intersects the edge of the figure , This side line is drawn clockwise , It is recorded as 1; If it is drawn counterclockwise, it is recorded as -1. Then add all the values , If it doesn't 0, So the point is in the graph .
chart 10- 19 Is the schematic diagram of these two rules :
about Qt::OddEvenFill The rules , The first intersection is marked as 1, The second intersection is recorded as 2;
about Qt::WindingFill The rules , Because ellipses and rectangles are drawn clockwise , Therefore, the corresponding edges of each intersection point use 1 To represent the .
project paintEvent The code is as follows :
void Widget::paintEvent(QPaintEvent *)
{

    QPainter painter(this);
    QPainterPath path;
    path.addEllipse(10,50,100,100);
    path.addRect(50,100,100,100);
    painter.setBrush(Qt::cyan); // Cyan
    painter.drawPath(path);

    painter.translate(180,0);
    path.setFillRule(Qt::WindingFill);
    painter.drawPath(path);
}
Here we first draw a path containing intersecting ellipses and rectangles , Because the filling rule is not explicitly specified , be By default Qt::OddEvenFill The rules . Then translate the path , Reuse Qt:: W indingFill The rule is drawn .
Now run the program to see the effect :
in addition , have access to
QPainter::fillPath()Come on Fill a path ;QPainter::strokePath()Function to Draw the outline of the path ;QPainterPath::elementAt()Come on Get an element in the path ;QPainterPath::elementCount()Get the number of elements in the path ;QPainterPath::contains()Function to Determine whether a point is in the path ;QPainterPath::toFillPolygon()function Convert the path to a polygon .
This part can be referred to Painter Paths Example The sample program , in addition Qt One is also provided Vector Deformation Demo program .
3 The plot
Concept :
Qt Provides 4 Class to process image data :QImage、QPixmap、QBitmap and QPicture, Are commonly used drawing equipment .
among
QImageMainly used forI/O Handle, It's right I/O Processing operations are optimized , It can also be used to access and manipulate pixels directly ;QPixmapMainly used inThe image is displayed on the screen, It's optimized for displaying images on the screen ;QBitmapyesQPixmapOf Subclass , It's used to process colors with a depth of 1 Image , That is, only black and white can be displayed ;QPictureUsed to record and replay QPainter command .
Let's see the effect of drawing graphics on these drawing devices .
newly build QT Widgets application , Project name: mydrawing3, Base class selection QWidget, Class called Widget. When it's done , stay widget.h Declare the declaration of redrawing event function in the file , And then to widget.cpp Add this header file
#include <QPainter>
#include <QImage>
#include <QPixmap>
#include <QBitmap>
#include <QPicture>
These are the required header files
Add... Below paintEvent() Definition of function :
void Widget::paintEvent(QPaintEvent *)
{

    QPainter painter;
    //  draw image
    QImage image(100, 100, QImage::Format_ARGB32);
    painter.begin(&image);
    painter.setPen(QPen(Qt::green, 3));
    painter.setBrush(Qt::yellow);
    painter.drawRect(10, 10, 60, 60);
    painter.drawText(10, 10, 60, 60, Qt::AlignCenter, tr("QImage"));
    painter.setBrush(QColor(0 , 0, 0, 100));
    painter.drawRect(50, 50, 40, 40);
    painter.end();
    //  draw pixmap
    QPixmap pix(100, 100);
    painter.begin(&pix);
    painter.setPen(QPen(Qt::green, 3));
    painter.setBrush(Qt::yellow);
    painter.drawRect(10, 10, 60, 60);
    painter.drawText(10, 10, 60, 60, Qt::AlignCenter, tr("QPixmap"));
    painter.setBrush(QColor(0 , 0, 0, 100));
    painter.drawRect(50, 50, 40, 40);
    painter.end();
    //  draw bitmap
    QBitmap bit(100, 100);
    painter.begin(&bit);
    painter.setPen(QPen(Qt::green, 3));
    painter.setBrush(Qt::yellow);
    painter.drawRect(10, 10, 60, 60);
    painter.drawText(10, 10, 60, 60, Qt::AlignCenter, tr("QBitmap"));
    painter.setBrush(QColor(0 , 0, 0, 100));
    painter.drawRect(50, 50, 40, 40);
    painter.end();
    //  draw picture
    QPicture picture;
    painter.begin(&picture);
    painter.setPen(QPen(Qt::green, 3));
    painter.setBrush(Qt::yellow);
    painter.drawRect(10, 10, 60, 60);
    painter.drawText(10, 10, 60, 60, Qt::AlignCenter, tr("QPicture"));
    painter.setBrush(QColor(0 , 0, 0, 100));
    painter.drawRect(50, 50, 40, 40);
    painter.end();
    //  stay widget Draw on the part
    painter.begin(this);
    painter.drawImage(50, 20, image);
    painter.drawPixmap(200, 20, pix);
    painter.drawPixmap(50, 170, bit);
    painter.drawPicture(200, 170, picture);
}
Here are... Respectively 4 On a drawing device Draw two intersecting squares , Smaller squares are filled with transparent black , The text is drawn in the middle of the larger square .
In definition in QImage、QPixmap and QBitmap object Their sizes are specified , That is, both width and height are 100.
and , Each drawing device has its own coordinate system , Their upper left corner is the origin .
When drawing , Because the drawn figure does not occupy the set size , And we didn't set the background fill color , So the background should be transparent . Here we also see , When drawing on different drawing equipment , It's all used begin() Function to specify the device , Use it after drawing end() Function to end the drawing .
Last , Will this 4 The image is drawn on the window interface .
Run the program , The effect is shown in the figure .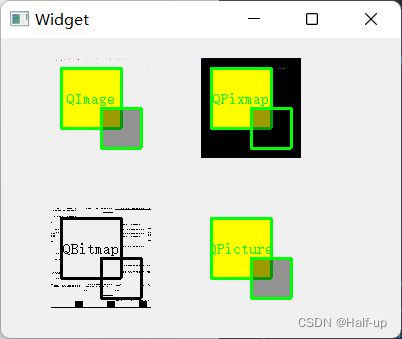
You can see ,QPixmap The transparent background of is displayed in black ,QBitmap Only the outline of the path can be displayed .
1 QImage
QImage Class provides a Hardware independent image representation , Direct access to pixel data , It can also be used as a drawing device .
because QImage yes QPaintDevice Subclasses of , therefore QPainter Can be directly in QImage Object .
When in QImage Upper use QPainter when , The draw operation will be in the current GUI Execute in a thread other than a thread .
QImage The supported image formats are shown in table 10-3 listed , They contain monochrome ,8 position 、32 Bit and alpha Mixed format images .
QImage Provides Get the correlation function of various information of the image , Some functions for converting images are also provided .
QImage Used Implicit data sharing , So you can pass values .
QImage Objects can use data streams , You can also compare .

Use the previous item , But rewrite paintEvent() What's in the function , Change it as follows :
void Widget::paintEvent(QPaintEvent *)
{

    QPainter painter(this);
    QImage image;
    //  Load a picture
    image.load("../mydrawing3/image.png");
    //  Output some information of the picture
    qDebug() << image.size() << image.format() << image.depth();
    //  Draw pictures on the interface
    painter.drawImage(QPoint(10, 10), image);
    //  Get a mirror image
    QImage mirror = image.mirrored();
    //  Twist the picture
    QTransform transform;
    transform.shear(0.2, 0);//shear()  It can realize the distortion of pictures . It has two parameters , The previous parameters realize lateral deformation , The following parameters realize longitudinal deformation . When their value is  0  when , Means no distortion .
    QImage image2 = mirror.transformed(transform);
    painter.drawImage(QPoint(10, 160), image2);
    //  Save the image to a file
    image2.save("../mydrawing3/mirror.png");
}
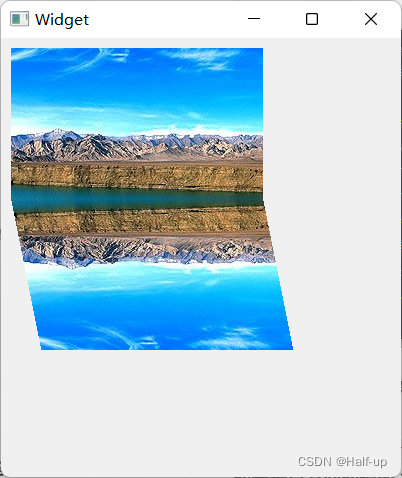
Here is the first one QImage Object loads a picture ( You need to put a picture in the source directory ), Then output some information of the picture , And draw the picture on the interface .
And then use QImage::mirrored(bool horizontal=false,bool vertical=true) function Got Mirror image of this picture , By default, the mirror image in the vertical direction is returned , It can also be set as a horizontal mirror .
Use transformed() function Can be The picture carries out various coordinate transformations , Finally used save() function Store pictures in a file .
The effect is to draw one first image stay 10,10 Location , Then twist shear(0.2, 0) The transverse 0.2 Distortion , Then draw 10,160 Location
Finally, the picture is saved to the project file :

QImage Class also provides powerful functions for manipulating pixels , No more examples here , There is a need for reference QImage Class .
2 QPixmap
QPixmap It can be used as a drawing device to display images on the screen .QPixmap The pixels in are internally managed by the underlying window system .
because QPixmap yes QPaintDevice Subclasses of , therefore QPainter You can also draw directly on it .
To access pixels , Only use QPainter The corresponding function of , Or will QPixmap Convert to QImage.
And with the QImage Different ,QPixmap Medium fill() Function to initialize the entire pixmap Images .
have access to toImage( ) and fromImage() function stay QImage and QPixmap Switch between .
Usually ,Qlmage Class is used to load an image file , Manipulating image data at will , And then QImage Yes
The image is transformed into QPixmap The type is displayed on the screen .
Of course , If you don't need to manipulate the image , It can also be used directly QPixmap To load the image file .
in addition , And QImage Here's the difference QPixmap Depending on the specific hardware .QPixmap class Is also used Implicit data sharing , Can be passed as a value .QPixmap It's easy to get through QLabel or QAbstractButton Subclasses of ( such as QPushButton) It's on the screen .QLabel To have a pixmap attribute , and QAbstractButton To have a icon attribute .QPixmap have access to copy() Copy an area on the image , You can also use mask() Achieve the masking effect .
Delete the previous program paintEvent What's in the function , Then change it as follows :
void Widget::paintEvent(QPaintEvent *)
{

    QPainter painter(this);
    QPixmap pix;
    pix.load("../mydrawing3/yafeilinux.png");
    painter.drawPixmap(0, 0, pix.width(), pix.height(), pix);
    painter.setBrush(QColor(255, 255, 255, 100));
    painter.drawRect(0, 0, pix.width(), pix.height());
    painter.drawPixmap(100, 0, pix.width(), pix.height(), pix);
    painter.setBrush(QColor(0, 0, 255, 100));
    painter.drawRect(100, 0, pix.width(), pix.height());

}
Use here QPixmap First draw the same picture side by side twice , Then draw a rectangle filled with different transparent colors on it , In this way, the image can show different colors , This uses the composite mode in the next section .
Let's realize the function of screen capture :
stay widget.cpp Add a header file to the file :
#include <QDesktopWidget>
#include <QLabel>
#include <QWindow>
#include <QScreen>
Then add the following code to the constructor :
    QWindow window;
    QPixmap grab =  window.screen()->grabWindow(QApplication::desktop()->winId());
    grab.save("../mydrawing3/screen.png");
    QLabel *label = new QLabel(this);
    label->resize(400, 200);
    QPixmap pix = grab.scaled(label->size(), Qt::KeepAspectRatio,
                                Qt::SmoothTransformation);
    label->setPixmap(pix);
    label->move(0, 100);
Use QPixmapQScreen::grabWindow(WId window,int x=0,int y=0,int width=-1,int height=-1) A function can Capture the contents of the screen to a QPixmap in , Here Specify the window system identifier (The window system identifier, Wid), There's more to be done The rectangle where the contents of the screen are intercepted , The default is to intercept the contents of the entire screen .
In addition to capturing the screen , You can also use QWidget::grab() Come on Intercept the content on the widget . then Display the captured image in a tag , In order to display the whole image , Here it is scaled , Using functions
QPixmap::scaled(const QSize &size,Qt::AspectRatioMode aspectRatioMode=Qt ::IgnoreAspectRatio,Qt::Transformation Mode transformMode=Qt::FastTransformation)
The function needs to specify the size size, Also specify Aspect ratio mode Qt::AspectRatioMode and Conversion module Qt::TransformationMode.
The aspect ratio modes here are 3 Species value , As shown in the table 10-4 listed :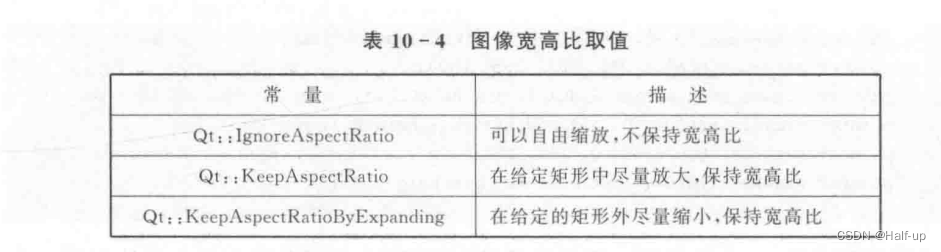
The effect is shown in the figure 10-21 Shown :
/
The conversion mode defaults to Fast conversion Qt::FastTransformation, There is also one used in the program Smooth conversion Qt::SmoothTransformation.
The screenshot function can be referred to Screenshot Example The sample program .
In the code :
 QPixmap pix = grab.scaled(label->size(), Qt::KeepAspectRatio,
                                Qt::SmoothTransformation);
//label size , Zoom in the rectangle , keep aspect ratio , Smooth mode
Then the overall code is like this :
#include "widget.h"
#include "ui_widget.h"
#include <QPainter>
#include <QImage>
#include <QPixmap>
#include <QBitmap>
#include <QPicture>
#include <QDebug>
#include <QDesktopWidget>
#include <QLabel>
#include <QWindow>
#include <QScreen>

Widget::Widget(QWidget *parent) :
    QWidget(parent),
    ui(new Ui::Widget)
{

    ui->setupUi(this);

    QWindow window;
    QPixmap grab =  window.screen()->grabWindow(QApplication::desktop()->winId());
    grab.save("../mydrawing3/screen.png");
    QLabel *label = new QLabel(this);
    label->resize(400, 200);
    QPixmap pix = grab.scaled(label->size(), Qt::KeepAspectRatio,
                                Qt::SmoothTransformation);
    label->setPixmap(pix);
    label->move(0, 100);

}

Widget::~Widget()
{

    delete ui;
}

void Widget::paintEvent(QPaintEvent *)
{

    QPainter painter(this);
    QPixmap pix;
    pix.load("../mydrawing3/yafeilinux.png");
    painter.drawPixmap(0, 0, pix.width(), pix.height(), pix);
    painter.setBrush(QColor(255, 255, 255, 100));
    painter.drawRect(0, 0, pix.width(), pix.height());
    painter.drawPixmap(100, 0, pix.width(), pix.height(), pix);
    painter.setBrush(QColor(0, 0, 255, 100));
    painter.drawRect(100, 0, pix.width(), pix.height());

}
 QPixmap grab =  window.screen()->grabWindow(QApplication::desktop()->winId());
    grab.save("../mydrawing3/screen.png");
    QLabel *label = new QLabel(this);
    label->resize(400, 200);
    QPixmap pix = grab.scaled(label->size(), Qt::KeepAspectRatio,
                                Qt::SmoothTransformation);
    label->setPixmap(pix);
    label->move(0, 100);
Captured the screen image , Then save to mydrawing3/screen.png, Then it shows label
Defined a QPixmap pix, Defining patterns , Then show
And in the paintEvent Events use
void Widget::paintEvent(QPaintEvent *)
{

    QPainter painter(this);
    QPixmap pix;
    pix.load("../mydrawing3/yafeilinux.png");
    painter.drawPixmap(0, 0, pix.width(), pix.height(), pix);
    painter.setBrush(QColor(255, 255, 255, 100));
    painter.drawRect(0, 0, pix.width(), pix.height());
    painter.drawPixmap(100, 0, pix.width(), pix.height(), pix);
    painter.setBrush(QColor(0, 0, 255, 100));
    painter.drawRect(100, 0, pix.width(), pix.height());

}
Read images yafeilinux.png, then painter.drawPixmap Draw out , Set the color setBrush
The final effect is as shown in the figure :
Only the specified size can be displayed , The captured image can only be displayed in a rectangle 
3 QPicture
QPicture It's a place to record and replay QPainter Command drawing device .
QPicture You can use a platform independent format (. pic Format ) Serialize the drawing command to I/О In the device , All can be drawn in QWidget Parts or QPixmap Content on , Can be saved in QPicture in .
QPicture It's not about resolution , The display effect is the same on different devices .
To record QPainter command , This can be done as follows :
QPicture picture;
QPainter painter;
painter.begin(&picture);
painter.drawEllipse(10,20,80,70);
painter.end();
picture.save("drawing.pic");
To repeat QPainter command , This can be done as follows :
QPicture picture;
picture.load("drawing. pic");
QPainter painter;
painter.begin(&myImage);
painter.drawPicture(0,0.picture);
painter.end();
4 Mixed mode ( similar ps Mixed layer mode )
QPainter Provides Compound mode (Composition Modes) To define how to complete Digital image composition , That is how Merge the pixels of the source image and the pixels of the target image .
QPainter The common composite mode provided and its effect are shown in the figure 10-22 Shown 
All composite patterns can be found in QPainter View in the help document for .
among , The most common type is SourceOver( Usually called alpha blend ), Namely The source pixels being drawn are mixed with the target pixels already drawn , Of the source pixels alpha component Defines its transparency , such The source image will be displayed on the target image with a transparent effect .
If the drawing device is QImage, The format of the image must be specified as Format_ARGB32Premultiplied perhaps Format_ARGB32, Otherwise, the composite mode will not have any effect .
When composite mode is set , It will be applied to all drawing operations , Like a paintbrush , A brush 、 Gradients and pixmap/image Drawing etc. .
newly build Qt widget project , Project name: mycomposition, Base class selection QTwidget.
stay widget.cpp Redraw the event handler function in the file , And then to widget.cpp Add header file to file
#include< QPainter>
Then define paintEvent Function as follows :
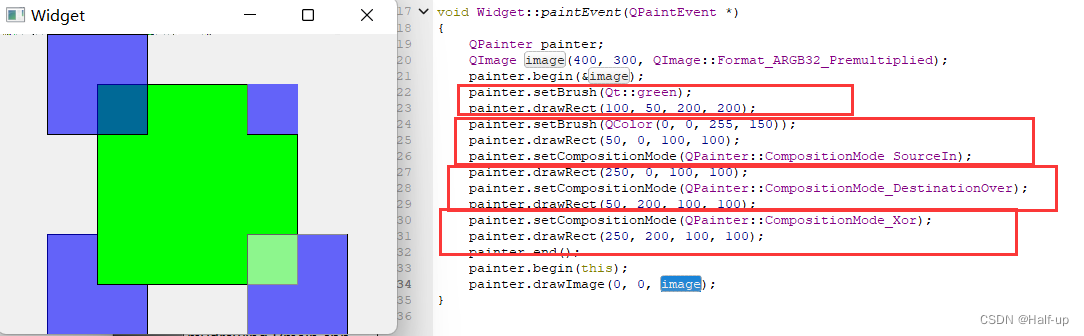
void Widget::paintEvent(QPaintEvent *)
{

    QPainter painter;
    QImage image(400, 300, QImage::Format_ARGB32_Premultiplied);
    painter.begin(&image);
    painter.setBrush(Qt::green);
    painter.drawRect(100, 50, 200, 200);
    painter.setBrush(QColor(0, 0, 255, 150));
    painter.drawRect(50, 0, 100, 100);
    painter.setCompositionMode(QPainter::CompositionMode_SourceIn);
    painter.drawRect(250, 0, 100, 100);
    painter.setCompositionMode(QPainter::CompositionMode_DestinationOver);
    painter.drawRect(50, 200, 100, 100);
    painter.setCompositionMode(QPainter::CompositionMode_Xor);
    painter.drawRect(250, 200, 100, 100);
    painter.end();
    painter.begin(this);
    painter.drawImage(0, 0, image);
}
Here in the first QImage There's a rectangle drawn on it ﹐ And then in this rectangle 4 The corners are drawn separately 4 A little rectangle , Each small rectangle uses a different composite pattern , And it's filled with translucent colors .
The first small rectangle does not explicitly specify the composite pattern , The default is SourceOver Pattern .
The use of composite mode can refer to Image Composition Example The sample program , You can also have a look at Composition Modes Demo program .
边栏推荐
- Zzuli:1057 prime number determination
- 论文分享:Generating Playful Palettes from Images
- Zzuli:1049 square sum and cubic sum
- Creation of data table of Doris' learning notes
- 分布式事务(Seata) 四大模式详解
- 1017 a divided by B (20 points)
- NOI OPENJUDGE 1.3(06)
- Zzuli:1044 failure rate
- 从书本《皮囊》摘录的几个句子
- Zzuli: cumulative sum of 1050 factorials
猜你喜欢

Frequently asked questions: PHP LDAP_ add(): Add: Undefined attribute type in

如何查询淘宝天猫的宝贝类目
![[qingniaochangping campus of Peking University] in the Internet industry, which positions are more popular as they get older?](/img/f6/fe61c84f289f0e74a45946dac687a6.jpg)
[qingniaochangping campus of Peking University] in the Internet industry, which positions are more popular as they get older?
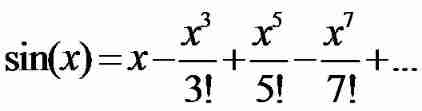
Zzuli:1053 sine function

天谋科技 Timecho 完成近亿元人民币天使轮融资,打造工业物联网原生时序数据库

表单文本框的使用(一) 选择文本

tonybot 人形机器人 查看端口并对应端口 0701
![洛谷P4047 [JSOI2010]部落划分 题解](/img/7f/3fab3e94abef3da1f5652db35361df.png)
洛谷P4047 [JSOI2010]部落划分 题解
Qt development - scrolling digital selector commonly used in embedded system
Rasterization: a practical implementation (2)
随机推荐
Zzuli:1057 prime number determination
MySQL multi table query subquery
Niuke bm83 string deformation (case conversion, string inversion, string replacement)
Stop asking yourself if you are suitable for software testing
[combinatorics] permutation and combination (set combination, one-to-one correspondence model analysis example)
提高效率 Or 增加成本,开发人员应如何理解结对编程?
Sword finger offer 28 Symmetric binary tree
adc128s022 ADC verilog设计实现
tonybot 人形机器人 查看端口并对应端口 0701
Zzuli:1046 product of odd numbers
[graphics] efficient target deformation animation based on OpenGL es 3.0
Showmebug entered Tencent conference, opening the era of professional technical interview
Some concepts about agile
Tonybot Humanoïde Robot Infrared Remote play 0630
Tiantu investment sprint Hong Kong stocks: asset management scale of 24.9 billion, invested in xiaohongshu and Naixue
tonybot 人形机器人 首次开机 0630
DDK for XP
Understand the application scenario and implementation mechanism of differential segment
tonybot 人形機器人 紅外遙控玩法 0630
从书本《皮囊》摘录的几个句子