当前位置:网站首页>Convolutional neural network model -- alexnet network structure and code implementation
Convolutional neural network model -- alexnet network structure and code implementation
2022-07-25 13:07:00 【1 + 1= Wang】
List of articles
AlexNet brief introduction
AlexNet Original address :https://proceedings.neurips.cc/paper/2012/file/c399862d3b9d6b76c8436e924a68c45b-Paper.pdf
AlexNet Born in 2012 year , from 2012 year ImageNet The winner of the competition Hinton And his students Alex Krizhevsky The design of the .
AlexNet The contribution of :
For the first time to use GPU Accelerate network training
Use ReLU Activation function , Substitution is not traditional Sigmoid and Tanh, It's solved Sigmoid The problem of gradient disappearance , Make convergence faster .

Use during training Dropout Ignore some neurons at random , In order to reduce the over fitting of the model .

Used LRN Local response normalization improves accuracy .
stay CNN Maximum pooling using overlap in , Enhance the richness of features .
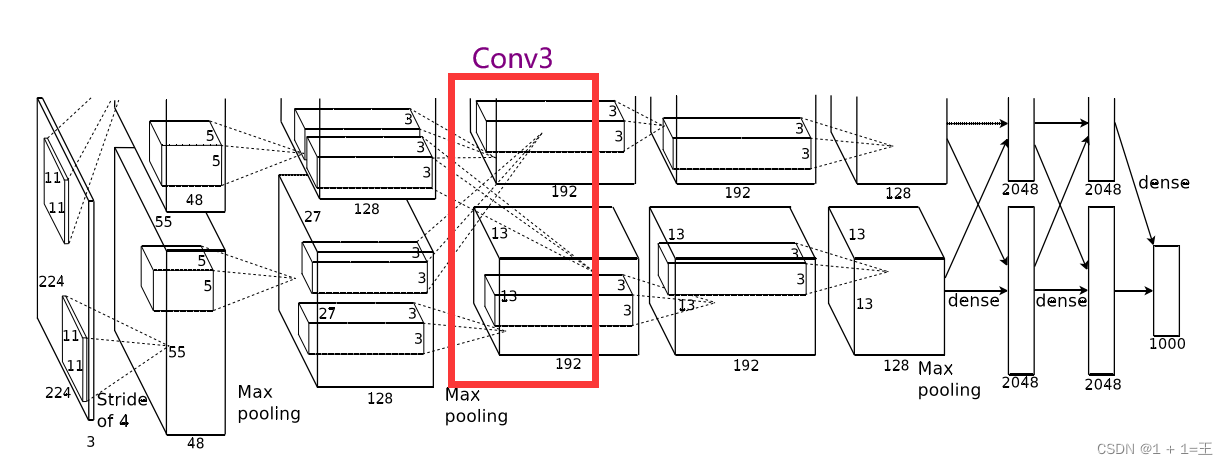
AlexNet The original input image size of the network is 【3,224,224】, from 5 Convolution layers 、3 Pool layers and 3 It's a fully connected layer , And after each convolution layer and full connection layer ReLU Activate . Among them 3 The two pooling layers are followed by 1、 The first 2 And the 5 After the activation of a convolution layer . The network structure diagram is as follows :
AlexNet Network structure analysis
Convolution layer 1(Conv + ReLU + MaxPool)

Conv1 The convolution kernel size used is 11, The step is 4,padding by 2.
Input size :【3,224,224】
Output size :【48,55,55】
N = (W-F+2P)/ S + 1 = (224-11+2*2)/4+1=55.
Convolution is followed by ReLU Activate , After activation, a maximum pool upsampling , The pool core size is 3, The step is 2, The output size after pooling is 【48,27,27】.
PyTorch Express this layer as :
# input[3, 224, 224]
nn.Conv2d(3, 48, kernel_size=11, stride=4, padding=2),  # output[48, 55, 55]
nn.ReLU(inplace=True),
nn.MaxPool2d(kernel_size=3, stride=2),                  # output[48, 27, 27]
Convolution layer 2(Conv + ReLU + MaxPool)

Conv2 The convolution kernel size used is 5, The step is 1,padding by 2.
Input size :【48,27,27】
Output size :【128,27,27】
N = (W-F+2P)/ S + 1 = (27-5+2*2)/1+1=27.
Convolution is followed by ReLU Activate , After activation, a maximum pool upsampling , The pool core size is 3, The step is 2, The output size after pooling is 【128,13,13】.
PyTorch Express this layer as :
# input[48,27,27]
nn.Conv2d(48, 128, kernel_size=5, padding=2),           # output[128, 27, 27]
nn.ReLU(inplace=True),
nn.MaxPool2d(kernel_size=3, stride=2),                  # output[128, 13, 13]
Convolution layer 3(Conv + ReLU )
Conv3 The convolution kernel size used is 3, The step is 1,padding by 1.
Input size :【128, 13, 13】
Output size :【192,13,13】
N = (W-F+2P)/ S + 1 = (13-3+1*2)/1+1=13.
Convolution is followed by ReLU Activate , No pooling .
PyTorch Express this layer as :
# input[128, 13, 13]
nn.Conv2d(128, 192, kernel_size=3, padding=1),          # output[192, 13, 13]
nn.ReLU(inplace=True),
Convolution layer 4(Conv + ReLU )

Conv4 The convolution kernel size used is 3, The step is 1,padding by 1.
Input size :【192, 13, 13】
Output size :【192,13,13】
N = (W-F+2P)/ S + 1 = (13-3+1*2)/1+1=13.
Convolution is followed by ReLU Activate , No pooling .
PyTorch Express this layer as :
# input[192, 13, 13]
nn.Conv2d(192, 192, kernel_size=3, padding=1),          # output[192, 13, 13]
nn.ReLU(inplace=True),
Convolution layer 5(Conv + ReLU + MaxPool)
Conv5 The convolution kernel size used is 3, The step is 1,padding by 1.
Input size :【192, 13, 13】
Output size :【128,13,13】
N = (W-F+2P)/ S + 1 = (13-3+1*2)/1+1=13.
Convolution is followed by ReLU Activate , After activation, a maximum pool upsampling , The pool core size is 3, The step is 2, The output size after pooling is 【128,6,6】.
PyTorch Express this layer as :
# input[192, 13, 13]
nn.Conv2d(192, 128, kernel_size=3, padding=1),          # output[128, 13, 13]
nn.ReLU(inplace=True),
nn.MaxPool2d(kernel_size=3, stride=2),                  # output[128, 6, 6]
The first 5 After a roll up , There are three full connection layers .
FC1

Full connection FC1 Do it once before Dropout.
FC1 Use 4096 Neurons , Yes 128 Size is 66 Characteristic graph , Make a full connection .
Input size :【12866】
Output size :【2048】
FC1 And then I'll do it again ReLU Activate .
PyTorch Express this layer as :
nn.Dropout(p=0.5),
nn.Linear(128 * 6 * 6, 2048),
nn.ReLU(inplace=True),
FC2

Full connection FC2 Do it once before Dropout.
FC1 Use 2048 Neurons , Yes 2048 Characteristics of figure , Make a full connection .
Input size :【2048】
Output size :【2048】
FC1 And then I'll do it again ReLU Activate .
PyTorch Express this layer as :
nn.Dropout(p=0.5),
nn.Linear(2048, 2048),
nn.ReLU(inplace=True),
FC3

FC3 yes AlexNet The output layer of , The output size is 1000, Corresponding 1000 Categories .
PyTorch Express this layer as :
nn.Linear(2048, 1000),
Use PyTorch build AlexNet Network structure
In the previous network structure analysis , Have given the code expression of each layer .
init
Here we use nn.Sequential take 5 Put the convolution layers together , Defined as features( It means extracting features ); take 3 Put all the connection layers together , Defined as classifier( Meaning classification ).
def __init__(self):
    super(AlexNet, self).__init__()
    self.features = nn.Sequential(
        nn.Conv2d(3, 48, kernel_size=11, stride=4, padding=2),  # output[48, 55, 55]
        nn.ReLU(inplace=True),
        nn.MaxPool2d(kernel_size=3, stride=2),                  # output[48, 27, 27]

        nn.Conv2d(48, 128, kernel_size=5, padding=2),           # output[128, 27, 27]
        nn.ReLU(inplace=True),
        nn.MaxPool2d(kernel_size=3, stride=2),                  # output[128, 13, 13]

        nn.Conv2d(128, 192, kernel_size=3, padding=1),          # output[192, 13, 13]
        nn.ReLU(inplace=True),

        nn.Conv2d(192, 192, kernel_size=3, padding=1),          # output[192, 13, 13]
        nn.ReLU(inplace=True),

        nn.Conv2d(192, 128, kernel_size=3, padding=1),          # output[128, 13, 13]
        nn.ReLU(inplace=True),
        nn.MaxPool2d(kernel_size=3, stride=2),                  # output[128, 6, 6]
    )
    self.classifier = nn.Sequential(
        nn.Dropout(p=0.5),
        nn.Linear(128 * 6 * 6, 2048),
        nn.ReLU(inplace=True),
        nn.Dropout(p=0.5),
        nn.Linear(2048, 2048),
        nn.ReLU(inplace=True),
        nn.Linear(2048, num_classes),
    )
forward
Then define the forward propagation process
def forward(self, x):
    x = self.features(x)	# 5 Convolution layers
    x = torch.flatten(x, start_dim=1)	#  take 3 The dimension is flattened into one dimension , Make a full connection
    x = self.classifier(x)	# 3 All connection layers
    return x
Complete code
class AlexNet(nn.Module):
    def __init__(self):
        super(AlexNet, self).__init__()
        self.features = nn.Sequential(
            nn.Conv2d(3, 48, kernel_size=11, stride=4, padding=2),  # output[48, 55, 55]
            nn.ReLU(inplace=True),
            nn.MaxPool2d(kernel_size=3, stride=2),                  # output[48, 27, 27]

            nn.Conv2d(48, 128, kernel_size=5, padding=2),           # output[128, 27, 27]
            nn.ReLU(inplace=True),
            nn.MaxPool2d(kernel_size=3, stride=2),                  # output[128, 13, 13]

            nn.Conv2d(128, 192, kernel_size=3, padding=1),          # output[192, 13, 13]
            nn.ReLU(inplace=True),

            nn.Conv2d(192, 192, kernel_size=3, padding=1),          # output[192, 13, 13]
            nn.ReLU(inplace=True),

            nn.Conv2d(192, 128, kernel_size=3, padding=1),          # output[128, 13, 13]
            nn.ReLU(inplace=True),
            nn.MaxPool2d(kernel_size=3, stride=2),                  # output[128, 6, 6]
        )
        self.classifier = nn.Sequential(
            nn.Dropout(p=0.5),
            nn.Linear(128 * 6 * 6, 2048),
            nn.ReLU(inplace=True),
            nn.Dropout(p=0.5),
            nn.Linear(2048, 2048),
            nn.ReLU(inplace=True),
            nn.Linear(2048, 1000),
        )

    def forward(self, x):
        x = self.features(x)
        x = torch.flatten(x, start_dim=1)
        x = self.classifier(x)
        return x

model = AlexNet();
print(model)
Print structure :
边栏推荐
- [today in history] July 25: IBM obtained the first patent; Verizon acquires Yahoo; Amazon releases fire phone
- web安全入门-UDP测试与防御
- [machine learning] experimental notes - emotion recognition
- 卷积核越大性能越强?一文解读RepLKNet模型
- 卷积神经网络模型之——AlexNet网络结构与代码实现
- AtCoder Beginner Contest 261 F // 树状数组
- Perf performance debugging
- Selenium use -- installation and testing
- The world is exploding, and the Google server has collapsed
- Azure Devops(十四) 使用Azure的私有Nuget仓库
猜你喜欢

工业互联网的内涵及其应用

R语言GLM广义线性模型:逻辑回归、泊松回归拟合小鼠临床试验数据(剂量和反应)示例和自测题

Shell常用脚本:获取网卡IP地址

485 communication (detailed explanation)

Selenium use -- installation and testing
![Detailed explanation of switch link aggregation [Huawei ENSP]](/img/34/dff118b52404e35f74a8f06b2517be.png)
Detailed explanation of switch link aggregation [Huawei ENSP]

Docekr learning - MySQL 8 master-slave replication setup deployment

Memory layout of program

卷积核越大性能越强?一文解读RepLKNet模型

【视频】马尔可夫链蒙特卡罗方法MCMC原理与R语言实现|数据分享
随机推荐
Shell common script: get the IP address of the network card
Lu MENGZHENG's "Fu of broken kiln"
Memory layout of program
[problem solving] ibatis.binding BindingException: Type interface xxDao is not known to the MapperRegistry.
Clickhouse notes 03-- grafana accesses Clickhouse
Word style and multi-level list setting skills (II)
Mlx90640 infrared thermal imager temperature sensor module development notes (V)
Shell常用脚本:判断远程主机的文件是否存在
Introduction to web security UDP testing and defense
The programmer's father made his own AI breast feeding detector to predict that the baby is hungry and not let the crying affect his wife's sleep
Detailed explanation of flex box
Selenium use -- installation and testing
I want to ask whether DMS has the function of regularly backing up a database?
【问题解决】ibatis.binding.BindingException: Type interface xxDao is not known to the MapperRegistry.
全球都热炸了,谷歌服务器已经崩掉了
公安部:国际社会普遍认为中国是世界上最安全的国家之一
web安全入门-UDP测试与防御
Chapter5 : Deep Learning and Computational Chemistry
If you want to do a good job in software testing, you can first understand ast, SCA and penetration testing
Zero basic learning canoe panel (12) -- progress bar