当前位置:网站首页>2022年最新《谷粒学院开发教程》:8 - 前台登录功能
2022年最新《谷粒学院开发教程》:8 - 前台登录功能
2022-06-27 15:23:00 【Laptoy】
| 资料 |
|---|
| 资料地址 |
| 后台管理系统目录 | 前台展示系统目录 |
|---|---|
| 1 - 构建工程篇 | 7 - 渲染前台页面 |
| 2 - 前后交互篇 | 8 - 前台登录功能 |
| 3 - 文件上传篇 | - |
| 4 - 课程管理篇 | - |
| 5 - 章节管理篇 | - |
| 6 - 微服务治理 | - |
文章目录
一、整合JWT令牌
1、在common_utils模块中添加jwt工具依赖
<dependencies>
    <!-- JWT-->
    <dependency>
        <groupId>io.jsonwebtoken</groupId>
        <artifactId>jjwt</artifactId>
    </dependency>
</dependencies>
2、资料复制JwtUtils和MD5工具类到该模块
二、整合阿里云短信服务
2.1、新建短信微服务
1、在service模块下创建子模块service_msm
2、配置类
# 服务器端口
server.port=8005
# 服务名
spring.application.name=service-msm
#返回json的全局时间格式
spring.jackson.date-format=yyyy-MM-dd HH:mm:ss
spring.jackson.time-zone=GMT+8
# nacos注册中心
spring.cloud.nacos.discovery.server-addr=120.76.55.55:8848
#配置mapper xml文件的路径
mybatis-plus.mapper-locations=/mapper/*.xml
#mybatis日志
mybatis-plus.configuration.log-impl=org.apache.ibatis.logging.stdout.StdOutImpl
# redis
spring.redis.host=120.76.55.55
spring.redis.port=6379
spring.redis.database=0
spring.redis.timeout=1800000
#最大阻塞等待时间(负数表示没限制)
spring.redis.lettuce.pool.max-active=20
spring.redis.lettuce.pool.max-wait=-1
# 最小空闲
spring.redis.lettuce.pool.max-idle=5
spring.redis.lettuce.pool.min-idle=0
# mysql数据库连接
spring.datasource.driver-class-name=com.mysql.cj.jdbc.Driver
spring.datasource.url=jdbc:mysql://120.76.55.55:3306/guli?useSSL=false&useUnicode=true&characterEncoding=utf-8&useLegacyDatetimeCode=false&serverTimezone=Asia/Shanghai
spring.datasource.username=root
spring.datasource.password=root
3、启动类
@SpringBootApplication(exclude = DataSourceAutoConfiguration.class)
@ComponentScan("com.laptoy")
public class Service_edu_Main8005 {

    public static void main(String[] args) {

        SpringApplication.run(Service_edu_Main8005.class, args);
    }
}
2.2、开通阿里云短信服务
1、开通短信服务
2、添加测试手机号 签名名称和模板Code为下述

2.3、编写发送短信接口
1、资料复制 生成随机数的工具类RandomUtils 放到common_utils模块
2、在service-msm的pom中引入依赖
<dependencies>
    <dependency>
        <groupId>com.alibaba</groupId>
        <artifactId>fastjson</artifactId>
    </dependency>
    <dependency>
        <groupId>com.aliyun</groupId>
        <artifactId>aliyun-java-sdk-core</artifactId>
    </dependency>
</dependencies>
3、编写控制层
@RestController
@RequestMapping("/msmservice/msm")
@CrossOrigin
public class MsmController {


    @Autowired
    private MsmService msmService;

    @Autowired
    private RedisTemplate<String, String> redisTemplate;

    //发送短信的方法
    @GetMapping("/send/{phone}")
    public R sendMsm(@PathVariable String phone) {

        //从redis获取验证码,如果能获取,直接返回
        String code = redisTemplate.opsForValue().get(phone);
        if (!StringUtils.isEmpty(code)) {

            return R.ok();
        }

        //获取不到就阿里云发送
        //生成随机值,并传递给阿里云短信,让他转发给手机
        code = RandomUtils.getSixBitRandom();
        HashMap<String, Object> map = new HashMap<>();
        map.put("code", code);

        //调用service中发送短信的方法
        boolean isSend = msmService.sendMsm(map, phone);
        if (isSend) {

            //如果发送成功,把发送成功的code验证码保存到redis中,并设置有效时间,设置5分钟过期
            redisTemplate.opsForValue().set(phone, code, 5, TimeUnit.MINUTES);
            return R.ok();
        } else {

            return R.error().message("短信发送失败");
        }
    }
}
3、业务层
@Service
public class MsmServiceImpl implements MsmService {


    //发送短信的方法
    @Override
    public boolean sendMsm(HashMap<String, Object> map, String phone) {

        if (StringUtils.isEmpty(phone)) return false;
        //参数1:地域节点
        //参数2:AccessKey ID
        //参数3:AccessKey Secret
        DefaultProfile profile = DefaultProfile.getProfile("default", "LTAI5tL5FrVJBuQadij4KRvJ", "Xs7dHUvxCdHLd0K5iFK7NWEbdUN7GG");
        DefaultAcsClient client = new DefaultAcsClient(profile);

        //设置相关固定参数
        CommonRequest request = new CommonRequest();
        //request.setProtocol(ProtocolType.HTTPS);
        request.setSysMethod(MethodType.POST); //提交方式,默认不能改
        request.setSysDomain("dysmsapi.aliyuncs.com");//请求阿里云哪里,默认不能改
        request.setSysVersion("2017-05-25");//版本号
        request.setSysAction("SendSms");//请求哪个方法

        //设置发送相关参数
        request.putQueryParameter("PhoneNumbers", phone);//设置要发送的【手机号】
        request.putQueryParameter("SignName", "阿里云短信测试");//申请阿里云短信服务的【签名名称】
        request.putQueryParameter("TemplateCode", "SMS_154950909");//申请阿里云短信服务的【模版中的 模版CODE】

        //要求传递的code验证码为jason格式,可以使用JSONObject.toJSONString()将map转为json格式
        request.putQueryParameter("TemplateParam", JSONObject.toJSONString(map));

        //最终发送
        try {

            CommonResponse response = client.getCommonResponse(request);
            return response.getHttpResponse().isSuccess();
        } catch (ClientException e) {

            e.printStackTrace();
            return false;
        }

    }

}
三、用户登录注册接口
3.1、搭建微服务
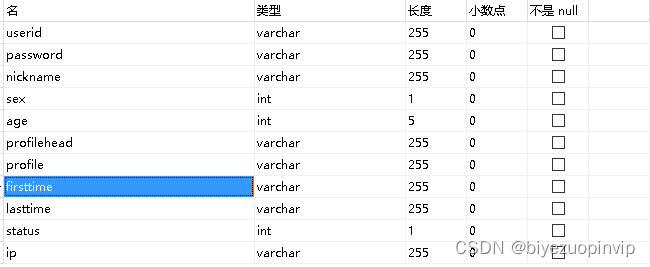
1、在service模块下创建子模块 service_ucenter
2、资料 脚本guli_ucenter.sql 脚本生成数据
3、逆向生成代码
gc.setOutputDir("D:\\MyCode\\IdeaCode\\project\\gulicollege\\guli_parent\\service\\service_ucenter" + "/src/main/java"); //输出目录

pc.setModuleName("ucenter"); //模块名

strategy.setInclude("ucenter_member");//根据数据库哪张表生成,有多张表就加逗号继续填写
4、配置文件
# 服务端口
server.port=8006
# 服务名
spring.application.name=service-ucenter
# mysql数据库连接
spring.datasource.driver-class-name=com.mysql.cj.jdbc.Driver
spring.datasource.url=jdbc:mysql://120.76.55.55:3306/guli?useSSL=false&useUnicode=true&characterEncoding=utf-8&useLegacyDatetimeCode=false&serverTimezone=Asia/Shanghai
spring.datasource.username=root
spring.datasource.password=00000
# redis
spring.redis.host=120.76.55.55
spring.redis.port=6379
spring.redis.database=0
spring.redis.timeout=1800000
spring.redis.lettuce.pool.max-active=20
spring.redis.lettuce.pool.max-wait=-1
#最大阻塞等待时间(负数表示没限制)
spring.redis.lettuce.pool.max-idle=5
spring.redis.lettuce.pool.min-idle=0
#最小空闲
#返回json的全局时间格式
spring.jackson.date-format=yyyy-MM-dd HH:mm:ss
spring.jackson.time-zone=GMT+8
#配置mapper xml文件的路径
mybatis-plus.mapper-locations=/mapper/*.xml
#mybatis日志
mybatis-plus.configuration.log-impl=org.apache.ibatis.logging.stdout.StdOutImpl
5、启动类
@SpringBootApplication
@ComponentScan("com.laptoy")
@MapperScan("com.laptoy.ucenter.mapper")
public class Service_edu_Main8006 {

    public static void main(String[] args) {

        SpringApplication.run(Service_edu_Main8006.class,args);
    }
}
6、实体类添加默认填充时间
public class Member implements Serializable {

    @ApiModelProperty(value = "创建时间")
    @TableField(fill = FieldFill.INSERT)
    private Date gmtCreate;

    @ApiModelProperty(value = "更新时间")
    @TableField(fill = FieldFill.INSERT_UPDATE)
    private Date gmtModified;
}
3.2、创建登录和注册接口
1、创建LoginVo和RegisterVo用于数据封装
//登录对象
@Data
public class LoginVo {

    private String mobile;
    private String password;
}
@Data
public class RegisterVo {

    private String nickname;
    private String mobile;
    private String password;
    private String code;
}
2、控制层
@RestController
@RequestMapping("/ucenter/member")
@CrossOrigin
public class MemberController {

    @Autowired
    MemberService memberService;

    //登录
    @PostMapping("/login")
    public R login(@RequestBody LoginVo loginVo) {

        //返回token,使用jwt生成
        String token = memberService.login(loginVo);
        return R.ok().data("token", token);
    }

    //注册
    @PostMapping("/register")
    public R register(@RequestBody RegisterVo registerVo) {

        memberService.register(registerVo);
        return R.ok();
    }

}
3、业务层
@Service
public class MemberServiceImpl extends ServiceImpl<MemberMapper, Member> implements MemberService {


    @Autowired
    MemberMapper memberMapper;

    @Autowired
    StringRedisTemplate redisTemplate;

    //登录的方法
    @Override
    public String login(LoginVo loginVo) {

        //获取手机号和密码
        String mobile= loginVo.getMobile();
        String password = loginVo.getPassword();
        //判断输入的手机号和密码是否为空
        if (StringUtils.isEmpty(password) || StringUtils.isEmpty(mobile)) {

            throw new LaptoyException(20001, "手机号或密码为空");
        }

        //判断手机号是否正确
        QueryWrapper<Member> wrapper = new QueryWrapper<>();
        wrapper.eq("mobile", mobile);
        Member ucenterMember = baseMapper.selectOne(wrapper);
        if (ucenterMember == null) {

            throw new LaptoyException(20001, "手机号不存在");
        }

        //判断密码是否正确
        // MD5加密是不可逆性的,不能解密,只能加密
        //将获取到的密码经过MD5加密与数据库比较
        if (!MD5.encrypt(password).equals(ucenterMember.getPassword())) {

            throw new LaptoyException(20001, "密码不正确");
        }

        //判断用户是否禁用
        if (ucenterMember.getIsDisabled()) {

            throw new LaptoyException(20001, "用户被禁用");
        }

        //生成jwtToken
        String token = JwtUtils.getJwtToken(ucenterMember.getId(), ucenterMember.getNickname());

        return token;

    }

    //注册的方法
    @Override
    public void register(RegisterVo registerVo) {

        // 获取前端传来的数据
        String nickname = registerVo.getNickname(); //昵称
        String code = registerVo.getCode(); //验证码
        String mobile = registerVo.getMobile(); //手机号
        String password = registerVo.getPassword(); //密码

        // 非空判断
        if (StringUtils.isEmpty(nickname) || StringUtils.isEmpty(code) || StringUtils.isEmpty(mobile) || StringUtils.isEmpty(password)) {

            throw new LaptoyException(20001, "传来的数据有空值,注册失败");
        }

        // 判断验证码
        // 获取redis验证码,根据手机号获取
        String redisCode = redisTemplate.opsForValue().get(mobile);
        if (!code.equals(redisCode)) {

            throw new LaptoyException(20001, "注册失败");
        }

        // 手机号不能重复
        QueryWrapper<Member> wrapper = new QueryWrapper<>();
        wrapper.eq("mobile", mobile);
        Integer count = baseMapper.selectCount(wrapper);
        if (count >= 1) {

            throw new LaptoyException(20001, "手机号重复,注册失败");
        }

        // 数据添加到数据库中
        Member member = new Member();
        member.setPassword(MD5.encrypt(password));//密码加密
        member.setMobile(mobile);
        member.setNickname(nickname);
        member.setIsDisabled(false);//用户不禁用
        member.setAvatar("https://img-blog.csdnimg.cn/480b7a82bddb4f6a9b6942c88db18d85.png?imageView2/1/w/80/h/80");
        baseMapper.insert(member);

    }
}
3.3、创建接口根据token获取用户信息
在UcenterMemberController中创建方法
//根据token获取用户信息
@GetMapping("/getUserInfoForJwt")
public R getUserInfoForJwt(HttpServletRequest request) {

    //调用jwt工具类里面的根据request对象,获取头信息,返回用户id
    String id = JwtUtils.getMemberIdByJwtToken(request);
    //查询数据库,根据用户id,获取用户信息
    Member member = memberService.getById(id);
    return R.ok().data("userInfo", member);
}
四、用户登陆注册前端
4.1、安装插件
1、安装element-ui 和 vue-qriously
npm install element-ui
npm install vue-qriously
2、修改配置文件 plugins/nuxt-swiper-plugin.js,使用插件
import Vue from 'vue'
import VueAwesomeSwiper from '../node_modules/vue-awesome-swiper/dist/ssr'
import VueQriously from 'vue-qriously'
import ElementUI from 'element-ui' //element-ui的全部组件
import 'element-ui/lib/theme-chalk/index.css'//element-ui的css
Vue.use(ElementUI) //使用elementUI
Vue.use(VueQriously)
Vue.use(VueAwesomeSwiper)
3、创建布局给登录注册使用:layouts/sign.vue
<template>
  <div class="sign">
    <!--标题-->
    <div class="logo">
      <img src="~/assets/img/logo.png" alt="logo" />
    </div>
    <!--表单-->
    <nuxt />
  </div>
</template>
使用的时候在对应页面指定布局,默认不指定就是用的default.vue

4、修改 layouts/default.vue 里的登录和注册地址,让其指向pages目录下对应的vue

4.2、用户注册功能
1、api/register.js
import request from '@/utils/request'

export default {

    //根据手机号码发送短信
    getMobile(mobile) {

        return request({

            url: `/msmservice/msm/send/${
      mobile}`,
            method: 'get'
        })
    },
    //用户注册
    register(formItem) {

        return request({

            url: `/ucenter/member/register`,
            method: 'post',
            data: formItem
        })
    }
}
2、pages/register.vue
<template>
  <div class="main">
    <div class="title">
      <a href="/login">登录</a>
      <span>·</span>
      <a class="active" href="/register">注册</a>
    </div>
    <div class="sign-up-container">
      <el-form ref="userForm" :model="params">
        <el-form-item class="input-prepend restyle" prop="nickname" :rules="[ { required: true, message: '请输入你的昵称', trigger: 'blur', }, ]">
          <div>
            <el-input type="text" placeholder="你的昵称" v-model="params.nickname" />
            <i class="iconfont icon-user" />
          </div>
        </el-form-item>
        <el-form-item class="input-prepend restyle no-radius" prop="mobile" :rules="[ { required: true, message: '请输入手机号码', trigger: 'blur' }, { validator: checkPhone, trigger: 'blur' }, ]">
          <div>
            <el-input type="text" placeholder="手机号" v-model="params.mobile" />
            <i class="iconfont icon-phone" />
          </div>
        </el-form-item>
        <el-form-item class="input-prepend restyle no-radius" prop="code" :rules="[ { required: true, message: '请输入验证码', trigger: 'blur' }, ]">
          <div style="width: 100%; display: block; float: left; position: relative">
            <el-input type="text" placeholder="验证码" v-model="params.code" />
            <i class="iconfont icon-phone" />
          </div>
          <div class="btn" style="position: absolute; right: 0; top: 6px; width: 40%">
            <a href="javascript:" type="button" @click="getCodeFun()" :value="codeTest" style="border: none; background-color: none">{
   { codeTest }}</a>
          </div>
        </el-form-item>
        <el-form-item class="input-prepend" prop="password" :rules="[{ required: true, message: '请输入密码', trigger: 'blur' }]">
          <div>
            <el-input type="password" placeholder="设置密码" v-model="params.password" />
            <i class="iconfont icon-password" />
          </div>
        </el-form-item>
        <div class="btn">
          <input type="button" class="sign-up-button" value="注册" @click="submitRegister()" />
        </div>
        <p class="sign-up-msg">
          点击 “注册” 即表示您同意并愿意遵守简书
          <br />
          <a target="_blank" href="http://www.jianshu.com/p/c44d171298ce">用户协 议</a>
          和
          <a target="_blank" href="http://www.jianshu.com/p/2ov8x3">隐私政策</a>
          。
        </p>
      </el-form>
      <!-- 更多注册方式 -->
      <div class="more-sign">
        <h6>社交帐号直接注册</h6>
        <ul>
          <li>
            <a id="weixin" class="weixin" target="_blank" href="http://huaan.free.idcfengye.com/api/ucenter/wx/login"><i class="iconfont icon-weixin" /></a>
          </li>
          <li>
            <a id="qq" class="qq" target="_blank" href="#"><i class="iconfont icon-qq" /></a>
          </li>
        </ul>
      </div>
    </div>
  </div>
</template>
<script> import "~/assets/css/sign.css"; import "~/assets/css/iconfont.css"; import registerApi from "@/api/register"; export default {
       layout: "sign", data() {
       return {
       params: {
       mobile: "", code: "", //验证码 nickname: "", password: "", }, sending: true, //是否发送验证码 second: 60, //倒计时间 codeTest: "获取验证码", }; }, methods: {
       //通过输入的手机号,发送验证码 getCodeFun() {
       //sending = false //his.sending原为true,请求成功,!this.sending == true,主要是防止有人把disabled属性去掉,多次点击; if (!this.sending) return; //debugger // prop 换成你想监听的prop字段 this.$refs.userForm.validateField("mobile", (errMsg) => {
       if (errMsg == "") {
       registerApi.getMobile(this.params.mobile).then((res) => {
       this.sending = false; this.timeDown(); }); } }); }, //倒计时 timeDown() {
       let result = setInterval(() => {
       --this.second; this.codeTest = this.second; if (this.second < 1) {
       clearInterval(result); this.sending = true; //this.disabled = false; this.second = 60; this.codeTest = "获取验证码"; } }, 1000); }, //注册提交的方法 submitRegister() {
       this.$refs["userForm"].validate((valid) => {
       if (valid) {
       registerApi.register(this.params).then((response) => {
       //提示注册成功 this.$message({
       type: "success", message: "注册成功", }); this.$router.push({
       path: "/login" }); }); } }); }, checkPhone(rule, value, callback) {
       //debugger if (!/^1[34578]\d{9}$/.test(value)) {
       return callback(new Error("手机号码格式不正确")); } return callback(); }, }, }; </script>
4.3、用户登录功能
1、api/login.js
import request from '@/utils/request'
export default {

    //登录
    submitLogin(userInfo) {

        return request({

            url: `/ucenter/member/login`,
            method: 'post',
            data: userInfo
        })
    },
    //根据token获取用户信息
    getLoginInfo() {

        return request({

            url: `/ucenter/member/getUserInfoForJwt/`,
            method: 'get',
            // headers: {'token': cookie.get('guli_token')}
        })
        //headers: {'token': cookie.get('guli_token')}
    }
}
2、安装 js-cookie 插件
npm install js-cookie
3、pages/login.vue
<template>
  <div class="main">
    <div class="title">
      <a class="active" href="/login">登录</a>
      <span>·</span>
      <a href="/register">注册</a>
    </div>
    <div class="sign-up-container">
      <el-form ref="userForm" :model="user">
        <el-form-item class="input-prepend restyle" prop="mobile" :rules="[ { required: true, message: '请输入手机号码', trigger: 'blur', }, { validator: checkPhone, trigger: 'blur' }, ]">
          <div>
            <el-input type="text" placeholder="手机号" v-model="user.mobile" />
            <i class="iconfont icon-phone" />
          </div>
        </el-form-item>
        <el-form-item class="input-prepend" prop="password" :rules="[{ required: true, message: '请输入密码', trigger: 'blur' }]">
          <div>
            <el-input type="password" placeholder="密码" v-model="user.password" />
            <i class="iconfont icon-password" />
          </div>
        </el-form-item>
        <div class="btn">
          <input type="button" class="sign-in-button" value="登录" @click="submitLogin()" />
        </div>
      </el-form>
      <!-- 更多登录方式 -->
      <div class="more-sign">
        <h6>社交帐号登录</h6>
        <ul>
          <li>
            <a id="weixin" class="weixin" target="_blank" href="http://qy.free.idcfengye.com/api/ucenter/weixinLogin/login"><i class="iconfont icon-weixin" /></a>
          </li>
          <li>
            <a id="qq" class="qq" target="_blank" href="#"><i class="iconfont icon-qq" /></a>
          </li>
        </ul>
      </div>
    </div>
  </div>
</template>

<script> import "~/assets/css/sign.css"; import "~/assets/css/iconfont.css"; import cookie from "js-cookie"; import loginApi from "@/api/login"; export default {
       layout: "sign", data() {
       return {
       user: {
       //封装用于登录的用户对象 mobile: "", password: "", }, //用于获取接口传来的token中的对象 loginInfo: {
      }, }; }, methods: {
       submitLogin() {
       loginApi.submitLogin(this.user).then((response) => {
       if (response.data.success) {
       //把token存在cookie中、也可以放在localStorage中 //参数1:cookie名称,参数2:具体的值,参数3:作用范围 cookie.set("guli_token", response.data.data.token, {
       domain: "localhost", }); //登录成功根据token获取用户信息 loginApi.getLoginInfo().then((response) => {
       this.loginInfo = response.data.data.userInfo; //将用户信息记录cookie cookie.set("guli_ucenter", JSON.stringify(this.loginInfo), {
       domain: "localhost" }); //跳转页面 window.location.href = "/"; //this.$router.push({path:'/'}) }); } }); }, checkPhone(rule, value, callback) {
       //debugger if (!/^1[34578]\d{9}$/.test(value)) {
       return callback(new Error("手机号码格式不正确")); } return callback(); }, }, }; </script>
<style> .el-form-item__error {
       z-index: 9999999; } </style>
4.4、nginx配置
server {

	listen       9001;
	server_name  localhost;

	location ~ /eduservice/ {

		proxy_pass http://localhost:8001;
	}

	location ~ /eduoss/ {

		proxy_pass http://localhost:8002;
	}

	location ~ /eduvod/ {

		proxy_pass http://localhost:8003;
	}

	location ~ /cmsservice/ {

		proxy_pass http://localhost:8004;
	}

	location ~ /msmservice/ {

		proxy_pass http://localhost:8005;
	}

	location ~ /ucenter/ {

		proxy_pass http://localhost:8006;
	}
}
4.5、拦截器配置
utils/request.js 用于传递token信息
import cookie from "js-cookie";

// http request 拦截器
service.interceptors.request.use(
    config => {

        //debugger
        //判断cookie中是否有名称叫 guli_token的数据
        if (cookie.get('guli_token')) {

            //把获取到的cookie值放到header中
            config.headers['token'] = cookie.get('guli_token');
        }
        return config
    },
    err => {

        return Promise.reject(err);
    })
4.6、分析登录流程
1、登录成功后调用接口获取用户信息,并将json格式的信息转为字符串存入cookie,之后跳转到index.vue页面,也就是 / (下图是login.vue)


2、index.vue使用的是default.vue格式模板(下图是default.vue)


五、OAuth2
边栏推荐
- ReentrantLock、ReentrantReadWriteLock、StampedLock
- Knowledge map model
- PR second training notes
- 基于Vue+Node+MySQL的美食菜谱食材网站设计与实现
- AI begets the moon, and thousands of miles share the literary heart
- Derivation of Halcon camera calibration principle
- Today, Teng Xu came out with 37k during the interview. It's really a miracle. He showed me his skill
- volatile与JMM
- 海量数据!秒级分析!Flink+Doris构建实时数仓方案
- Interpretation of new version features of PostgreSQL 15 (including live Q & A and PPT data summary)
猜你喜欢
Julia1.1 installation instructions
2022-2-15 learning the imitated Niuke project - Section 5 shows comments

In the past, domestic mobile phones were arrogant in pricing and threatened that consumers would like to buy or not, but now they have plummeted by 2000 for sale

Massive data! Second level analysis! Flink+doris build a real-time data warehouse scheme

Acwing game 57

Atomic operation class

Why can't the start method be called repeatedly? But the run method can?
Integration of entry-level SSM framework based on XML configuration file

Let's talk about the process of ES Indexing Documents
基于SSM的Web网页聊天室系统
随机推荐
ThreadLocal之强、弱、软、虚引用
R language triple becomes matrix matrix becomes triple
élégant pool de threadpoolexecutor personnalisé
sql注入原理
Calcul de la confidentialité Fate - Prévisions hors ligne
PR second training notes
Notes learning summary
Strong, weak, soft and virtual references of ThreadLocal
Semaphore of thread synchronization
Teach you how to realize pynq-z2 bar code recognition
my. INI file configuration
[xman2018 qualifying] pass
QT 如何在背景图中将部分区域设置为透明
Leetcode 724. 寻找数组的中心下标(可以,一次过)
優雅的自定義 ThreadPoolExecutor 線程池
Design and implementation of food recipe and ingredients website based on vue+node+mysql
522. longest special sequence II / Sword finger offer II 101 Split equal sum subset
Experience sharing of mathematical modeling: comparison between China and USA / reference for topic selection / common skills
Great God developed the new H5 version of arXiv, saying goodbye to formula typography errors in one step, and the mobile phone can easily read literature
[microservices sentinel] hotspot rules | authorization rules | cluster flow control | machine list