当前位置:网站首页>Deploy flash based websites using Google cloud
Deploy flash based websites using Google cloud
2022-07-25 22:52:00 【lyz_ fish】
background
Several of our undergraduate students are 20 In the autumn semester of, I chose a program about tracking COVID19 situation ( Australia ) Project ; At present, the web page structure has been completed , Just deploy it to the server , Because my account has $400 So the team leader decided to entrust this task to me . When I was today , Successfully deployed to the server through the method in the article , So I strike while the iron is hot , Share with you , How to use Google Cloud, Deploy the website to the server ~
Why google cloud
google cloud When new users register , If you bind a credit card , I'll give it to you $440 Free points for . You use this money in Google cloud Do anything inside ~
Because I created a single cpu virtual machine , Run up ,$0.034/ Hours ; attractive price , It is very suitable for the presentation of the course
however , Because the binding is a credit card , Virtual machine created , Make sure you close it , Otherwise, the fee will be deducted continuously !!
Project requirements
A domain name :www.your_domain( We use Tencent ),github repo( Contains all the code of the web page ),Google Cloud,Gunicorn Application server and Nginx Front end reverse proxy
Language :Python3
Environmental Science :Ubuntu18.04
Google cloud The initialization :
Get into cloud:
stay google All in the search engine Google cloud– Click on the first link – menu –Compute Engine– VM instances
Click create a virtual machine :

Next, you will enter such a page : The amount will be displayed in the upper left corner ( If there is no special need , Choose the lowest tariff )
System words , choice linux All systems are OK , But I use ubuntu, Therefore, it is recommended to use ubuntu
Choose Allow HTTP traffic and Allow HTTPS traffic
anManagement, security, disks, networking, sole tenancyCheck delete Protection ( Protect files stored in virtual machines , The default is delete !! If you don't choose , After deletion, the file will disappear )

Set still external IP Address
menu –VPC network–External IP address
The virtual machine that has just been initialized external Address set to static, This will have a fixed external IP Address ~
Set up firewall
Avoid using the browser to access the website , And the embarrassing situation …
Create a new “firewall rules”, And set as shown in the figure below "rules"
Be careful tcp You can fill in here according to your own situation , The interface used in this tutorial is 5000
Turn on the virtual machine
Virtual machine in google cloud There is no user interface , therefore , We need to get through SSH(bash) Operate on it .
Be careful : Creation time , The virtual machine is in the startup state ; Be sure to ! must do ! Be sure to shut down the virtual machine !!
I have a Korean classmate , because 3 Week did not shut down the virtual machine (GPU edition ), By google Take out your credit card 800 dollar ! So before you close the webpage , Make sure again , The virtual machine has been shut down , Avoid unpleasant things happen ~
After turning on the virtual machine , It will look like the picture above ”dashboard“ equally , A green ” Check mark “, Be alert when you encounter that checkmark !!
The next step is to open the virtual machine shell/bash La , Click on SSH, It will pop up automatically ~
In the virtual machine (Linux) Download 、 install Nginx
install Nginx
sudo apt update
sudo apt install nginx
Test the firewall
sudo ufw app list
Will be output :
Available applications:
  Nginx Full
  Nginx HTTP
  Nginx HTTPS
  OpenSSH
sudo ufw allow 'Nginx HTTP'
Check the browser
systemctl status nginx
Will be output
● nginx.service - A high performance web server and a reverse proxy server
   Loaded: loaded (/lib/systemd/system/nginx.service; enabled; vendor preset: enabled)
   Active: active (running) since Fri 2018-04-20 16:08:19 UTC; 3 days ago
     Docs: man:nginx(8)
 Main PID: 2369 (nginx)
    Tasks: 2 (limit: 1153)
   CGroup: /system.slice/nginx.service
           ├─2369 nginx: master process /usr/sbin/nginx -g daemon on; master_process on;
           └─2380 nginx: worker process
Everything is all set. , Start deployment
install python3, And related components (pip)
sudo apt update
sudo apt install python3-pip python3-dev build-essential libssl-dev libffi-dev python3-setuptools
sudo apt install python3-pip
establish Python3 Virtual environment for
sudo apt install python3-venv
Upload files
Here we choose to upload the file to github repo, Reuse git Instructions are extracted from the warehouse ~
sudo apt install git
git clone "github Of http link "
Change folder ( file ) The name is "myproject"
In order to facilitate the subsequent code display , It is suggested to change the file name to myproject
Will file file1 Change it to myproject
mv file1 myproject
Create a virtual environment
python3. 7-m venv myprojectenv
Activate the virtual environment
source myprojectenv/bin/activate
The format is similar :
(myprojectenv)[email protected]:~/myproject$
Set up Flask Applications
download wheel and gunicorn
pip install wheel
pip install gunicorn flask
It is suggested that app The file name is reused mv file1 myproject Named after the , Make the name here consistent .
modify flask The content of the document
nano To modify instructions , Run and open an editor , Turn off use Ctrl+W And then choose Y To determine the contents of the changed file
nano ~/myproject/myproject.py
The following code is the place that needs to be slightly modified :host Need to replace with virtual machine internal IP( Can be found in VM instance Find )
if __name__ == "__main__":
    app.run(host=' my Internal IP',port = '5000')
UFW Firewall port enabled
Enable 5000 Access port for text
sudo ufw allow 5000
Test open web page
python myproject.py
If the library is not installed , Please use pip Instruction in bash Install one by one ~
Output
* Serving Flask app "myproject" (lazy loading)
 * Environment: production
   WARNING: Do not use the development server in a production environment.
   Use a production WSGI server instead.
 * Debug mode: off
 * Running on http://your_Internal_IP:5000/ (Press CTRL+C to quit)
Next , Search in the browser :http://your_external_IP:5000
Use after run CTRL-C End operation
Warning : If present Error, Please solve it before proceeding to the next step ! Otherwise, the following operations will be invalid !
establish WSGI entry point
nano ~/myproject/wsgi.py
edit wsgi file — from "myproject" Introduction in server(flask), And run
from myproject import server

if __name__ == "__main__":
    server.run()
To configure Gunicorn
cd ~/myproject
gunicorn --bind your_Internal_IP:5000 wsgi:server
Output
[2018-07-13 19:35:13 +0000] [28217] [INFO] Starting gunicorn 19.9.0
[2018-07-13 19:35:13 +0000] [28217] [INFO] Listening at: http://0.0.0.0:5000 (28217)
[2018-07-13 19:35:13 +0000] [28217] [INFO] Using worker: sync
[2018-07-13 19:35:13 +0000] [28220] [INFO] Booting worker with pid: 28220
Again , Search the browser for :
http://your_external_IP:5000
Warning : If you encounter bug, Solve it and then move on to the next step !
Exit virtual Python Environmental Science
deactivate
Create a .service stay /etc/systemd/system
sudo nano /etc/systemd/system/myproject.service
Will all user(YOUR_USER_NAME) Change to you google cloud Username ~
Then copy and paste the following code to nano Editor ~
[Unit]
Description=Gunicorn instance to serve myproject
After=network.target

[Service]
User=YOUR_USER_NAME
Group=www-data
WorkingDirectory=/home/YOUR_USER_NAME/myproject
Environment="PATH=/home/YOUR_USER_NAME/myproject/myprojectenv/bin"
ExecStart=/home/YOUR_USER_NAME/myproject/myprojectenv/bin/gunicorn --workers 3 --bind unix:myproject.sock -m 007 wsgi:server

[Install]
WantedBy=multi-user.target
Create and enable Gunicorn
sudo systemctl start myproject
sudo systemctl enable myproject
Check status
sudo systemctl status myproject
Output
● myproject.service - Gunicorn instance to serve myproject
   Loaded: loaded (/etc/systemd/system/myproject.service; enabled; vendor preset: enabled)
   Active: active (running) since Fri 2018-07-13 14:28:39 UTC; 46s ago
 Main PID: 28232 (gunicorn)
    Tasks: 4 (limit: 1153)
   CGroup: /system.slice/myproject.service
           ├─28232 /home/sammy/myproject/myprojectenv/bin/python3.6 /home/sammy/myproject/myprojectenv/bin/gunicorn --workers 3 --bind unix:myproject.sock -m 007
           ├─28250 /home/sammy/myproject/myprojectenv/bin/python3.6 /home/sammy/myproject/myprojectenv/bin/gunicorn --workers 3 --bind unix:myproject.sock -m 007
           ├─28251 /home/sammy/myproject/myprojectenv/bin/python3.6 /home/sammy/myproject/myprojectenv/bin/gunicorn --workers 3 --bind unix:myproject.sock -m 007
           └─28252 /home/sammy/myproject/myprojectenv/bin/python3.6 /home/sammy/myproject/myprojectenv/bin/gunicorn --workers 3 --bind unix:myproject.sock -m 007
To configure Nginx Agent request
sudo nano /etc/nginx/sites-available/myproject
### Fill in the domain name
your_domain For your own domain name ( form :google.com)
Remember to replace YOUR_USER_NAME Oh !
server {

    listen 80;
    server_name your_domain www.your_domain;

    location / {

        include proxy_params;
        proxy_pass http://unix:/home/YOUR_USER_NAME/myproject/myproject.sock;
    }
}
To enable the Nginx Server block configuration , Please link the file to sites-enabled Under the table of contents
sudo ln -s /etc/nginx/sites-available/myproject /etc/nginx/sites-enabled
Check for grammatical errors
sudo nginx -t
If the returned result does not indicate any problem , Please restart Nginx Process to read the new configuration :
sudo systemctl restart nginx
sudo ufw delete allow 5000
sudo ufw allow 'Nginx Full'
The exciting moment has come ! Now? ! You should be able to use the browser , Visited your website !http://your_domain
Thank you for your patience !
Remember to pay attention to , Collection !~
边栏推荐
- Today, learn about the use of lists, hyperlinks, image tags, and audio and video
- [natural language processing] [vector representation] augsbert: improve the data enhancement method of Bi encoders for paired sentence scoring tasks
- The third experiment OSPF
- Express framework
- 【集训DAY15】油漆道路【最小生成树】
- QT Chinese programming encounters c2001 error, prompting "there is a newline character in the constant"
- Review of static routing
- 力扣解法汇总919-完全二叉树插入器
- Interview question 17.11. word distance ●●
- The difference between "rewrite" and "overload"
猜你喜欢
Session and cookie, token and storage

【论文笔记】A Meta-Reinforcement Learning Algorithm for Causal Discovery

武汉理工大学第三届程序设计竞赛 B-拯救DAG王国(拓扑性质处理可达性统计问题)
![[natural language processing] [vector representation] augsbert: improve the data enhancement method of Bi encoders for paired sentence scoring tasks](/img/9a/9bb00abf7804d61d3408143e5e4bda.png)
[natural language processing] [vector representation] augsbert: improve the data enhancement method of Bi encoders for paired sentence scoring tasks

Interview question 17.11. word distance ●●

Express framework

Qtreewidget control of QT

Von Neumann architecture

Anaconda~Upload did not complete.
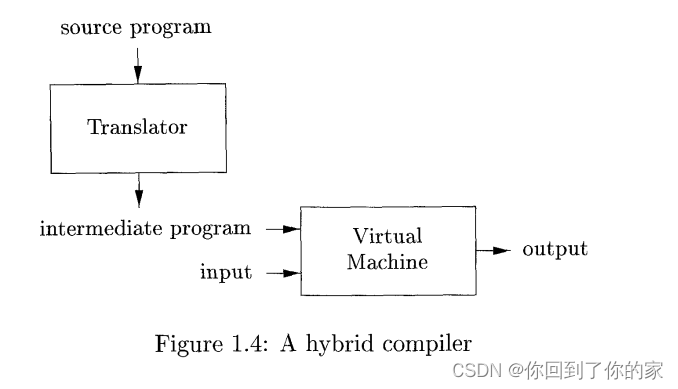
编译器引论
随机推荐
QT log file system
Mysql数据类型
自媒体人必备的4个资源工具,每一个都很实用
我们为什么要推出Getaverse?
Node.js operation database
JVM memory area
[natural language processing] [vector representation] augsbert: improve the data enhancement method of Bi encoders for paired sentence scoring tasks
Simulated Xiaomi mall head home page
Day 3 experiment
[literature reading] - HRL -[hrl with universal policies for multi step robotic control]
DOM event object
Oracle query statement summary
自媒体人必备的4个素材网站,再也不用担心找不到素材
The third programming competition of Wuhan University of technology b- save the kingdom of DAG (topological properties deal with accessibility Statistics)
Express framework
Madness. Smbms (supermarket order management system)
【集训DAY15】油漆道路【最小生成树】
Summary of traversal methods of six sets list, set, map, queue, deque and stack
XSS collect common code
PE格式: 分析IatHook并实现