当前位置:网站首页>Hands on deep learning (32) -- fully connected convolutional neural network FCN
Hands on deep learning (32) -- fully connected convolutional neural network FCN
2022-07-04 09:36:00 【Stay a little star】
List of articles
Reference resources :
【1】 https://zh-v2.d2l.ai/
【2】 https://zhuanlan.zhihu.com/p/30195134
【3】 https://www.sohu.com/a/270896638_633698
1. What is full convolution neural network (Fully Convolutional Networks)
We usually use CNN+ Fully connected layer , The feature map generated by convolution layer (feature map) Mapping to a fixed length eigenvector . With AlexNet For example , Due to image classification, it is expected to get a numerical description of the whole input image ( probability ), such as AlexNet Of ImageNet The model outputs a 1000 The vector of dimension represents the probability that the input image belongs to each class (softmax normalization ).
for example : The following figure shows , Input picture , Use AlexNet analysis , We get a length of 1*1000 Vector , Then, according to this vector, it is judged that the category of this picture is cat 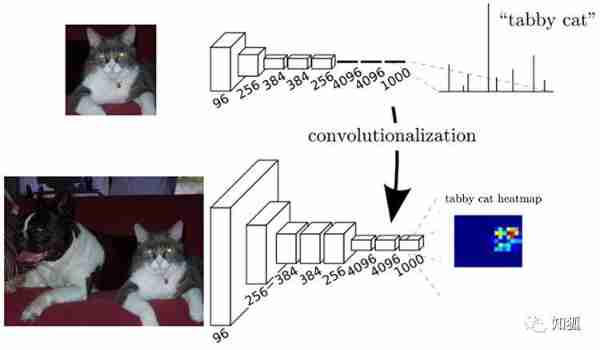
Conventional CNN There is a problem :
- Big storage cost
- The sliding window is large , Each window needs storage space to store features and identify categories
- Use a fully connected structure , The last few layers of nearly exponential storage
- Calculation efficiency is low . There's a lot of double counting
- Sliding windows are independent , The use of full connection layer at the end is only for local features .
To address these issues , If the full connection layer in the model is replaced by convolution layer, the problem can be solved to a certain extent , We call this network, which is all composed of convolution layers, a full convolution neural network FCN.
2. FCN It is the foundational work of semantic segmentation
Replace with transpose convolution CNN The last full connection layer , So as to realize the prediction of each pixel , Achieve the purpose of semantic segmentation

3. Use FCN Semantic segmentation
%matplotlib inline
import torch
import torchvision
from torch import nn
from torch.nn import functional as F
from d2l import torch as d2l
import os
3.1 model building
#  Use in ImageNet Pre trained on dataset ResNet-18 Image feature extraction , And record the network instance as pretrained_net
#  Be careful ResNet-18 The last few layers of are the global average pooling layer and the full connection layer , stay FCN There is no need for
pretrained_net = torchvision.models.resnet18(pretrained=True)
list(pretrained_net.children())[-3:]
[Sequential(
   (0): BasicBlock(
     (conv1): Conv2d(256, 512, kernel_size=(3, 3), stride=(2, 2), padding=(1, 1), bias=False)
     (bn1): BatchNorm2d(512, eps=1e-05, momentum=0.1, affine=True, track_running_stats=True)
     (relu): ReLU(inplace=True)
     (conv2): Conv2d(512, 512, kernel_size=(3, 3), stride=(1, 1), padding=(1, 1), bias=False)
     (bn2): BatchNorm2d(512, eps=1e-05, momentum=0.1, affine=True, track_running_stats=True)
     (downsample): Sequential(
       (0): Conv2d(256, 512, kernel_size=(1, 1), stride=(2, 2), bias=False)
       (1): BatchNorm2d(512, eps=1e-05, momentum=0.1, affine=True, track_running_stats=True)
     )
   )
   (1): BasicBlock(
     (conv1): Conv2d(512, 512, kernel_size=(3, 3), stride=(1, 1), padding=(1, 1), bias=False)
     (bn1): BatchNorm2d(512, eps=1e-05, momentum=0.1, affine=True, track_running_stats=True)
     (relu): ReLU(inplace=True)
     (conv2): Conv2d(512, 512, kernel_size=(3, 3), stride=(1, 1), padding=(1, 1), bias=False)
     (bn2): BatchNorm2d(512, eps=1e-05, momentum=0.1, affine=True, track_running_stats=True)
   )
 ),
 AdaptiveAvgPool2d(output_size=(1, 1)),
 Linear(in_features=512, out_features=1000, bias=True)]
#  according to pretrained net Create a new network instance , Remove FCN Unnecessary parts
net = nn.Sequential(*list(pretrained_net.children())[:-2])
#  The given height and width is (320*480) The input of ,net The forward network reduces the input height and width to the original 1/32, namely (10,15)
X = torch.rand(size=(1,3,320,480))
net(X).shape
torch.Size([1, 512, 10, 15])
#  Use 1*1 The convolution layer of converts the number of output channels into Pascal VO2012 The number of categories in the dataset (21 class ).
#  Here, the number of output channels is selected 21 The reason is to reduce the following transpose Calculation amount of layers ( Minimize )
num_classes =21
net.add_module('final_conv',nn.Conv2d(512,num_classes,kernel_size=1))
Use the transpose roll to increase the height and width of the feature map 32 times , Restore to the height and width of the input image
because ( 320 − 64 + 16 × 2 + 32 ) / 32 = 10 (320-64+16\times2+32)/32=10 (320−64+16×2+32)/32=10 And ( 480 − 64 + 16 × 2 + 32 ) / 32 = 15 (480-64+16\times2+32)/32=15 (480−64+16×2+32)/32=15, We construct a step with 32 32 32 The transposition of the convolution layer , The height and width of convolution kernel are set to 64 64 64, Fill in with 16 16 16.
We can see that if the stride is s s s, Fill in with s / 2 s/2 s/2( hypothesis s / 2 s/2 s/2 Is an integer ) And the height and width of convolution kernel are 2 s 2s 2s, The transposed convolution kernel enlarges the input height and width respectively s s s times .
net.add_module('transpose_conv',nn.ConvTranspose2d(num_classes,num_classes,kernel_size=64,padding=16,stride=32))
3.2 Initialize transpose convolution
In image processing , Sometimes we need to enlarge the image , namely On the sampling (upsampling).
Bilinear interpolation (bilinear interpolation) It is one of the commonly used up sampling methods , It is also often used to initialize the transpose convolution layer . To explain bilinear interpolation , Suppose given an input image , We want to calculate each pixel on the upsampled output image .
- First , The coordinates of the image will be output ( x , y ) (x,y) (x,y) Coordinates mapped to the input image ( x ′ , y ′ ) (x',y') (x′,y′) On . for example , Map according to the size ratio of input to output . Please note that , Mapped x ′ x′ x′ and y ′ y′ y′ Is the set of real Numbers .
- then , Find the abscissa on the input image ( x ′ , y ′ ) (x',y') (x′,y′) Current 4 Pixel .
- Last , The output image is in coordinates ( x , y ) (x,y) (x,y) The pixels on the input image are based on the 4 Pixels and their relation to ( x ′ , y ′ ) (x',y') (x′,y′) To calculate the relative distance of .
The up sampling of bilinear interpolation can be realized by transposing convolution layer , The kernel consists of the following bilinear_kernel The function structure .
Limited to space , We only give bilinear_kernel Implementation of function , The principle of the algorithm is not discussed
def bilinear_kernel(in_channels, out_channels, kernel_size):
    factor = (kernel_size + 1) // 2
    if kernel_size % 2 == 1:
        center = factor - 1
    else:
        center = factor - 0.5
    og = (torch.arange(kernel_size).reshape(-1, 1),
          torch.arange(kernel_size).reshape(1, -1))
    filt = (1 - torch.abs(og[0] - center) / factor) * \
           (1 - torch.abs(og[1] - center) / factor)
    weight = torch.zeros(
        (in_channels, out_channels, kernel_size, kernel_size))
    weight[range(in_channels), range(out_channels), :, :] = filt
    return weight
#  Here we use transpose layer to realize bilinear difference , Build a transposed convolution layer with twice the input height and width , And use convolution kernel `bilinear_kernel` Function construction
conv_trans = nn.ConvTranspose2d(3,3,kernel_size=4,padding=1,stride=2,bias=False)
conv_trans.weight.data.copy_(bilinear_kernel(3,3,4))
#  Read images X, Record the result of the upper sampling as Y, In order to output the printed picture, you need to adjust the dimension
img = torchvision.transforms.ToTensor()(d2l.Image.open('./course_file/pytorch/img/catdog.jpg'))
X = img.unsqueeze(0)
Y = conv_trans(X)
out_img = Y[0].permute(1, 2, 0).detach()
d2l.set_figsize()
print('input image shape:', img.permute(1, 2, 0).shape)
d2l.plt.imshow(img.permute(1, 2, 0))
input image shape: torch.Size([561, 728, 3])
print('output image shape:', out_img.shape)
d2l.plt.imshow(out_img);
You can see , The transposed convolution layer enlarges the height and width of the image respectively 2 times . Except for different coordinate scales , The image magnified by bilinear interpolation looks no different from the original image . So we are in a full convolution network ,[ Initialization of transpose convolution layer by up sampling of bilinear interpolation . about 1 × 1 1\times 1 1×1 Convolution layer , We use Xavier Initialize parameters .]
W = bilinear_kernel(num_classes, num_classes, 64)
net.transpose_conv.weight.data.copy_(W);
3.3 Reading data sets
We use it https://blog.csdn.net/jerry_liufeng/article/details/120820270 Introduced method data set .
Specifies that the shape of the randomly cropped output image is 320 × 480 320\times 480 320×480: Both height and width can be 32 32 32 to be divisible by .
#@save
def read_voc_images(voc_dir, is_train=True):
    """ Read all VOC Image and label ."""
    txt_fname = os.path.join(voc_dir, 'ImageSets', 'Segmentation',
                             'train.txt' if is_train else 'val.txt')
    mode = torchvision.io.image.ImageReadMode.RGB
    with open(txt_fname, 'r') as f:
        images = f.read().split()
    features, labels = [], []
    for i, fname in enumerate(images):
        features.append(
            torchvision.io.read_image(
                os.path.join(voc_dir, 'JPEGImages', f'{
      fname}.jpg')))
        #  For semantic segmentation , It is required to classify each pixel , therefore label Save as an uncompressed .png The document is more appropriate
        labels.append(
            torchvision.io.read_image(
                os.path.join(voc_dir, 'SegmentationClass', f'{
      fname}.png'),
                mode))
    return features, labels

#@save
VOC_COLORMAP = [[0, 0, 0], [128, 0, 0], [0, 128, 0], [128, 128, 0],
                [0, 0, 128], [128, 0, 128], [0, 128, 128], [128, 128, 128],
                [64, 0, 0], [192, 0, 0], [64, 128, 0], [192, 128, 0],
                [64, 0, 128], [192, 0, 128], [64, 128, 128], [192, 128, 128],
                [0, 64, 0], [128, 64, 0], [0, 192, 0], [128, 192, 0],
                [0, 64, 128]]

#@save
VOC_CLASSES = [
    'background', 'aeroplane', 'bicycle', 'bird', 'boat', 'bottle', 'bus',
    'car', 'cat', 'chair', 'cow', 'diningtable', 'dog', 'horse', 'motorbike',
    'person', 'potted plant', 'sheep', 'sofa', 'train', 'tv/monitor']

"""  Defining a function will RGB Color column and category index are mapped  """

#@save
def voc_colormap2label():
    """ Build from RGB To VOC Mapping of category indexes ."""
    colormap2label = torch.zeros(256**3, dtype=torch.long)
    for i, colormap in enumerate(VOC_COLORMAP):
        colormap2label[(colormap[0] * 256 + colormap[1]) * 256 +
                       colormap[2]] = i
    return colormap2label

#@save
def voc_label_indices(colormap, colormap2label):
    """ take VOC In the tag RGB Values map to their category index ."""
    colormap = colormap.permute(1, 2, 0).numpy().astype('int32')
    idx = ((colormap[:, :, 0] * 256 + colormap[:, :, 1]) * 256 +
           colormap[:, :, 2])
    return colormap2label[idx]

#@save
def voc_rand_crop(feature, label, height, width):
    """ Randomly crop features and label images ."""
    rect = torchvision.transforms.RandomCrop.get_params(
        feature, (height, width))
    feature = torchvision.transforms.functional.crop(feature, *rect)
    label = torchvision.transforms.functional.crop(label, *rect)
    return feature, label

#@save
class VOCSegDataset(torch.utils.data.Dataset):
    """ One for loading VOC Custom datasets for datasets ."""
    def __init__(self, is_train, crop_size, voc_dir):
        self.transform = torchvision.transforms.Normalize(
            mean=[0.485, 0.456, 0.406], std=[0.229, 0.224, 0.225])
        self.crop_size = crop_size
        features, labels = read_voc_images(voc_dir, is_train=is_train)
        self.features = [
            self.normalize_image(feature)
            for feature in self.filter(features)]
        self.labels = self.filter(labels)
        self.colormap2label = voc_colormap2label()
        print('read ' + str(len(self.features)) + ' examples')

    def normalize_image(self, img):
        return self.transform(img.float())

    def filter(self, imgs):
        return [
            img for img in imgs if (img.shape[1] >= self.crop_size[0] and
                                    img.shape[2] >= self.crop_size[1])]

    def __getitem__(self, idx):
        feature, label = voc_rand_crop(self.features[idx], self.labels[idx],
                                       *self.crop_size)
        return (feature, voc_label_indices(label, self.colormap2label))

    def __len__(self):
        return len(self.features)

#@save
def load_data_voc(batch_size, crop_size):
    """  load VOC Semantic segmentation dataset . """
    # voc_dir = d2l.download_extract('voc2012',
    # os.path.join('VOCdevkit', 'VOC2012'))
    voc_dir = os.path.join("../data/VOCdevkit/VOC2012/")
    num_workers = d2l.get_dataloader_workers()
    train_iter = torch.utils.data.DataLoader(
        VOCSegDataset(True, crop_size, voc_dir), batch_size, shuffle=True,
        drop_last=True, num_workers=num_workers)
    test_iter = torch.utils.data.DataLoader(
        VOCSegDataset(False, crop_size, voc_dir), batch_size, drop_last=True,
        num_workers=num_workers)
    return train_iter, test_iter
batch_size, crop_size = 24, (320, 480)
train_iter, test_iter = load_data_voc(batch_size, crop_size)
read 1114 examples
read 1078 examples
3.4 Training
def loss(inputs, targets):
    return F.cross_entropy(inputs, targets, reduction='none').mean(1).mean(1)

num_epochs, lr, wd, devices = 5, 0.001, 1e-3, d2l.try_all_gpus()
trainer = torch.optim.SGD(net.parameters(), lr=lr, weight_decay=wd)
#  many GPU Training and evaluation
def train_batch(net, X, y, loss, trainer, devices):
    if isinstance(X, list):
        #  fine-tuning BERT Required in ( Discussed later )
        X = [x.to(devices[0]) for x in X]
    else:
        X = X.to(devices[0])
    y = y.to(devices[0])
    net.train()
    trainer.zero_grad()
    pred = net(X)
    l = loss(pred, y)
    l.sum().backward()
    trainer.step()
    train_loss_sum = l.sum()
    train_acc_sum = d2l.accuracy(pred, y)
    return train_loss_sum, train_acc_sum


def train(net, train_iter, test_iter, loss, trainer, num_epochs,
               devices=d2l.try_all_gpus()):
    timer, num_batches = d2l.Timer(), len(train_iter)
    animator = d2l.Animator(xlabel='epoch', xlim=[1, num_epochs], ylim=[0, 1],
                            legend=['train loss', 'train acc', 'test acc'])
    net = nn.DataParallel(net, device_ids=devices).to(devices[0]) #  many GPU function
    for epoch in range(num_epochs):
        # 4 Dimensions : Store training losses , Training accuracy , Number of instances , Characteristic number
        metric = d2l.Accumulator(4)
        for i, (features, labels) in enumerate(train_iter):
            timer.start()
            l, acc = train_batch(net, features, labels, loss, trainer,
                                      devices)
            metric.add(l, acc, labels.shape[0], labels.numel())
            timer.stop()
            if (i + 1) % (num_batches // 5) == 0 or i == num_batches - 1:
                animator.add(
                    epoch + (i + 1) / num_batches,
                    (metric[0] / metric[2], metric[1] / metric[3], None))
            print(metric[0]/metric[2])
        test_acc = d2l.evaluate_accuracy_gpu(net, test_iter)
        animator.add(epoch + 1, (None, None, test_acc))
    print(f'loss {
      metric[0] / metric[2]:.3f}, train acc '
          f'{
      metric[1] / metric[3]:.3f}, test acc {
      test_acc:.3f}')
    print(f'{
      metric[2] * num_epochs / timer.sum():.1f} examples/sec on '
          f'{
      str(devices)}')
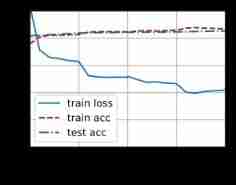
train(net, train_iter, test_iter, loss, trainer, num_epochs, devices)
loss 0.420, train acc 0.869, test acc 0.854
0.8 examples/sec on [device(type='cuda', index=0)]
3.5 forecast
When predicting, the input image needs to be standardized in each channel , And convert it into four-dimensional input format of convolutional neural network
def predict(img):
    X = test_iter.dataset.normalize_image(img).unsqueeze(0)
    pred = net(X.to(devices[0])).argmax(dim=1)
    return pred.reshape(pred.shape[1],pred.shape[2])
in order to [ Categories of visual predictions ] Give each pixel , We map the prediction categories back to their annotation colors in the dataset .
def label2image(pred):
    colormap = torch.tensor(d2l.VOC_COLORMAP, device=devices[0])
    X = pred.long()
    return colormap[X, :]
The images in the test data set vary in size and shape .
Because the model uses a stride of 32 The transposition of the convolution layer , Therefore, when the height or width of the input image cannot be changed 32 Divisible time , The height or width of the output of the transposed convolution layer will deviate from the size of the input image .
To solve this problem , We can intercept multiple blocks in the image with the height and width of 32 An integer multiple of a rectangular region , And do forward calculation for the pixels in these areas respectively . Please note that , The union of these regions needs to completely cover the input image . When a pixel is covered by multiple areas , The average value of the output of the transposed convolution layer in the forward calculation of different regions can be used as softmax Input of operation , So as to predict the category .
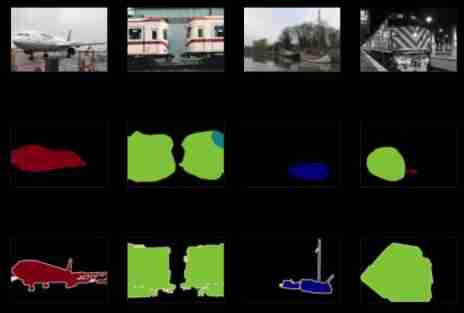
For the sake of simplicity , We only read a few large test images , And the shape is intercepted from the upper left corner of the image 320 × 480 320\times480 320×480 The area of is used to predict .
For these test images , We print the areas they intercept one by one , Then print the prediction results , Finally, print the marked category .
voc_dir = os.path.join("../data/VOCdevkit/VOC2012/")
test_images, test_labels = d2l.read_voc_images(voc_dir, False)
n, imgs = 4, []
for i in range(n):
    crop_rect = (0, 0, 320, 480)
    X = torchvision.transforms.functional.crop(test_images[i], *crop_rect)
    pred = label2image(predict(X))
    imgs += [
        X.permute(1, 2, 0),
        pred.cpu(),
        torchvision.transforms.functional.crop(test_labels[i],
                                               *crop_rect).permute(1, 2, 0)]
d2l.show_images(imgs[::3] + imgs[1::3] + imgs[2::3], 3, n, scale=2);
4. summary
- Full convolution network first uses convolution neural network to extract image features , And then through 1*1 The convolution layer of converts the number of channels into the number of categories , Finally, the height and width of the feature image are transformed into the size of the input image by transposing the convolution layer .
- In a fully convolutional network , We can initialize the transposed convolution layer as the upsampling of bilinear interpolation .
- Calculation reference of transposed convolution parameters https://blog.csdn.net/jerry_liufeng/article/details/120816608?spm=1001.2014.3001.5501
- The final result of semantic analysis is not very good , This is different from mine The number of iterations and Network layer construction of
- Because the size of the input data is 360*480, every last batch Yes 36 Pictures , Yes GPU The requirement of video memory is relatively large , Therefore, you may need to adjust the corresponding size during training ( I just adjusted batch The size is 24). But the efficiency of training is still very low
边栏推荐
- Reading notes on how to connect the network - hubs, routers and routers (III)
- Launpad | 基礎知識
- Daughter love: frequency spectrum analysis of a piece of music
- At the age of 30, I changed to Hongmeng with a high salary because I did these three things
- Markdown syntax
- Explanation of for loop in golang
- PHP is used to add, modify and delete movie information, which is divided into foreground management and background management. Foreground users can browse information and post messages, and backgroun
- Dynamic analysis and development prospect prediction report of high purity manganese dioxide in the world and China Ⓡ 2022 ~ 2027
- Implementing expired localstorage cache with lazy deletion and scheduled deletion
- Golang 类型比较
猜你喜欢
自动化的优点有哪些?

2022-2028 global optical transparency industry research and trend analysis report
Svg image quoted from CodeChina
C # use gdi+ to add text with center rotation (arbitrary angle)
Mantis creates users without password options

Nurse level JDEC addition, deletion, modification and inspection exercise
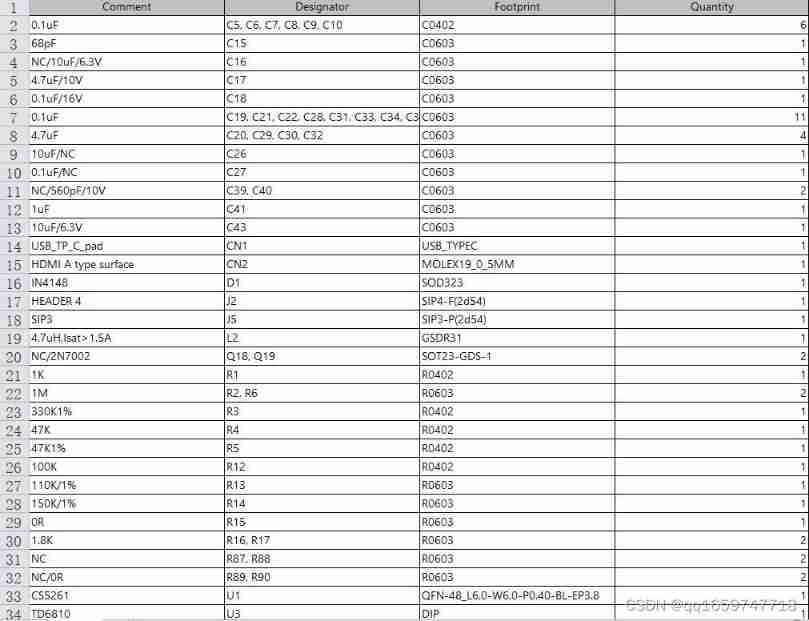
Function comparison between cs5261 and ag9310 demoboard test board | cost advantage of cs5261 replacing ange ag9310
2022-2028 global strain gauge pressure sensor industry research and trend analysis report
C # use gdi+ to add text to the picture and make the text adaptive to the rectangular area
2022-2028 global probiotics industry research and trend analysis report
随机推荐
QTreeView+自定义Model实现示例
SSM online examination system source code, database using mysql, online examination system, fully functional, randomly generated question bank, supporting a variety of question types, students, teache
《网络是怎么样连接的》读书笔记 - WEB服务端请求和响应(四)
Reading notes on how to connect the network - tcp/ip connection (II)
Analysis report on the development status and investment planning of China's modular power supply industry Ⓠ 2022 ~ 2028
Global and Chinese market of sampler 2022-2028: Research Report on technology, participants, trends, market size and share
2022-2028 global small batch batch batch furnace industry research and trend analysis report
Luogu deep foundation part 1 Introduction to language Chapter 4 loop structure programming (2022.02.14)
Explain TCP protocol in detail three handshakes and four waves
C # use gdi+ to add text to the picture and make the text adaptive to the rectangular area
How do microservices aggregate API documents? This wave of show~
Golang defer
Launpad | basic knowledge
DR6018-CP01-wifi6-Qualcomm-IPQ6010-IPQ6018-FAMILY-2T2R-2.5G-ETH-port-CP01-802-11AX-MU-MIMO-OFDMA
2022-2028 global edible probiotic raw material industry research and trend analysis report
What is uid? What is auth? What is a verifier?
Lauchpad X | 模式
Global and Chinese market of wheel hubs 2022-2028: Research Report on technology, participants, trends, market size and share
The 14th five year plan and investment risk analysis report of China's hydrogen fluoride industry 2022 ~ 2028
PHP is used to add, modify and delete movie information, which is divided into foreground management and background management. Foreground users can browse information and post messages, and backgroun