当前位置:网站首页>【云原生 | 17】容器的四种网络模式
【云原生 | 17】容器的四种网络模式
2022-07-26 04:39:00 【小鹏linux】
作者简介:云计算领域优质创作者新星计划第三季python赛道TOP1 阿里云ACE认证高级工程师
️个人主页:小鹏linux
个人社区:小鹏linux(个人社区)欢迎您的加入!
为大家推荐一款刷题神奇 点击链接访问牛客网
各大互联网大厂面试真题。基础题库到进阶题库等各类面试题应有尽有!
牛客网面经合集,满足大厂面试技术深度,快速构建Java核心知识体系大厂面试官亲授,备战面试与技能提升,主要考点+主流场景+内功提升+真题解析

1. Docker 进程修改
比较少见 会影响到所有的容器进程 |
-b, --bridge=”” 指定 Docker 使用的网桥设备,默认情况下 Docker 会自动创建和使用 docker0 网桥设备,通过此参数可以使用已经存在的设备。 --bip 指定 Docker0 的 IP 和掩码,使用标准的 CIDR 形式,如 10.10.10.10/24 --dns 配置容器的 DNS,在启动 Docker 进程时添加,所有容器全部生效 |
2. 容器的四种网络模式
跟在docker run命令之后的: --dns 用于指定启动的容器的 DNS(默认是物理机的) --net 用于指定容器的网络通讯方式,有以下四个值 bridge:Docker 默认方式,网桥模式 none:容器没有网络栈(主要用于离线分析等模式,数据可以通过目录挂载的方式传输,方便又安全) container:使用其它容器的网络栈,Docker容器会加入其它容器的 network namespace(相当容器二的网卡直接进入容器一的虚拟空间内,两个容器直接通过本地回环接口通信,非常高校。一般用于只有网络采用这种模式联通,其他进程都是互相隔离的) --network container:(ContainerName) host:表示容器使用 Host 的网络,没有自己独立的网络栈。容器可以完全访问 Host 的网络, 不安全! --network host |
2.1 bridge模式实验
[[email protected] ~]# docker images		#查看镜像
[[email protected] ~]# docker run --name test1 -d nginx:latest		#容器test1不指定网络模式
[[email protected] ~]# docker run --name test2 --net bridge -d nginx:latest	#指定容器test2的网络模式为 bridge网桥模式
[[email protected] ~]# docker inspect test1		#查看到"Gateway": "172.17.0.1",和"IPAddress": "172.17.0.2",
[[email protected] ~]# docker inspect test2		#查看到"Gateway": "172.17.0.1",和 "IPAddress": "172.17.0.3
说明两个容器的网络模式是一样的且能互相通信。即容器的默认网络模式就是bridge网桥模式 |
2.2 none模式实验
[[email protected] ~]# docker run --name test3 --net none -d nginx:latest		#指定容器test3的网络模式为 none模式
[[email protected] ~]# docker inspect test3	#查看发现没有ip和网关
2.3 container模式实验
[[email protected] ~]# cc	#先删除掉所有的容器
[[email protected] ~]# docker images	#查看镜像
[[email protected] ~]# docker run --name test1 -d nginx:latest	#正常启动镜像nginx:latest
[[email protected] ~]# docker run --name test2 --net container:test1 -d hub.c.163.com/public/centos:7.2-tools	#container模式启动镜像hub.c.163.com/public/centos:7.2-tools
[[email protected] ~]# docker exec -it test2 /bin/bash		#进入test2容器
[[email protected] /]# curl localhost			#发现访问到了nginx的默认页面
[[email protected] /]# ifconfig 		#查看eth0的ip为172.17.0.2
[[email protected] /]# exit		#退出
[[email protected] ~]# docker inspect test1		#查看发现就是此容器test1的地址
说明该模式下网络已共享。 |
2.4 host模式实验
浏览器访问192.168.232.165,访问失败 |
[[email protected] ~]# netstat -anpt | grep 80	#查看端口,无80端口
[[email protected] ~]# docker run --name test1 --net host -d nginx:latest		#以host网络模式启动nginx镜像
[[email protected] ~]# netstat -anpt | grep 80	#查看到80端口开启
浏览器访问192.168.232.165,访问成功 |
3. 自定义 Docker0 的网桥地址
修改 /etc/docker/daemon.json 文件 |
{
    "bip": "192.168.1.5/24",						#指定当前的docker的地址
    "fixed-cidr": "192.168.1.0/24",					#安全的cidr网段(每个容器的地址都是通过dhcp获取的)
    "fixed-cidr-v6": "2001:db8::/64",				#ipv6的安全的cidr网段
    "mtu": "1500",								    #数据包的大小
    "default-gateway": "192.168.1.1",				#默认的网关
    "default-gateway-v6": "2001:db8:abcd::89",		#ipv6的默认网关
    "dns": ["192.168.1.2","192.168.1.3"]			#DNS服务器
}
4. 项目隔离方式
4.1 基础命令
docker network ls # 查看当前可用的网络类型 例: |

docker network create -d 类型 #网络空间名称 # 类型分为: # overlay network # bridge network |
4.2 独立至不同的网络命名空间进行隔离
| 命令: docker network create -d bridge --subnet "172.26.0.0/16" --gateway "172.26.0.1" my-bridge-network |
| 实验步骤: |
先创建my-bridge-network网络,网络类型为bridge,网段为26 |
[[email protected] ~]# docker network create -d bridge --subnet "172.27.0.0/16" --gateway "172.27.0.1" anxiaopeng| 然后创建anxiaopeng网络,网络类型也为bridge,网段为27 |
[[email protected] ~]# docker network create -d bridge --subnet "172.27.0.0/16" --gateway "172.27.0.1" anxiaopeng查看如下: |
[[email protected] ~]# docker network ls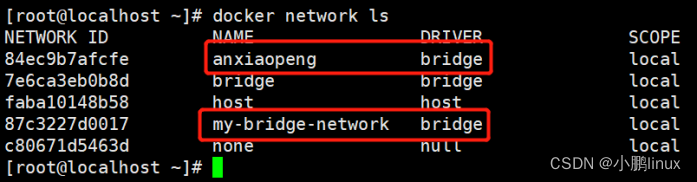
启动镜像,以网络名定义前两个容器为同一个网桥(26网段,但ip是此网段随机的),后两个容器为同一个网桥(27网段,但 ip是此网段随机的)。但是四个容器都是bridge 网桥模式。此情景相当于工作中创建多个项目,每个项目内有多个容器,每个项目内的容器都可以互相通信,但是每个项目之间是隔离不能通信的。 |
[[email protected] ~]# docker run --name test1.1 --net my-bridge-network -d hub.c.163.com/public/centos:7.2-tools
[[email protected] ~]# docker run --name test1.2 --net my-bridge-network -d hub.c.163.com/public/centos:7.2-tools
[[email protected] ~]# docker run --name test2.1 --net anxiaopeng -d hub.c.163.com/public/centos:7.2-tools
[[email protected] ~]# docker run --name test2.2 --net anxiaopeng -d hub.c.163.com/public/centos:7.2-tools| 命令如下: |
docker run -d --network=my-bridge-network --name test1  hub.c.163.com/public/centos:6.7-tools
docker run -d --name test2  hub.c.163.com/public/centos:6.7-tools
4.3 使用 Linux 桥接器进行主机间的通讯
[[email protected] ~]# docker run --name test1 -p 2222:22 -d hub.c.163.com/public/centos:7.2-tools
[[email protected] ~]# docker exec -it test1 /bin/bash
[[email protected] /]# vim /etc/ssh/sshd_config	#打开sshd配置文件
将#PermitRootLogin yes取消注释,允许root远程登录 |
[[email protected] /]# passwd #修改密码为123456然后用xshell工具远程连接IP为:192.168.232.165,端口为:2222 |
[[email protected] ~]#	    #发现可以成功登录。说明当前容器可以当作一个ssh的远程服务了
[[email protected] ~]# docker commit test1 ssh:v0.1	#将此容器封装成ssh服务的镜像!
[[email protected] ~]# cc	#删除容器
[[email protected] ~]# mkdir /usr/local/script	#创建一个目录
[[email protected] ~]# ifconfig	#先查看一下现存的网桥,以下创建网桥时候名称不能冲突
[[email protected] ~]# vim /usr/local/script/init-br.sh	#创建一个脚本,脚本内容如下:
#!/bin/bash
ip addr del dev ens33 192.168.232.165/24        #删除当前物理机ens33网卡的ip地址
ip link add link ens33 dev br0 type macvlan mode bridge     #创建一个基于ens33网卡的br0网桥,类型为macvlan网络模式为bridge
ip addr add 192.168.232.165/24 dev br0  #设置br0网桥的ip地址为本机ip(如果一个物理网卡变成网桥了,那它就不许有ip地址了,与网桥共享)
ip link set dev br0 up                  #启动br0网桥
ip route add default via 192.168.232.1 dev br0  #给br0网桥添加一个网关
[[email protected] ~]# chmod +x /usr/local/script/init-br.sh 		#添加权限
[[email protected] ~]# /bin/bash /usr/local/script/init-br.sh		#启动脚本
[[email protected] ~]# ifconfig	#查看发现ens33网卡没有ip地址了,br0网桥有192.168.232.165IP地址了
用电脑客户端的cmd窗口ping 192.168.232.165,发现能ping通了 |
[[email protected] ~]# rz	#上传pipework-master.zip压缩包
[[email protected] ~]# unzip pipework-master.zip	#解压缩
[[email protected] ~]# cp -a pipework-master/pipework /usr/local/bin/
[[email protected] ~]# chmod a+x /usr/local/bin/pipework	#添加权限
[[email protected] ~]# docker run --name test1 --net none -d ssh:v0.1
[[email protected] ~]# pipework br0 test1 192.168.232.166/[email protected]	    #设置容器地址分配
然后用脑客户端的cmd窗口ping 192.168.232.166,发现能ping通 |
结束语
为大家推荐一款刷题神奇 点击链接访问牛客网
各大互联网大厂面试真题。基础题库到进阶题库等各类面试题应有尽有!
牛客网面经合集,满足大厂面试技术深度,快速构建Java核心知识体系大厂面试官亲授,备战面试与技能提升,主要考点+主流场景+内功提升+真题解析

边栏推荐
- MySQL的优化分析及效率执行
- Autocomplete prevents the form from automatically filling in
- 快恢复二极管工作原理及使用
- [300 + selected interview questions from big companies continued to share] big data operation and maintenance sharp knife interview question column (VIII)
- 数组排序2
- 2022杭电多校 DOS Card(线段树)
- Why is mongodb fast
- 自动化测试框架该如何搭建?
- 「游戏引擎 浅入浅出」4. 着色器
- Database startup message: ora-29702: error occurred in cluster group service
猜你喜欢

Is this my vs not connected to the database

2022河南萌新联赛第(三)场:河南大学 L - 合成游戏

data warehouse

Codeforces Round #807 (Div. 2)

What if win11 cannot wake up from sleep? Solution of win11 unable to wake up during sleep

Customer service relationship management based on SQL net enterprise messenger enterprise communications

计算离散点的曲率(matlab)

Low cost, fast and efficient construction of digital collection app and H5 system, professional development of scallop technology is more assured!

理性认知教育机器人寓教于乐的辅助作用

Recursive implementation of exponential enumeration
随机推荐
The auxiliary role of rational cognitive educational robot in teaching and entertainment
clock_ gettime
快恢复二极管工作原理及使用
Phaser (I): platform jumping collection game
九、文件上传和下载
STM32开发 | AD7606并行多路采集数据
计算离散点的曲率(matlab)
qt编译报错整理及Remote模块下载
数组排序3
1、 Basic introduction
egg-sequelize TS编写
Spark Structured Streaming HelloWorld
UE4 controls the rotation of objects by pressing keys
Authentication Encyclopedia (cookies, sessions, tokens, JWT, single sign on), in-depth understanding and understanding of authentication
Yuansaka Lin wallpaper
Several methods of realizing high-low byte or high-low word exchange in TIA botu s7-1200
IEC61131 数据类型与 C#数据类型的对应
Compiled by egg serialize JS
Customer service relationship management based on SQL net enterprise messenger enterprise communications
MapReduce中分区数与ReduceTask个数关系比较