当前位置:网站首页>Keras deep learning practice (12) -- facial feature point detection
Keras deep learning practice (12) -- facial feature point detection
2022-06-27 18:52:00 【Hope Xiaohui】
Keras Deep learning practice (12)—— Facial feature point detection
0. Preface
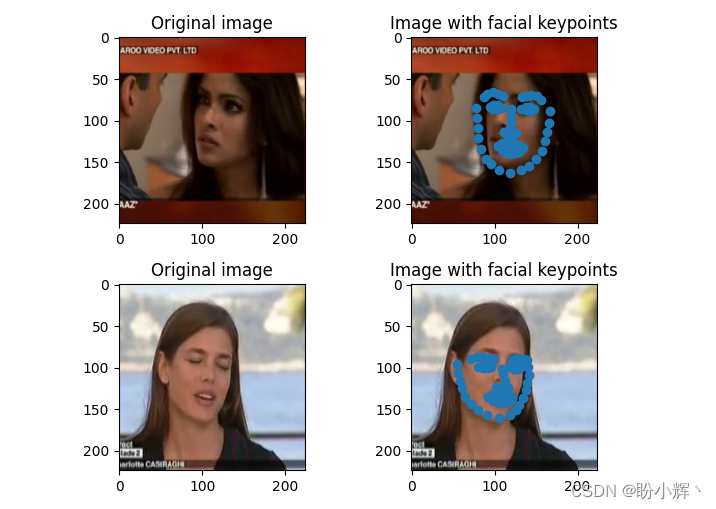
In computer vision , Facial key points ( Also known as facial feature points ) The location of is usually a key step in many face analysis methods and algorithms . In this section , We will train the convolutional neural network to detect the key points of the face , Right and left eyes , The boundary of the four coordinates of the nose and mouth . Here are two sample images that draw facial keys :

As shown in the figure above , The detected key points are drawn as points in this figure . Detect in the face image 68 A key point , The key points of the face include : mouth , Right eyebrow , Left eyebrow , Right eye , The left eye , nose , chin . In this paper , We will be based on pre training VGG16 Image feature extraction based on Architecture , Then fine tune the model to detect the key points of the face in the image .
1. Data set and model analysis
1.1 Dataset analysis
For key point detection tasks , The data sets we use can be obtained from Github in download , The key points of the face of the person in the image are marked in the data set . In this mission , The input data is an image on which key points need to be detected , The output data is the key points of the human face in the image x and y coordinate .
Before building the model , First, download the data set to the local , View the face key information marked in the dataset , The file path is P1_Facial_Keypoints/data/training_frames_keypoints.csv:

Check the facial key information in this dataset , You can see , There is a total of 137 Column , The first column is the name of the image , rest 136 The column represents... In the corresponding image 68 Facial key points x and y Coordinate value .
1.2 model analysis
Next , Continue to analyze this task and the model architecture we will use :
- Detect tasks according to key points , Download datasets
- Adjust the image to a shape that can be used for network input
- When resizing the image , You need to make sure that you modify the keys at the same time , So that they can correspond to the resized image
- Using pre-trained
VGG16Model extraction of input image features - Create an input and output array of facial key detection tasks , Where the input array is through
VGG16Image features after model processing , The output array is the position coordinates of the modified face key points - Last , Training the model to reduce the absolute average error between the predicted key points and the actual key points
2. Facial feature point detection
In this section , We will program and implement the facial key point detection model analyzed in the previous section .
Import related libraries 、 Data sets , And instantiate the pre trained `VGG16 Model :
import pandas as pd
import cv2
import numpy as np
from copy import deepcopy
from keras.applications.vgg16 import preprocess_input
from keras.applications import vgg16
from matplotlib import pyplot as plt

data = pd.read_csv('P1_Facial_Keypoints/data/training_frames_keypoints.csv')
vgg16_model = vgg16.VGG16(include_top=False, weights='imagenet',input_shape=(224,224,3))
Preprocessing datasets , Include : Extracting images 、 Adjust the image size 、 get VGG16 Extracted image features , The position of the face key points modified according to the scaled image is output .
Initializes the list used to create outputs and outputs :
x = []
x_img = []
y = []
Loop to build image file name , And read the image :
for i in range(data.shape[0]):
    img_path = 'P1_Facial_Keypoints/data/training/' + data.iloc[i,0]
    img = cv2.imread(img_path)
Capture and store face key values , Then adjust the image size. , To meet the model input shape , And preprocess the image , So that it can be passed to VGG16 Model and extract features ::
    kp = deepcopy(data.iloc[i,1:].tolist())
    kp_x = (np.array(kp[0::2])/img.shape[1]).tolist()
    kp_y = (np.array(kp[1::2])/img.shape[0]).tolist()
    kp2 = kp_x +kp_y
    img = cv2.resize(img, (224, 224))
    preprocess_img = preprocess_input(img.reshape(1,224,224,3))
    vgg16_img = vgg16_model.predict(preprocess_img)
Append the input and output values to the corresponding list :
    x_img.append(img)
    x.append(vgg16_img)
    y.append(kp2)
Create input and output arrays :
x = np.array(x)
x = x.reshape(x.shape[0], x.shape[2], x.shape[3], x.shape[4])
y = np.array(y)
Build and compile the model
from keras.models import Sequential
from keras.layers import Conv2D, MaxPooling2D, Flatten, Dense, Dropout
model_fine_tuning = Sequential()
model_fine_tuning.add(Conv2D(512, kernel_size=(3, 3), activation='relu',input_shape=(x.shape[1],x.shape[2],x.shape[3])))
model_fine_tuning.add(MaxPooling2D(pool_size=(2, 2)))
model_fine_tuning.add(Flatten())
model_fine_tuning.add(Dense(512, activation='relu'))
model_fine_tuning.add(Dropout(0.5))
model_fine_tuning.add(Dense(y.shape[1], activation='sigmoid'))
model_fine_tuning.summary()
Output the brief information of the fine-tuning model used to detect facial keys as follows :
Model: "sequential"
_________________________________________________________________
Layer (type)                 Output Shape              Param #
=================================================================
conv2d (Conv2D)              (None, 5, 5, 512)         2359808
_________________________________________________________________
max_pooling2d (MaxPooling2D) (None, 2, 2, 512)         0
_________________________________________________________________
flatten (Flatten)            (None, 2048)              0
_________________________________________________________________
dense (Dense)                (None, 512)               1049088
_________________________________________________________________
dropout (Dropout)            (None, 512)               0
_________________________________________________________________
dense_1 (Dense)              (None, 136)               69768
=================================================================
Total params: 3,478,664
Trainable params: 3,478,664
Non-trainable params: 0
_________________________________________________________________
Last , Compile and fit the model :
model_fine_tuning.compile(loss='mean_absolute_error',optimizer='adam')
history = model_fine_tuning.fit(x/np.max(x), y,
                            epochs=10,
                            batch_size=32,
                            verbose=1,
                            validation_split = 0.1)
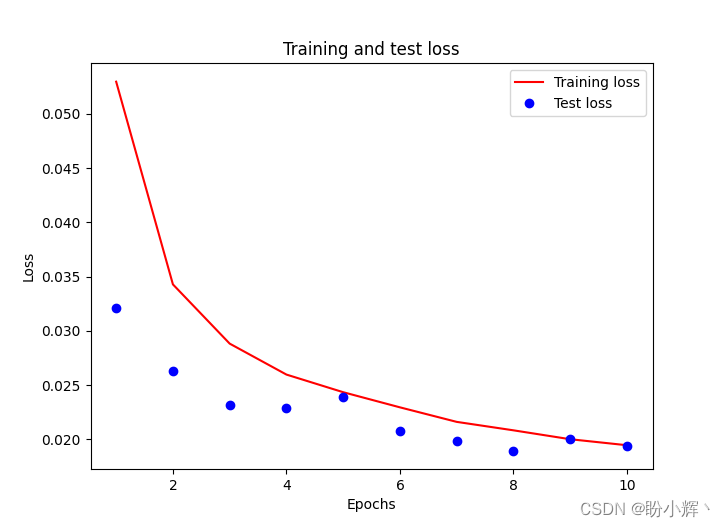
It should be noted that , We divide the input array by the maximum value of the input array , To scale the input dataset , and validation_split Optional parameters are used when no validation set is provided , In proportion ( Here is 10% ) Take part of the training data from the training set as the test set . Training and testing losses follow epoch The changes of the increase are as follows :
3. Model test
Predict test images . In the following code , We predict the penultimate in the input array 6 And the 7 Images , because validation_split by 0.1, The model did not see this during the training 2 Zhang image , It can be used to measure the performance of the model after training . We make sure that the image passes through preprocess_input Methods pretreatment , And then through vgg16_model Extraction of image features , The final will be vgg16_model The output of is passed to the built model_fine_tuning :
test_img_input = preprocess_input(x_img[-7].reshape(1,224,224,3))
pred = model_fine_tuning.predict(vgg16_model.predict(test_img_input/np.max(test_img_input)))

plt.subplot(221)
plt.title('Original image')
plt.imshow(cv2.cvtColor(x_img[-7], cv2.COLOR_BGR2RGB))
plt.subplot(222)
plt.title('Image with facial keypoints')
plt.imshow(cv2.cvtColor(x_img[-7], cv2.COLOR_BGR2RGB))
kp = pred.flatten()
plt.scatter(kp[0:68]*224, kp[68:]*224)

test_img_input = preprocess_input(x_img[-6].reshape(1,224,224,3))
pred = model_fine_tuning.predict(vgg16_model.predict(test_img_input/np.max(test_img_input)))

plt.subplot(223)
plt.title('Original image')
plt.imshow(cv2.cvtColor(x_img[-6], cv2.COLOR_BGR2RGB))
plt.subplot(224)
plt.title('Image with facial keypoints')
plt.imshow(cv2.cvtColor(x_img[-6], cv2.COLOR_BGR2RGB))
kp = pred.flatten()
plt.scatter(kp[0:68]*224, kp[68:]*224)
plt.show()
The previous prediction of the test image can be as follows , We can see , The key points on the face of the person in the picture can be detected very accurately on the test image .
Summary
The location of facial key points is usually a key step in many facial analysis methods and algorithms . In this section , We introduce how to train convolutional neural network to detect the key points of face , Firstly, the feature is extracted by pre training model , Then the fine-tuning model is used to predict the facial key points of the characters in the image .
Series links
Keras Deep learning practice (1)—— Detailed explanation of neural network foundation and model training process
Keras Deep learning practice (2)—— Use Keras Building neural network
Keras Deep learning practice (3)—— Neural network performance optimization technology
Keras Deep learning practice (4)—— Detailed explanation of activation function and loss function commonly used in deep learning
Keras Deep learning practice (5)—— Detailed explanation of batch normalization
Keras Deep learning practice (6)—— Deeply studied the fitting problems and solutions
Keras Deep learning practice (7)—— Convolution neural network detailed explanation and implementation
Keras Deep learning practice (8)—— Use data enhancement to improve neural network performance
Keras Deep learning practice (9)—— The limitations of convolutional neural networks
Keras Deep learning practice (10)—— The migration study
Keras Deep learning practice (11)—— Visual neural network middle layer output
边栏推荐
- Galaxy Kirin V10 system activation
- How to arrange digital collections on online platforms such as reading and Chinese online? Will "read/write-to-earn" products be launched in the future?
- 实现时序数据库(Time Series Database)在特定场景下“远超”通用数据库的难点
- 银河麒麟V10系统激活
- 详解 OpenTSDB 与 TDengine 在系统功能层面上存在的差异
- Project team management - Tuckman ladder theory
- Why migrate from opentsdb to tdengine
- Optimal binary search tree
- Application of scaleflux CSD 2000 in Ctrip
- 利用OpenCV执行相机校准
猜你喜欢

SQL update batch update

原创 | 2025实现“5个1”奋斗目标!解放动力全系自主非道路国四产品正式发布

推荐几个开源的物联网平台

Camera calibration with OpenCV

PostgreSQL数据库WAL——资源管理器RMGR

Hikvision tools manager Hikvision tools collection (including sadp, video capacity calculation and other tools) a practical tool for millions of security practitioners

Explain the distributed computing of Apache skywalking OAP in detail

Wechat applet payment countdown

Win10 LTSC 2021 wsappx CPU usage high

阿里巴巴的使命、愿景、核心价值观
随机推荐
Wanzhou gold industry: what are the common gold investment and warehouse building modes?
Wanzhou gold industry: what knowledge points do you need to master to invest in precious metals?
About redis master-slave replication
Wechat applet map displays the current position with annotation
如何使用物联网低代码平台进行画面管理?
TDengine 连接器上线 Google Data Studio 应用商店
MFS distributed file system
产学合作协同育人,麒麟软件携手南开大学合力完成《软件测试与维护》实践课程
国内首家!EMQ加入亚马逊云科技“初创加速-全球合作伙伴网络计划”
数据同步工具 DataX 已经正式支持读写 TDengine
MySQL中的行转列和列转行
Hikvision tools manager Hikvision tools collection (including sadp, video capacity calculation and other tools) a practical tool for millions of security practitioners
Explain the distributed computing of Apache skywalking OAP in detail
Seata中 SelectForUpdateExecutor 可以先获取全局锁,再执行 sql吗?
Lvgl8.x migrating to stm32f4
Daily leetcode force deduction (31~35)
Hikvision Tools Manager海康威视工具大全(含SADP、录像容量计算等工具)百万安防从业者的实用工具
Three methods to quickly open CMD in a specified folder or place
Open source summer 2022 | opengauss project selected and announced
校园书籍资源共享平台